Projects: The foundation of Test Management
Learn how you can create projects in BrowserStack Test Management.
Projects are the highest-level organizational units in your test management system. A project encapsulates all the test cases, test runs, and test plans related to a specific application or feature. By grouping related testing activities under a project, you can easily manage and track the progress of testing. Each project serves as a container that holds the necessary test data, making it easier to focus on specific testing goals without being overwhelmed by unrelated tasks.
Create Projects
To create projects:
- Log in to Test Management.
- Click Create Project.

- Enter a project name and description, and then click Create Project.

Every project has these component sections:
- Dashboard
- Test Cases
- Test Runs
- Test Plans
- Reports

Use the project drop-down menu to switch between projects. Or, select View All Projects to list all the projects.

Create Folder
Use folders to organize your test cases in a project. To create a folder:
- Click Create Folder.

- Enter a folder name and description, and then click Create Folder.

- Click on kebab icon next to a folder. It has the following options:
- Create Test Case: Create a test case within the folder.
- Add Sub Folder: Add a folder within the folder.
- Move Folder: Move the folder to a different location.
- Edit Folder: Edit the folder name or description.
-
Delete: Delete the folder.

The folder structure is typically hierarchical, with subfolders indented under parent folders. Each folder displays immediate and cumulative counts, providing insight into local and total test case numbers.
Search projects
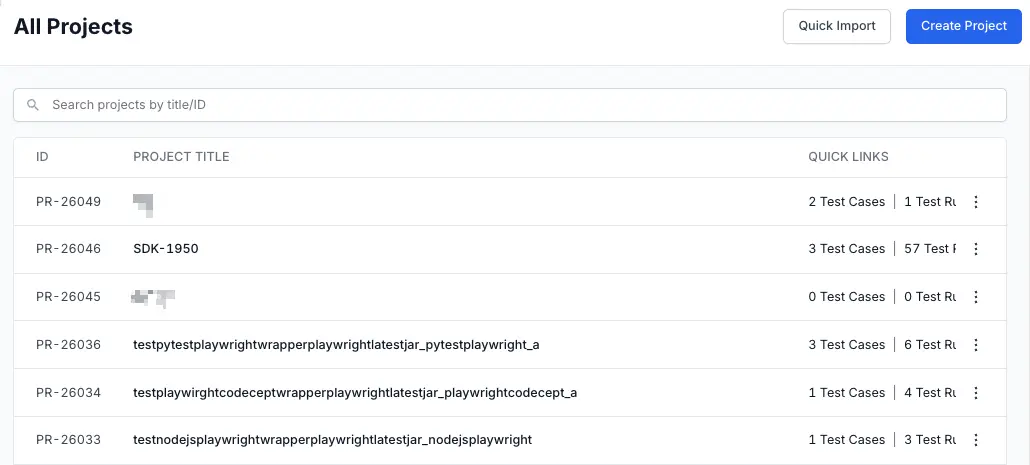
The Search functionality allows you to look up projects based on their Projects ID or Title within your projects list view. Quickly find the custom field you need by searching for its title. Our intuitive search helps you locate the right entry without having to scroll or filter through long lists.
The search bar is visible above the list of projects in the list view.
Custom date ranges in dashboards
The dashboard provides flexible date range selection to help you analyze trends and track progress over specific periods. While default options like 7D, 30D, 6M, 1Y, and All Time are available, you can also define a custom date range to focus on particular timeframes.
To select a custom date range:
- On your dashboard, locate the date range selector in the top-left corner.
- Click Custom (see annotation 1).
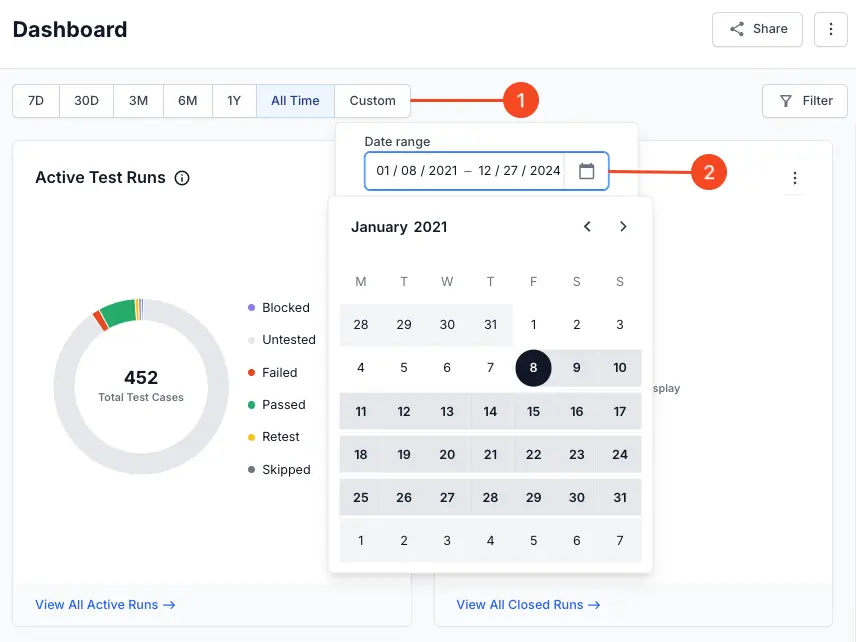 A calendar interface will appear.
 - Click the calendar to select your desired start and end date (see annotation 2).
The dashboard automatically refreshes to display data within the selected custom date range.
Custom date range feature allows you to:
-
Analyze specific time periods: Isolate data for a particular campaign, sprint, or event.
-
Identify trends: Observe patterns and changes in your test results over defined periods.
- Track progress: Monitor improvements and regressions within a custom timeframe.
By utilizing the custom date range functionality, you can gain deeper insights into your testing data and tailor your analysis to your specific requirements.
Share your dashboard publicly
You can share your project dashboard with anyone on the internet using a public link. This allows external stakeholders who may not have access to view your dashboard stay informed about your testing progress.
To share your dashboard publicly:
-
On your dashboard, click Share (see annotation 1).
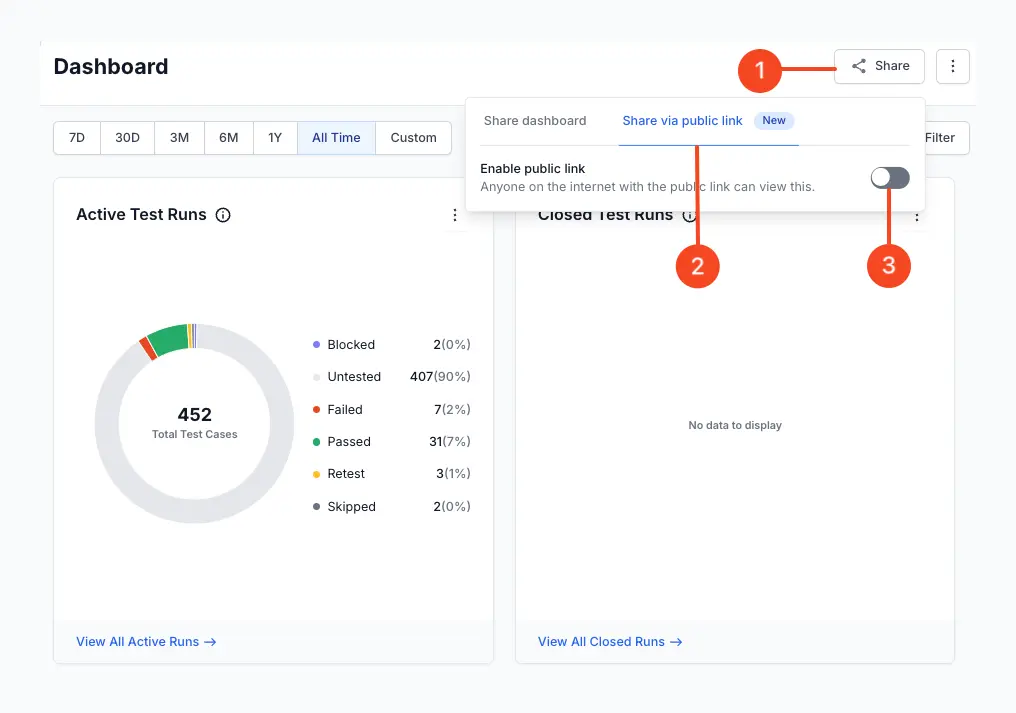
- Click Share via public link tab (see annotation 2).
- Enable the Enable public link toggle (see annotation 3).
-
Click Copy link to copy the generated URL and share it with anyone you want to grant access to.
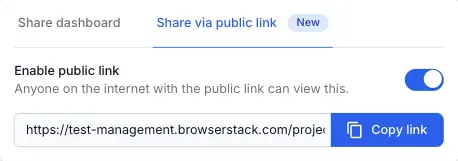
- Anyone with the link can view your dashboard.
- Users accessing the dashboard via the public link can apply filters to refine the displayed data.
Export project dashboard as CSV
You can the export project dashboard as a CSV file. Selecting Export as CSV from the menu allows you to download key metrics, such as test case distribution, pass/fail rates, and defect logs, into a CSV file. This file reflects whichever time range (e.g., 7D, 30D, All Time) is currently selected on the dashboard, making it easy to analyze trends offline.
To export the project dashboard data as a CSV file, click the ︙ icon in the top right corner and select Export as CSV.

In addition to exporting the entire project dashboard, you can also export data from individual dashboard tiles as CSV files. The following dashboard tiles can be exported as CSV files:
- Active Test Runs: Includes data on currently running tests, such as test names, start times, and current status.
- Closed Test Runs: Contains data on completed test runs, including pass/fail rates, execution times, and associated defects.
- Results from Closed Test Runs: Provides detailed results for each test case within closed test runs.
- Type of Test Cases: Exports data on the distribution of test case types within the project (e.g., functional, regression, performance).
- Trend of Test Cases: Downloads historical data on test case execution trends, including pass/fail rates over time.
- Defects Logged: Exports a log of all defects found within the project and associated test cases.
The exported CSV file contains the data for the currently selected time range on the dashboard (e.g., 7D, 30D, All Time).
To download an individual dashboard:
- Hover over the individual dashboard you wish to export.
-
Click the ︙ icon that is in the top right corner of the dashboard.
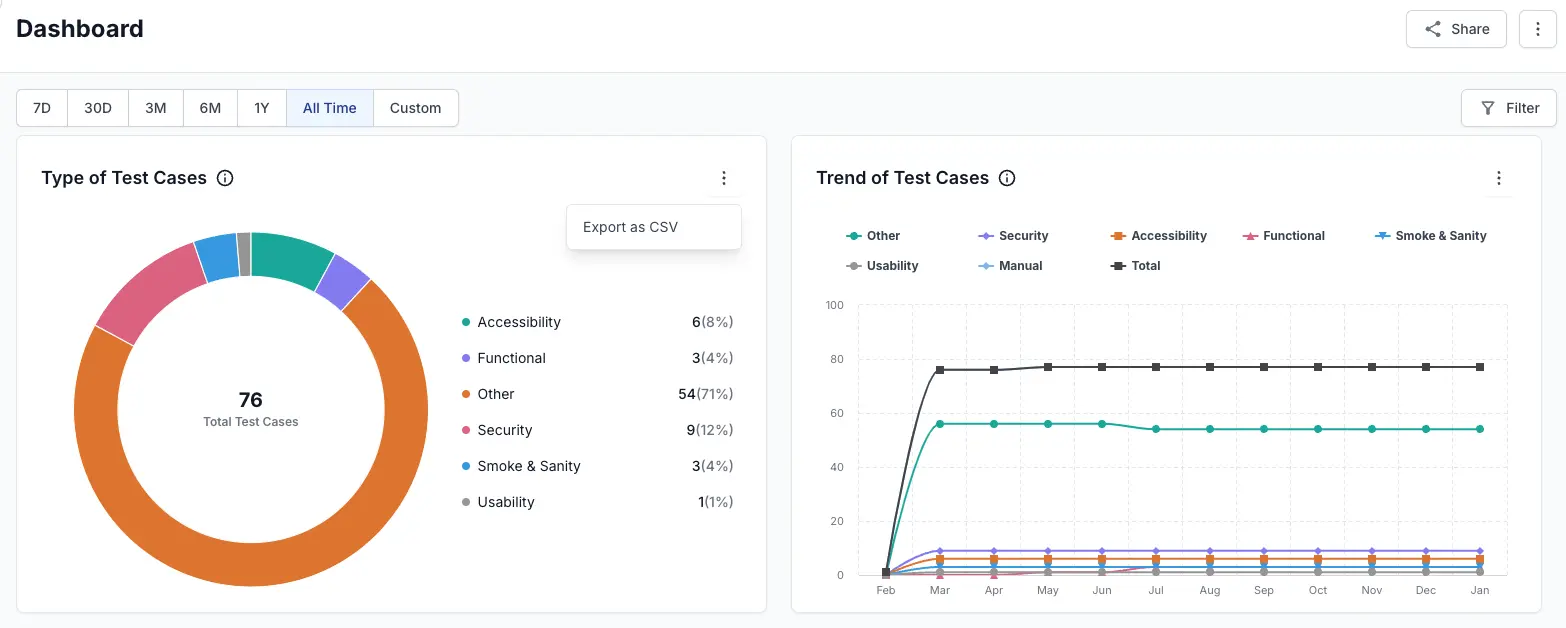
- Click Export as CSV.
This will download a CSV file containing the data displayed in that specific individual dashboard.
We're sorry to hear that. Please share your feedback so we can do better
Contact our Support team for immediate help while we work on improving our docs.
We're continuously improving our docs. We'd love to know what you liked
We're sorry to hear that. Please share your feedback so we can do better
Contact our Support team for immediate help while we work on improving our docs.
We're continuously improving our docs. We'd love to know what you liked
Thank you for your valuable feedback!
