Manage and organize test cases with copy or move
You can copy or move test cases across projects to manage and organize test cases based on the project priorities.
Easily manage your testing workflow by copying or moving test cases between projects and folders.
Copy test cases across projects
Copying test cases allows you to create duplicates for reuse across different projects or folders. Each copied test case is an exact replica of the original, preserving all field values at the time of copying. Remember, subsequent modifications to the original test case will not affect the copied version, ensuring independent management.
Key benefits
-
Efficient test case reuse
Quickly replicate test cases, including all field values, within the same project or across different projects. -
Flexible organization
Copy individual or multiple test cases into existing folders or create new folders for better organization. -
Independent test case versions
Changes made to the original test case will not affect the copied version, allowing for separate management.
Follow these steps to copy test cases:
-
Go to the project containing the test cases you want to copy.
- Select the test case you want to copy:
- Select individual test cases: Click the checkbox next to each test case.
- Select multiple test cases across pages: Navigate through different pages within the folder and continue selecting test cases by clicking their checkboxes. Your selections are preserved as you move between pages, allowing you to select more than 30 test cases without selecting all test cases in the folder.
-
Select all test cases in a folder: Click the checkbox at the top of the list to select all test cases displayed on the current page. Then, click the prompt Select all XXX test cases in this folder to select all test cases within the folder across all pages.
- Deselect specific test cases: After selecting all test cases in the folder, you can deselect individual test cases by unchecking their checkboxes. This allows you to exclude specific test cases from your bulk action.
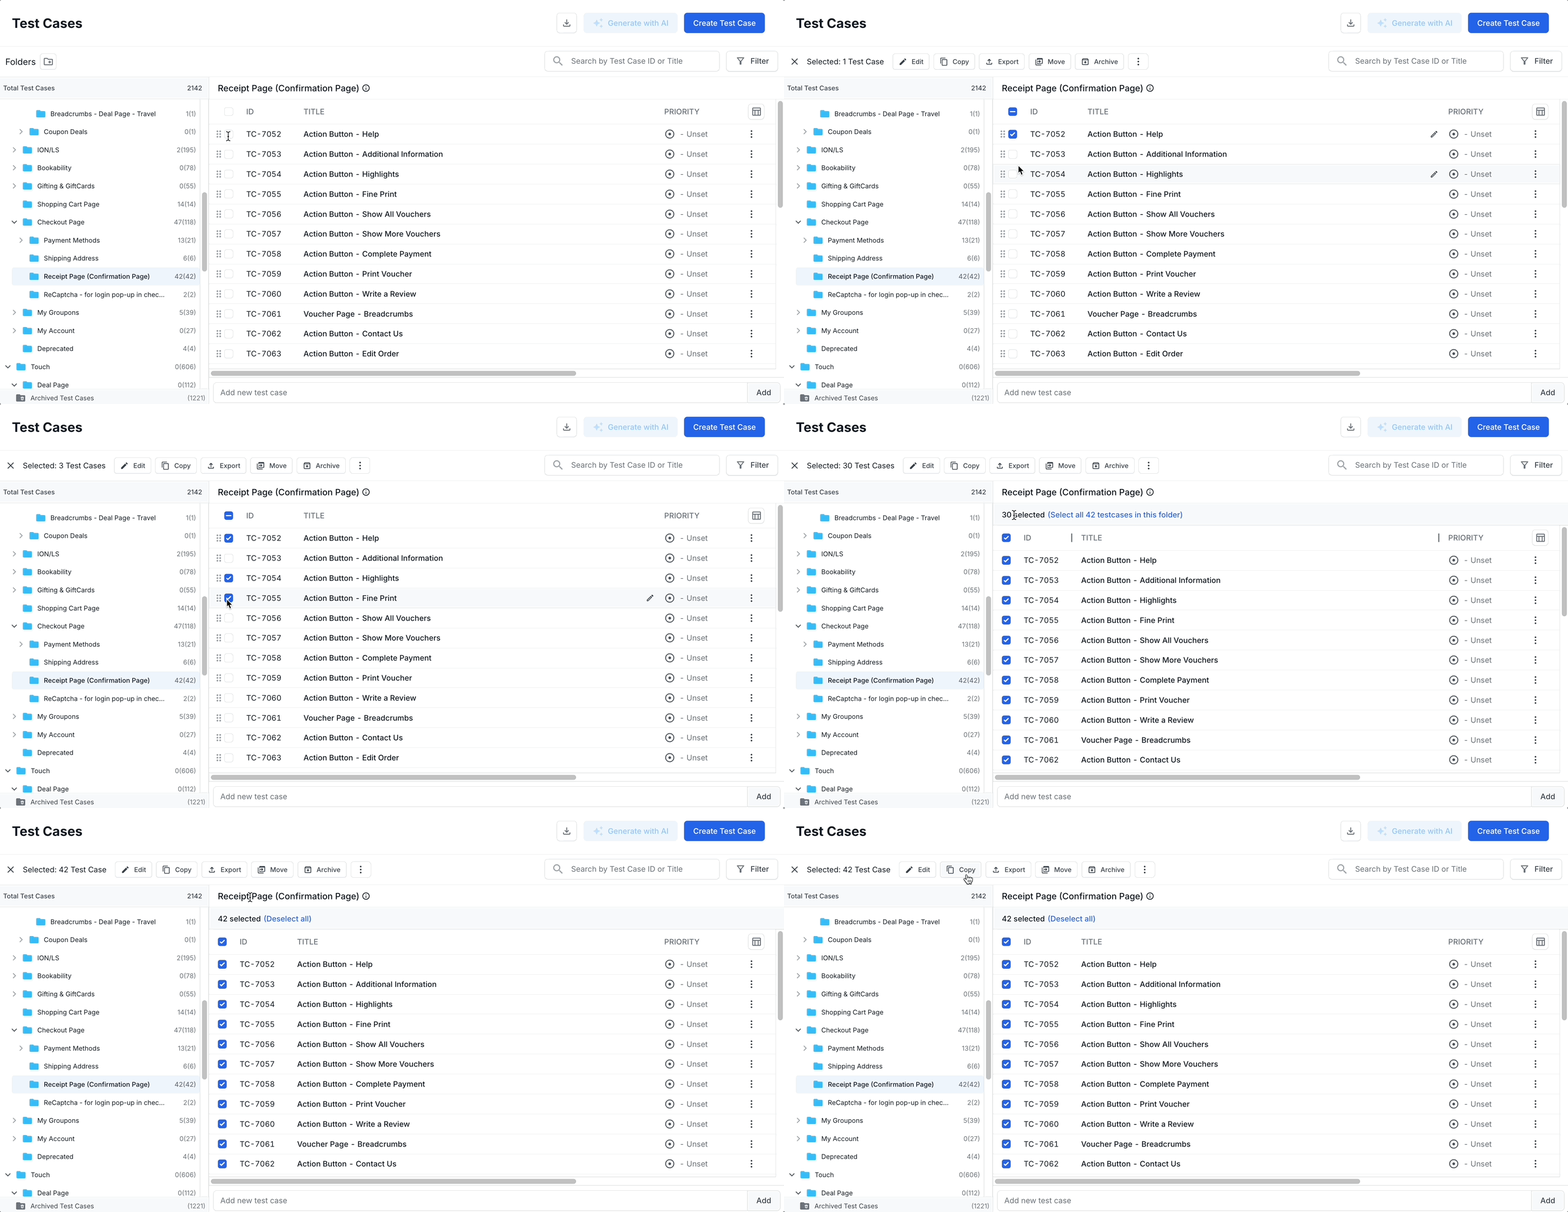
You can filter test cases based on specific criteria before performing bulk actions. Once the filtered results appear, select the test cases using the selection methods described above.
-
Click Copy.
-
Choose the Target Project from the drop-down menu (the default is the current project).

- You can copy the test cases to:
- An existing folder.
- Click Create Folder for a new folder.
- Click the options menu (three vertical dots) and Add Sub Folder in the existing folder.

- Click Copy Test Cases.
A success notification confirms the copy and provides a link to the destination folder.
- You can move test cases within the same project to reorganize them while retaining their unique test case IDs. To move test cases between projects, you will need to copy them, which will generate new test case IDs for the copied versions.
- Copying or moving a test case creates a duplicate test case without linked test runs or past results. The original test case remains unchanged and retain all existing links and results.
Move test cases within a project
Reorganize test cases within the same project without creating duplicates.
To move a test case to another folder:
- Select the test case you want to move:
- Select individual test cases: Click the checkbox next to each test case.
- Select multiple test cases across pages: Navigate through different pages within the folder and continue selecting test cases by clicking their checkboxes. Your selections are preserved as you move between pages, allowing you to select more than 30 test cases without selecting all test cases in the folder.
-
Select all test cases in a folder: Click the checkbox at the top of the list to select all test cases displayed on the current page. Then, click the prompt Select all XXX test cases in this folder to select all test cases within the folder across all pages.
- Deselect specific test cases: After selecting all test cases in the folder, you can deselect individual test cases by unchecking their checkboxes. This allows you to exclude specific test cases from your bulk action.
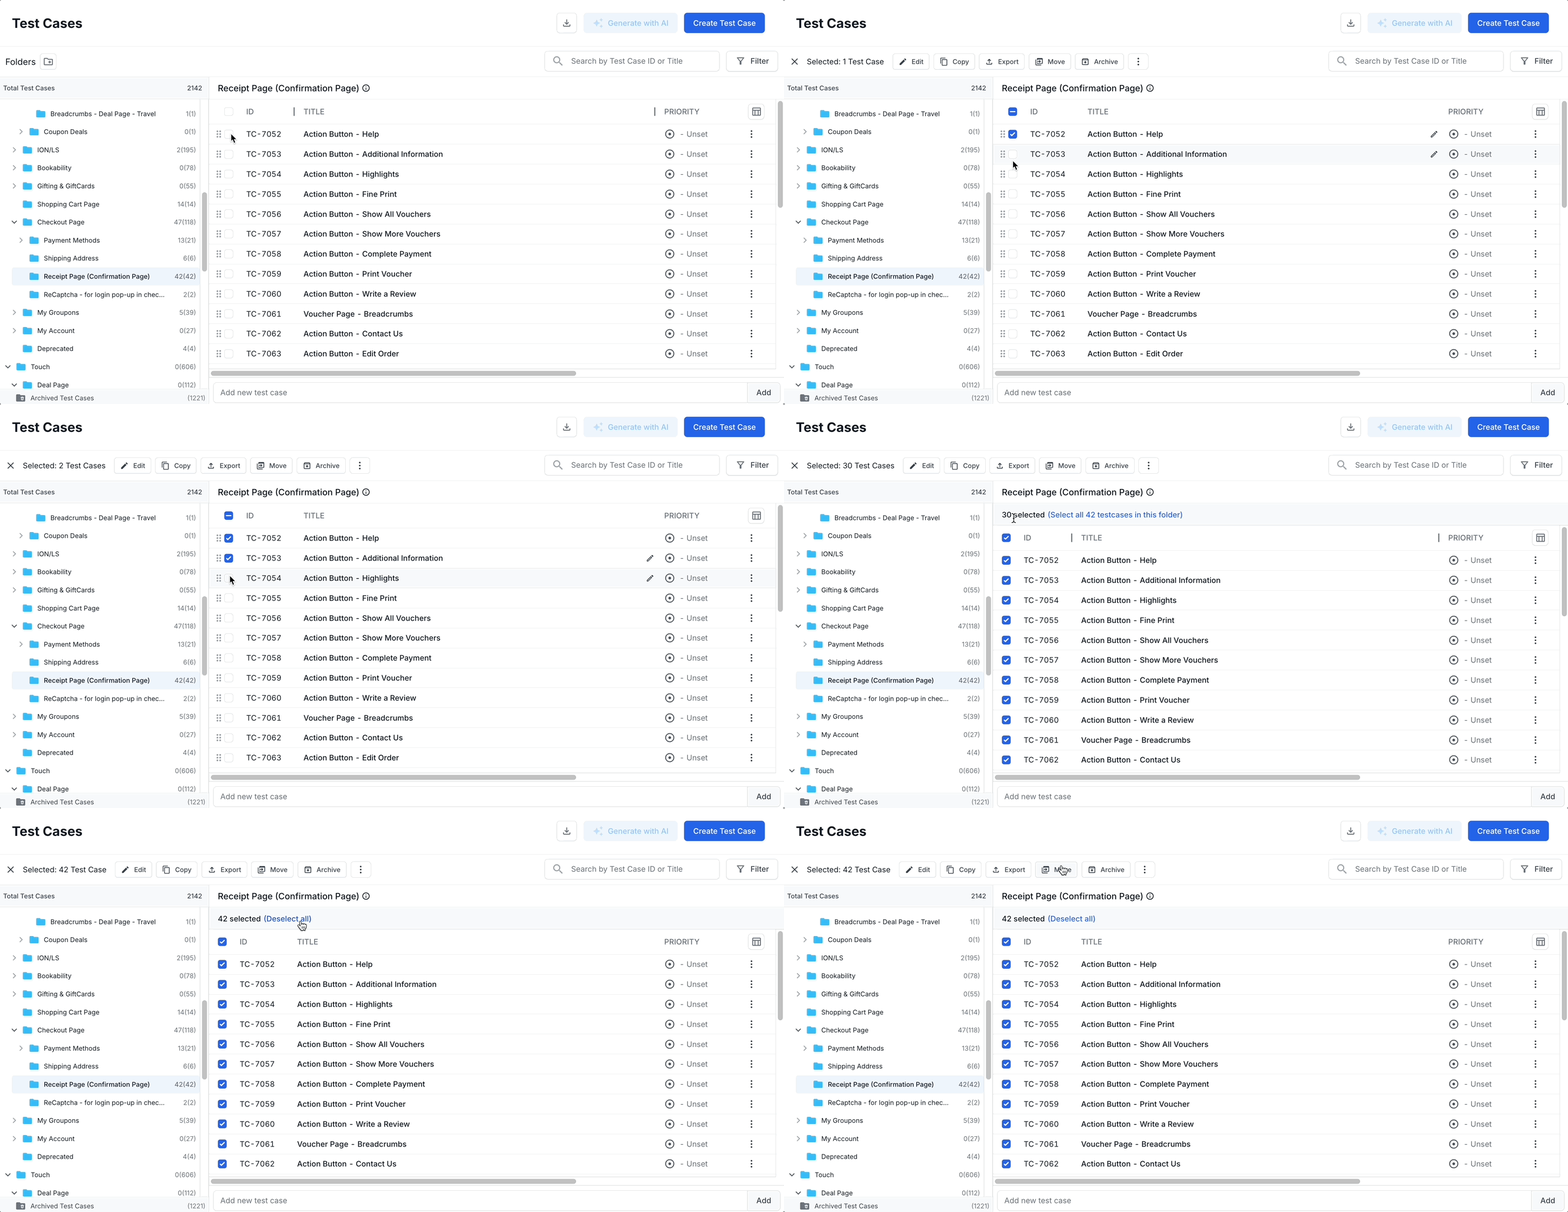
You can filter test cases based on specific criteria before performing bulk actions. Once the filtered results appear, select the test cases using the selection methods described above.
-
Click Move.
- You can move the test cases to:
- An existing folder.
- A new folder by clicking Create Folder.
- A subfolder within an existing folder by clicking the options menu (three vertical dots) and selecting Add Sub Folder.
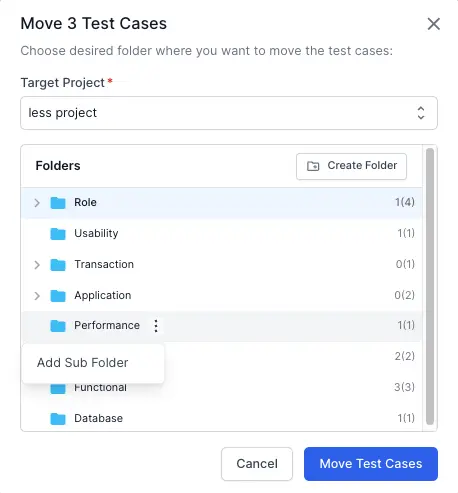
- Click Move Test Cases.
A success notification confirms the test cases are moved to the new destination folder.
Move test cases across projects
Moving test cases in Test Management retains the same identifier, keeping all existing test case details and links to automation. Unlike copying, which creates a new identifier, moving preserves all connections to test runs and test case results within the same project.
To retain custom fields and their values when you move test cases, ensure they are mapped to both the source and destination projects. If any custom fields and their values are mapped only to the source project, those fields will be dropped.
Prerequisites
- Ensure you have the create access in Test Management to move test cases.
How to move test cases
- Go to the project containing the test cases you want to move.
- Select the test case you want to move:
- Select individual test cases: Click the checkbox next to each test case.
- Select multiple test cases across pages: Navigate through different pages within the folder and continue selecting test cases by clicking their checkboxes. Your selections are preserved as you move between pages, allowing you to select more than 30 test cases without selecting all test cases in the folder.
-
Select all test cases in a folder: Click the checkbox at the top of the list to select all test cases displayed on the current page. Then, click the prompt Select all XXX test cases in this folder to select all test cases within the folder across all pages.
- Deselect specific test cases: After selecting all test cases in the folder, you can deselect individual test cases by unchecking their checkboxes. This allows you to exclude specific test cases from your bulk action.

You can filter test cases based on specific criteria before performing bulk actions. Once the filtered results appear, select the test cases using the selection methods described above.
- Click Move.
-
Choose the destination project from the dropdown menu (the default is the current project).
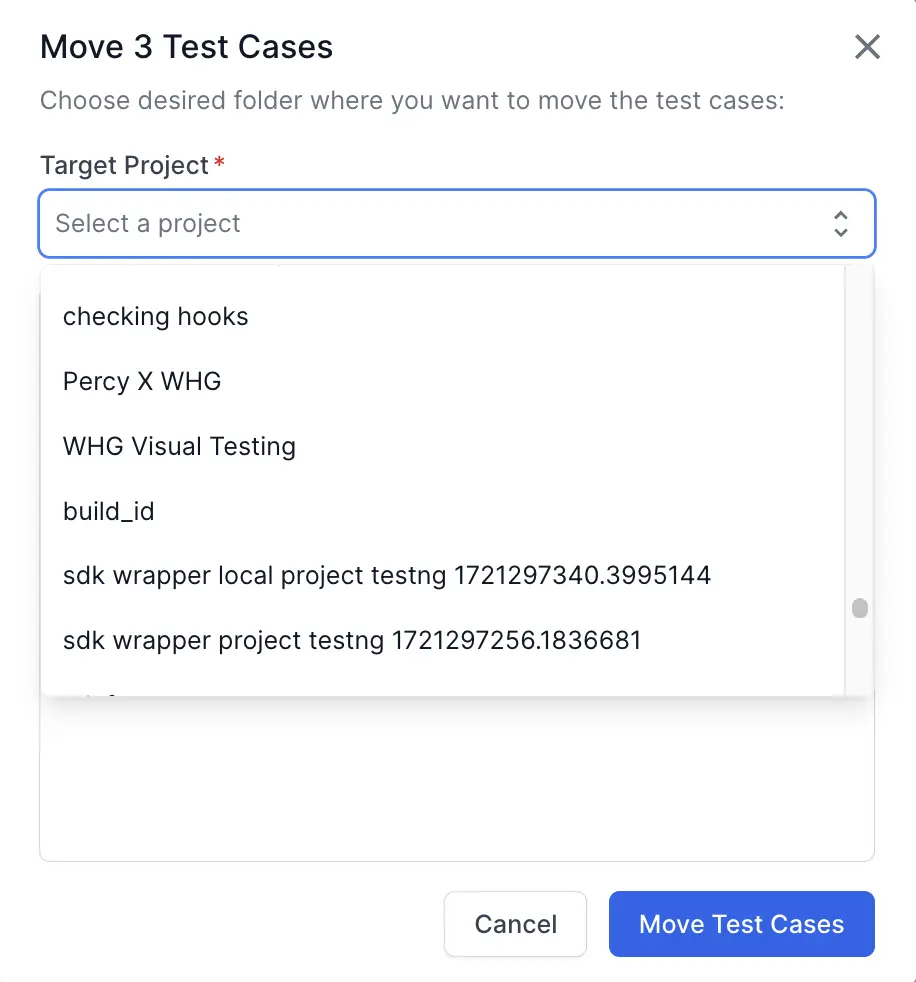
- You can move the test cases to:
- An existing folder.
- A new folder by clicking Create Folder.
- A subfolder within an existing folder by clicking the options menu (three vertical dots) and selecting Add Sub Folder.
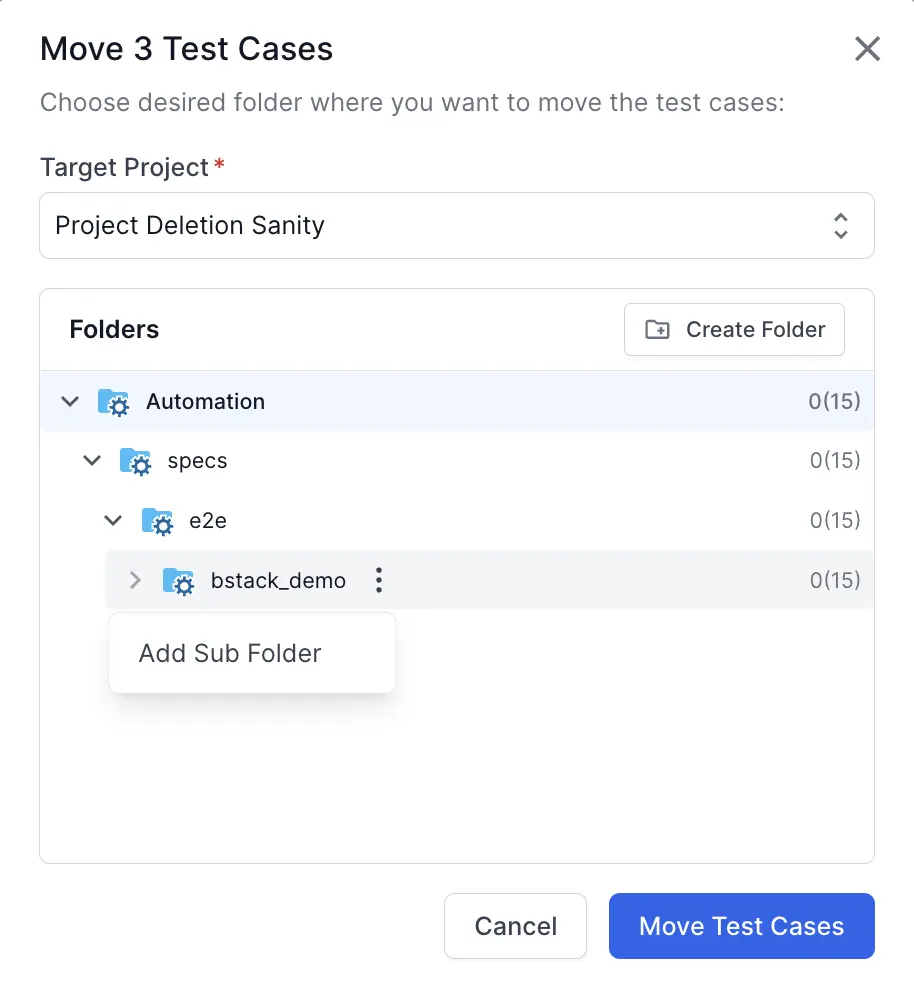
- Click Move Test Cases.
A success notification confirms the move and provides a link to the destination folder. Following these steps will ensure your test cases are moved successfully and retain all relevant links and details.
Drag and drop the test cases
The drag-and-drop feature simplifies the organization of your test cases within the Test Management. It allows you to rearrange the order of test cases within a folder easily.
The drag-and-drop modifies the order of test cases within the list view on the current viewing page only. It does not move test cases between the pages or folders.
Follow these steps to reorder test cases within a given folder:
- Navigate to the test cases folder where you want to rearrange your test cases.
- Select the test cases:
- For moving a single test case, click and hold the drag handle next to the test case ID.
- For moving multiple test cases, check the boxes next to the test cases you want to move. Once selected, click and hold the drag handle of one of the highlighted test cases.
- Drag the test case to the desired position within the list.
- Release the mouse button to drop the test case into its new location.
By following these steps, you can successfully reorder test cases within the list view. This helps maintain a logical sequence of test cases.
Impact on test runs
When you change the order of test cases in the list view, these changes are automatically reflected in the test runs. This ensures that any updates you make to the test case order are consistently applied during test execution, maintaining the intended sequence and structure of your test cases in all relevant test runs.
We're sorry to hear that. Please share your feedback so we can do better
Contact our Support team for immediate help while we work on improving our docs.
We're continuously improving our docs. We'd love to know what you liked
We're sorry to hear that. Please share your feedback so we can do better
Contact our Support team for immediate help while we work on improving our docs.
We're continuously improving our docs. We'd love to know what you liked
Thank you for your valuable feedback!