Manage test cases in Jira app
The BrowserStack integration for Jira app simplifies your workflow by allowing you to create and manage test cases directly within Jira. You can edit or delete test cases as needed. You can also unlink the test case from the associated Jira issue.
Quickly add a new test case from Jira
Follow these steps to quickly add a new test case from the Jira app to a new or existing project.
- If there are no projects available, enter the new test case in the Add new Test Case field.
-
Click Select location to choose a folder location for the test case.

-
For existing projects with test cases, enter the new test case in the Add New Test Case field below the list of test cases.
 You can also change the project and folder location by clicking the folder icon.
 - Click Add.
An Atlassian notification stating “A Test Case is created successfully” will appear. This confirms that your test case has been added to the project.
If you add a Test Case without a project, a new project and a folder are created in the background to nest the new Test Case.
Create test case from Jira app
To create a test case from the Jira app, follow these steps:
- In the Jira app, navigate to the Jira issue in a project where you want to create a test case.
-
Click Create Test Case.

A Create Test Case window appears. The associated Jira issue, project, and folder are automatically selected by default. You can change the project and folder if necessary.
-
In the test case form, enter all the mandatory fields, such as Title, State, Owner, Priority, Type of Test Case, and Automation Status.

You may enter all the necessary fields, such as description, pre-conditions, steps, expected results, and so on.
- Choose the type of test case template from the drop-down menu, either Text or Step template.
- Click Create.
The new test case appears in the test cases list view.
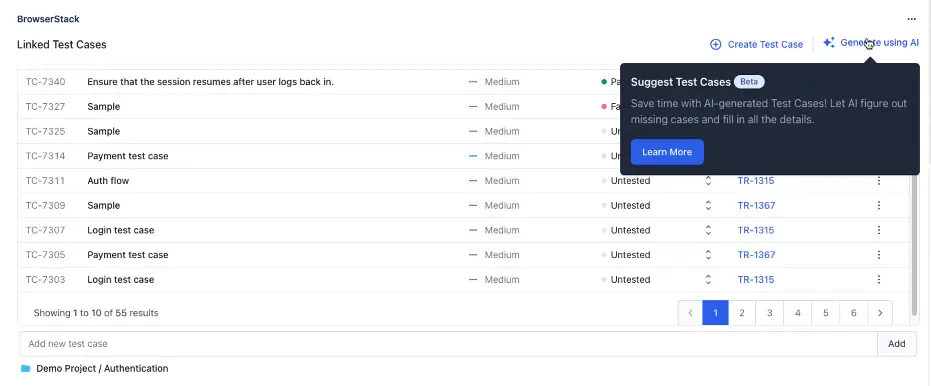
Generate test cases using AI from Jira app
To generate test cases using AI from the Jira app, follow these steps:
- In the Jira app, navigate to the Jira issue in a project where you want to generate test cases.
-
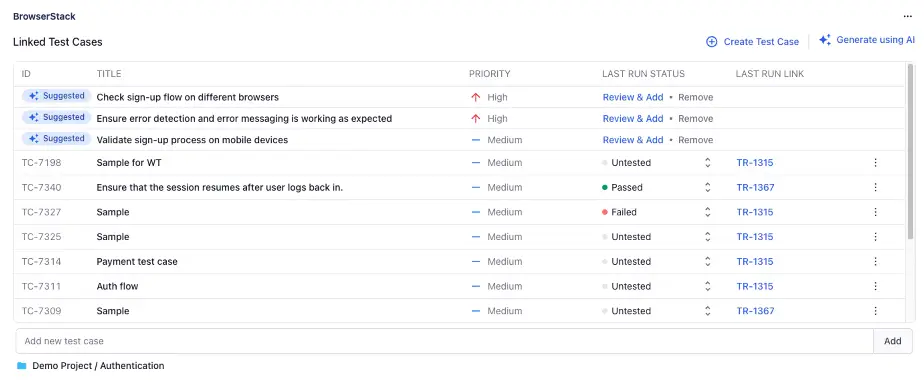
Click Generate using AI.

The associated Jira issue, project, and folder are automatically selected by default. A set of three Test case suggestions is generated based on existing test cases.

-
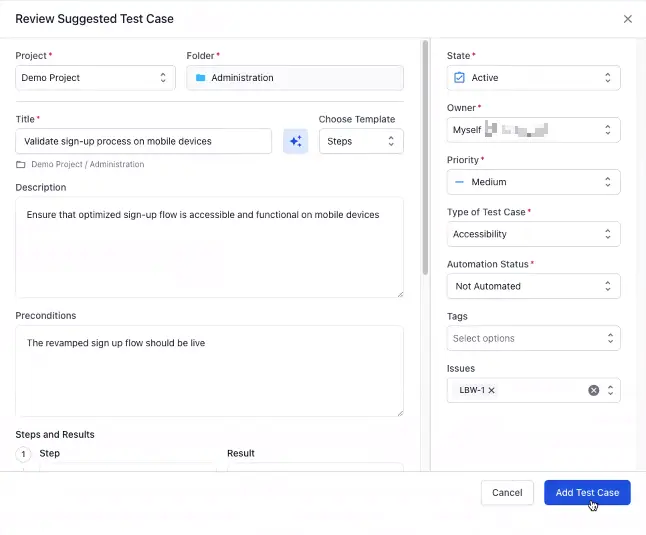
Select a suggested test case and review all the mandatory fields, such as Title, State, Owner, Priority, Type of Test Case, and Automation Status.

You may enter all the necessary fields, such as description, pre-conditions, steps, expected results, and so on. Optionally, you can click Remove to discard a suggested test case.
- Choose the type of test case template from the drop-down menu, either Text or Step template.
- Click Add Test Case.
The new test case appears in the test cases list view.
Edit test case from Jira app
You can edit a test case from the Jira app if you choose to modify its applicable fields. To edit the test case, follow these steps:
- In the Jira app, navigate to the Jira issue.
-
Locate the test case, click the kebab menu, and select Edit Test Case.

A confirmation message appears.
-
Make the required changes to the fields as applicable.

- Click Update.
The test case is updated with the new information and is available in the test case list view.
Unlink test case from Jira app
If you have a test case linked to a Jira issue, it is possible to remove the connection between them. To unlink the test case, follow these steps:
- In the Jira app, navigate to the Jira issue.
-
Locate the test case, click the kebab menu, and select Unlink from JIRA.

A confirmation message appears.
-
Click Unlink.

The test case is unlinked from the associated Jira issue.
Delete test case from Jira app
You can delete the test cases from the Jira app. To delete the test case, follow these steps:
- In the Jira app, navigate to the Jira issue.
-
Locate the test case, click the kebab menu, and select Delete.

A confirmation message appears.
-
Click Delete.

The test case has been removed from both the Jira app and Test Management.
We're sorry to hear that. Please share your feedback so we can do better
Contact our Support team for immediate help while we work on improving our docs.
We're continuously improving our docs. We'd love to know what you liked
We're sorry to hear that. Please share your feedback so we can do better
Contact our Support team for immediate help while we work on improving our docs.
We're continuously improving our docs. We'd love to know what you liked
Thank you for your valuable feedback!
