Adding Validations
Achieve complex verifications on your website with Low Code Automation Validations.
This guide outlines the four essential validation methods offered by Low Code Automation, designed to streamline the validation process for your automated tests. Low Code Automation enables users to effortlessly ensure the accuracy and reliability of your workflows without the need for extensive coding expertise. It provides the following four validation methods:
Visual Validation
Visual Validation is a powerful feature that allows you to confirm the correctness of elements, ensuring they appear as expected. It helps identify discrepancies in the visual presentation of your web application, such as layout issues, color changes, or missing elements.
With Low Code Automation, you can perform visual validation on specific elements. This helps ensure the accuracy and consistency of critical elements without verifying the entire page. It also ensures that changes or updates to other parts of the page do not affect the validation results for unrelated elements, thereby improving test stability.
How to add Visual Validations
While you record a test, you can add visual validations to specific elements to ensure they appear as expected.
To perform visual validation on specific elements:
- While recording, click Visual Validation.
- You can perform the following actions:
- Hover over the screen and choose the element to validate. You can also use UP or DOWN arrow keys to select a more appropriate element.
- You can also add more visual validations for other steps as needed.
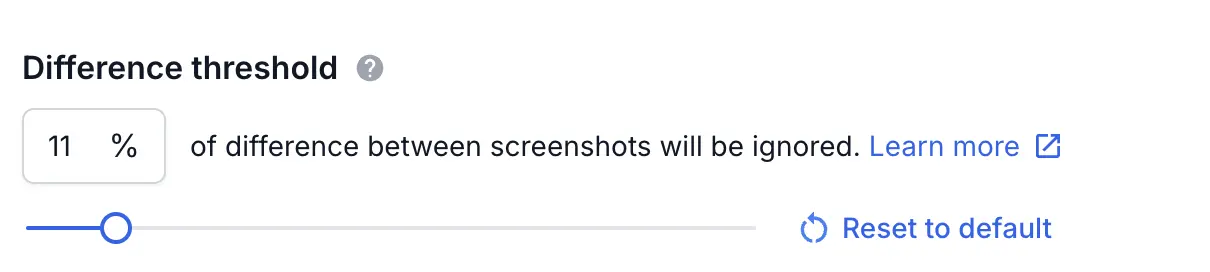
- If needed, you can set acceptable variations between expected and actual screenshots for visual validation. You can do that by using the Difference Threshold slider in the step details section. For more information, see the Difference Threshold section.
- Click Save recording.
Visual validation works best when added for a specific element on the page. Using this feature to validate full page screenshots is not recommended.
Replay of Visual Validation
Low Code Automation uses Percy’s visual diff engine to compare new screenshots with the baseline. During recording, Low Code Automation captures the screenshot of the element where the visual validation is added and uses it as baseline to compare it with screenshots taken during execution for the same element.
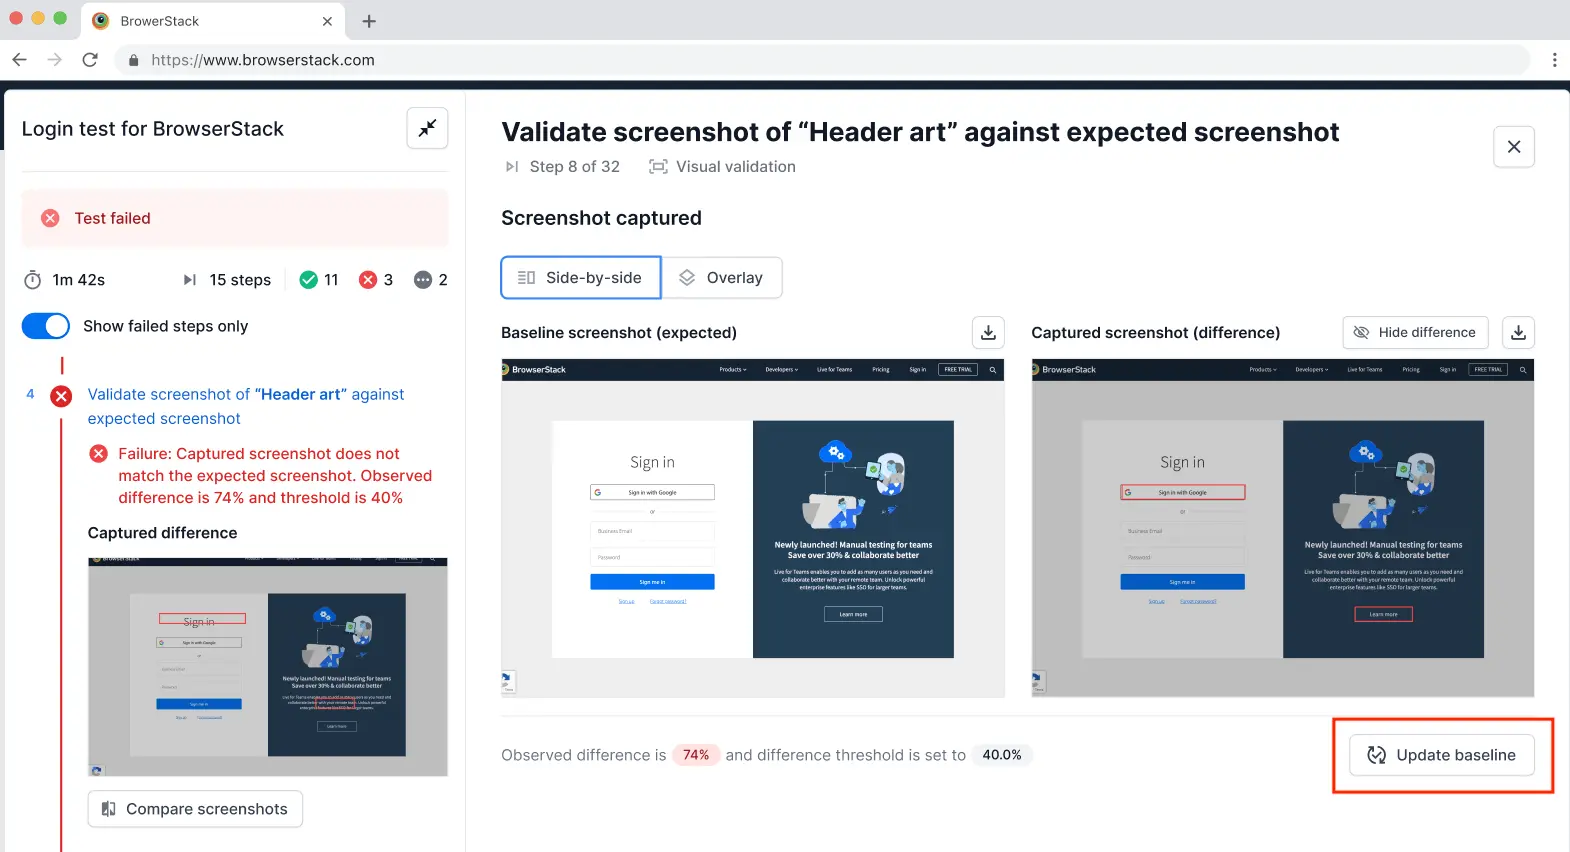
When the test gets executed, you can click Compare Screenshots to view and compare the baseline and captured screenshots. You can compare them using the following views:
- Side-by-side: Displays the Baseline (expected) and Captured (actual) screenshots side by side and the percentages for observed difference and set threshold.
- Overlay: Shows the Baseline (expected) and Captured (actual) screenshots layered on top of each other for comparison.
Difference Threshold
The Difference Threshold feature lets you specify the acceptable difference between expected and actual screenshots for visual validations. You can adjust the threshold for each visual validation step. The default threshold is 10% and the minimum is 0%.
Until a cloud run is successful for the test, the difference in threshold is set higher at 40% to establish the baseline for cloud. This is required to accommodate for variations in environment and browser changes. Once the baseline is established for cloud, subsequent runs would use the appropriate threshold configured at the step level.
Update Visual Baseline
When your application undergoes recent visual changes, it can lead to test failures due to the new changes.
To solve this, Low Code Automation offers an Update Visual Baseline feature. With this feature, you can easily update the baseline image to the latest version without having to re-record all the steps.
On the step page, click Update baseline to refresh the baseline image. All future test executions will use this updated baseline.
Text Validation
Text Validation is a key feature that provides a user-friendly and efficient way to verify the accuracy and consistency of text content on your websites.
With Low Code Automation, you can even perform advanced checks on text content, such as:
- Check for Equality of text content
- Check for text Contains some string
- Check for text content Starts with string
- Check for text content Matches Regex string
- Check for Date inputs to ensure correct values and formats
Validate text using regex
You can also validate specific text on the screen using regular expressions. For example, to match a message like “Your order number is 60.”, you can use a pattern such as:
Your order number is \d+.
For more details on regex and advanced patterns, refer to the Regular Expressions and Regex cheat sheet document.
For testing and debugging regular expressions, refer to Regex Expression 101.
Enable case sensitivity
Select Enable case sensitivity to ensure that the expected value matches the exact casing of the captured value. You can disable it to allow case-insensitive validation, where differences in letter casing are ignored during comparison.
Date control validation
The date control validation feature verifies date inputs in your web application. This ensures that date pickers or calendars display correct values, formats, and behaviors during automated tests. Use it whenever accurate date selection is essential, such as in booking systems, scheduling tools, or forms with date fields.
You can configure date control validation with the following options:
-
Captured date and comparison operator:
The captured value from the date field is shown in the Captured date field. You can select a comparison operator to define the manner in which the captured date is checked against the expected value:- equals
- not equals
- is between
- is not between
- is after
- is before
For example, select equals to check if the captured date matches the expected date exactly.
-
Expected date configuration:
Once you capture the date and select a comparison operator, choose the expected value. In the Expected date field, you can select from several options:
- Today: Validates that the field contains the current date.
- Tomorrow: Checks if the field contains the date for the next day.
- Yesterday: Checks if the field contains the previous day’s date.
- A year from now: Validates the date is exactly one year ahead.
- A month from now: Validates the date is exactly one month ahead.
- Specific date: Lets you pick a particular date from a calendar.
- Import date from variables: Uses a variable value for dynamic date validation.
-
Adjust days for expected date:
Use the + or – buttons to add or subtract days from the chosen expected date. This is helpful for validating offsets like3 days after todayor2 days before tomorrow. -
Date format selection:
The date format is chosen automatically based on the captured date, or you can select one manually to ensure validation uses the correct format. Use the Format dropdown to select one of the options:dd mm yyyydd mmm yyyymm dd yyyymmm dd yyyyyyyy mm dd
-
Select between two dates:
You can validate that a date falls within a specific range by using the is between comparison operator. You can set both a Start date (inclusive) and an End date (inclusive). You can select a specific date or use dynamic options liketodayora week from now.
Element Presence Validation
Element Presence Validation complements visual and text validation by addressing scenarios where the presence or absence of elements is crucial for your application’s functionality, user experience, and stability.
Element Presence Validation only validates whether the recorded element is present or absent on the page. It does not verify visuals, position or the contents of the element. To validate the contents, use Visual or Text validations instead.
It provides the following two options:
- Validate element present: Ensures that a specific element is visible on the page when it should be. It is useful to confirm essential components on the webpage are available and functioning as expected. If the element is not present when it should be, the test fails for that step. For example, verify the Submit button is present after entering credentials to enable login. You can also use Element Presence Validation to wait for a particular element before recording any actions. More best practices for Validations can be found here.
-
Validate element not present: Ensures that an element is not visible on the page when it should be hidden. It is useful to verify elements are properly removed or hidden in response to user actions. If the element is still visible when it should be absent, the test fails for that step. For example, ensure that filters applied on the eCommerce website are not present after removing them.
File Download Validation
You can also validate the metadata of files, including the file name, size, extension, and content accuracy, using the MD5 checks of downloaded files. Low Code Automation automatically captures and records a file download step whenever a file is downloaded during actions performed on the web application.
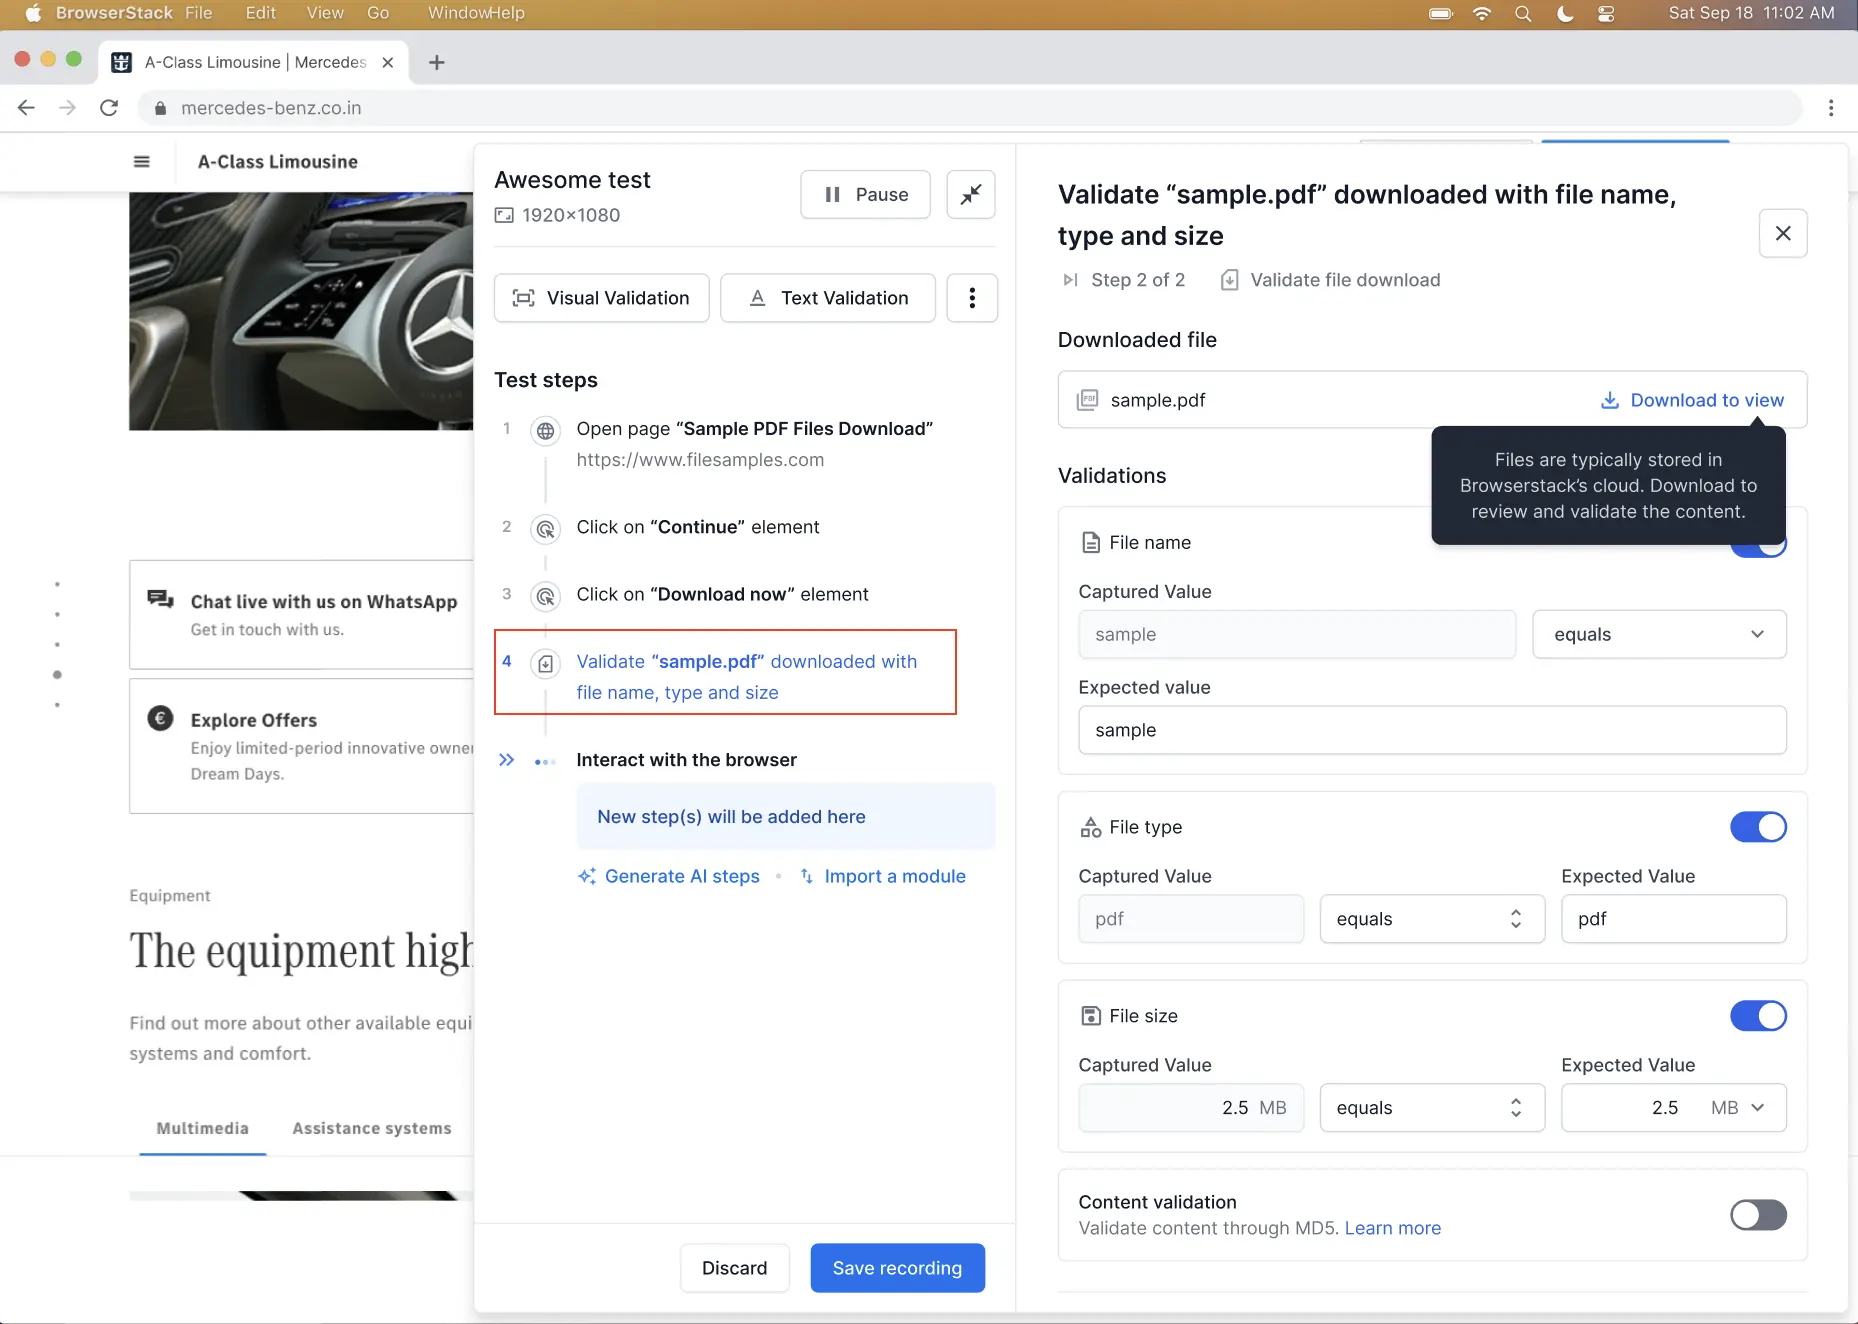
It also supports validating content-level details, even for dynamic files with changing data.

For more details, refer to the Validate downloaded files and its content page.
We're sorry to hear that. Please share your feedback so we can do better
Contact our Support team for immediate help while we work on improving our docs.
We're continuously improving our docs. We'd love to know what you liked
We're sorry to hear that. Please share your feedback so we can do better
Contact our Support team for immediate help while we work on improving our docs.
We're continuously improving our docs. We'd love to know what you liked
Thank you for your valuable feedback!