Image injection for App Accessibility testing
Simulate photos, QR codes, and barcodes scanning on real devices to streamline your app’s accessibility testing without physical hardware.
The Image Injection feature in App Accessibility allows you to test app functionalities that rely on camera input, such as capturing images, scanning QR codes, or scanning barcodes on real devices provided by BrowserStack. By injecting images or codes directly into your app during testing, you can simulate these camera actions without the need for physical devices or environments.
Following are the scenarios you can test using Image Injection:
- Capturing images of documents, receipts, checks, or other items.
- Scanning QR codes for authentication or information retrieval.
- Scanning barcodes for product information or inventory management.
This guide will walk you through the steps to:
- Prepare your app for image injection
- Upload images or QR codes
- Perform tests using these injected inputs.
Supported images/QR codes/barcodes
- Images or QR codes/barcodes in the
.jpg,.jpeg, and.pngformats. - Maximum size of an image/QR code/barcode not exceeding
10 MB.
Patch your app for Image Injection
To use the Image Injection feature, you need to patch your app so it can accept injected images or codes during testing.
Prerequisites
Before you start, ensure you have the following:
- Your BrowserStack
usernameandaccess key. - The original
.apkor.ipafile of your app. - Access to the API endpoint for patching your app. If you do not have this access, please contact BrowserStack Support to enable it for your account.
Following are the steps to prepare your app for Image Injection.
- Open the Terminal (macOS/Linux) or Command Prompt (Windows) on your computer.
- Use the following command to patch your app:
curl -o patched_app.apk --location \
--request POST 'https://api-cloud.browserstack.com/app-automate/instrument-android-app' \
-u YOUR_USERNAME:YOUR_ACCESS_KEY \
--form 'file=@"/path/to/app.apk"' \
--form 'instrumentation_types="[\"CameraImageInjection\"]"'
Replace the placeholder:
-
"/path/to/app.apk": The file path to your app’s APK file.
curl -o patched_app.ipa --location \
--request POST 'https://api-cloud.browserstack.com/app-automate/instrument-app' \
-u YOUR_USERNAME:YOUR_ACCESS_KEY \
--form 'file=@"/path/to/app.ipa"
--form 'instrumentation_types="[\"CameraImageInjection\"]"'
Replace the placeholder:
-
"/path/to/app.ipa": The file path to your app’s IPA file.
After you run the command, a new file named patched_app is created in your current directory. This is your app patched for image injection.
Upload the patched app to App Accessibility
Use the following method to upload your patched app to inject images or codes as needed and test.
Select the patched_app file from your computer.
Upload and inject image or QR code/barcode
Follow these steps to upload and inject image or QR code/barcode.
-
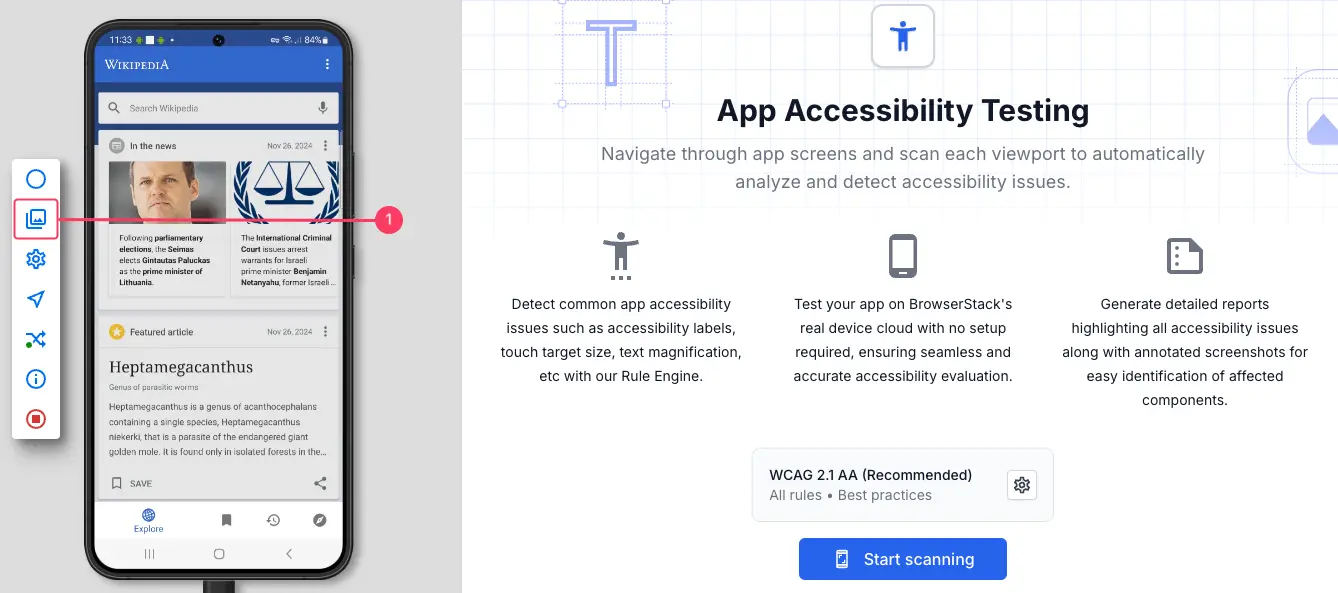
In the session toolbar, click the Image Injection icon (see annotation 1).
-
Click Upload asset.
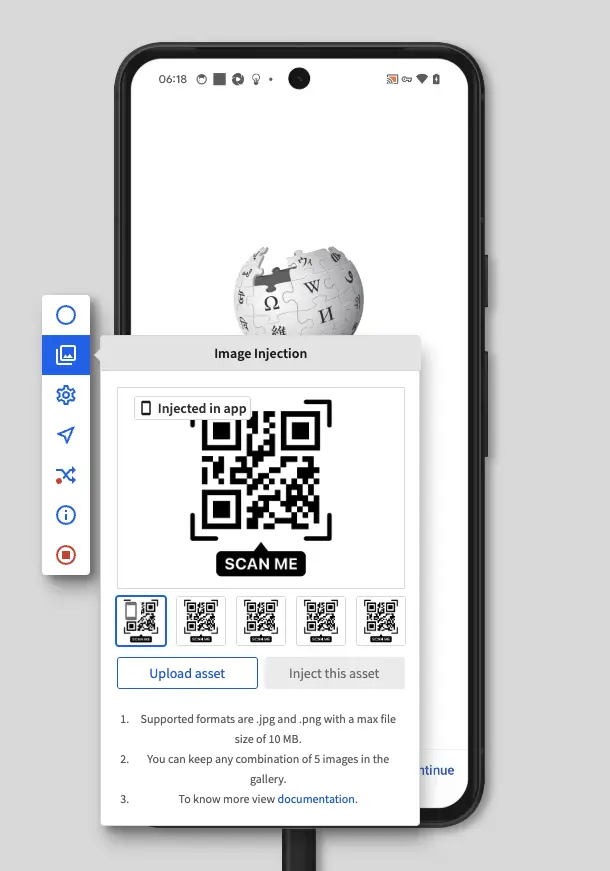
- Select the image or QR code/barcode from your local directory.
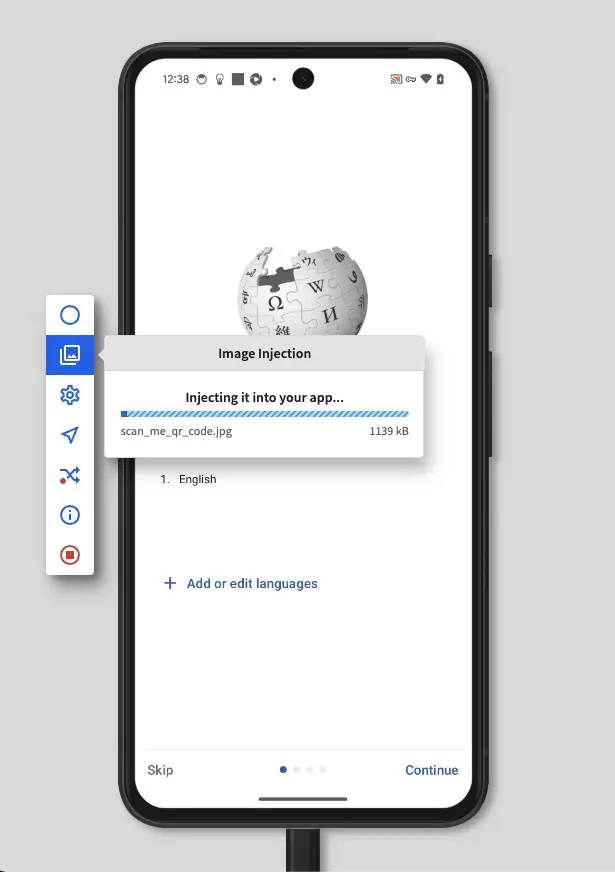
- Uploading of the asset and injecting it into your app takes place and the prompt displays the following:
- The progress bar while the image/QR code/barcode is being uploaded.
- A preview of the image/QR code/barcode after the upload is complete.
- Image gallery that displays the uploaded images.
You see a message on the dashboard that the asset is uploaded and injected in your app.
The latest uploaded image/QR code/barcode is injected in your app by default. However, you can select another image from the gallery to be injected in your app, and click Inject this asset.
Now proceed with your workflow in your application where image input is required. For example, if a button in your app must scan a barcode. When you perform this action the barcode injected as image will be scanned.
Replace or delete an image/QR code/barcode
Managing your image assets is important. Learn how to replace existing images or remove unwanted QR codes and barcodes from your image gallery. These steps ensure that your test environment remains up-to-date and organized, allowing you to effectively simulate various camera inputs during your app accessibility testing.
Prerequisite
To replace an image when the image gallery is full:
- Click Upload asset.
-
On the Your gallery is full prompt, click Remove and Upload.
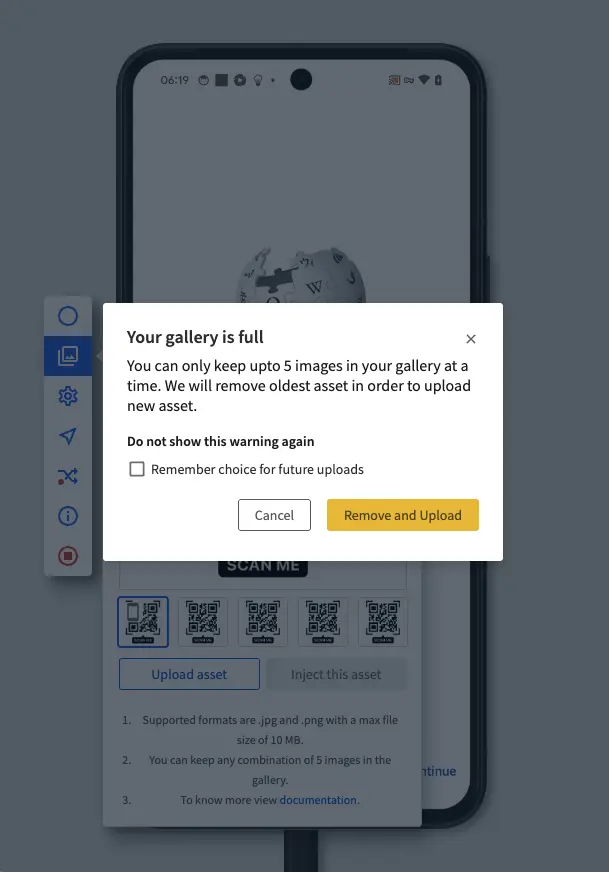
The oldest uploaded image is removed and is replaced by the latest uploaded image.
To delete an image from the image gallery:
- Click the image you want to delete.
-
Click the delete icon (see annotation 1) on the image.

You see a message on the dashboard that the image was deleted successfully.
We're sorry to hear that. Please share your feedback so we can do better
Contact our Support team for immediate help while we work on improving our docs.
We're continuously improving our docs. We'd love to know what you liked
We're sorry to hear that. Please share your feedback so we can do better
Contact our Support team for immediate help while we work on improving our docs.
We're continuously improving our docs. We'd love to know what you liked
Thank you for your valuable feedback!