Create grid on your Kubernetes cluster
Automate TurboScale provides Helm chart to create a browser automation grid on your existing Kubernetes cluster on your choice of Cloud provider. The TurboScale Grid is compatible with EKS on AWS, GKE on GCP, AKS on Azure. With this setup, you get a self-hosted grid that scales with on-demand resource consumption along with 360-degree insights into grid utilization and cost saving opportunities.
- The prerequisite is to have an BrowserStack account that allows you to authenticate your Grid on AWS, GCP and Azure and a running Kubernetes Cluster.
- With this approach, you need to manually configure the required IAM roles/service account and storage for Test Artifacts, More details below.
- The recommended approach to create a Grid from scratch is to use BrowserStack CLI with the required dependencies.
Deploy Helm chart
Helm chart is the recommended installation way if you want to use your existing Kubernetes setup for setting up TurboScale Grid.
Deployment steps with Helm
1. Add BrowserStack’s Helm chart repository:
helm repo add automate https://grid.browserstack.com/packages/helm
2. Update Helm Chart
helm repo update
3. Install Helm Chart in new Namespace
helm install high-scale-grid automate/selenium-grid --set bstack-username="YOUR_USERNAME" --set bstack-accesskey="YOUR_ACCESS_KEY" --set cluster-name="<ClusterName>" --set region="<ClusterRegion>" --set cloud-provider="<CloudProvider>"
By default, we create an nginx-ingress controller. To use custom ingress, follow these steps.
Please update the above command with relevant Cloud provider details. The cluster-name and region parameter should be in smallcase without spaces. The accepted value for cloud provider parameter is from aws, gcp and azure. Use our setup guide to access the appropriate command as per your requirement.
Enable storage of test artifacts
By default, TurboScale Grid will start recording the test artifacts as per your Grid settings from our Automation Console. You can enable artifact storage by following relevant steps on cloud provider and accessing them using our Builds Dashboard.
Enable Test Artifacts on EKS cluster
There are two methods to enable storage of test artifacts on AWS EKS cluster.
- Grant s3 access to a cluster’s IAM Role
- Grant access to a specific bucket
Grant s3 access to a cluster’s IAM Role
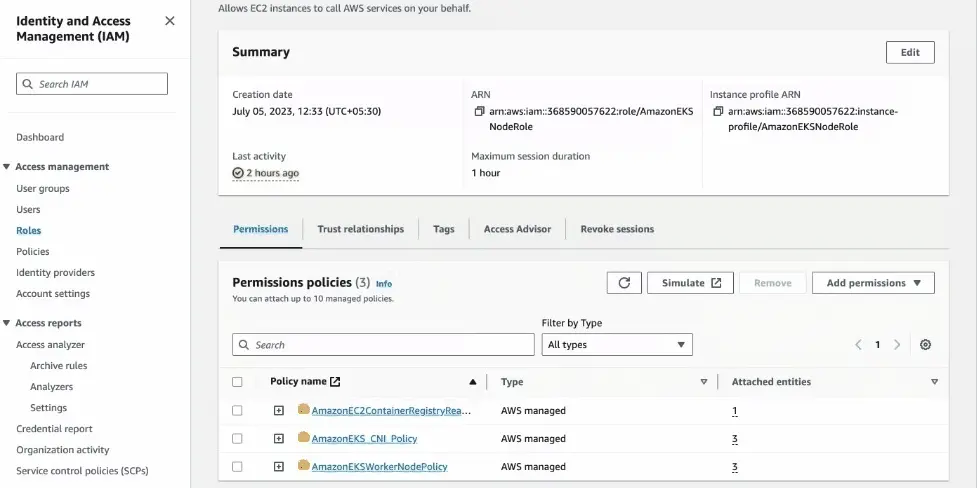
You must add AWS managed policy AmazonS3FullAccess to IAM role attached to your Kubernetes cluster. Follow these steps to attach the AmazonS3FullAccess policy to an IAM role associated with an Amazon EKS cluster’s node group.
- Open the AWS Management Console and navigate to the Amazon EKS Console.
- Choose your cluster from the list, then locate and note the IAM role attached to your cluster’s node group.
- On the Identify and Access Management (IAM) dashboard, under Access Management in the left-hand navigation pane, select Roles.

- Find and select the IAM role you noted in step 2 (for example,
AmazonEKSNodeRole). - In the Permissions tab, select Add permissions from the dropdown in the upper-right corner and choose Attach policies.
- In the list of policies, search for
AmazonS3FullAccess, then select the corresponding checkbox. - Click Add permissions to confirm the addition of the
AmazonS3FullAccesspolicy.
Grant access to a specific bucket
Think of this method as if you are handing your EKS cluster a unique key that grants access only to a specific S3 bucket. It means cluster has credentials restricted solely to that bucket.
Download the configuration file
Download the s3role.yaml configuration file.
Create a new IAM role with CloudFormation
- Run this command in your terminal (you must install AWS CLI and configure it):
 aws cloudformation create-stack \
 --stack-name turboscale-high-scale-grid-4-s3role \
 --template-body file://s3role.yaml \
 --parameters ParameterKey="ClusterName",ParameterValue="<cluster name>" ParameterKey="GridNamespace",ParameterValue="<grid name>" ParameterKey="BucketName",ParameterValue="<bucket name>" \
 --capabilities CAPABILITY_NAMED_IAM \
 --region "us-east-1"
This command instructs CloudFormation to use thes3role.yamlfile to create a new IAM role with permissions configured for your specific bucket.
-
Replace the placeholders in the following command with actual values as per your configuration:
-
<cluster name>: The name of your EKS cluster. -
<grid name>: The actual Grid name in your cluster (in the example, it is “high-scale-grid”). -
<bucket name>: The name of the S3 bucket you want to use.
-
Configure Kubernetes to use the new Role:
You must update the configuration of two Kubernetes ServiceAccounts (which are like user accounts within Kubernetes) to use the newly created IAM role.
- Add the
eks.amazonaws.com/role-arn: <arn of s3 role created from above cf>annotation in each of the following commands:
kubectl edit serviceaccount default -n high-scale-grid
kubectl edit serviceaccount browser-node -n high-scale-grid
- Replace
<arn of s3 role created from above cf>with the actual ARN (Amazon Resource Name) of the role you have created using CloudFormation. You can find this ARN in the output of the CloudFormation command.
Inform Automate TurboScale about your bucket:
You need to send a request to the BrowserStack API to let it know which bucket to access for publishing results on the dashboard.
curl -u YOUR_USERNAME:YOUR_ACCESS_KEY \
-H "Content-Type: application/json" \
-d '{"clusterName":"<name of cluster>", "bucketName":"<name of bucket>", "bucketRegion":"<region of bucket>"}' \
https://api.browserstack.com/automate-turboscale/v1/clusters/updateStorageInfo-
Replace the placeholders in the following curl command with your actual values:
-
<name of cluster>: The name of your EKS cluster. -
<name of bucket>: The name of your S3 bucket. -
<region of bucket>: The AWS region where your bucket is located (e.g., “us-east-1”).
-
Troubleshooting
Visibility on resources
BrowserStack adds tags on AWS, GCP and Azure whenever a new resource(Compute or Non-Compute) is being created as part of Automate TurboScale in your Cloud account.
Tags are key-value pairs that you can use to view your Cloud resources and identify, organize, or search for resources. Here is a list of tags added by BrowserStack on all the resources.
| Tag Key | Tag value |
|---|---|
browserstack:managedBy |
BrowserStack |
browserstack:service |
BrowserStack-Automate-TurboScale |
browserstack:grid |
<grid name> used while creating a browser Automation Grid |
browserstack:creationDate |
Epoch Timestamp of resource creation |
Contact us
Need help? Reach out to us here.
We're sorry to hear that. Please share your feedback so we can do better
Contact our Support team for immediate help while we work on improving our docs.
We're continuously improving our docs. We'd love to know what you liked
We're sorry to hear that. Please share your feedback so we can do better
Contact our Support team for immediate help while we work on improving our docs.
We're continuously improving our docs. We'd love to know what you liked
Thank you for your valuable feedback!

