Integrate your test suite with BrowserStack
BrowserStack C# SDK supports a plug-and-play integration. Run your entire test suite in parallel with a few steps!
Prerequisites
- An existing automated test suite.
- .Net v6.0+
- NUnit v3.0.0+ (if you are using NUnit runner) and xUnit v2.0+ (if you are using xUnit runner)
Integration steps
Depending on your preferred method of building projects, perform the following steps to Integrate your test suite with BrowserStack. You can integrate your test suite with C# SDK using NUnit, xUnit, or SpecFlow.
SDK integration
Integration steps
Based on the method you use to build your project, complete the steps in the following tabs to integrate with BrowserStack.
Add BrowserStack SDK as NuGet package
Steps to install BrowserStack SDK as a NuGet package:
- On the Visual Studio toolbar, select Project > Manage NuGet Packages. A NuGet Package Manager Window opens.
- In the Browse tab, search for BrowserStack.TestAdapter, and click Install.

Create your BrowserStack config file
After installing the SDK, create a browserstack.yml config file at the root level of your project. This file holds all the required capabilities to run tests on BrowserStack.
Set access credentials
Set userName and accessKey parameters in the browserstack.yml file, available in the root directory, to authenticate your tests on BrowserStack.
Set platforms on which to test
Set the browsers you want to test under the platforms object. Our configuration follows W3C-formatted capabilities.
| Platform | Browser |
|---|---|
| Linux | Firefox |
| Linux | Chrome |
| Linux | Edge |
To dynamically configure platforms across different tests, you can comment out the platforms capability while still passing platform-specific capabilities.
Enable BrowserStack Local
Test localhost/internal servers in your network
BrowserStack’s Local Testing feature connects with test suites pointing to your localhost URL

BrowserStack Local supports all advanced use cases and restricted networks. Contact our support team for assistance in configuring BrowserStack Local for your enterprise.
BrowserStack Reporting
You can leverage BrowserStack’s extensive reporting features using the following capabilities:
Set a name to your build (usually the same as the build ID that’s on your CI/CD platform).
Accepted characters: A-Z, a-z, 0-9, ., :, -, [], /, @, &, ', _. All other characters are ignored.
Character limit: 255

| buildIdentifier | Description | Generated build name on dashboard |
|---|---|---|
| ${BUILD_NUMBER} (Default) | If the build is triggered locally, an incremental counter is appended. If build is triggered with CI tools, CI-generated build number is appended. |
bstack-demo 1 bstack-demo CI 1395 |
| ${DATE_TIME} | The timestamp of run time is appended to the build. | bstack-demo 29-Nov-20:44 |
Advanced use cases for build names
Custom formatting of build name
Prefix buildIdentifier with desired characters, for example, # or :
buildName: bstack-demo
buildIdentifier: '#${BUILD_NUMBER}'
Re-run tests in a build
In order to re-run your build, you need to ensure that your build name matches an existing build so that your tests get merged into the previously run build.
You can re-run selected tests from a build using any of the following options:
Option 1: Set the existing build name in the BROWSERSTACK_BUILD_NAME variable and prepend it to your test run command to re-run tests in the same build:
MacOS/Linux:
BROWSERSTACK_BUILD_NAME=“bstack-demo 123” dotnet test --filter "Category=sample-test"
Windows Powershell:
$env:BROWSERSTACK_BUILD_NAME=“bstack-demo 123”; dotnet test --filter "Category=sample-test"
Windows cmd:
set BROWSERSTACK_BUILD_NAME="bstack-demo 123" && dotnet test --filter "Category=sample-test"
Option 2: Set the build name as a combination of buildName and buildIdentifier, as seen on the dashboard, and set buildIdenitifier as null:
buildName: bstack-demo 123
buildIdentifier: null
Option 3: Set the buildIdentifier as the build number or time of the required build as seen on the dashboard:
buildName: bstack-demo
buildIdentifier: 123
Set a project name for your project.
sessionName is the name of your test sessions and is automatically picked from your test class/spec name. It doesn’t need to be set manually when using the BrowserStack SDK.
Use additional debugging features
BrowserStack offers session logs, screenshots of failed commands, and a video of the entire test, with additional options to enable.
Update browserstack.yml file
Update the browserstack.yml file in the root folder of your test suite and add the given code to it.
Run your test suite
The BrowserStack Test Adapter enables you to execute your test suite seamlessly, just as you did previously.
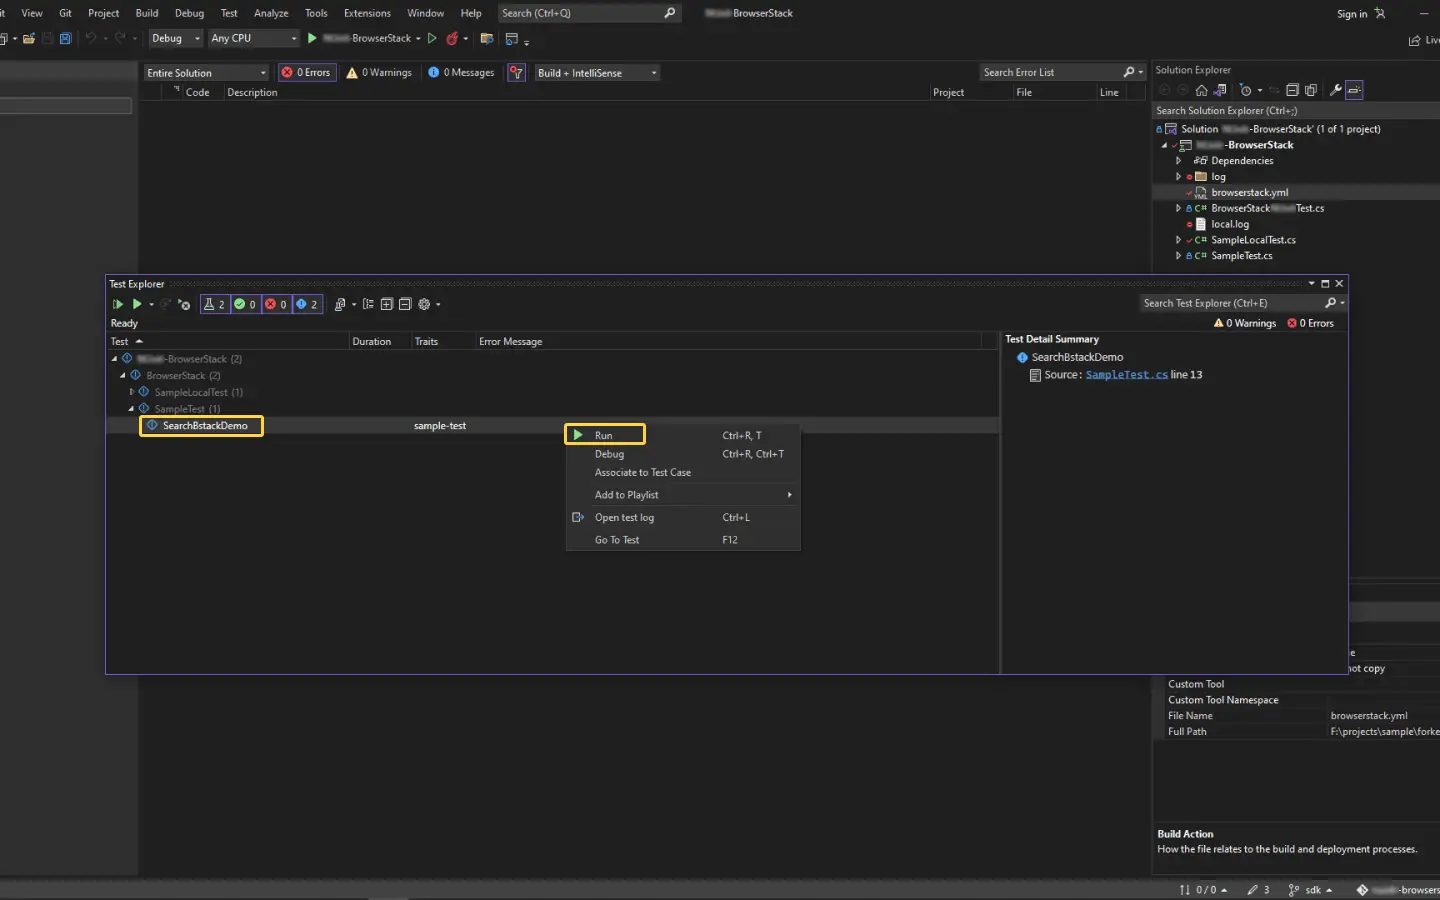
- On the Visual Studio toolbar, select Test > Test Explorer.
- Right-click on your test and click Run.
Install BrowserStack SDK
Run the given command to install the BrowserStack SDK and create a browserstack.yml file in the root directory of your project.
-
The
browserstack.ymlconfig file holds all the required capabilities to run tests on BrowserStack. -
The
BrowserStack.TestAdapterworks on top of your framework test adapter to run parallel tests on BrowserStack across multiple platforms mentioned on thebrowserstack.ymlfile.
Update your BrowserStack config file
Now that the BrowserStack SDK has been installed and the browserstack.yml config file has been created, update your browserstack.yml config file with the given parameters.
Set platforms on which to test
Set the browsers you want to test under the platforms object. Our configuration follows W3C-formatted capabilities.
| Platform | Browser |
|---|---|
| Linux | Firefox |
| Linux | Chrome |
| Linux | Edge |
Enable BrowserStack Local
Test localhost/internal servers in your network
BrowserStack’s Local Testing feature connects with test suites pointing to your localhost URL
BrowserStack Local supports all advanced use cases and restricted networks. Contact our support team for assistance in configuring BrowserStack Local for your enterprise.
BrowserStack Reporting
You can leverage BrowserStack’s extensive reporting features using the following capabilities:
Set a name to your build (usually the same as the build ID that’s on your CI/CD platform).
Accepted characters: A-Z, a-z, 0-9, ., :, -, [], /, @, &, ', _. All other characters are ignored.
Character limit: 255
| buildIdentifier | Description | Generated build name on dashboard |
|---|---|---|
| ${BUILD_NUMBER} (Default) | If the build is triggered locally, an incremental counter is appended. If build is triggered with CI tools, CI-generated build number is appended. |
bstack-demo 1 bstack-demo CI 1395 |
| ${DATE_TIME} | The timestamp of run time is appended to the build. | bstack-demo 29-Nov-20:44 |
Advanced use cases for build names
Custom formatting of build name
Prefix buildIdentifier with desired characters, for example, # or :
buildName: bstack-demo
buildIdentifier: '#${BUILD_NUMBER}'
Re-run tests in a build
In order to re-run your build, you need to ensure that your build name matches an existing build so that your tests get merged into the previously run build.
You can re-run selected tests from a build using any of the following options:
Option 1: Set the existing build name in the BROWSERSTACK_BUILD_NAME variable and prepend it to your test run command to re-run tests in the same build:
MacOS/Linux:
BROWSERSTACK_BUILD_NAME=“bstack-demo 123” dotnet test --filter "Category=sample-test"
Windows Powershell:
$env:BROWSERSTACK_BUILD_NAME=“bstack-demo 123”; dotnet test --filter "Category=sample-test"
Windows cmd:
set BROWSERSTACK_BUILD_NAME="bstack-demo 123" && dotnet test --filter "Category=sample-test"
Option 2: Set the build name as a combination of buildName and buildIdentifier, as seen on the dashboard, and set buildIdenitifier as null:
buildName: bstack-demo 123
buildIdentifier: null
Option 3: Set the buildIdentifier as the build number or time of the required build as seen on the dashboard:
buildName: bstack-demo
buildIdentifier: 123
Set a project name for your project.
sessionName is the name of your test sessions and is automatically picked from your test class/spec name. It doesn’t need to be set manually when using the BrowserStack SDK.
Use additional debugging features
BrowserStack offers session logs, screenshots of failed commands, and a video of the entire test, with additional options to enable.
Update browserstack.yml file with selected capabilities
Copy the code snippet and replace the contents of the browserstack.yml file in the root folder of your test suite.
Non-SDK integration
If you prefer not to use the SDK, you can integrate your test suite manually.
Set up authentication
Set environment variables for BrowserStack credentials:
# Set these values in your ~/.zprofile (zsh) or ~/.profile (bash)
export BROWSERSTACK_USERNAME=YOUR_USERNAME
export BROWSERSTACK_ACCESS_KEY=YOUR_ACCESS_KEY
It is recommended that you store your credentials as environment variables and use those environment variables in your test script.
Update your test script
Use BrowserStack credentials and update the selenium hub URL
String username = System.getenv("YOUR_USERNAME");
String accessKey = System.getenv("YOUR_ACCESS_KEY");
public RemoteWebDriver driver;
driver = new RemoteWebDriver(new URL("https://" + username + ":" + accessKey + "@hub-ft.browserstack.com/wd/hub"), new ChromeOptions());
Update the selenium hub URL to the BrowserStack remote hub URL: https://hub-ft.browserstack.com/wd/hub
Update Browser and OS capabilities
After you set up authentication in your test scripts, you can now add configurations, such as browser-OS combinations, test suite organization details, test status that you want to track, and then run your tests.
// Add the following capabilities to your test script
MutableCapabilities capabilities = new MutableCapabilities();
HashMap<String, Object> bstackOptions = new HashMap<String, Object>();
capabilities.setCapability("browserName", "Chrome");
bstackOptions.put("browserVersion", "latest");
bstackOptions.put("projectName", "ProjectSample");
bstackOptions.put("buildName", "BuildSample");
bstackOptions.put("sessionName", "SessionSample");
capabilities.setCapability("bstack:options", bstackOptions);
We're sorry to hear that. Please share your feedback so we can do better
Contact our Support team for immediate help while we work on improving our docs.
We're continuously improving our docs. We'd love to know what you liked
We're sorry to hear that. Please share your feedback so we can do better
Contact our Support team for immediate help while we work on improving our docs.
We're continuously improving our docs. We'd love to know what you liked
Thank you for your valuable feedback!