Run Leapwork tests with Automate
A step-by-step guide to running Leapwork tests with BrowserStack Automate
The Leapwork Automation Platform enables users to build and run automation flows for test automation. The platform is designed to create automated test scripts in a low code environment with minimal test script creation effort. By integrating Leapwork with BrowserStack Automate, you can run Leapwork recorded test scripts on 3000+ real devices and desktop browsers.
In this guide, you will learn about:
- Running Leapwork tests on BrowserStack
- Testing privately hosted websites
- Running multiple tests in parallel
- Marking test status as passed or failed
- Limitations
Prerequisites
- BrowserStack Username and Access key, which you can find in your account settings. If you have not created an account yet, you can sign up for a Free Trial or purchase a plan.
- Leapwork is installed.
- Leapwork test script is available.
Running your first Leapwork tests on BrowserStack
Leapwork provides a BrowserStack Agent using which you can run your automated tests on BrowserStack.
Use the following steps to configure the BrowserStack Agent and run your first test on BrowserStack:
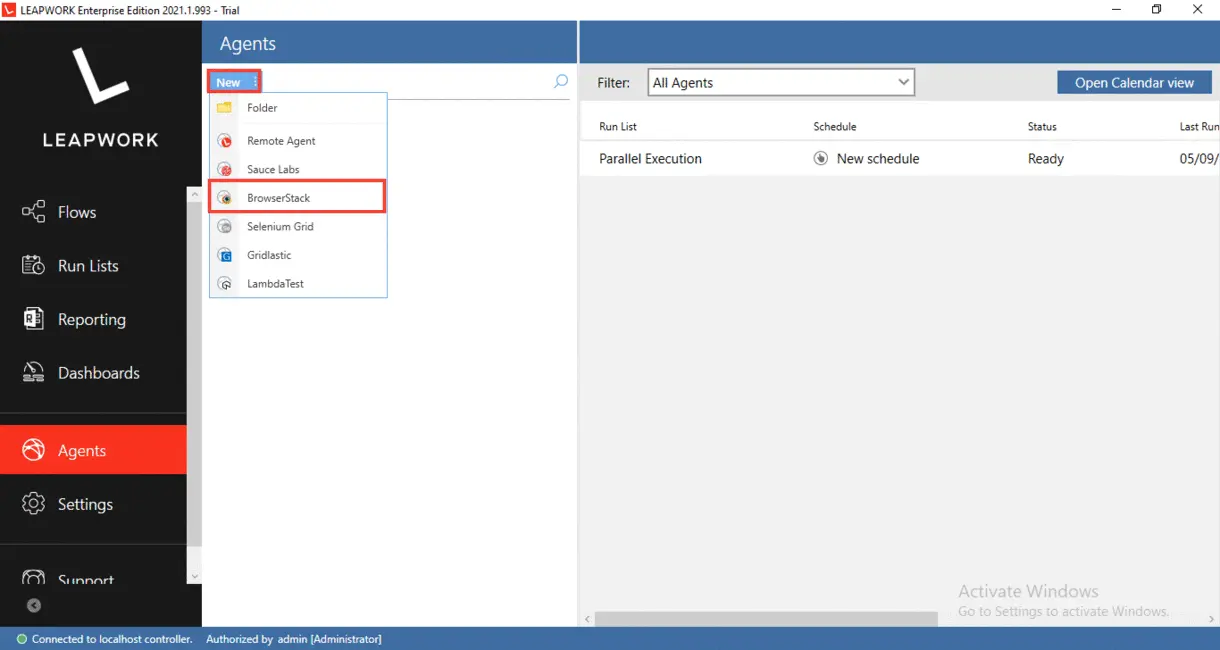
Step 1. In the Dashboard, click Agents.
Step 2. In Agents window, click NEW, and then click BrowserStack.
Step 3. In the Agent Settings window, enter the details, such as BrowserStack credentials, and OS-Browser/Device combination that you want to use for running your test. The following list shows the mandatory settings that you must configure.
-
Username- BrowserStack Username -
Access Key- BrowserStack Access Key -
Platform & OS- Platform for example, Windows or MacOS -
Version- Platform/OS version, for example, Windows 11 -
Browser- Browser name, for example, Chrome -
Version- Version -
Screen Resolution- Screen resolution at which you want to test
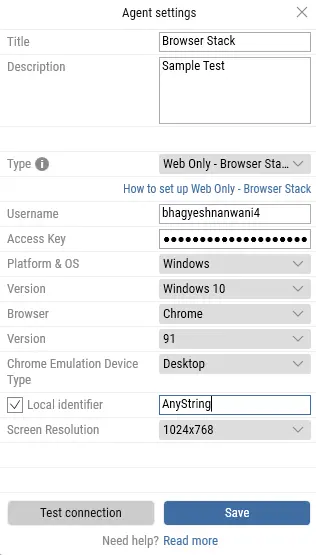
Step 4. Click Test connection to verify if the connection to BrowserStack is established. A Successfully Connected message appears.
Step 5. Click Save to save the BrowserStack agent.
Step 6. In Leapwork, open the test script you want to run on BrowserStack.
Step 7. In the Dashboard, click Flows to open the test script.
Step 8. In the Flow view, click the Agent Settings selector, and then select the BrowserStack Agent.
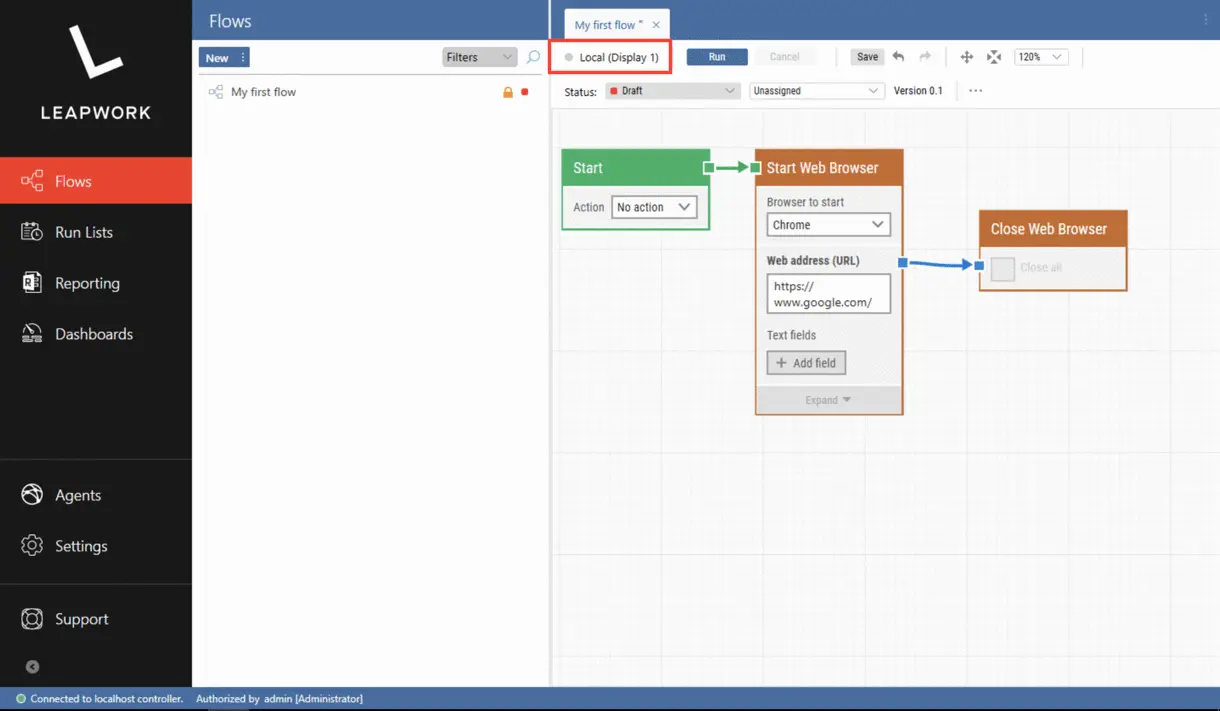
Step 9. Click Run to start the test run on BrowserStack.
Step 10. Verify the test script status on the BrowserStack Automate Dashboard.
Testing privately hosted websites
You can test your websites hosted privately using the BrowserStack Local Testing feature. You must enable Local Testing on your local machine, establishing a secure tunnel to test your private websites and other private network configurations.
Enabling Local Testing with Automate involves:
Establish a Local Testing connection
Use the following steps to start a Local Testing connection through your command-line interface:
Step 1. Download the appropriate binary for your system:
Step 2. Unzip the binary to a folder/directory on your machine.
Step 3. Open your command-line interface and navigate to the Local binary folder.
Step 4. Run the binary using the following command:
./BrowserStackLocal --key YOUR_ACCESS_KEY --local-identifier <AnyString>
# --local-identifier helps reuse an existing binary connection and must be a unique string.
BrowserStackLocal.exe --key YOUR_ACCESS_KEY --local-identifier <AnyString>
# --local-identifier helps reuse an existing binary connection and must be a unique string.
Configure Leapwork tests to use Local Testing
Prerequisites
- BrowserStack agent using the steps in the Running Leapwork tests on BrowserStack section is already created. We will use this agent as an example to make a Local connection.
Use the following steps to configure the existing BrowserStack Agent to create a Local connection:
Step 1. In the Dashboard, click Agents, and double-click BrowserStack Agent.
Step 2. Select the Local identifier checkbox, enter the unique local identifier, and click Save.
Ensure that the local-identifier used to start the Local Binary is used in the BrowserStack Agent used to create a Local connection.
Step 3. In the Dashboard, click Flows to open the test script.
Step 4. In the Flow view, click the Agent Settings selector, and then select the BrowserStack Agent.

Step 5. Click Run to start the test run on BrowserStack.
Step 6. Verify the test script status on the BrowserStack Automate Dashboard.
Running multiple tests in parallel
On BrowserStack, you can run multiple test scripts simultaneously across various browser, device, and OS combinations, this is Parallel Testing. Parallel Testing gives you the same benefits as running a multi-threaded application. Parallel Testing helps to reduce the run time of your test suites, resulting in faster build times and faster releases.
In Leapwork, parallel testing is implemented with the help of a Run Lists. A Run List comprises of automation test flows that run on one or more Schedules. Schedules define when the Run Lists are executed, and the Agents that will be used.
Parallel testing with Leapwork has some limitations. Check out these limitations before you start testing.
Use the following steps to run parallel tests on BrowserStack:
Step 1. Determine and create the number of agents corresponding to the number of parallel instances you want to trigger on BrowserStack. For example, create 5 agents if you’re going to trigger 5 parallel instances.
Check out the steps to create BrowserStack Agents in the Running Leapwork tests on BrowserStack section.
Step 2. After all the agents are created, click Run Lists.
Step 3. Click New → Run List and provide a name for the Run List.
Step 4. After the Run List is created, add flows to the Run List.
Step 5. Right-click the Run List you created and click New Schedule.
Step 6. Set Trigger to on-demand or Schedule as per your requirement. These run types define the execution schedule for the tests.
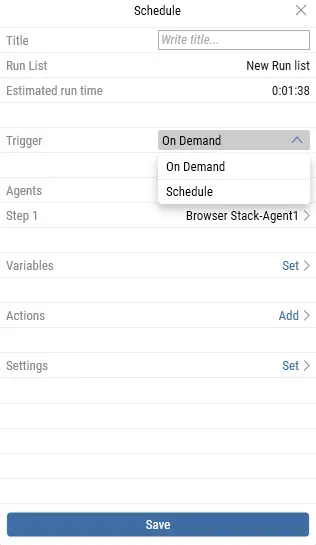
Step 7. Under Agents, select all the instances of BrowserStack Agents that you created earlier in step 1.
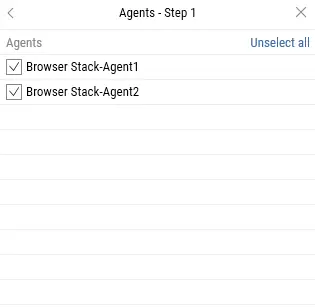
Step 8. Set the Agent Distribution to Divide flows on each agent. This option appears if your Run List includes multiple flows.
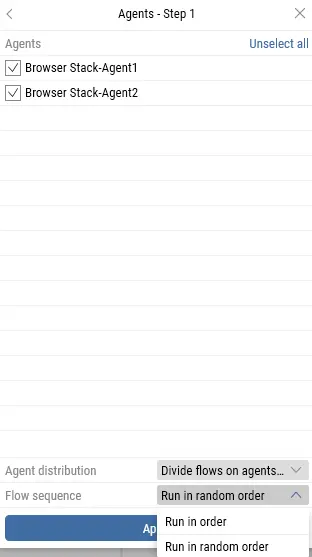
Step 9. Set Flow Sequence to Run in order, and then click Apply. This option appears if your Run List includes multiple flows.
After the schedule is created, based on the Trigger you set, click Run now to trigger tests or wait for the test to trigger based on the schedule you configured.
Marking test status as passed or failed
BrowserStack does not know whether your test’s assertions have passed or failed because only the test script knows whether the assertions have passed. You can inform BrowserStack whether your test script has passed or failed by setting the test status to PASSED or FAILED.
Use the following steps to set test status to PASSED or FAILED:
Step 1. As part of creating a flow, right-click in the view area or press CTRL+N.
Step 2. Click Add Building Block.
Step 3. Click Web to view a list of available blocks.
Step 4. Click the Run Web Javascript block.
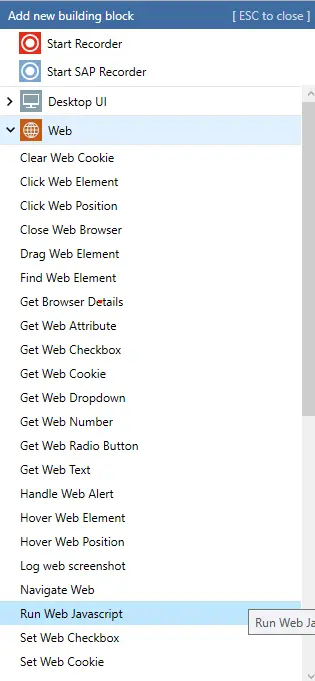
Step 5. Copy the following sample code in Script. Replace <Test Status> with either Passed or Failed and <Reason> with a corresponding message to mark your test status.
browserstack_executor: {"action": "setSessionStatus", "arguments": {"status": "<Test Status>", "reason": "<Reason>"}}
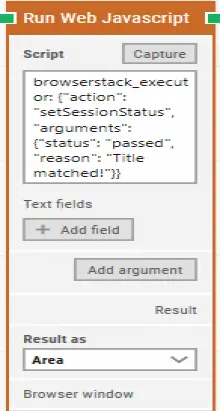
Ensure that the Close Web Browser building block is added at the end of the test flow.
Limitations of using Leapwork with BrowserStack
- In Leapwork, the
number of testsand thenumber of agentsmaintain a 1:1 relationship. This means for every test you want to run, you must create a unique agent. - Leapwork supports limited capabilities, namely
Screen resolution,OS,OS version,Browser,Browser version. You can’t use BrowserStack capabilities, such asbuild,project, etc. - Leapwork can be installed only on Windows.
- Leapwork does not support testing on mobile devices.
- Additional debugging capabilities provided by BrowserStack are not supported.
We're sorry to hear that. Please share your feedback so we can do better
Contact our Support team for immediate help while we work on improving our docs.
We're continuously improving our docs. We'd love to know what you liked
We're sorry to hear that. Please share your feedback so we can do better
Contact our Support team for immediate help while we work on improving our docs.
We're continuously improving our docs. We'd love to know what you liked
Thank you for your valuable feedback!
