Run Tests with Bitbucket Pipelines
A step-by-step guide to help you integrate Bitbucket Pipelines with the BrowserStack device cloud for running all your Selenium tests on BrowserStack Automate.
You can run your automated tests on BrowserStack Automate using your existing Bitbucket pipelines setup. Bitbucket Pipelines uses bitbucket-pipelines.yml for configuration, and the same can be used to run your tests on BrowserStack too.
To run your tests, there are three things that we recommend you to do:
- Setup your environment as per your testing needs
- Set your BrowserStack authentication details as environment variables and read them in your tests
- Integrate test cases for privately hosted websites
Set up test environment
You can simply update your bitbucket-pipelines.yml as per your needs. Here is an example configuration for your reference:
image: maven:3.3.9
pipelines:
  default:
    - step:
        script:
          - mvn clean
          - mvn test # Your test runner command to run the tests
The above example is for a Java based test suite, for more languages refer to Use Pipelines in different software languages page.
Set up environment variables
If you are already using environment variables to specify your BrowserStack authentication details, you can skip this step.
If not, we strongly recommend you not to hardcode the auth details in your code (and hence do not commit and check-in your auth keys into code repositories). This helps in both maintaining a secure codebase, as well as helping you flexibly run your tests using different service accounts based on your needs (for example, run pre-prod regression suites using a team account with higher parallels limit).
Go to your Bitbucket repository’s settings and add the following environment variables:
-
BROWSERSTACK_USERNAME: Your BrowserStack username -
BROWSERSTACK_ACCESS_KEY: Your BrowserStack access key
You can then read these variables in your tests. Here is a sample code to demonstrate how that’s done:
String username = System.getenv("BROWSERSTACK_USERNAME");
String accessKey = System.getenv("BROWSERSTACK_ACCESS_KEY");

MutableCapabilities capabilities = new MutableCapabilities();
capabilities.setCapability("browserName", "Chrome");
HashMap<String, Object> browserstackOptions = new HashMap<String, Object>();
browserstackOptions.put("os", "Windows");
capabilities.setCapability("bstack:options", browserstackOptions);

WebDriver driver = new RemoteWebDriver(new URL("https://" + username + ":" + accessKey + "@hub.browserstack.com/wd/hub"), capabilities);
username = process.env.BROWSERSTACK_USERNAME
accessKey = process.env.BROWSERSTACK_ACCESS_KEY

var capabilities = {
  'bstack:options' : {
    "os" : "Windows",
    "userName" : username,
    "accessKey" : accessKey,
  },
    "browserName" : "Chrome",
}

var driver = new webdriver.Builder().
  usingServer("https://hub-cloud.browserstack.com/wd/hub").
  withCapabilities(capabilities).
  build();
String username = Environment.GetEnvironmentVariable("BROWSERSTACK_USERNAME");
String accessKey = Environment.GetEnvironmentVariable("BROWSERSTACK_ACCESS_KEY");

Dictionary<string, object> browserstackOptions = new Dictionary<string, object>();
browserstackOptions.Add("os", "Windows");
browserstackOptions.Add("browserName", "Chrome");
capabilities.AddAdditionalOption("bstack:options", browserstackOptions);
driver = new RemoteWebDriver(new URL("https://" + username + ":" + accessKey + "@hub.browserstack.com/wd/hub"), capabilities);
$username = getenv('BROWSERSTACK_USERNAME');
$accessKey = getenv('BROWSERSTACK_ACCESS_KEY');

$caps = array(
'bstack:options' => array(
    "os" => "Windows",
),
  "browserName" => "Chrome",
);
$web_driver = RemoteWebDriver::create(
  "https://".$username.":".$accessKey."@hub.browserstack.com/wd/hub",
  $caps
);
username = os.environ.get('BROWSERSTACK_USERNAME')
accessKey = os.environ.get('BROWSERSTACK_ACCESS_KEY')

bstack_options = {
    "os" : "Windows",
    "userName": username,
    "accessKey": accessKey
}
options = ChromeOptions()
options.set_capability('bstack:options', bstack_options)
driver = webdriver.Remote(
    command_executor="https://hub.browserstack.com/wd/hub",
    options=options)
username = ENV['BROWSERSTACK_USERNAME']
accessKey = ENV['BROWSERSTACK_ACCESS_KEY']

# to run on Chrome
options = Selenium::WebDriver::Options.chrome
capabilities = {
  'bstack:options' => {
    "os" => "Windows",
  },
  "browserName" => "Chrome",
}

options.add_option('bstack:options', bstack_options)
driver = Selenium::WebDriver.for(:remote,
  :url => "https://"+username+":"+accessKey+"@hub.browserstack.com/wd/hub",
  :capabilities => options)
String username = System.getenv("BROWSERSTACK_USERNAME");
String accessKey = System.getenv("BROWSERSTACK_ACCESS_KEY");

DesiredCapabilities capabilities = new DesiredCapabilities();
capabilities.setCapability("os", "Windows");
capabilities.setCapability("browser", "chrome");
driver = new RemoteWebDriver(new URL("https://" + username + ":" + accessKey + "@hub.browserstack.com/wd/hub"), capabilities);
username = process.env.BROWSERSTACK_USERNAME
accessKey = process.env.BROWSERSTACK_ACCESS_KEY

var capabilities = {
 "os" : "Windows",
 "browser" : "chrome",
 "browserstack.user" : username,
 "browserstack.key" : accessKey
}

var driver = new webdriver.Builder().
  usingServer("https://hub-cloud.browserstack.com/wd/hub").
  withCapabilities(capabilities).
  build();
String username = System.getenv("BROWSERSTACK_USERNAME");
String accessKey = System.getenv("BROWSERSTACK_ACCESS_KEY");

DesiredCapabilities capabilities = new DesiredCapabilities();
capabilities.setCapability("os", "Windows");
capabilities.setCapability("browser", "chrome");
driver = new RemoteWebDriver(new URL("https://" + username + ":" + accessKey + "@hub.browserstack.com/wd/hub"), capabilities);
$username = getenv("BROWSERSTACK_USERNAME");
$accessKey = getenv("BROWSERSTACK_ACCESS_KEY");

$caps = array(
  "os" => "Windows",
  "browser" => "chrome"
);

$web_driver = RemoteWebDriver::create(
  "https://" . $username . ":" . $accessKey . "@hub-cloud.browserstack.com/wd/hub",
  $caps
);
username = os.getenv("BROWSERSTACK_USERNAME")
access_key = os.getenv("BROWSERSTACK_ACCESS_KEY")

caps = {
 'os': 'Windows',
 'browser': 'chrome',
 'browserstack.user': username,
 'browserstack.key': access_key
}

driver = webdriver.Remote(
    command_executor='https://hub-cloud.browserstack.com/wd/hub',
    desired_capabilities=caps)
username = ENV["BROWSERSTACK_USERNAME"]
access_key = ENV["BROWSERSTACK_ACCESS_KEY"]

caps = Selenium::WebDriver::Remote::Capabilities.new
caps["os"] = "Windows"
caps["browser"] = "chrome"
caps["browserstack.user"] = username
caps["browserstack.key"] = access_key

driver = Selenium::WebDriver.for(:remote,
  :url => "https://hub-cloud.browserstack.com/wd/hub",
  :desired_capabilities => caps)
Integrate test cases for privately hosted websites
If you are testing websites hosted locally as part of your testing or development environment, configure your bitbucket-pipelines.yml file to use the BrowserStack Local binary and route your tests through the local server.
Enable Local Testing
If you prefer to manage the Local connection through the BrowserStack SDK you can add the capability in the browserstack.yml file.
If you chose to use BrowserStack Local binary as a way to establish a local connection, in the bitbucket-pipelines.yml file you must configure pipeline to automatically download and start the binary.
Edit your existing bitbucket-pipelines.yml file to include the code in the following snippets.
# For Linux-based systems, add the following commands in the given console to download the binary, run it, and stop its execution after the test has been executed.
- wget "https://www.browserstack.com/browserstack-local/BrowserStackLocal-linux-x64.zip"
- unzip BrowserStackLocal-linux-x64.zip
- ./BrowserStackLocal --key $BROWSERSTACK_ACCESS_KEY --daemon start
- <your-test-command>
- ./BrowserStackLocal --key $BROWSERSTACK_ACCESS_KEY --daemon stop

 # For macOS-based systems, add the following commands in the given console to download the binary, run it, and stop its execution after the test has been executed.
- wget "https://www.browserstack.com/browserstack-local/BrowserStackLocal-darwin-x64.zip"
- unzip BrowserStackLocal-darwin-x64.zip
- ./BrowserStackLocal --key $BROWSERSTACK_ACCESS_KEY --daemon start
- <your-test-command>
- ./BrowserStackLocal --key $BROWSERSTACK_ACCESS_KEY --daemon stop

 # For Windows-based systems, add the following commands in the given console to download the binary, run it, and stop its execution after the test has been executed.
- wget "https://www.browserstack.com/browserstack-local/BrowserStackLocal-win32.zip"
- powershell.exe Expand-Archive BrowserStackLocal-win32.zip
- ./BrowserStackLocal-win32/BrowserStackLocal.exe --key %BROWSERSTACK_ACCESS_KEY% --daemon start
- <your-test-command>
- ./BrowserStackLocal-win32/BrowserStackLocal.exe --key %BROWSERSTACK_ACCESS_KEY% --daemon stop
If you prefer to manage the Local connection through your test scripts, you can use the language bindings.
Check out enabling Local testing using language bindings to edit your test scripts.
Apart from these configurations, you can set other Local options, such as, testing behind a proxy, folder testing, or using multiple local instances. Check out Introduction to Local Testing for more information.
Add the local capability to test scripts
Add the local capability to test scripts using the following code snippets. When you set this capability to true, BrowserStack resolves the request via the Local agent running in your network.
browserstackOptions.put("local", "true");
'bstack:options' : {
  	"local" : "true",
  },
browserstackOptions.Add("local", "true");
'bstack:options' => array(
  	"local" => "true",
  ),
'bstack:options' : {
  	"local" : "true",
  },
'bstack:options' => {
  	"local" => "true",
  },
caps.setCapability("browserstack.local", "true");
"browserstack.local" : "true",
capability.AddAdditionalCapability("browserstack.local", "true");
"browserstack.local" => "true"
"browserstack.local" : "true"
caps["browserstack.local"] = "true"
And that’s all! You are now all set to run your tests automatically on BrowserStack Automate on every PR or commit as per your workflows.
You can verify if the test suite passed or failed by clicking Pipelines in your repository as shown in the following image.
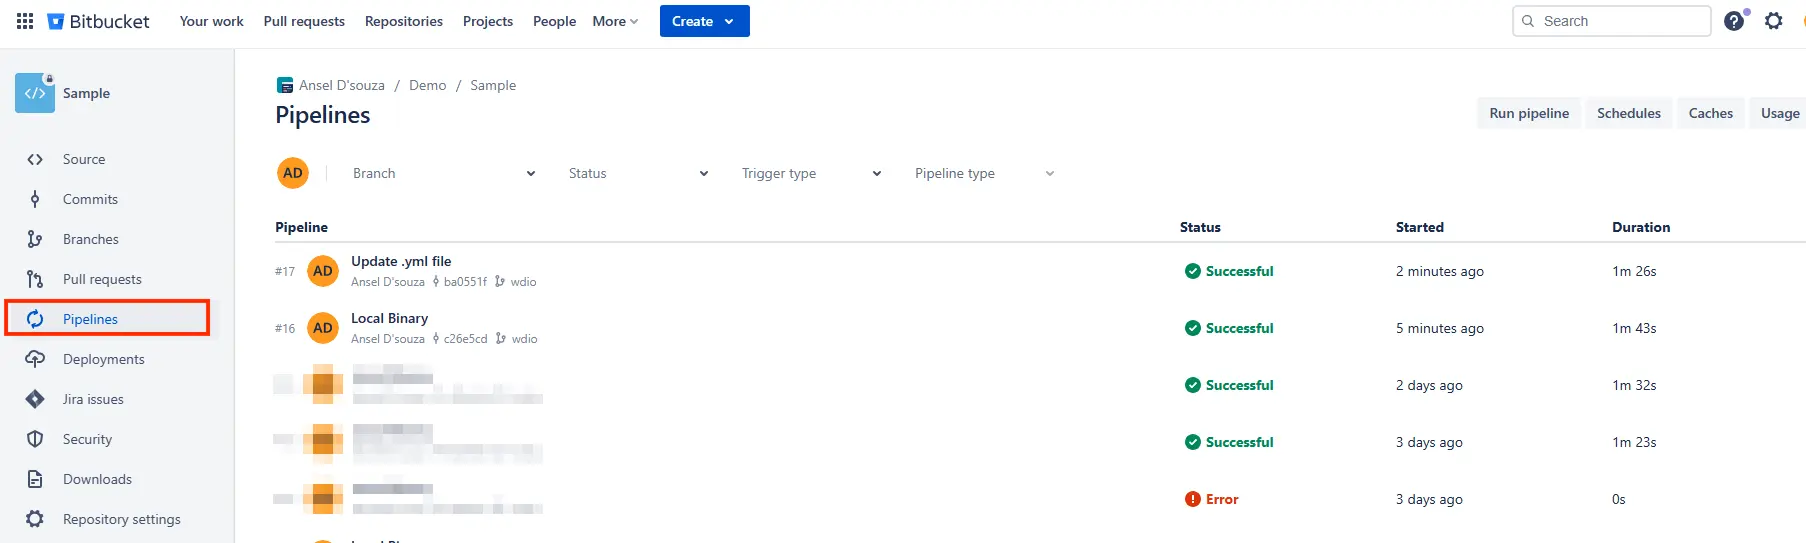
Once the pipeline has completed execution you will be able to check the triggered build on the Automate dashboard as well.
We're sorry to hear that. Please share your feedback so we can do better
Contact our Support team for immediate help while we work on improving our docs.
We're continuously improving our docs. We'd love to know what you liked
We're sorry to hear that. Please share your feedback so we can do better
Contact our Support team for immediate help while we work on improving our docs.
We're continuously improving our docs. We'd love to know what you liked
Thank you for your valuable feedback!