Integrate your Selenium test suite with GitLab using BrowserStack’s GitLab plugin in Automate.
GitLab CI/CD is a continuous integration tool used to integrate your test suites, enabling continuous testing, building applications, and deploying iterative code changes.
The information in this section applies to GitLab CI/CD implemented as part of GitLab SaaS offering and requires some knowledge of GitLab. Check out GitLab documentation before configuring BrowserStack.
The .gitlab-ci.yml file includes configurations that BrowserStack uses to authenticate and run the test cases. You can use the information in this section to edit the .yml file and add configurations, such as BrowserStack credentials, Local settings, and so on. For your existing repositories hosted in GitLab, integrating BrowserStack requires minimal changes to your environment.
This guide requires some knowledge of GitLab. Check out GitLab documentation before configuring BrowserStack.
If you are new to BrowserStack, take some time to check out the getting started guides to learn about integrating BrowserStack with your existing test scripts.
The following sections guide you through setting up BrowserStack to test your websites or locally hosted staging environments:
Set up your BrowserStack access key and username as variables in the GitLab CI/CD settings using the following steps:
Log in to GitLab CI.
Click Settings > CI/CD.
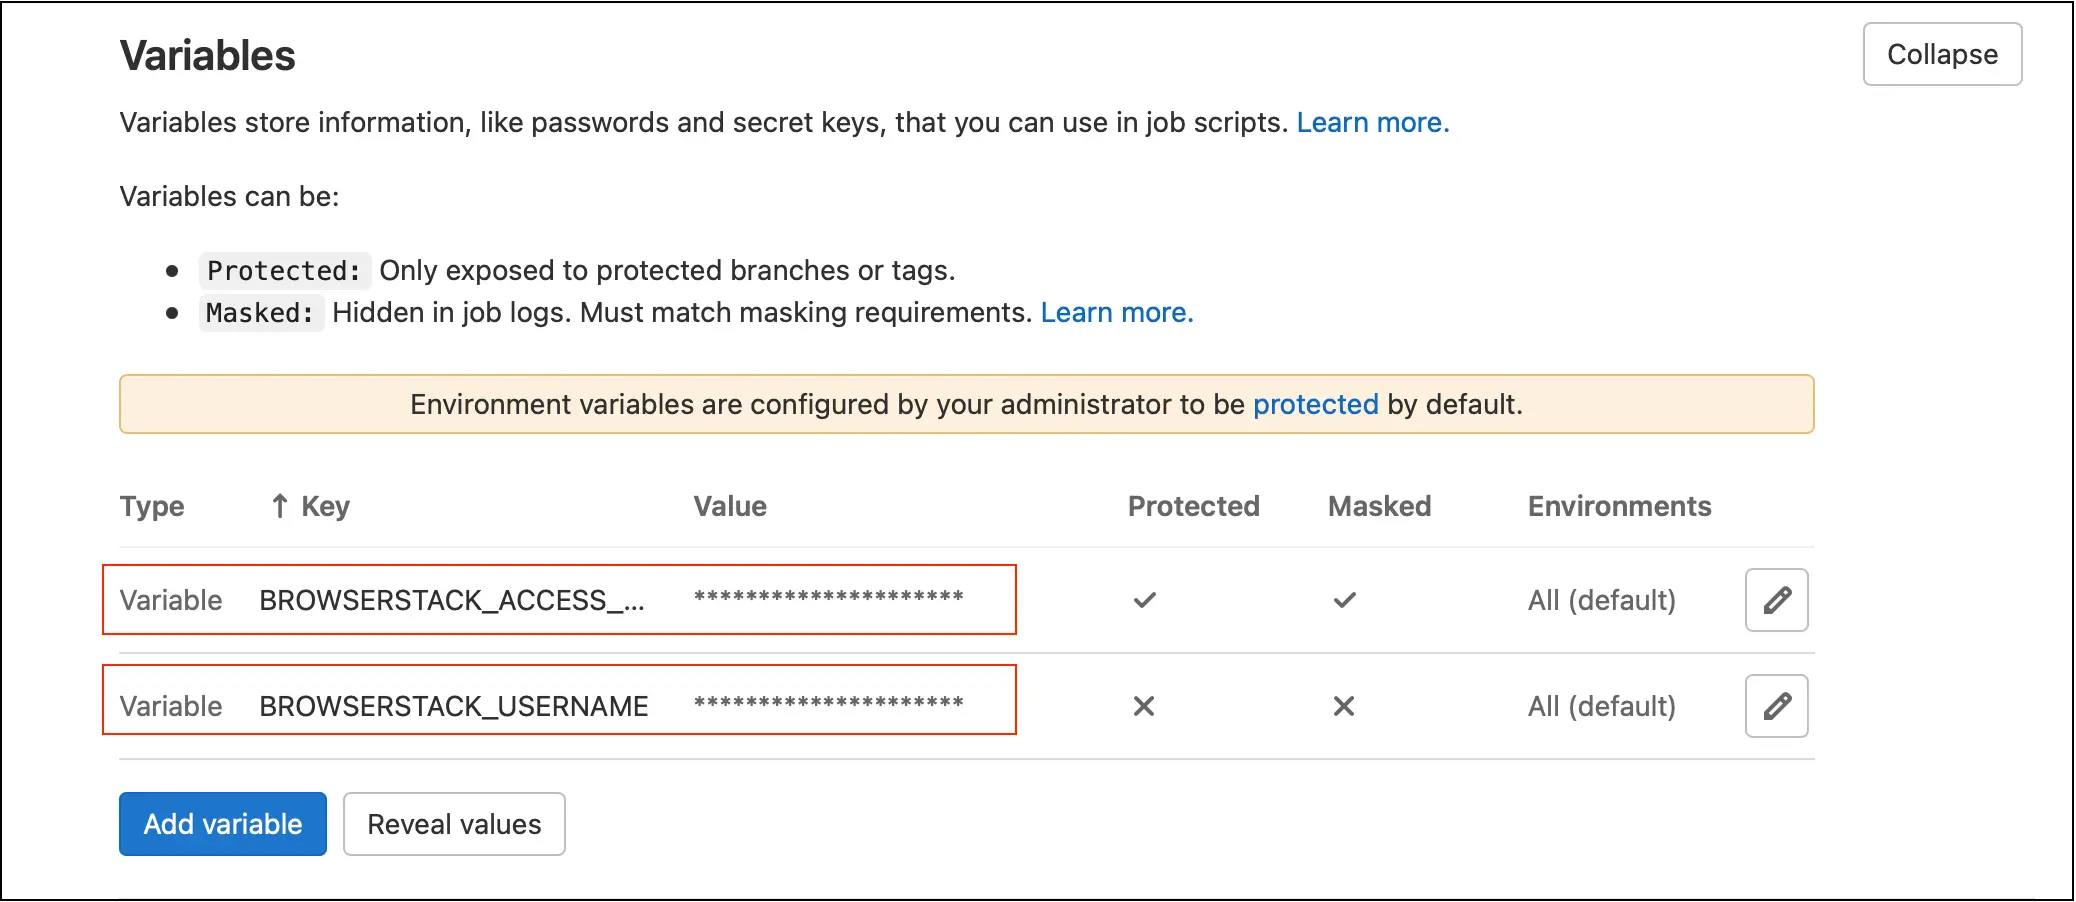
In the Variables row, click Expand to add variables.
Add BrowserStack Access Key as a variable.
a. Click Add Variable.
b. Set the variable name as BROWSERSTACK_ACCESS_KEY.
c. Enter your BrowserStack access key value.
Add BrowserStack username as a variable.
a. Click Add Variable.
b. Set the variable name as BROWSERSTACK_USERNAME.
c. Enter your BrowserStack Username.
You can also pass the BrowserStack Access key and Username as variables in the .gitlab-ci.yml file of each project or repository that you want to test.
variables:BROWSERSTACK_USERNAME:"YOUR_USERNAME"BROWSERSTACK_ACCESS_KEY:"YOUR_ACCESS_KEY"# Set to true when using Local.BROWSERSTACK_LOCAL:"false"# Set when using multiple Local instances.BROWSERSTACK_LOCAL_IDENTIFIER:"IDENTIFIER_NAME"# Set an appropriate build name as a best practice. This helps group tests under the same name for better visibility in the Automate dashboard.BROWSERSTACK_BUILD_NAME:"BUILD_NAME"
Add BrowserStack capabilities
Though your existing test scripts include capabilities, BrowserStack also provides specific capabilities that help determine how tests are run. The following example code snippet sets the OS to windows and the browser to Chrome.
Set capabilities using the following code snippet:
$username=getenv('BROWSERSTACK_USERNAME');$accessKey=getenv('BROWSERSTACK_ACCESS_KEY');$browserstackLocal=getenv('BROWSERSTACK_LOCAL');$browserstackLocalIdentifier=getenv('BROWSERSTACK_LOCAL_IDENTIFIER');$buildName=getenv('BROWSERSTACK_BUILD_NAME');$buildNumber=getenv('BROWSERSTACK_BUILD_NUMBER');$caps=array("os_version"=>"10","resolution"=>"1920x1080","browser"=>"Chrome","browser_version"=>"latest","os"=>"Windows","name"=>"BStack-[Php] Sample Test",// test name"build"=>"".$buildName,// CI/CD job or build name"buildName"=>"".$buildNumber,"browserstack.local"=>"".$browserstackLocal,"browserstack.localIdentifier"=>"".$browserstackLocalIdentifier);$web_driver=RemoteWebDriver::create("https://".$username.":".$accessKey."@hub-cloud.browserstack.com/wd/hub",$caps);
Use Git commands to push the code into GitLab repository.
Update the .gitlab-ci.yml file with run commands
image: maven:latest
variables:BROWSERSTACK_USERNAME:'$BROWSERSTACK_USERNAME'BROWSERSTACK_ACCESS_KEY:'$BROWSERSTACK_ACCESS_KEY'stages:- build
- test
- package
- deploy
test_job:stage: test
tags:- docker
script:- <Run command>
Run the GitLab pipeline
Ensure the build is generated in Automate dashboard and verify your test execution
Integrate test cases for locally hosted websites
If you are testing websites hosted locally as part of your testing or development environment, configure your .gitlab-ci.yml file to use the BrowserStack Local binary and route your tests through the local server. Apart from setting up a Local connection, you must also add the local capability in your test scripts.
If you chose to use BrowserStack Local binary as a way to establish a local connection, in the .gitlab-ci.yml file you must configure the before_script keyword to automatically download and start the binary.
Edit your existing .gitlab-ci.yml file to include the code in the following snippets.
before_script:# Download the browserstack binary file- wget "https://www.browserstack.com/browserstack-local/BrowserStackLocal-linux-x64.zip"
# For OS X systems, use the following command# install zip unzip bash file- apt-get install zip unzip
# Unzip the BrowserStack Local binary file- unzip BrowserStackLocal-linux-x64.zip
# Run the file with your access key- ./BrowserStackLocal --key $BROWSERSTACK_ACCESS_KEY --daemon start
before_script:#Download the browserstack binary file- wget "https://www.browserstack.com/browserstack-local/BrowserStackLocal-linux-x64.zip"
#For OS X systems, use the following command#install zip unzip bash file- apt-get install zip unzip
#Unzip the BrowserStack Local binary file- unzip BrowserStackLocal-linux-x64.zip
#Run the file with your access key- ./BrowserStackLocal --key $BROWSERSTACK_ACCESS_KEY --daemon start
before_script:-'dotnet restore --packages $NUGET_PACKAGES_DIRECTORY'- apt-get update
- apt-get install zip unzip
#Download the browserstack binary file .- wget "https://www.browserstack.com/browserstack-local/BrowserStackLocal-linux-x64.zip"
#For OS X systems, use the following command#install zip unzip bash file- apt-get install zip unzip
#Unzip the BrowserStack Local binary file- unzip BrowserStackLocal-linux-x64.zip
#Run the file with your access key- ./BrowserStackLocal --key $BROWSERSTACK_ACCESS_KEY --daemon start
before_script:- apt-get update
- apt-get install zip unzip
- apt-get install wget
- apt-get update -yqq
- apt-get install -yqq git libpq-dev libcurl4-gnutls-dev libicu-dev libvpx-dev libjpeg-dev libpng-dev libxpm-dev zlib1g-dev libfreetype6-dev libxml2-dev libexpat1-dev libbz2-dev libgmp3-dev libldap2-dev unixodbc-dev libsqlite3-dev libaspell-dev libsnmp-dev libpcre3-dev libtidy-dev libonig-dev libzip-dev
# Install PHP extensions- docker-php-ext-install mbstring pdo_pgsql curl intl gd xml zip bz2 opcache
# Install & enable Xdebug for code coverage reports- pecl install xdebug
- docker-php-ext-enable xdebug
# Install and run Composer- curl -sS https://getcomposer.org/installer | php
- php composer.phar install
# Download the browserstack binary file- wget "https://www.browserstack.com/browserstack-local/BrowserStackLocal-linux-x64.zip"
#For OS X systems, use the following command#install zip unzip bash file- apt-get install zip unzip
# Unzip the BrowserStack Local binary file- unzip BrowserStackLocal-linux-x64.zip
# Run the file with your access key- ./BrowserStackLocal --key $BROWSERSTACK_ACCESS_KEY --daemon start
before_script:- python -V # Print out python version for debugging- pip install virtualenv
- virtualenv venv
- source venv/bin/activate
- pip install selenium
# Download the browserstack binary file- wget "https://www.browserstack.com/browserstack-local/BrowserStackLocal-linux-x64.zip"
#For OS X systems, use the following command# install zip unzip bash file- apt-get install zip unzip
# Unzip the BrowserStack Local binary file- unzip BrowserStackLocal-linux-x64.zip
# Run the file with your access key- ./BrowserStackLocal --key $BROWSERSTACK_ACCESS_KEY --daemon start
before_script:- ruby -v # Print out ruby version for debugging# Uncomment next line if your rails app needs a JS runtime:# - apt-get update -q && apt-get install nodejs -yqq- bundle config set --local path 'vendor' # Install dependencies into ./vendor/ruby- gem install selenium-webdriver
# Download the browserstack binary file- wget "https://www.browserstack.com/browserstack-local/BrowserStackLocal-linux-x64.zip"
#For OS X systems, use the following command# install zip unzip bash file- apt-get install zip unzip
# Unzip the BrowserStack Local binary file- unzip BrowserStackLocal-linux-x64.zip
# Run the file with your access key- ./BrowserStackLocal --key $BROWSERSTACK_ACCESS_KEY --daemon start
before_script:- perl -v # Print out perl version for debugging- cpanm Selenium::Remote::Driver
# Download the browserstack binary file- wget "https://www.browserstack.com/browserstack-local/BrowserStackLocal-linux-x64.zip"
#For OS X systems, use the following command# install zip unzip bash file- apt-get install zip unzip
# Unzip the BrowserStack Local binary file- unzip BrowserStackLocal-linux-x64.zip
# Run the file with your access key- ./BrowserStackLocal --key $BROWSERSTACK_ACCESS_KEY --daemon start
If you are using a Windows image, then add the following lines to download and run the BrowserStack local executable file.
If you prefer to manage the Local connection through your test scripts, you can use the language bindings. This is the recommended method to establish a local testing connection.
Apart from these configurations, you can set other Local options, such as testing behind a proxy, folder testing, or using multiple local instances. Check out Introduction to Local Testing for more information.
Add the local capability to test scripts
Add the local capability to test scripts using the following code snippets. When you set this capability to true, BrowserStack resolves the request via the Local agent running in your network.
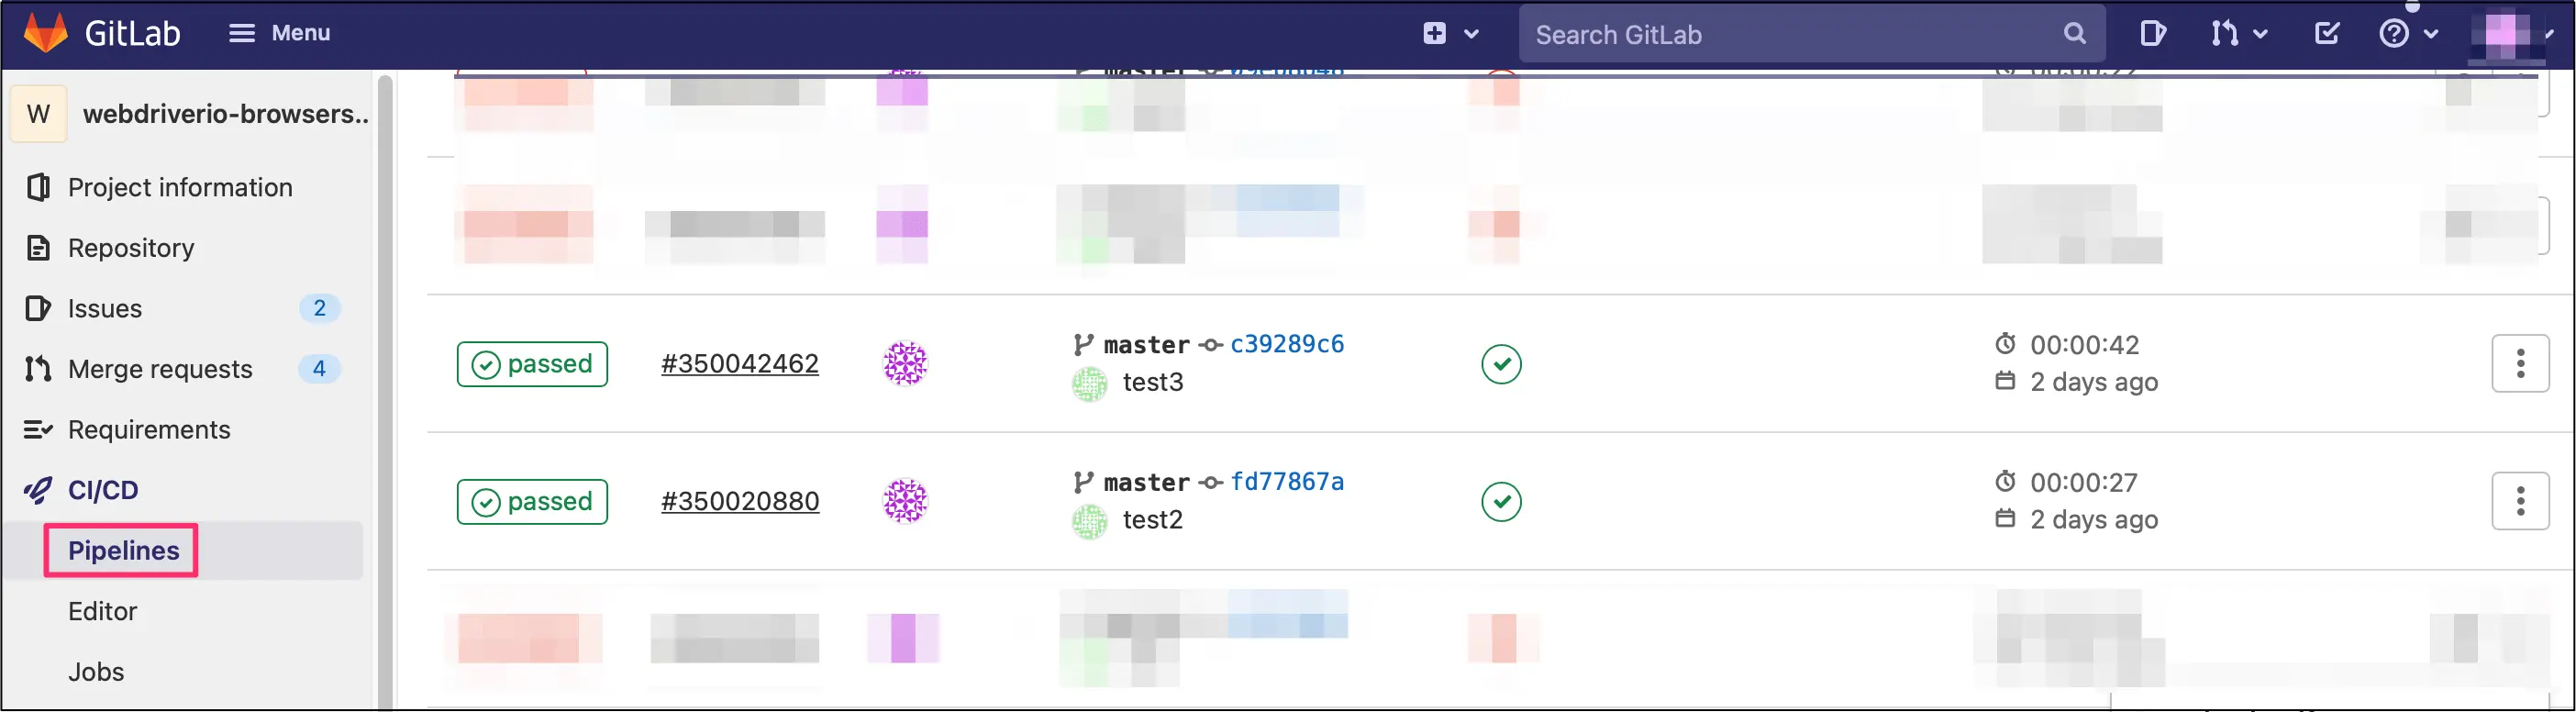
Post these configurations, when you commit any code change, GitLab CI/CD automatically runs the test scripts as configured in the .gitlab-ci.yml file, which includes BrowserStack configurations.
You can verify if the test passed or failed by clicking CI/CD>Pipelines in your repository as shown in the following image.
Also, you will be able to check the triggered build in Automate dashboard as well.
Did this page help you?
We're sorry to hear that. Please share your feedback so we can do better
Contact our Support team for immediate help while we work on improving our docs.
We're continuously improving our docs. We'd love to know what you liked