Integrate BrowserStack Automate with Azure Pipelines
Learn how to integrate your Cypress tests with Azure Pipelines.
Azure Pipelines is a continuous integration and delivery platform that automates the development, testing, and deployment of code projects. It supports a wide range of languages and tools, and provides pre-defined tasks and the ability to create custom tasks and integrations. It is part of the Azure DevOps suite of tools for managing the development lifecycle of applications.
The information in this section applies to using the BrowserStack plugin with Azure Pipelines as part of the Azure DevOps Services (cloud) offering only.
In this guide, you’ll learn how to:
- Install the BrowserStack Azure DevOps Extension
- Configure BrowserStack credentials in Azure Pipelines
- Configure BrowserStack Local in Azure Pipelines (for testing locally hosted websites)
Prerequisites
Before you can start integration, ensure that:
- You’ve hosted your project on any of these source repositories supported by Azure.
- You are a maintainer or owner of the project.
- You are an administrator of your Azure DevOps organization.
- You’ve created a pipeline for the project’s repository. If you are yet to create a pipeline, check out how to create an Azure Pipeline.
- You have access to the BrowserStack account credentials, namely Access Key and Username.
Install the BrowserStack Azure DevOps Extension
The BrowserStack Azure DevOps Extension eases the process of configuring Azure Pipelines to run tests on BrowserStack. To install the extension follow these steps:
- Navigate to the Visual Studio Marketplace, and click Azure DevOps.
- Search for BrowserStack Azure DevOps Extension.
- In the BrowserStack Azure DevOps Extension page, click Get it Free.
- To sign in to your Azure account, open the Sign in page. Once you’ve signed in, click Select an Azure DevOps organization and choose your organization.
- Click Install to add the extension.
BrowserStack’s extension is now installed in your Azure DevOps organization. This installs the BrowserStack Config, BrowserStackResults, and BrowserStackStopLocal tasks to the list of available tasks for you to use them in your pipeline.
Configure BrowserStack in Azure Pipelines
For your Cypress tests to run on BrowserStack, the Azure Pipeline needs additional information, such as BrowserStack credentials.
You can create a pipeline using either a YAML editor or a classic editor. Depending on the editor you used to create the pipeline, refer to the steps in the following tabs to integrate BrowserStack in your pipeline.
-
Navigate to the Azure portal page, and click My Azure DevOps Organizations.
-
On the Azure DevOps Organizations page, click the project where you’ve created a pipeline for your project’s repository from the list of projects that appear.
-
In the bottom-left corner of your project’s page, click Project settings.
-
On the Project details page, click Service connections > Create service connection.
-
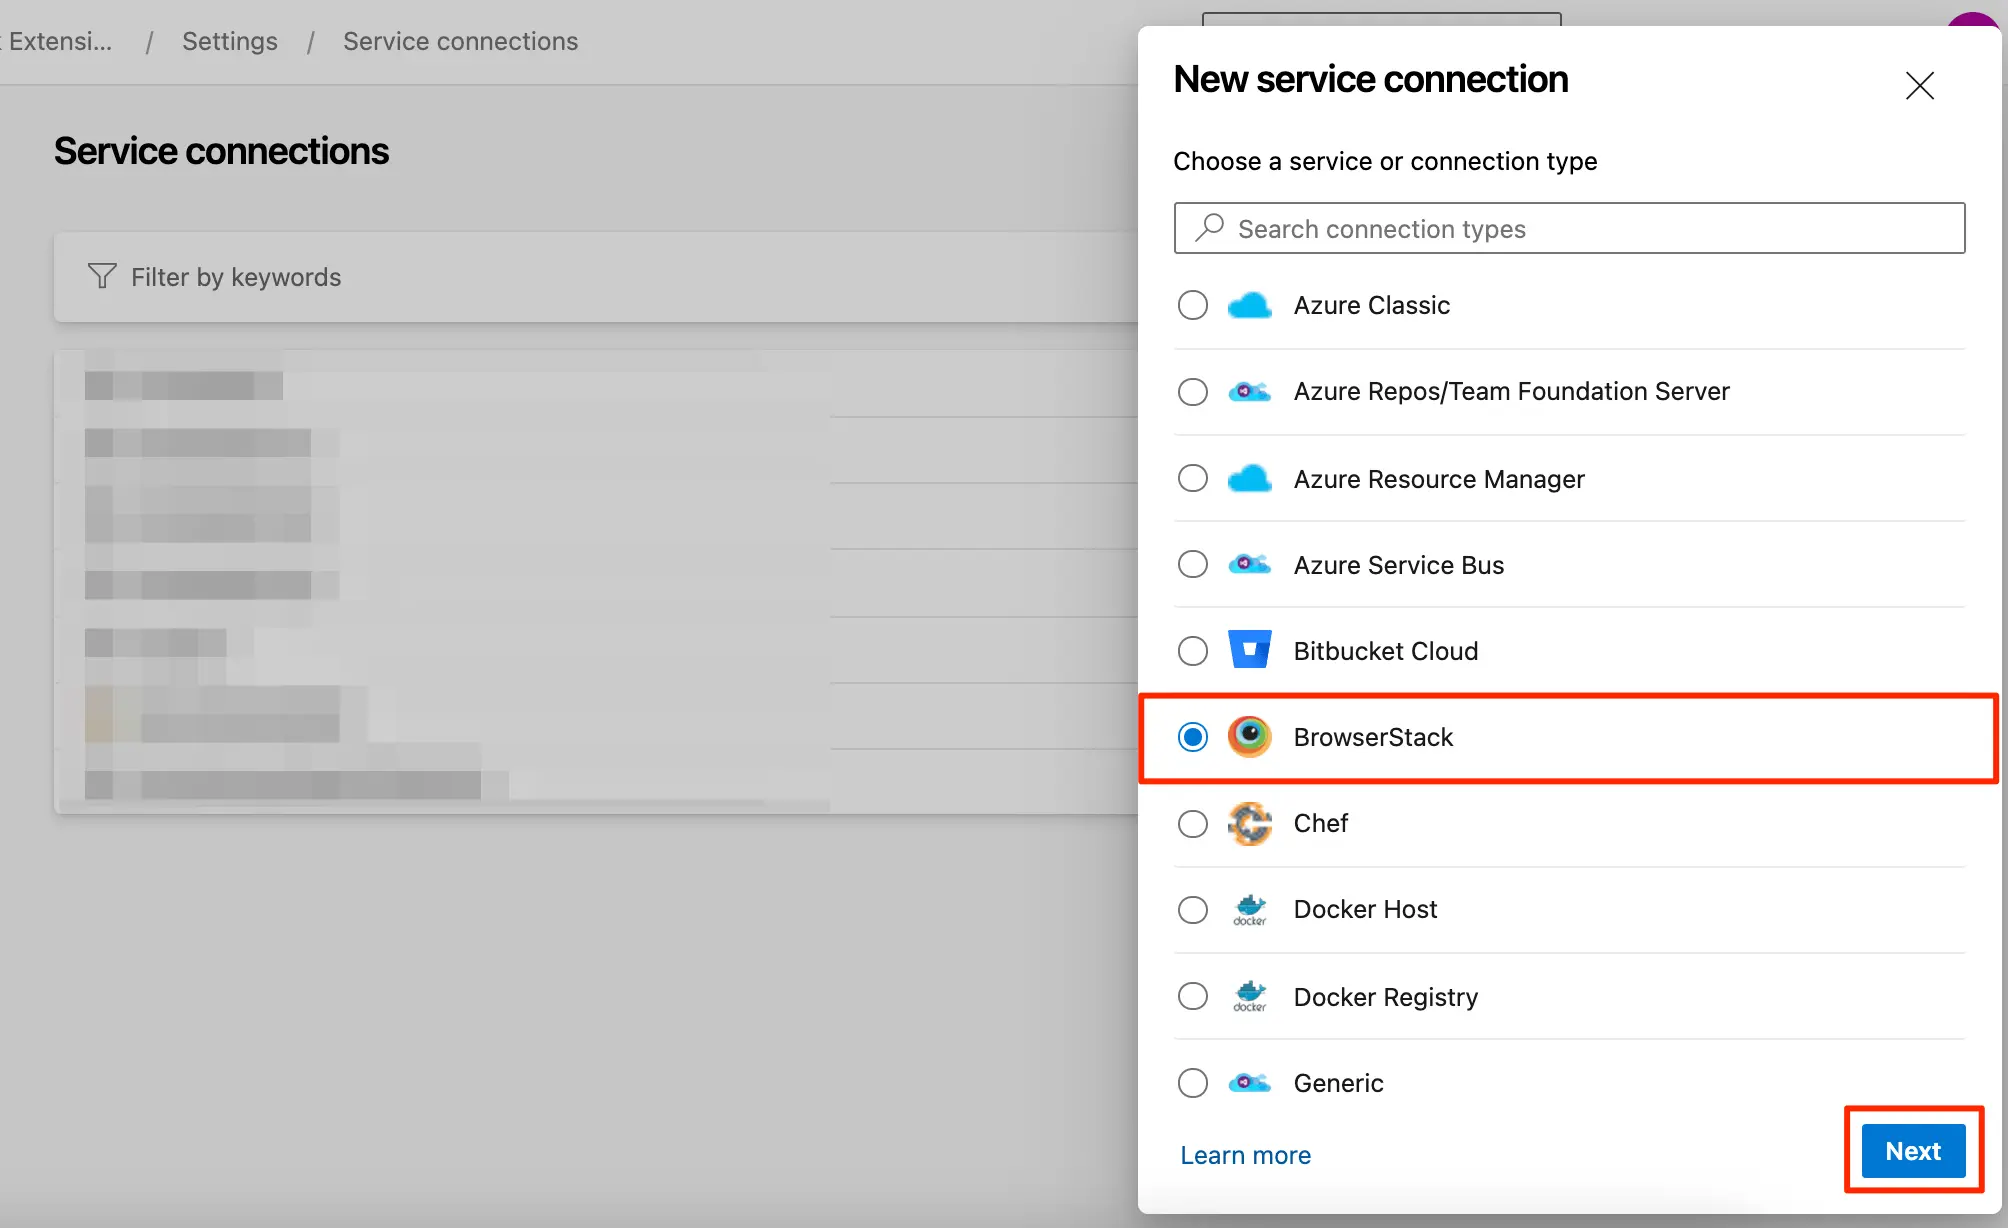
In the New service connection section, select BrowserStack from the list, and click Next.
-
In the New BrowserStack service connection section, enter your BrowserStack Username in the Username field, and then enter Access key in the AccessKey field.
-
Click Verify to verify your BrowserStack credentials.
-
After successful verification, enter a service connection name in the Service connection name field, such as
browserstack-connection, and then click Verify and save. The service connection gets added and you’re redirected to the Service connections page.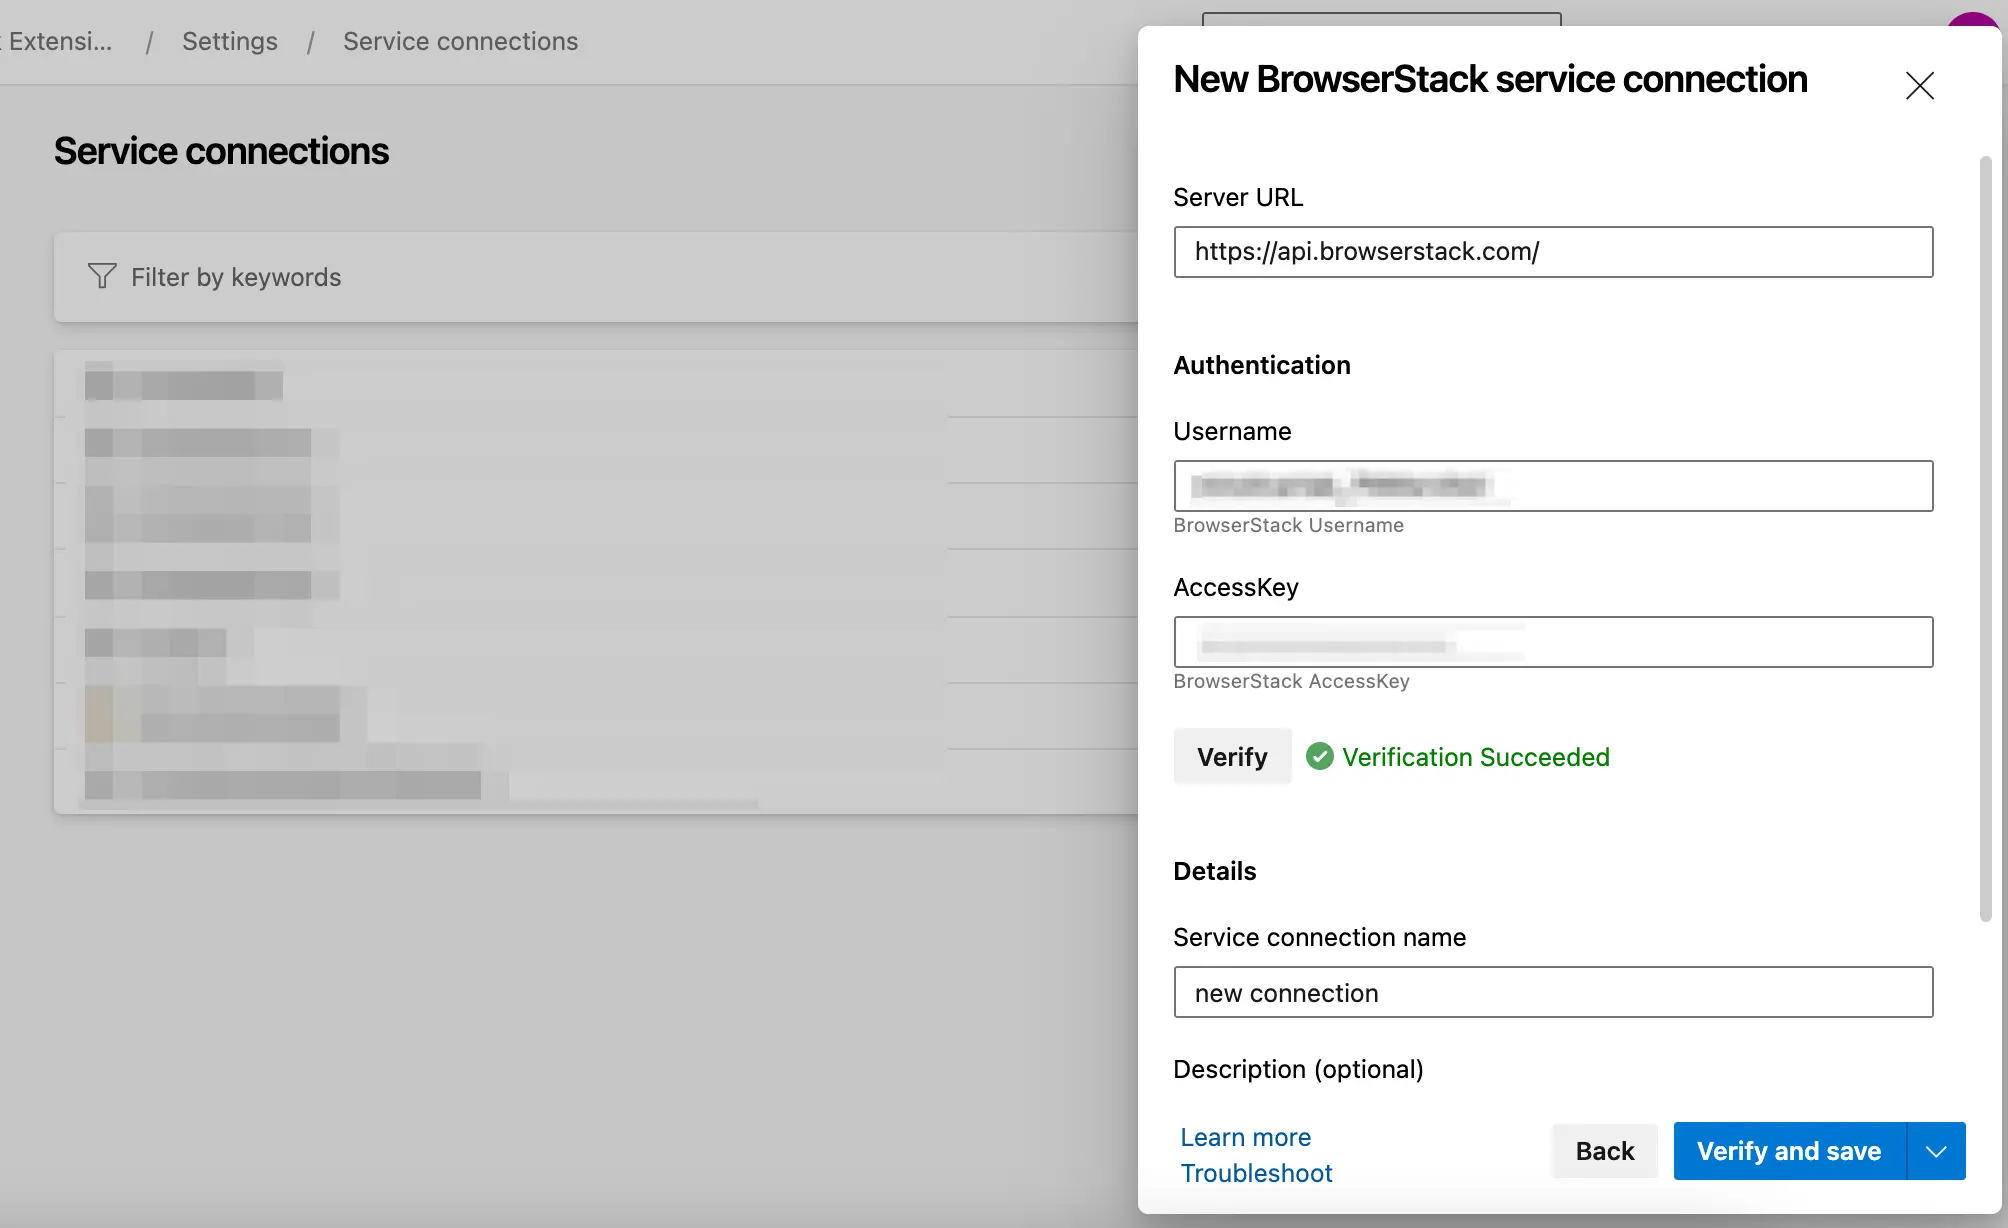
-
Click the
 (Pipelines) icon.
 -
On the Pipelines page, select your pipeline.
-
Click Edit to edit the pipeline.
-
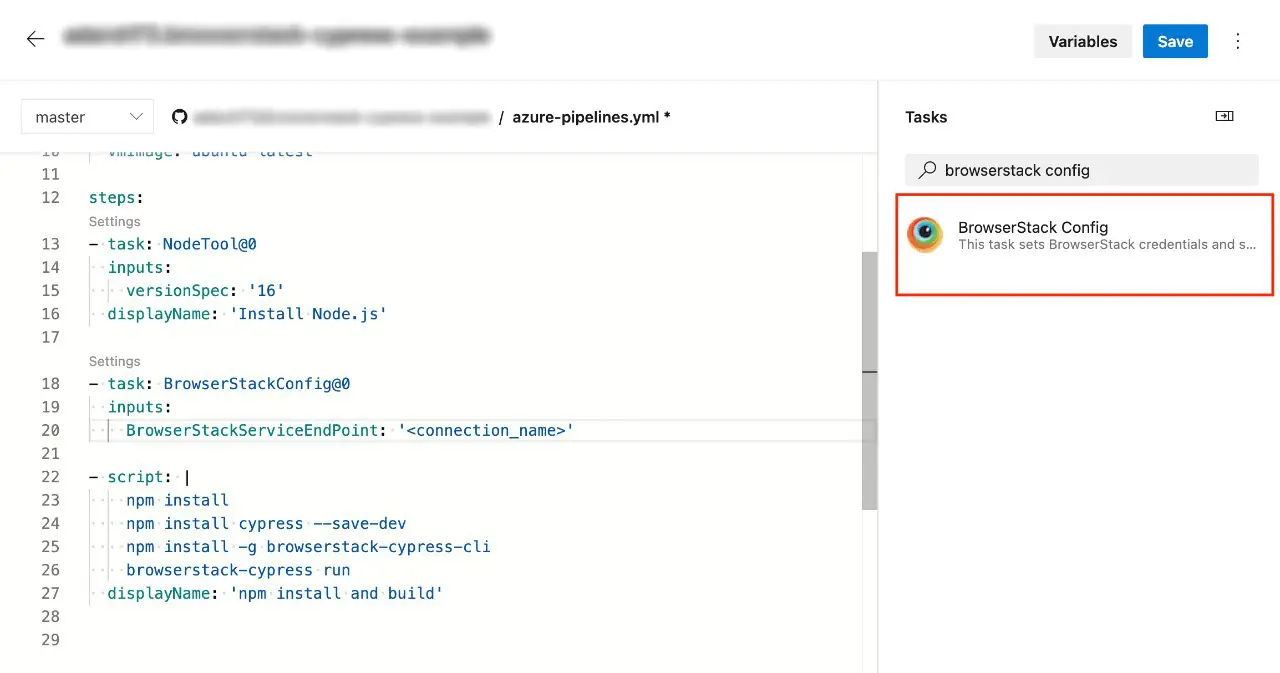
In the pipeline editor, from the Tasks pane, search for the BrowserStack Config task, and then select it.
-
In the BrowserStack Config section, select the connection, created in Step 8, from BrowserStack service end point
-
Click Add.
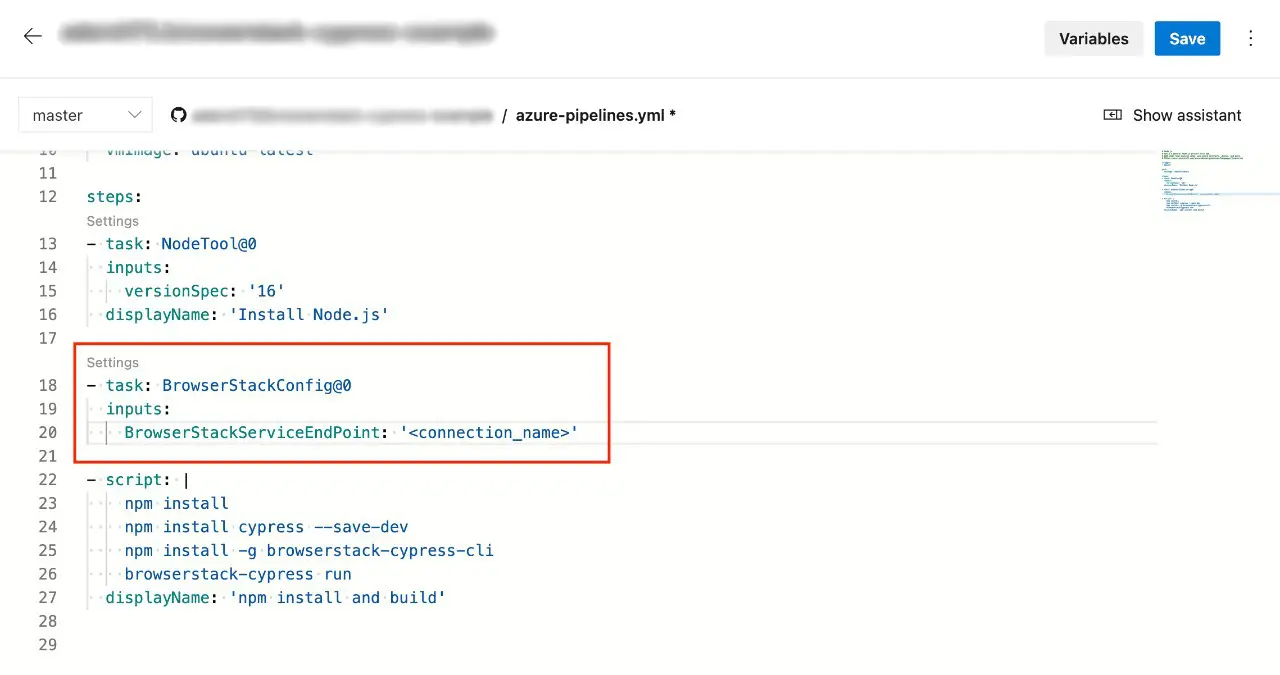
The following image shows the azure-pipelines.yml file with all the BrowserStack tasks configured to run your test on BrowserStack.
-
Navigate to the Azure portal page, and click My Azure DevOps Organizations.
-
On the Azure DevOps Organizations page, select the project from the given list.
-
On the project’s page, click the
 Pipelines option.
 -
On the Pipelines page, click to select your pipeline.
-
On the pipeline’s page, click Edit to edit your pipeline.
-
On the Tasks tab, click the Add (+) icon next to the Agent Job 1 card.
-
On the Add tasks pane, select the BrowserStack Config task from the tasks list, and click Add.
-
Click the BrowserStack configuration setup card and click + New.
-
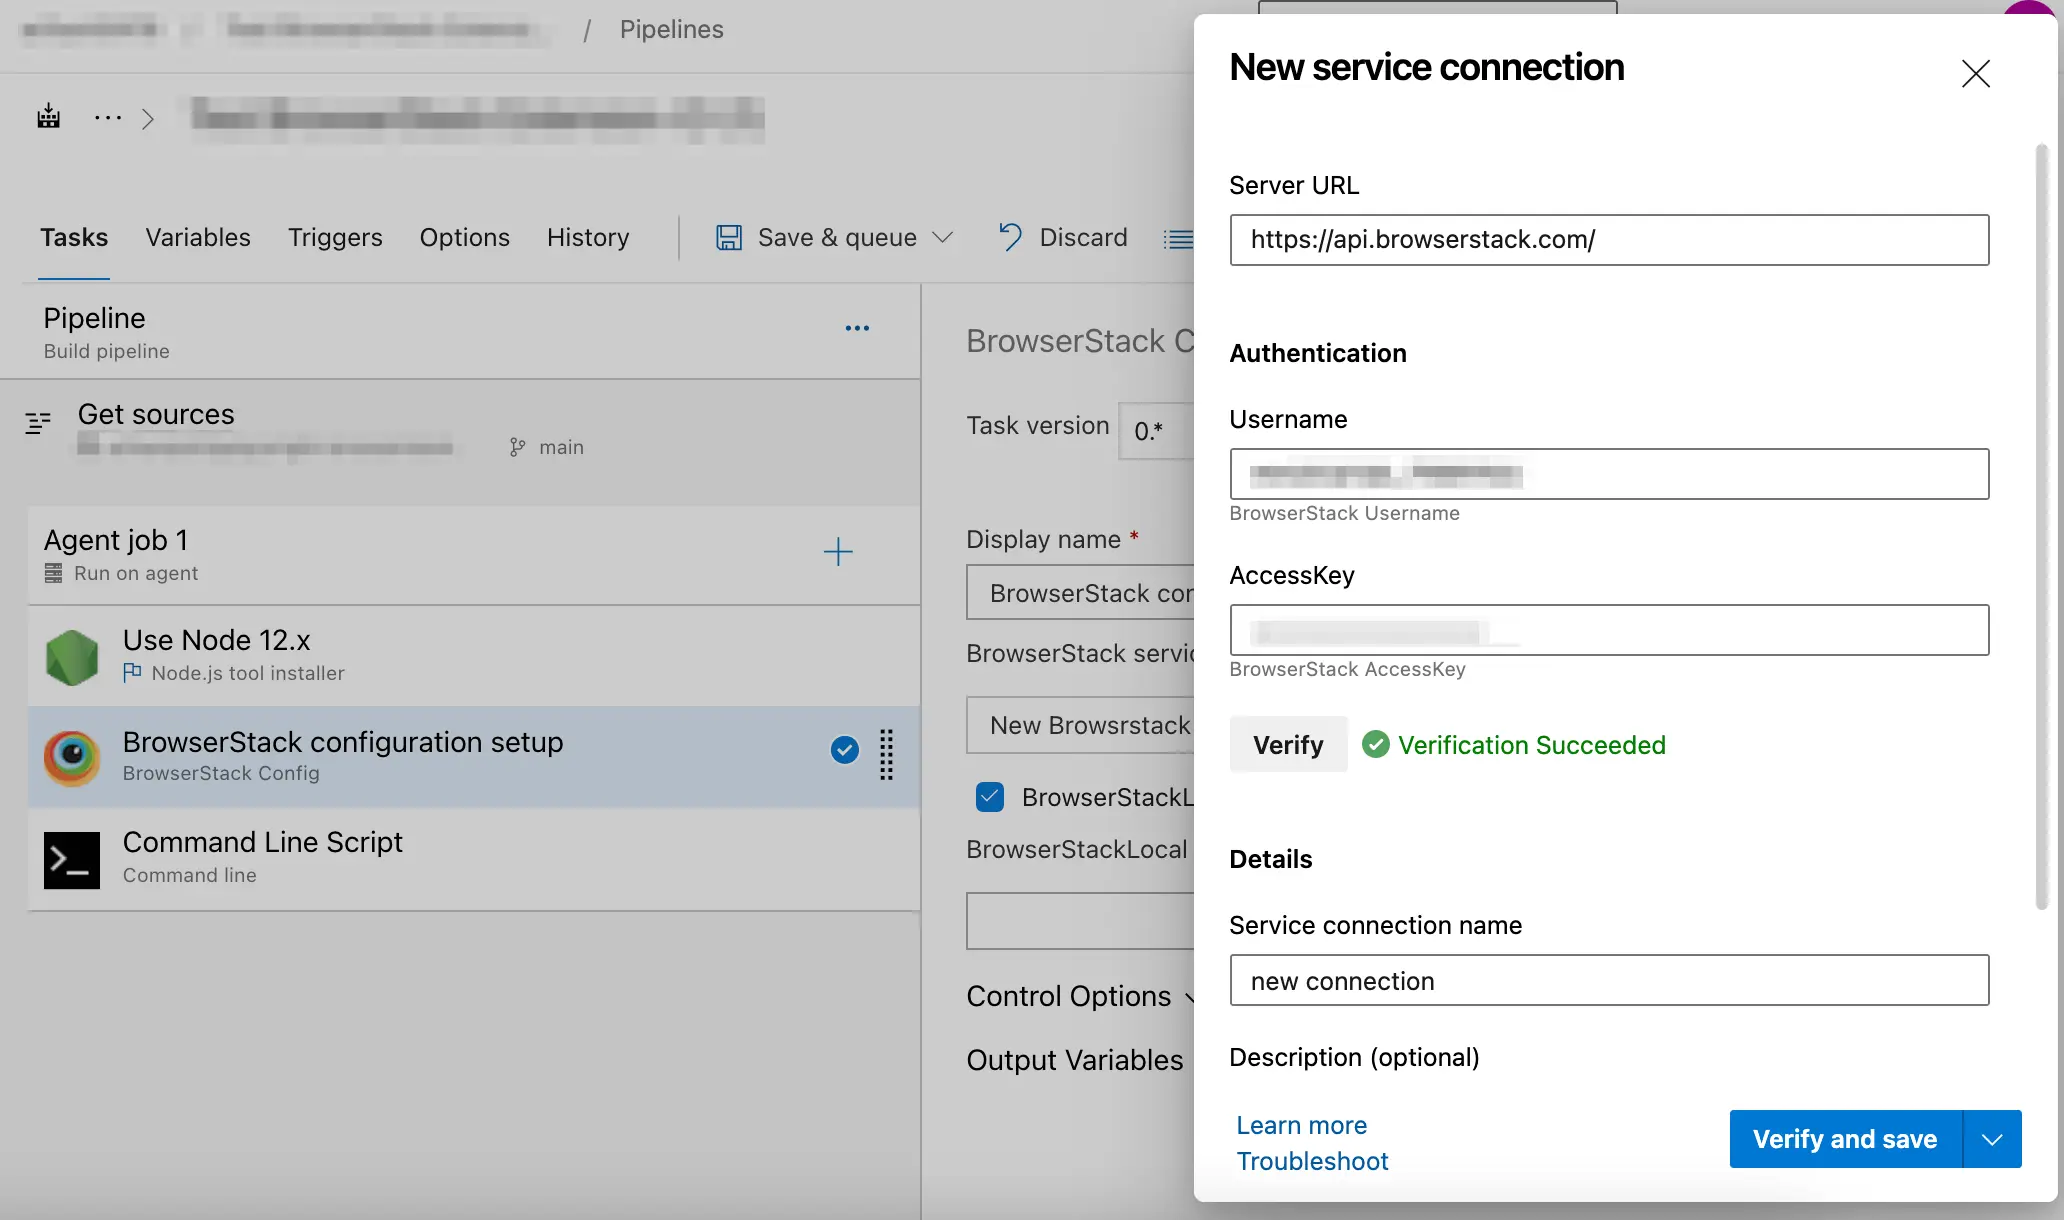
Create a new service connection using the following steps in the New service connection screen:
a. Enter your BrowserStack Username.
b. Enter your BrowserStack Access key.
c. Click Verify.
d. After verification succeeds, enter a name for service connection.
e. Click Verify and save.
-
Click Save & queue and select Save to save the changes.
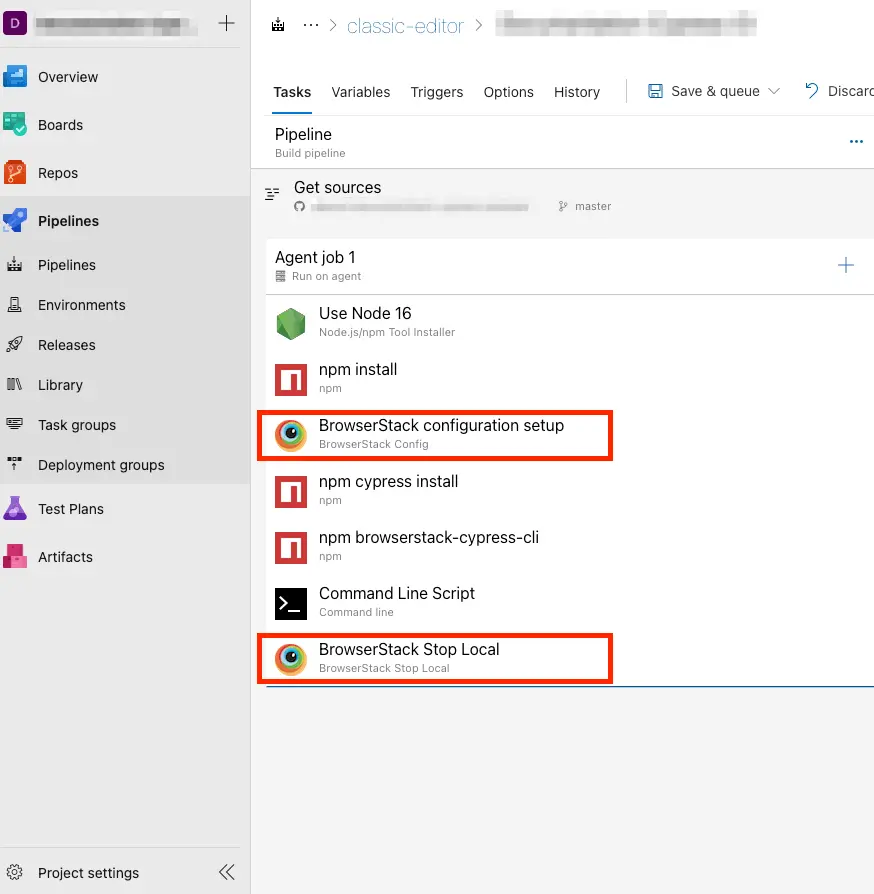
The following image shows all the BrowserStack tasks configured in the pipeline to run your test on BrowserStack.
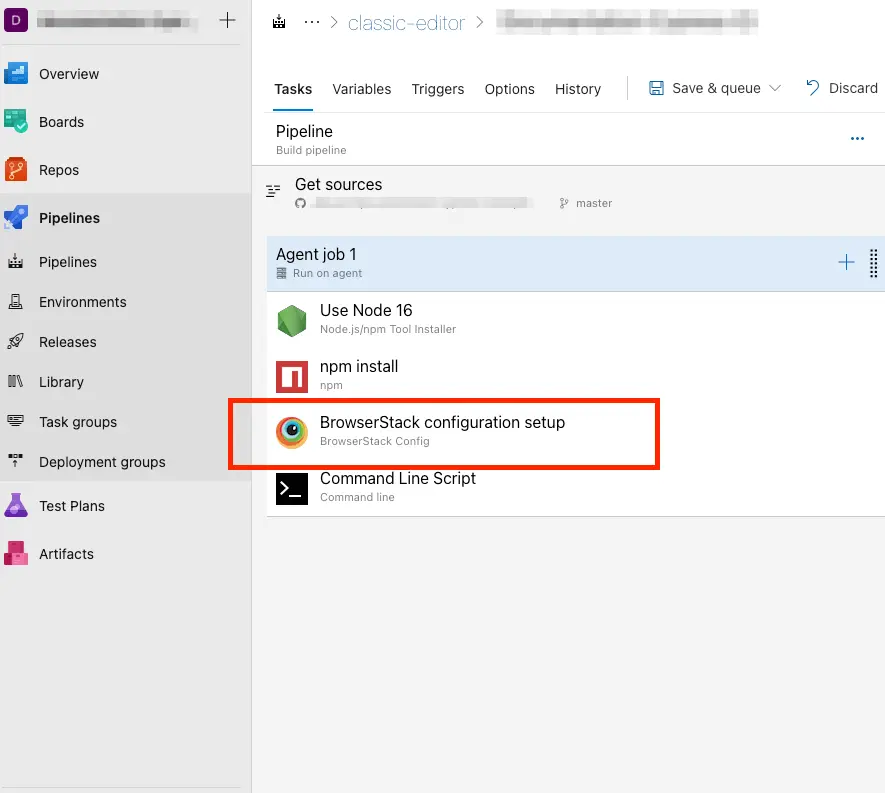
Your build pipeline is successfully configured to connect with the BrowserStack cloud for your project.
If you don’t want to use the BrowserStack extension for authentication, you can configure your BrowserStack username and access key as variables in Azure pipeline, you need to provide the same name as defined in your browserstack.json file.
Configure BrowserStack Local in Azure Pipelines
Use BrowserStack Local Testing to test your web applications hosted on private, development, and internal servers. With the BrowserStack Local Testing binary, you can create a secure, private connection between the BrowserStack and your internal servers.
Configuring BrowserStack Local involves:
Use the BrowserStack Azure DevOps Extension
The BrowserStack Azure DevOps extensiont sets the following environment variables by default:
BROWSERSTACK_USERNAME
BROWSERSTACK_ACCESS_KEY
BROWSERSTACK_LOCAL
BROWSERSTACK_LOCAL_IDENTIFIER
When you create a service connection, the BROWSERSTACK_USERNAME and the BROWSERSTACK_ACCESS_KEY are automatically added as variables during the configuration step.
Additionally, when you add the BrowserStack Config task in your pipeline, the BROWSERSTACK_LOCAL and BROWSERSTACK_LOCAL_IDENTIFIER environment variables are set automatically by the extension.
Ensure to pass the local and localIdentifier capabilities to run tests if required to run tests on your local development servers.
Add task to start BrowserStack Local
When you add the BrowserStack Config task, you have an option to select BrowserStack Local to run your tests on any development or staging environment. Based on the editor you used to create your pipeline, refer to the steps in the following tabs:
-
Navigate to your pipeline and click Edit.
-
In the Tasks pane, select BrowserStack Config from the tasks list.
-
Select the service endpoint you created earlier.
-
Select the BrowserStackLocal checkbox, and then click Add.
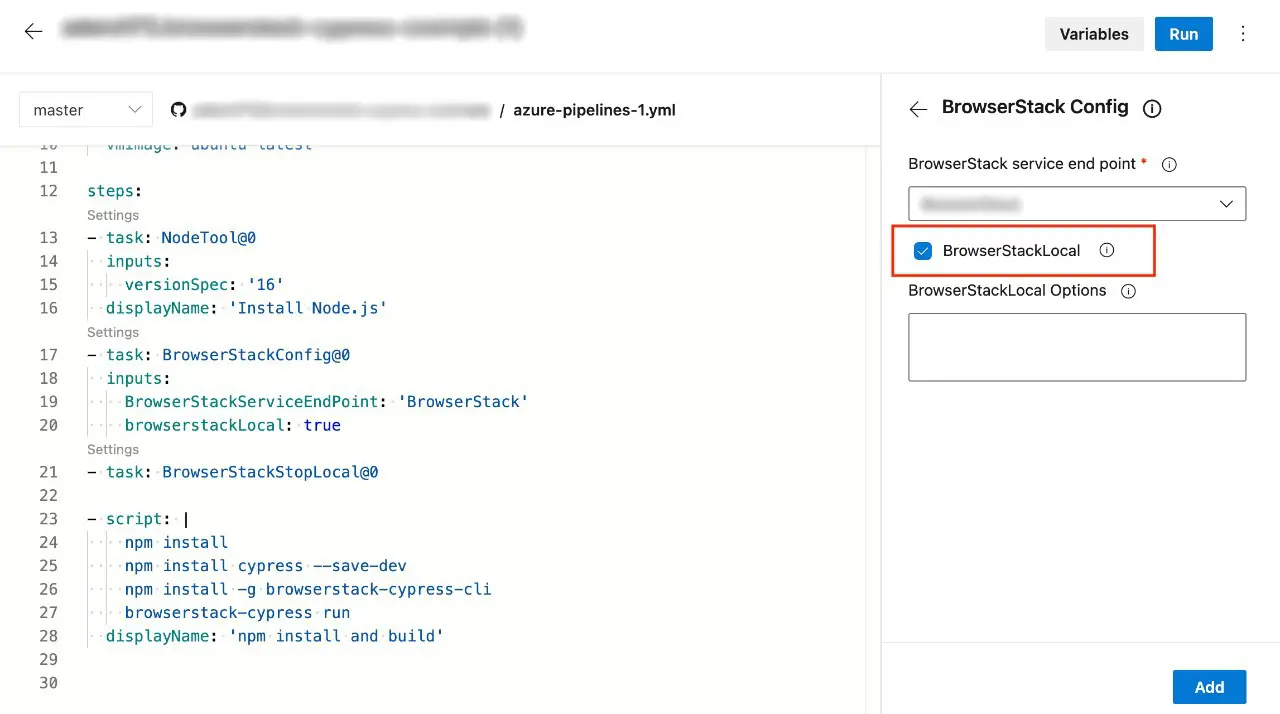
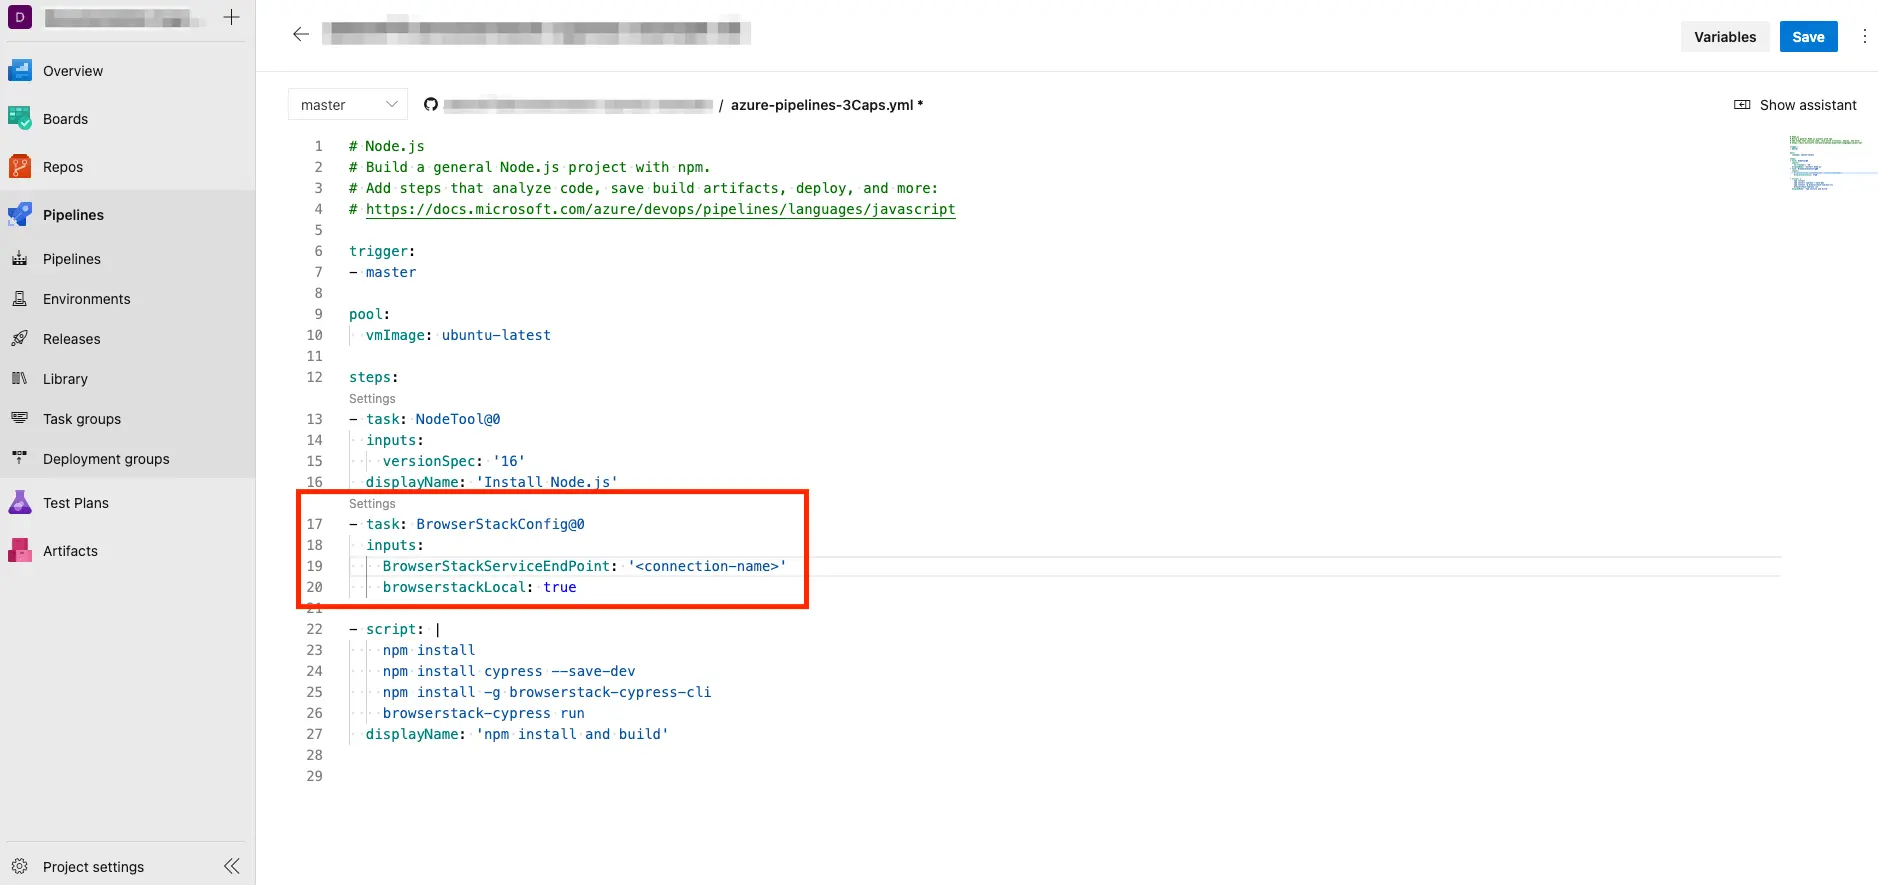
The following image shows the azure-pipelines.yml file with all the BrowserStack tasks and local configured to run your test on BrowserStack.
-
Navigate to your pipeline page and click Edit.
-
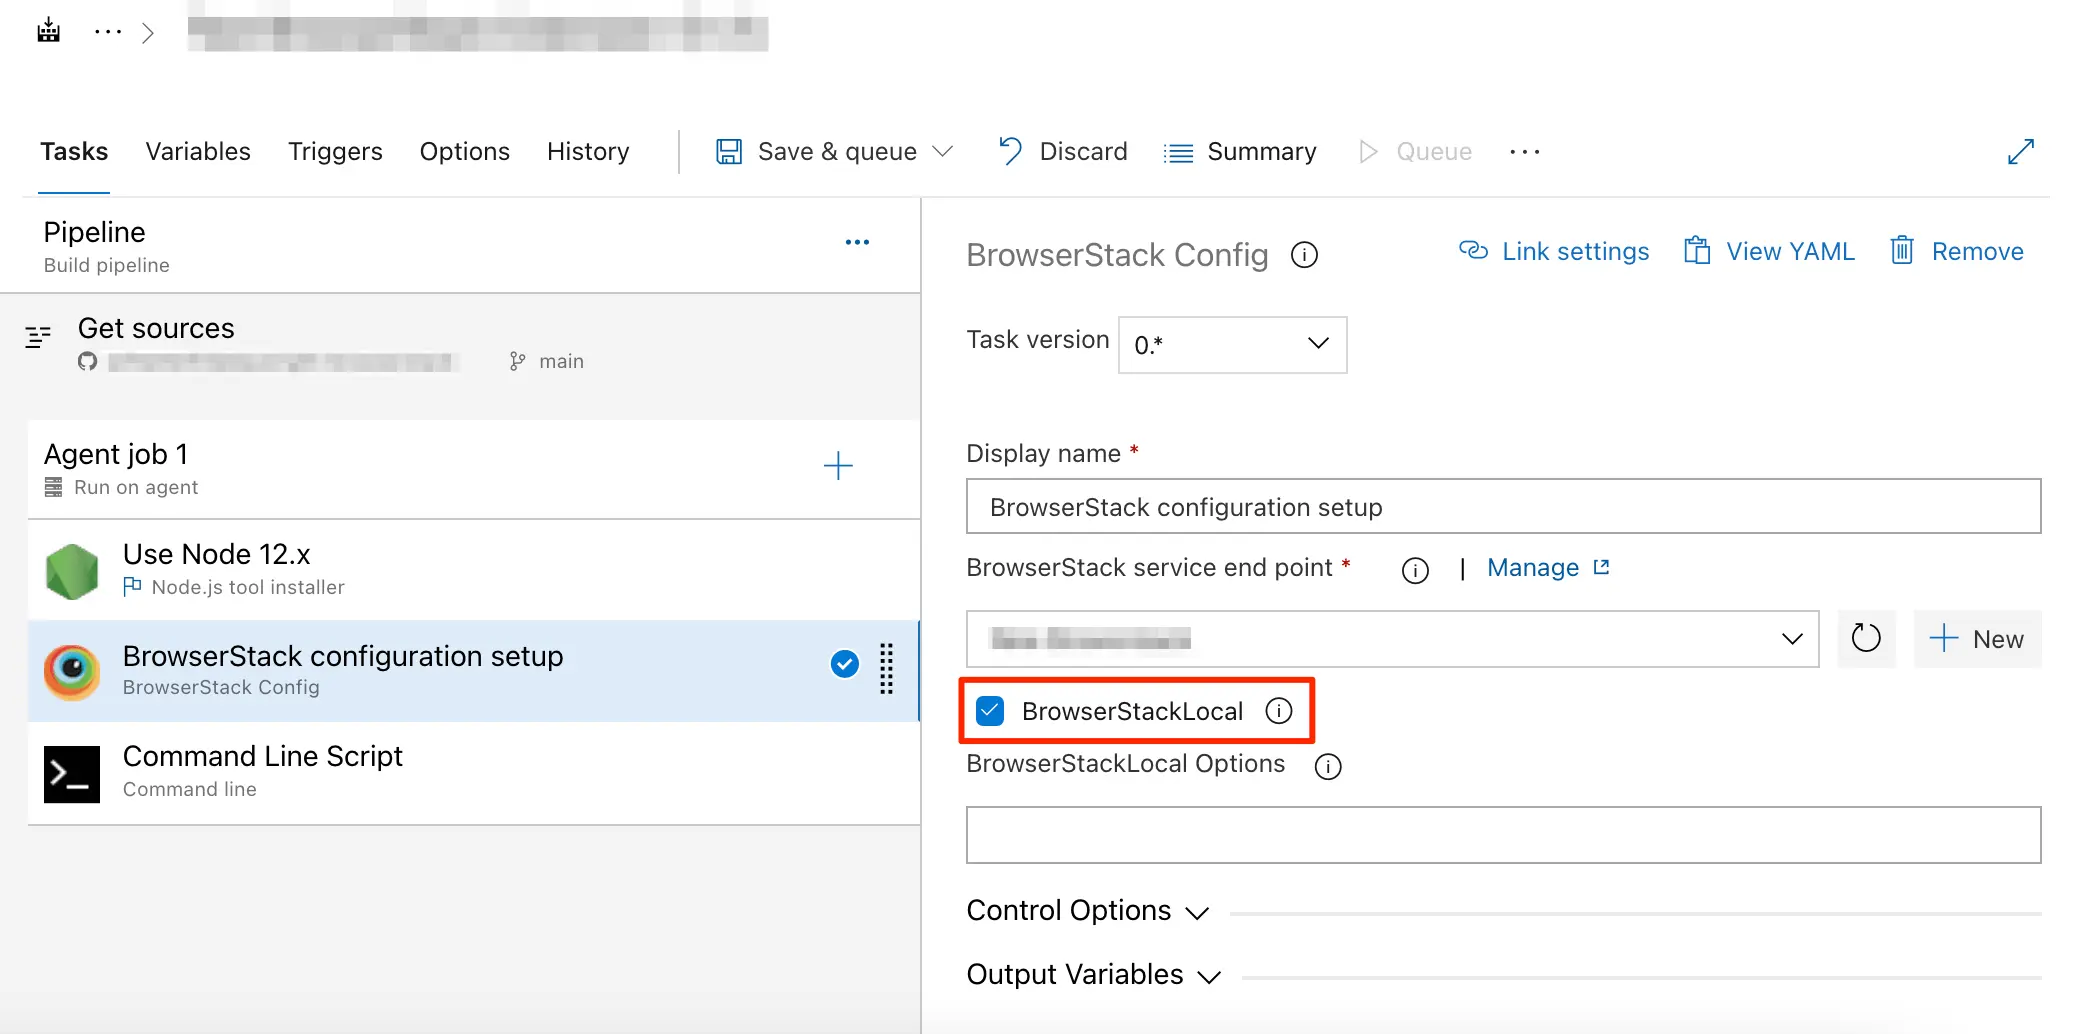
In the Tasks tab, click the BrowserStack configuration setup card.
-
In the BrowserStack Config section, select the BrowserStackLocal checkbox.
-
Click Save & queue and select Save to save the changes.
The following image shows the azure-pipelines.yml file with all the BrowserStack tasks and local configured to run your test on BrowserStack.

Set Additional Configuration options
With the Local binary, you can set additional configurations, such as verbose logging, excluding hosts, and so on. To set any additional configuration options, add the flags in the BrowserStackLocal Options section. For example, to enable verbose logging and to route all traffic via the proxy, set the following flags in the BrowserStackLocal Options field:
{"verbose": true, "forceProxy": true}
Check out Flag for Local Binary to learn about more Local Testing parameters.
Follow Camel case style when adding local modifier options. For example, enter the --force-local option as forcelocal in the BrowserStackLocal Options section.
Add task to stop BrowserStack Local
It is recommended to stop the BrowserStack Local binary after tests have been executed to optimize your resources. Add the BrowserStack Stop Local task in your pipeline using the following steps:
-
Navigate to your pipeline and click Edit.
-
In the Tasks pane, search for BrowserStack Stop Local from the tasks list, and then select it.
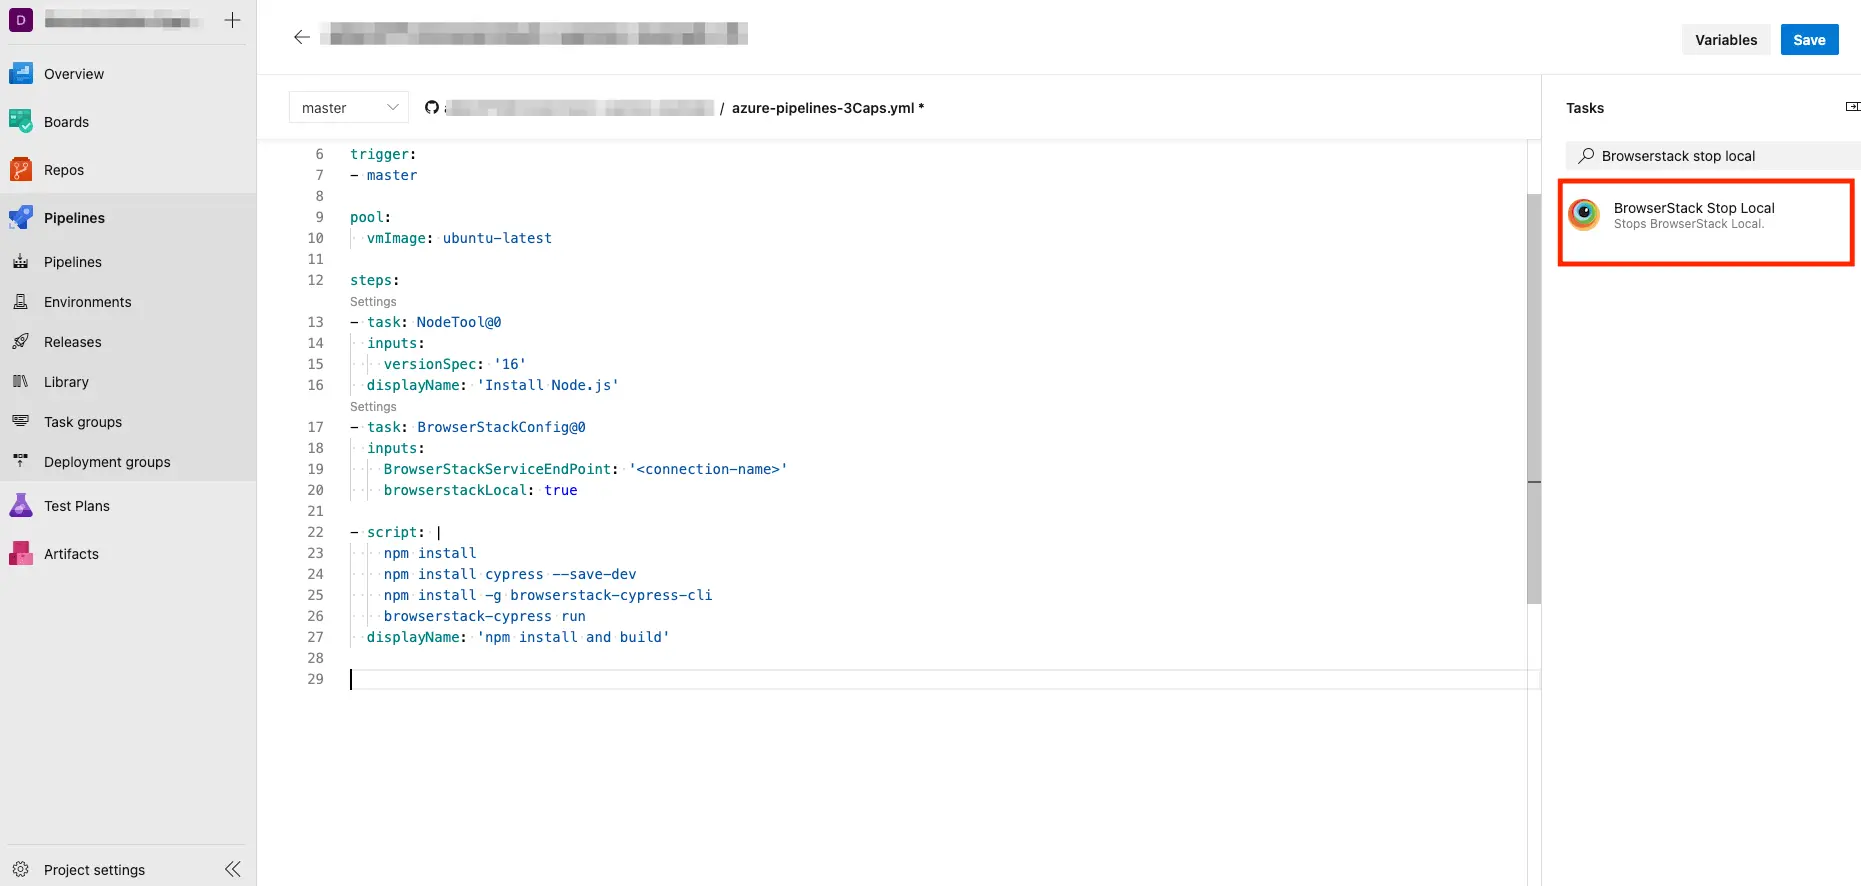
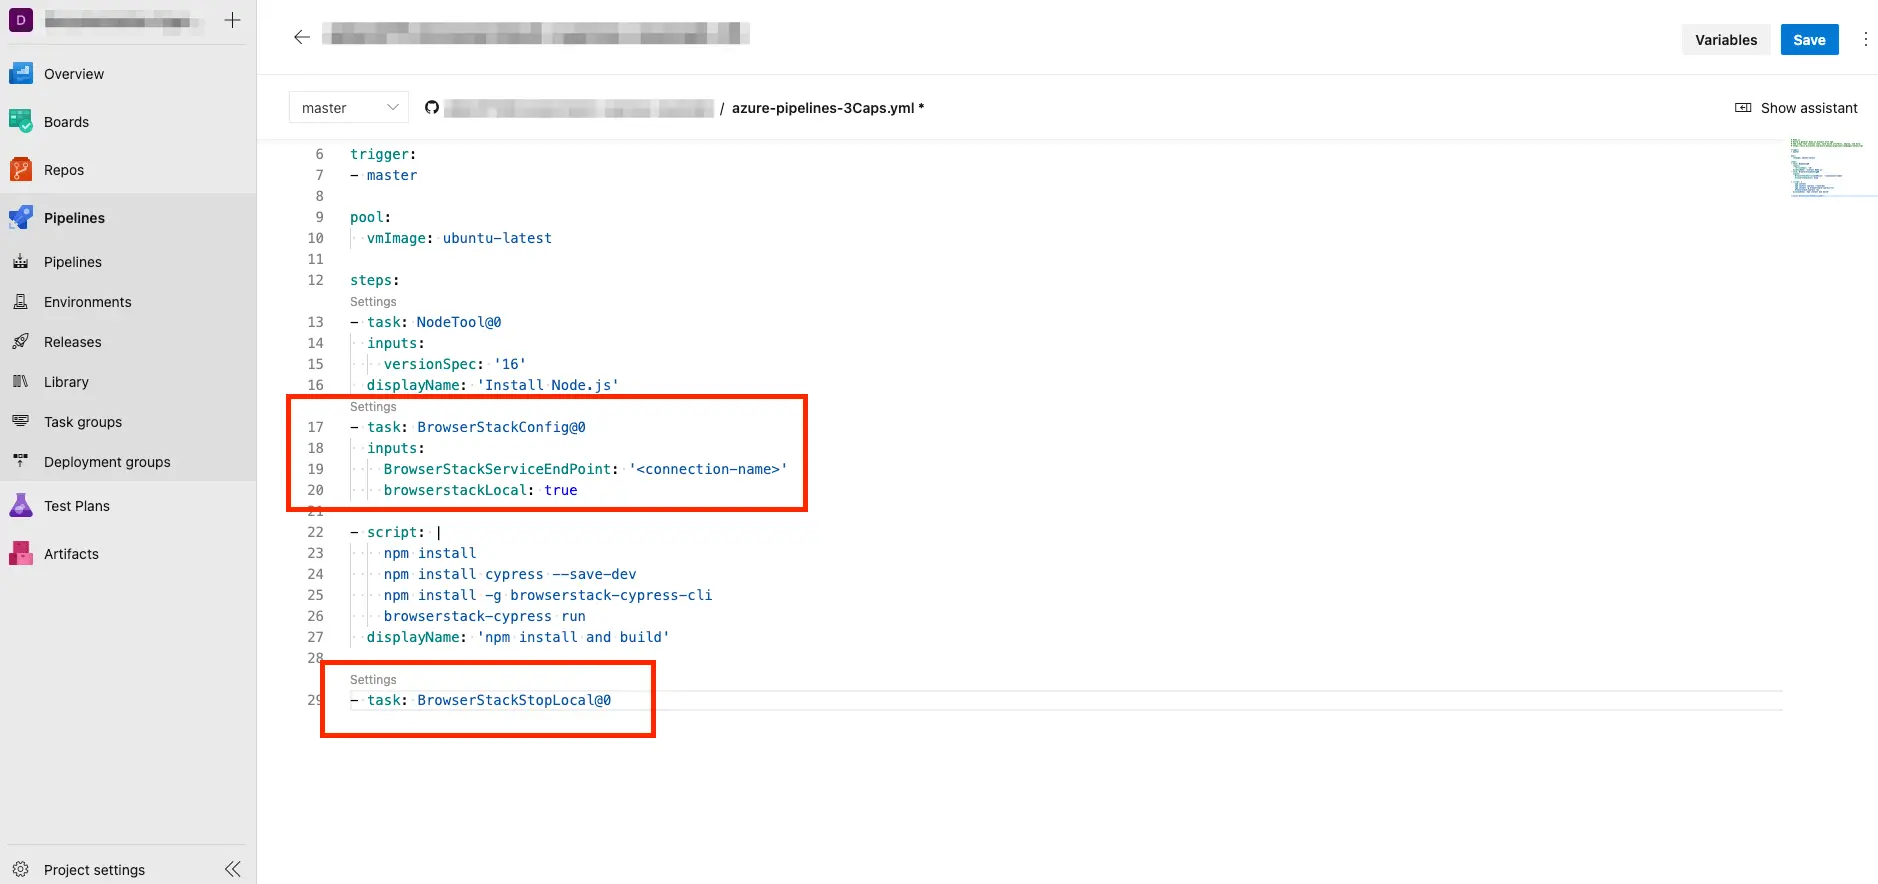
The following image shows the azure-pipelines.yml file with all the BrowserStack tasks configured to run your local test on BrowserStack.
-
Navigate to your pipeline and click Edit.
-
In the Task tab, click + on the Agent job 1 card.
-
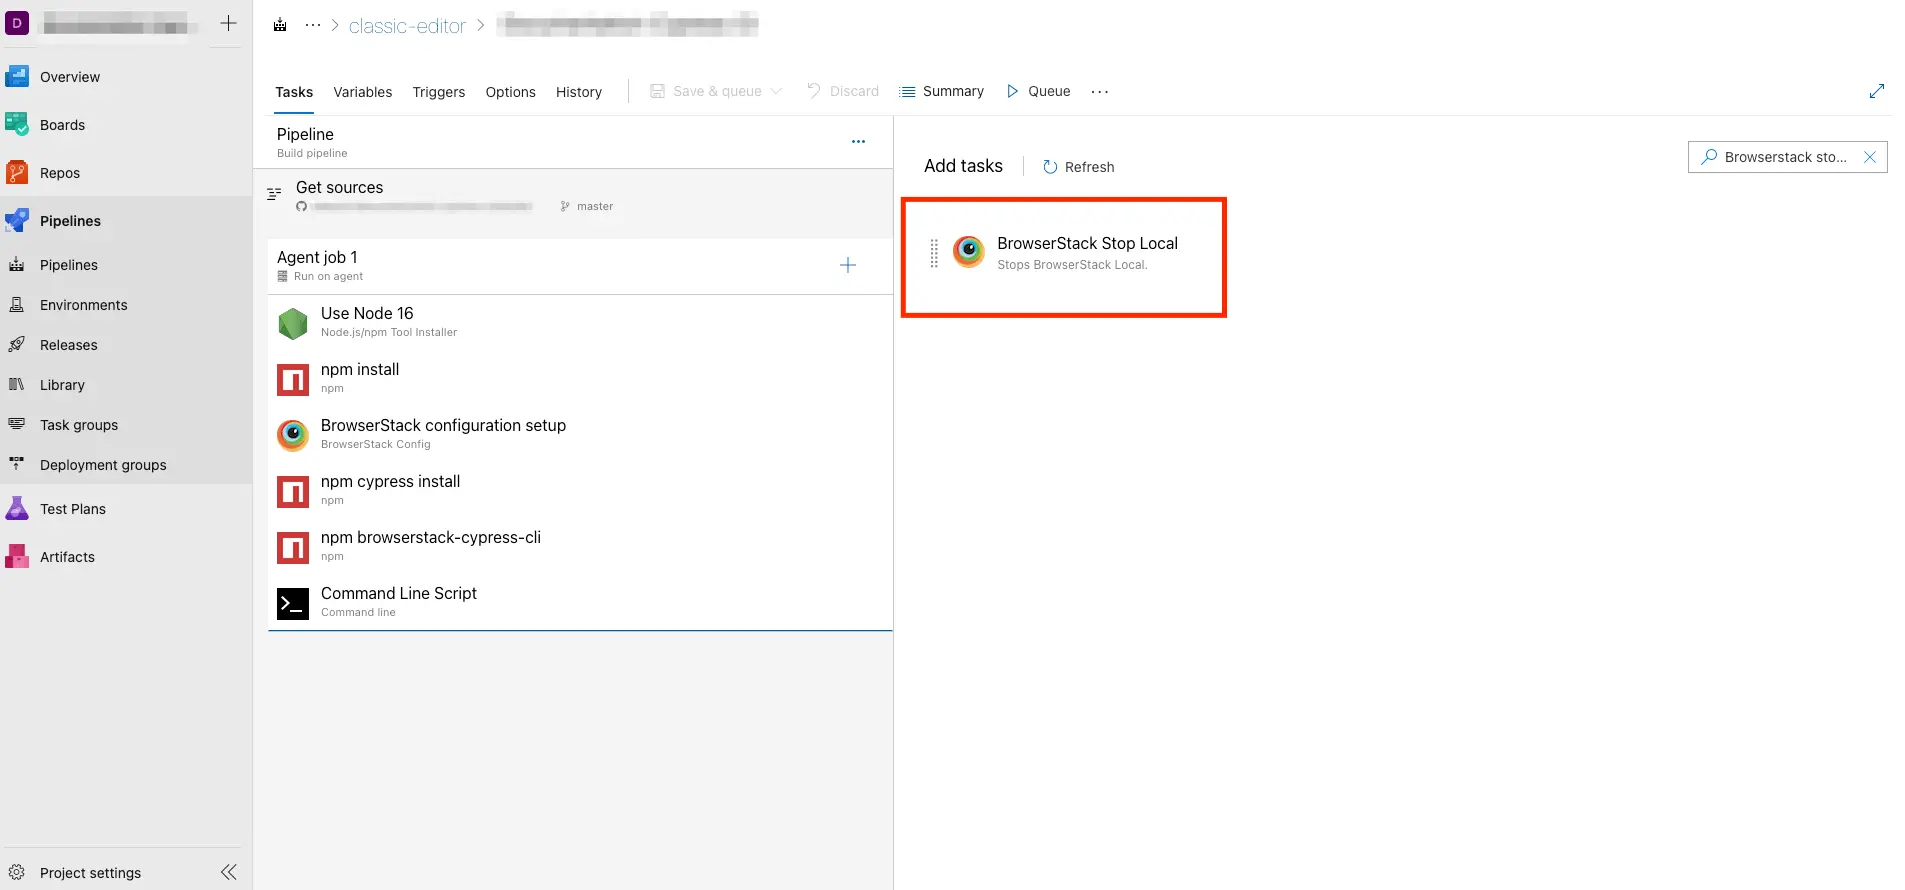
Search for BrowserStack Stop Local and click Add.
-
Click Save & queue and select Save to save the changes.
The following image shows all the BrowserStack tasks configured to run your local test on BrowserStack.
If you do not prefer to use BrowserStack extension for your web applications hosted on private, development, and internal servers(local testing), you can make necessary code changes in the browserstack.json file as described here.
After these configurations, you should be able to run Cypress tests on your locally hosted websites on BrowserStack Automate.
We're sorry to hear that. Please share your feedback so we can do better
Contact our Support team for immediate help while we work on improving our docs.
We're continuously improving our docs. We'd love to know what you liked
- RESOURCES
We're sorry to hear that. Please share your feedback so we can do better
Contact our Support team for immediate help while we work on improving our docs.
We're continuously improving our docs. We'd love to know what you liked
Thank you for your valuable feedback!