Managing Selenium dependencies manually can be time-consuming and error-prone. Selenium Maven Dependency simplifies test automation by letting Maven automatically download and manage the required Selenium libraries, ensuring smooth project setup and execution.
Overview
Understanding Maven: Maven is a Project Object Model (POM)-based build automation and project management tool, primarily used for Java projects, facilitating efficient dependency management.
Maven Integration with Selenium: Maven simplifies the process of managing Selenium dependencies by automatically downloading necessary JAR files from the Maven repository, streamlining project setup.
Advantages of Using Maven:
- Automates the download and management of project dependencies.
- Manages the entire lifecycle of a test project, from build to deployment.
- Simplifies project configuration through the pom.xml file.
This guide shares in detail about Selenium Maven dependencies, advantages, installation, choosing the right version, and more.
What is Maven?
Maven is a POM (project object model) based build automation and project management tool written in Java. However, it is compatible with projects written in C#, Python, Ruby. Developers or Automation testers face a common problem while using versions of JAR’s/dependencies as all of their code is placed in Eclipse, IntelliJ.
As per research by the International Journal of Computer Techniques, 65% of programmers use Eclipse as their IDE and out of them, more than 65% uses Maven as their build tool. Hence, it is the most popular build management tool in the market.
What is Maven Dependency with Selenium?
Maven allows QA to download all the JARs and Dependencies, and manage lifecycle for a Selenium Java project. This makes it easier for the QA to configure dependencies for Selenium Java by automatically downloading the JARs from the Maven repository.
Key Advantages of Maven
Here are the key advantages of Maven:
- One can easily configure dependencies required for building, testing and running code using pom.xml
- Maven downloads the required file automatically from the repository
- Using Maven, one can manage the entire life-cycle of a test project
Facts: Many users get confused by facing multiple dependencies in the Maven Dependency folder without adding them through pom.xml, or manually. This is because some dependencies depend on other dependencies, so if one wants to add them then they add dependent dependencies automatically, this feature is known as a transitive dependency. One can refer to the guide offered by Maven Apache.
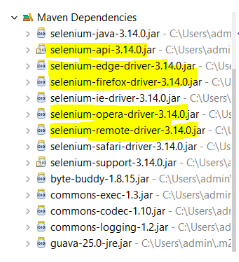
For example, let a Selenium Tester add Selenium 3.14.0 version using Maven pom.xml (as shown below). After adding it, some other JARs also get added like selenium-API, selenium-chrome-driver, selenium-edge-driver.
<dependencies>

  <dependency>

    <groupId>org.seleniumhq.selenium</groupId>

    <artifactId>selenium-java</artifactId>

    <version>3.14.0</version>

  </dependency>

</dependencies>
Just Press Ctrl+ Click on Selenium Dependency. It opens the Selenium pom XML where all the dependent dependencies are mentioned.
After adding this dependency, the Maven Dependency folder is updated with below JARs:
Concept: What is Transitive Dependency?
Whenever a programmer adds dependency which in-turn depends on another dependency, Maven automatically downloads the dependent JARs and adds them in the Maven Dependency folder. This feature is known as transitive dependencies.
Read More: How to create Selenium test cases
Getting Started: How to Install Maven
Follow the below steps to download and set up Maven in the system:
- Make sure that the system has Java installed (atleast JDK 1.7) and JDK & JAVA_HOME environment variables configured
- Go to the Maven Apache Download page and download the binary zip file. Unzip it to the C drive, and the installation is complete
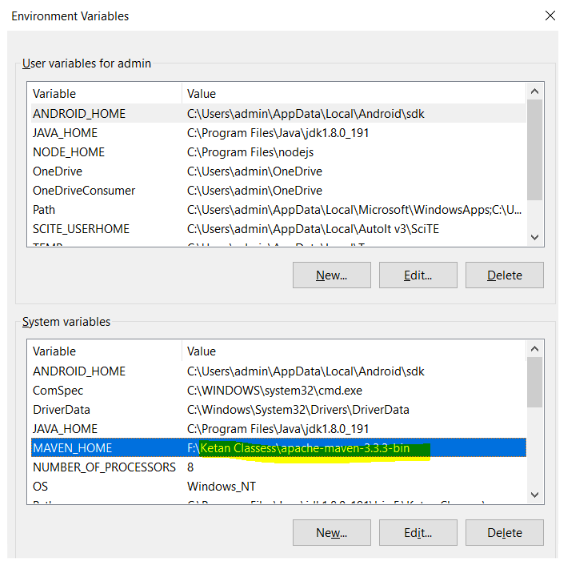
- Configure the MAVEN_HOME path as Environment Variable and give path till the bin folder
- Open the Control panel and go to the System link
- Click on the Advanced system settings tab at the left slide and navigate to the Advanced tab
- Click on the environment variables and add the MAVEN_HOME variable in system variables and give the path of the Maven bin folder and save it.
- To set the Environmental Variable – Go to Start menu > Edit Environment Variables > System Properties > Environment Variables > In the System Variables set the MAVEN_HOME path
To verify whether Maven is installed or not, open the command prompt and run the command ‘mvn –version’ and then hit enter. It should return the Maven version, in this case, Maven 3.6.1.
Creating a Maven project and adding the Selenium Dependency
User can create a Maven project and add the desired dependency using the below steps:
- Open Eclipse or any other IDE and create a Maven project
- Once a Project is created, a predefined folder structure, pom.xml is also created
- Open the pom.xml and navigate to the pom.xml tab at the bottom
- Add different plugins inside the pom.xml as per the below structure
<build>
  <plugins>
    <plugin>
       desired plugins are placed here
    </plugin>
  </plugins>
</build>- While adding the JARs used in our project, search the desired JAR files or dependency in the Maven Repository website
- Take an example and try to add Selenium dependency in the project. Search Selenium 3.0 Maven dependency and navigate to Maven
- Click on the dependency, and it is copied to clipboard
- Go to the pom.xml and paste the Selenium dependency inside the below XML structure
<dependencies>
<dependency>
- Paste the Selenium dependency inside the dependencies tags
<\dependency>
<\dependencies>
- Paste the Selenium dependency inside the dependencies tags
- Similar to this, add all the dependencies and paste inside the dependencies tags
Choosing the Right Selenium Version in Maven
When working on automation testing with Selenium and Maven, picking the right Selenium version matters. It helps avoid errors and keeps your tools compatible. Here’s how to choose the right one and manage it properly.
Step 1: Know your project setup
Before selecting a Selenium version, ensure compatibility with your Java version, browser versions, and testing tools like JUnit or TestNG. For modern projects, Selenium 4 is compatible with Java 11 and works well with recent browsers such as Chrome, Firefox, or Edge.
Step 2: Look at the release notes
Visit the official Selenium GitHub Releases or Maven Central to identify the latest stable release. Review the release notes for new features, bug fixes, and any potential breaking changes.
Step 3: Update your pom.xml
To add the chosen Selenium version, update the pom.xml file with the dependency information in this format:
<dependency>

  <groupId>org.seleniumhq.selenium</groupId>

  <artifactId>selenium-java</artifactId>

  <version>4.20.0</version>

</dependency>
Step 4: Check tool compatibility
Before finalizing the version, verify that it works seamlessly with other tools in your setup, such as CI/CD pipelines, Cucumber, or TestNG. Test them together to ensure there are no compatibility issues that could disrupt your testing process or lead to runtime errors.
Step 5: Match browser drivers
Selenium requires WebDriver executables, such as ChromeDriver or GeckoDriver, that correspond to both your browser version and Selenium version. Mismatched versions can lead to errors or test failures during execution.
Step 6: Test your framework
Once you have updated to the selected Selenium version, run your test suite to check for any issues. This setup will help identify any potential issues, such as failing tests or incompatibilities, before they affect the project.
By following these steps, you can choose the right Selenium version for your Maven project.
Best Practices for using Selenium Maven Dependency
In addition to the steps above, sticking to a few best practices outlined below will help manage your Selenium Maven dependency properly and keep your testing process smooth.
- Stable Versions Only: Stick to stable Selenium versions to avoid issues from beta or alpha releases. This ensures reliability and better long-term compatibility.
- Pin Exact Version in pom.xml: Always specify an exact version in pom.xml to prevent unwanted updates that could break compatibility or introduce errors.
- Check for Dependency Conflicts: Use the mvn dependency:tree command to identify any conflicts in your project dependencies. This step helps prevent issues from mismatched versions.
- Document Version Changes: Keep track of the versions you’re using and note why each version was selected. This helps with future troubleshooting and decision-making.
- Test New Releases in a Separate Branch: Regularly check for new Selenium releases and test them in a separate branch before merging them into your main codebase. This helps avoid disruptions in your workflow.
- Automate Tests in CI: Set up automated tests in your Continuous Integration pipeline. This will catch issues early and ensure your project stays stable as you update Selenium versions.
By applying these best practices, you can manage your Selenium Maven dependency with ease.
Saving or Updating the Maven Project: Check if Dependencies are added
After adding all the dependencies, follow the below steps to download them to the local computer:
- Save the pom.xml and update the Maven Project by right-clicking on the project and updating the Project inside Maven
- After saving the project, all the dependencies start downloading from the Maven Repository to the local compute
- All the dependencies are downloaded to the C drive under the m2 folder
- Before downloading the dependencies, Maven first verifies whether these dependencies are already present in the m2 folder or not. If yes, then Maven directly takes it from there, else Maven downloads it
Using Maven for Dependency Management: Use Cases
There are various applications of Maven as dependency management. Listed below are a few applications:
- If the user wants to change the version of any dependency, that can be done by just updating the version of the dependency in pom.xml and saving the project
- Updating to the new JAR version can be done by simply sharing the pom.xml file to all the team members and the entire module of the project can be quickly built on the new version
- In the case of Eclipse IDE for Selenium development, the user can use an M2Eclipse Maven plug-in. One can create, modify, and execute Maven projects from Eclipse IDE
One can download M2E Eclipse plug-in from Eclipse Marketplace.
How to configure the TestNG XML in pom.xml
Selenium testing using TestNG can be powerful. We can prioritize our test methods by using TestNG. Users can easily integrate the TestNG XML with Maven.
Users can place TestNG.xml in the Maven folder and use the below code snippet inside the configuration tag, that can be placed in the pom.xml to integrate the testing with Maven.
 <Configuration>
    <suiteXmlFiles>
          <suiteXmlFile>TestNG.xml</suiteXmlFile>
   </suiteXmlFiles>
</Configuration>
How to Run the Maven Project?
There are multiple features available in Maven, to run the Selenium Java code. They are as follows:
- Maven Clean: Clean the Target folder to start the fresh run so that previous output files can be deleted before running a fresh run.
- Maven Build: Build command builds the code and verifies whether all the test cases are running fine. If the code is flawless, then Build is successful else the build fails. For a build to be successful, code should be flawless. In case of a Build Pass or a Build Fail, this kind of report is displayed in the command prompt
- Maven Install: Maven install command is the combination of both Maven clean, and Maven build command. First, it cleans the target folder files from the previous run and then builds a fresh one.
- Maven Test: This command is used to execute the tests against the compiled source code with the help of an appropriate unit testing framework.
- Maven Compile: It is used to compile the source code of the Maven project.
- Maven Package: It will pack the executed code in a different format like Jar.
These commands, along with running methods, can also be executed without using an IDE like Eclipse, IntelliJ. Here are the steps to run the maven project from Command prompt:
- Go the path where the pom.xml is placed
- Type the mvn clean for Maven clean, mvn build for Maven build and mvn install for Maven install
- User can get the console output on the command prompt screen only
Conclusion
Maven simplifies dependency management in Selenium projects by automatically handling libraries, maintaining consistent builds, and streamlining integration with CI/CD pipelines. By defining all required dependencies in the pom.xml file, testers can ensure reproducibility and scalability across environments, making it easier to manage large and evolving automation suites.
To further enhance your Selenium testing experience, consider using BrowserStack Automate — a cloud-based platform that allows you to run your Selenium tests at scale across 3500+ real browsers and devices. With zero setup and parallel execution capabilities, BrowserStack Automate accelerates your test cycles and ensures cross-browser compatibility effortlessly.
Frequently Asked Question
1. What is a Selenium Maven dependency?
A Selenium Maven dependency is a tool that helps manage and include Selenium in your Java project. It allows you to use Selenium’s features for automating web browser tasks without manually downloading and setting it up.
2. Why should I use Maven for Selenium?
Using Maven simplifies managing dependencies. It automatically handles updates, versions, and dependencies for your Selenium setup.
3. What happens if I don’t manage dependencies properly?
Improper dependency management can lead to version conflicts or errors during tests. It can also slow down your project and make it difficult to update or fix issues in the future.
4. How do I handle Selenium dependency updates?
To stay updated with the latest Selenium version, check the official release notes and update your pom.xml with the new version. Additionally, always test the new version in a separate branch before applying it to your main project.
5. Can I use different versions of Selenium for different projects?
Yes, you can use different versions of Selenium for different projects by specifying the version in each project’s pom.xml file.


