TestNG is a popular testing framework for Java that allows users to perform automated testing for web applications. Selenium, on the other hand, is a popular automation testing tool that enables users to automate web browsers. Combining these two tools allows developers to create powerful automated tests for their web applications.
Overview
Goal of TestNG in Selenium
Enable structured, efficient, and scalable test automation by combining Selenium’s browser automation with TestNG’s advanced testing features.
Core Benefits of Using TestNG with Selenium
- Organize and group test cases for easier management
- Execute tests in parallel for faster results
- Enable parameterization for data-driven testing
- Generate detailed HTML reports for better insights
- Support cross-browser testing and CI/CD pipelines
Key Features and Achievements
- Annotations for Structured Execution: @BeforeSuite, @AfterSuite, @BeforeMethod, @AfterMethod, etc.
- Parallel & Cross-Browser Support: Run tests across multiple browsers and platforms simultaneously
- Data-Driven Testing: Execute tests with different input sets using @DataProvider
- Advanced Reporting: Auto-generated HTML reports with execution details and logs
- Seamless Integration: Works smoothly with Selenium Grid, CI/CD tools, and BrowserStack infrastructure
Business Impact of TestNG in Selenium
- Faster release cycles with parallel execution
- Higher test coverage across browsers and environments
- Improved product quality with structured and validated tests
- Reduced manual effort through reusable test components
- Increased team confidence with reliable, repeatable automation
This guide provides a step-by-step tutorial on using TestNG in Selenium. Automating TestNG in Selenium involves setting up the environment, creating test cases, configuring TestNG, and integrating Selenium with TestNG.
What is TestNG Framework?
TestNG is an open-source test automation framework for Java. It is developed on the same lines as JUnit and NUnit. A few advanced and useful features provided by TestNG make it a more robust framework than its peers. The NG in TestNG stands for ‘Next Generation.’
Created by Cedric Beust, it is used more frequently by developers and testers in test case creation owing to its ease of using multiple annotations, grouping, dependence, prioritization, and parametrization features.
What is TestNG in Selenium?
TestNG provides advanced features such as annotations, data-driven testing, test sequencing, and parallel testing to help you organize and execute your Selenium tests more efficiently and effectively.
Some of the benefits of using TestNG in Selenium:
- Group test cases into logical units, making managing and maintaining your test suite easier.
- Run tests in parallel, significantly reducing the time it takes to execute your test suite.
- TestNG provides a wide range of annotations that you can use to customize your tests, such as @BeforeSuite, @AfterSuite, @BeforeTest, @AfterTest, @BeforeMethod, and @AfterMethod.
- It supports data-driven testing, allowing you to run the same test case with multiple test data sets.
- Better reporting and logging features than other testing frameworks make identifying and debugging issues in your tests easier.
Hence TestNG framework in Selenium can improve the efficiency and effectiveness of your test automation efforts.
Advantages of TestNG over JUnit
TestNG is a more flexible, powerful, and feature-rich testing framework than JUnit, making it a better choice for complex and large test automation projects. Here are the advantages of TestNG over JUnit:
- Flexible test configuration and execution options. For example, TestNG allows you to configure tests to run in parallel, run tests in a specific order, and run tests with different data sets.
- It supports powerful features such as test grouping, prioritization, and test dependencies, which are unavailable in JUnit.
- In TestNG, you can use the DataProvider annotation to pass data to a test method, while JUnit requires you to write custom code to handle data-driven testing.
- TestNG generates HTML reports with detailed information about test execution, including test results, failures, and errors. JUnit, on the other hand, generates simple text-based reports.
- Supports more advanced annotations such as @BeforeSuite, @AfterSuite, @BeforeTest, @AfterTest, @BeforeGroups, @AfterGroups, @BeforeClass, and @AfterClass, which allow you to configure test execution at different levels of granularity.
Follow-Up Read: JUnit Vs TestNG
Why use TestNG with Selenium?
One of the drawbacks of Selenium is that it does not have a proper format for the test results. By using the TestNG framework in Selenium, you can:
- Generate the report in a proper format.
- Include the number of test cases run; tests passed, failed, and skipped in the report.
- Group test cases by converting them to testing.xml
- Use invocation count and execute multiple tests without using loops
- Perform cross browser testing
- Easily understand annotations
Installing and Setting up TestNG
It’s pretty easy to install TestNG. If you are using Eclipse IDE, it comes as a plugin. Below are the steps to install TestNG:
- Install Eclipse IDE from the Eclipse website. It serves as a platform for you to code on and write your test cases
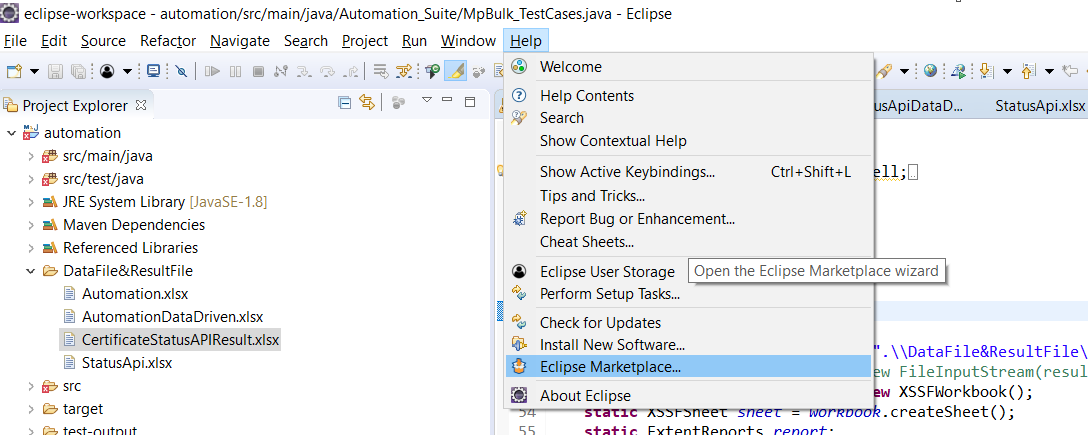
- Once installed, go to help and navigate to the ‘Eclipse Marketplace’. The referenced snapshot is below:
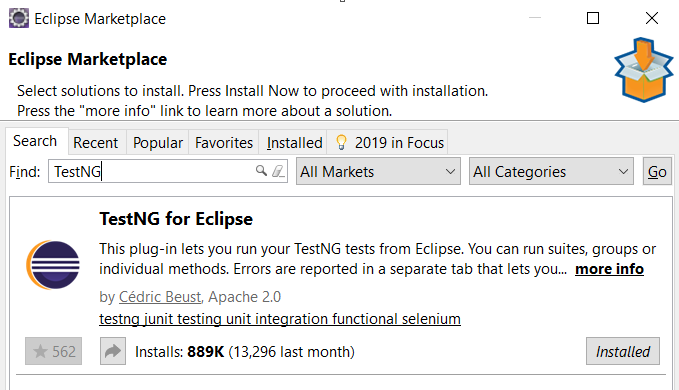
- Click on ‘Eclipse Marketplace’. You will be directed to the marketplace modal. Type TestNG in the search keyword and hit ‘Go’. The referenced snapshot is below:
- If TestNG is not installed in your Eclipse, rather than the ‘Installed’ button you would see ‘install’. Click on install and your TestNG framework will be installed in your Eclipse. As a good practice, Eclipse would recommend you to restart to use the features of the installed plugin
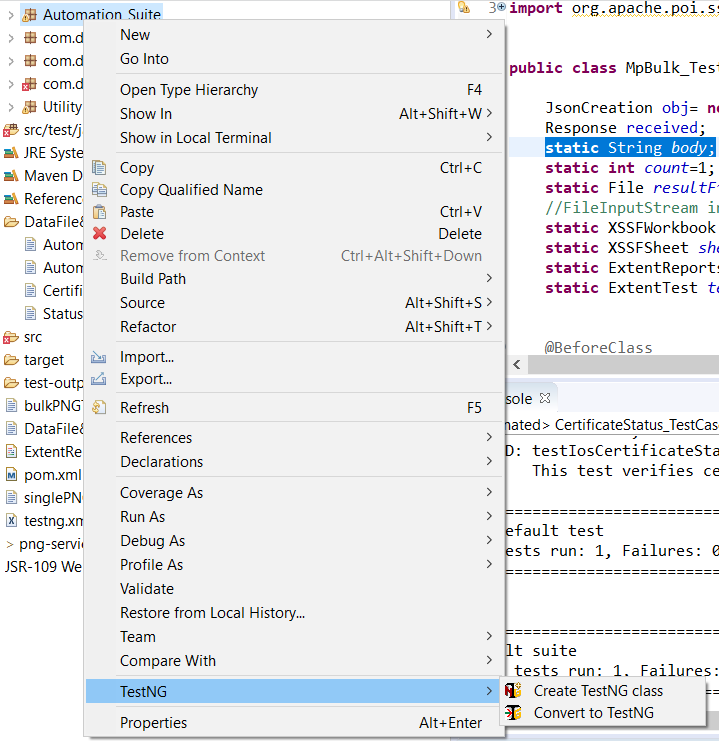
- Post-restarting your Eclipse, re-verify whether you can see options for creating a TestNG class or not as below:
TestNG Annotations
An annotation tag provides information about the method, class, and suite. It helps to define the execution approach of your test cases and the different features associated with it. Below are the major annotations used:
- @Test– This is the root of TestNG test cases. To use TestNG, all methods should be annotated with this annotation. Below is an example:
@Test
public void setupTestNG()
{
System.out.println(“this is a test annotation method”)
}A few attributes associated with the TestNG annotation are:
- Description: You can describe your test case under the description, stating what it does
@Test(description=”This test validates login functionality”)
- Priority: You can prioritize the order of your test methods in TestNG by defining a priority. Based on the defined priority, the test shall execute in that order.
@Test(priority=1)
- DependsOnMethod: This attribute works miracles if one test case is dependent on another. For example, to view your profile details, you need to login to the application. So, your profile test case is dependent on the login test case
@Test(dependsOnMethod=”Login”)
- Enabled: Using this attribute, you can choose to execute or skip the execution of this test case. Setting it to true execute it and putting it to false will skip the test from the execution cycle
@Test(enabled=’true’)
- Groups: Using this attribute, you can club your test cases into a single group and specify the group you wish to execute in your TestNG XML file. The test cases clubbed to that group will only be executed, and the rest will be skipped
@Test(groups=”Smoke Suite”)
While the above ones should help you get started, other major annotations are:
- @BeforeMethod and @AfterMethod – These annotations run before and after each test method
- @BeforeClass and @AfterClass – These annotations run once before and after the first @test method in a class
- @BeforeTest and @AfterTest – The BeforeTest annotation runs before the @BeforeClass annotation and the AfterTest annotation runs after the @AfterClass annotation
- @BeforeSuite and @AfterSuite– These annotations run before and after any test annotated method in a class respectively. These annotations start the beginning of a test and the end of it, for all the classes in a suite
Talking about the execution order of these annotations, they execute in the below order:
@BeforeSuite -> @BeforeTest -> @BeforeClass -> @BeforeMethod -> @Test -> @AfterMethod -> @AfterClass -> @AfterCTest -> @AfterSuite
How to Write your First TestNG Test
Using the above annotations and attributes, we will write our first test case with the TestNG framework. Let’s take the example of Browserstack, where we will open the landing page and sign up on the platform. Let’s write the code if you understand Selenium and its syntax fairly.
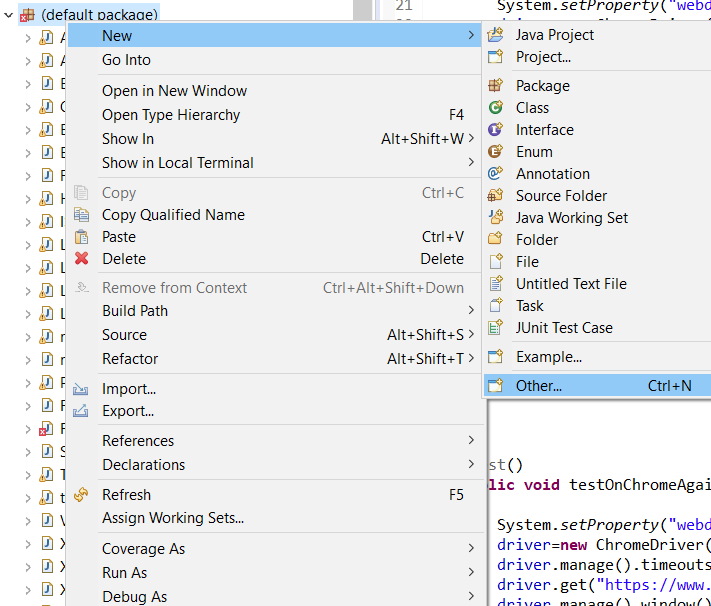
Step #1 – Create your first TestNG class by right-clicking on the package and selecting the’ Other’ folder from the ‘New’ option.
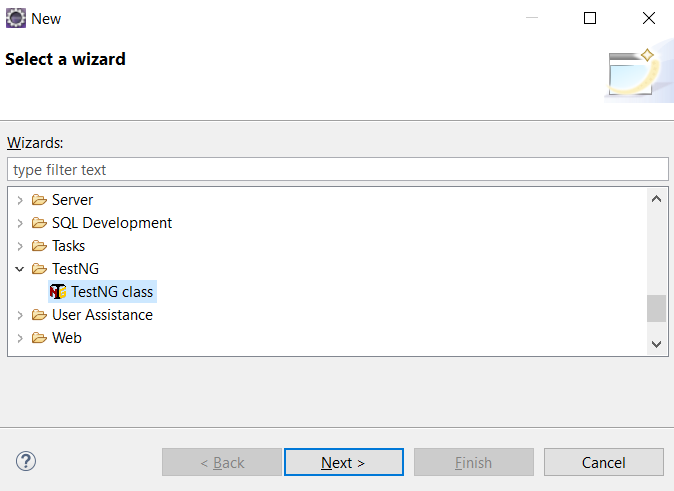
Step #2 – From the wizard modal, select the TestNG folder and select the TestNG class as below:
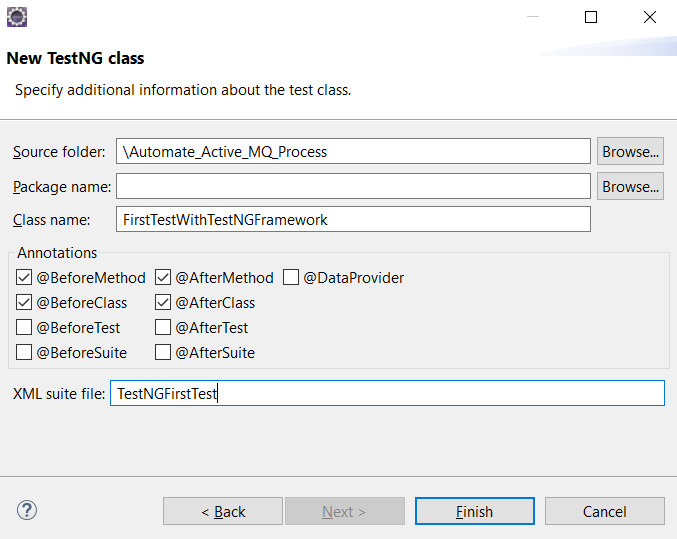
Step #3 – Click the ‘New’ button and choose any predefined annotations you wish to have in your class as below:
We will use BeforeMethod, AfterMethod, BeforeClass, and AfterClass along with our test annotation. Do note the XML file name is given on this modal. Using this TestNG XML file, we can choose to define our execution for the defined class or classes.
Step #4 – Click on finish, and you are ready to start writing your first TestNG class. Reference screenshot below, containing the defined methods with the annotations chosen in the step above:
Step #5 – We will automate the sign-up flow using these annotations in the code snippet below.
import org.testng.annotations.Test;
import org.testng.annotations.BeforeMethod;
import org.testng.annotations.AfterMethod;
import org.testng.annotations.BeforeClass;

import java.util.concurrent.TimeUnit;

import org.openqa.selenium.By;
import org.openqa.selenium.WebDriver;
import org.openqa.selenium.chrome.ChromeDriver;
import org.testng.annotations.AfterClass;

public class FirstTestWithTestNGFramework {

WebDriver driver;

@BeforeClass
public void testSetup()
{
System.setProperty("webdriver.chrome.driver", ".\\Driver\\chromedriver.exe");
driver=new ChromeDriver();
driver.manage().timeouts().implicitlyWait(10, TimeUnit.SECONDS);
driver.manage().window().maximize();

}

@BeforeMethod
public void openBrowser()
{
driver.get("https://www.browserstack.com/");
driver.findElement(By.id("signupModalButton")).click();
System.out.println("We are currently on the following URL" +driver.getCurrentUrl());
}

@Test(description="This method validates the sign up functionality")
public void signUp()
{
driver.findElement(By.id("user_full_name")).sendKeys("user_name");
driver.findElement(By.id("user_email_login")).sendKeys("email_id");
driver.findElement(By.id("user_password")).sendKeys("password");
driver.findElement(By.xpath("//input[@name='terms_and_conditions']")).click();
driver.findElement(By.id("user_submit")).click();

}

@AfterMethod
public void postSignUp()
{
System.out.println(driver.getCurrentUrl());

}

@AfterClass
public void afterClass()
{
driver.quit();
}

}
As you can see, in this snippet above, we have used @BeforeClass annotation to setup the browser.
- In the @BeforeMethod, we have opened the BrowserStack homepage and navigated to the signup page.
- In the @Test annotated method, we are performing the sign-up functionality.
- In the @AfterMethod, we are printing the currentURL we are on
- And in the @AfterClass method, we are closing the browser.
Also, note the associated attribute ‘description’ used with the test annotation. Now, you must execute this test and validate your TestNG reports and console output.
Step #6 – To execute your report, you can either choose to run directly as a TestNG class or run the XML file created which contains the class name and details. Below is the auto-created TestNG XML file:
<?XML version="1.0" encoding="UTF-8"?>
<!DOCTYPE suite SYSTEM "https://testng.org/testng-1.0.dtd">
<suite name="Suite">
<test name="Test">
<classes>
<class name=".FirstTestWithTestNGFramework"/>
</classes>
</test> <!-- Test -->
</suite> <!-- Suite -->
You can modify the XML file and mention the various class names when executing multiple classes. You can also define the groups in the XML file you want to execute here. Once the modification is done, you can right-click on the file and run it. Your class containing the test shall be executed. Below is the referenced console output of the executed test:
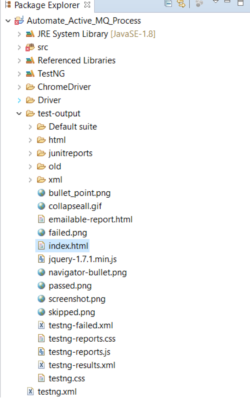
Step #7 – To access the TestNG report, you only need to refresh your project folder. A folder as ‘test output’ will be auto-generated. Within this folder, you shall see a file ‘index.html’ as below:
Step #8 – Double click on it and you can view your TestNG reports, showing the passed and failed methods of the execution as below.
TestNG provides various listeners to customize this default report according to your needs. Learn more about TestNG Listeners. But this default report will be more than enough at the beginner level.
Step #9 – As a QA or tester, the next step is to validate your tests. If you did not validate your test methods, it basically means your testing process is incomplete. To validate your tests, TestNG provides assertions for it. So, let us investigate them to complete your TestNG tutorial.
Also Read: How to use TestNG Reporter Log in Selenium
TestNG Assertions
Like JUnit, TestNG provides multiple-level assertions to validate your actual results against your expected results. Few of the commonly used assertions are:
- assertTrue– This assertion verifies whether the defined condition is true or not. If true, it will pass the test case. If not, it will fail the test case
Assert.assertTrue(condition);
- assertFalse– This assertion verifies whether the defined condition is false or not. If false, it will pass the test case. If not, it will fail the test case
Assert.assertFalse(condition);
- assertEquals– This assertion compares the expected value with the actual value. If both are the same, it passes the test case. If not, it fails the test case. You can compare strings, objects, integer values etc. using this assert
Assert.assertEquals(actual,expected);
- assertNotEquals: This is just opposite to what assertEquals does. If actual matches the expected, the test case fails, else the test case passes
Assert.assertNotEquals(actual,expected,Message);
An important part to note in assertions is that your tests will not execute to the next line of code if your assertions failed. It will automatically jump to the next test annotated method.
Now, let us try to validate our code snippet below using assertions. In the snippet above, in the @AfterClass method, we will be verifying the current URL we are on and the expected URL, which should be the signup page.
@AfterMethod
public void postSignUp()
{
Assert.assertEquals(driver.getCurrentUrl(), "https://www.browserstack.com/users/sign_up");
}
Make this change in your code snippet above and execute it. The test case should pass. Also try giving another expected URL, to validate if the tests fail.
Follow-up Read: All About TestNG Listeners
What is Parameterization in TestNG?
Parameterization is a powerful feature of TestNG that allows you to write more efficient and effective tests by reusing the same test logic with different input data.. It is useful when you need to test a particular functionality with different input values to ensure that it works correctly in all scenarios.
Key Takeaways
TestNG makes automated tests more structured, readable, maintainable, and user-friendly. It provides powerful features and reporting. Its high-end annotations like dataprovider, make it easier to scale up, as you perform cross browser testing across multiple devices, browsers, and their versions.
- Do note that BrowserStack supports both running Selenium tests using TestNG and running Selenium tests using JUnit.
- As an engineering function, if you are automating your test cases and considering choosing the right framework, start by listing your current needs and usage. A
- lso, think about what you will need as you scale. Then decide on the framework that works best for you.
- Avoid picking the latest framework in the market since that might hamper you from scaling down the line.
