Xcode is Apple’s integrated development environment (IDE) for creating applications across macOS, iOS, watchOS, and tvOS.
Overview
Xcode provides tools like a code editor, debugger, and interface builder, along with simulators for testing apps, making it an essential platform for Apple ecosystem development.
Features
- Primary features of Xcode include:
- Code Editor
- Interface Builder
- Simulators
- Debugger
- Programming Languages
Importance
- Here are the reasons, why you need Xcode:
- Product specific development
- Access to Apple’s latest technologies
- Comprehensive development environment
- Access to Apple’s latest technologies
This guide explores in detail Xcode including the evolution of Xcode, its features, installation process, and more.
What is Xcode?
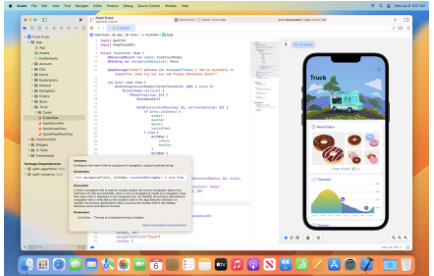
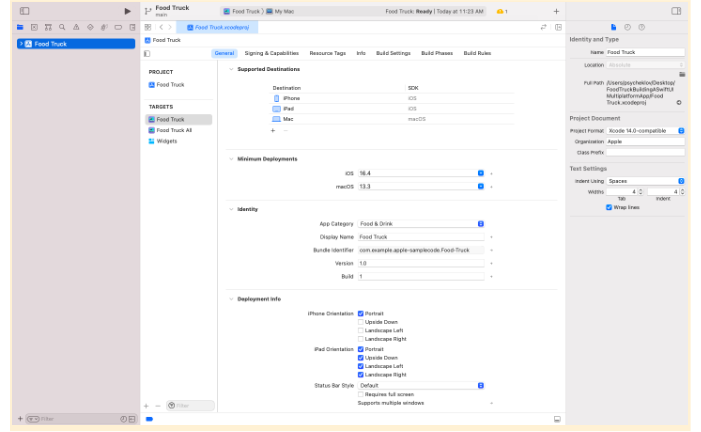
Xcode is an integrated development environment (IDE) created by Apple Inc. for developing software applications for iOS, iPadOS, macOS, WatchOS, tvOS and beyond. It includes a suite of tools that developers can use to write, debug, and test software, as well as tools for managing project files and resources.
Xcode running on macOS
Evolution of Xcode
Last 3 major releases were:
Xcode 12 – September 16, 2020 :
- Xcode 12 includes Swift 5.3 and software development kits (SDKs) for iOS 14, iPadOS 14, tvOS 14, watchOS 7, and macOS Catalina.
- The new version features App Clips, which are small parts of an app that can be discovered and launched quickly, as well as WidgetKit, a SwiftUI-based tool for building widgets that users can install on their iPhone home screens.
- The update also introduces improvements to the user interface, such as resizable Navigator fonts and a redesigned Organizer that reports new app metrics.
- For Swift and SwiftUI, performance has been enhanced and new features have been added to improve code completion, turn SwiftUI Views into reusable components, and support resources and localizations in Swift Package Manager.
Xcode 13 – September 20, 2021 :
- This update features improved type inference, faster incremental builds, and adds support for concurrency to Swift.
- It also includes a pull request workflow, code review comments integrated into the editor, and Test Flight crash reports displayed faster.
- Other features include Swift package collections, Swift Docc, Quick compare, Vim mode in the editor, and Simulator with CarPlay support. There are also additional bug fixes and stability improvements.
Xcode 14 – September 12, 2022 :
- Xcode 14 introduced Swift 5.7 and SDKs for iOS 16, iPadOS 16, tvOS 16, watchOS 9, and macOS Monterey 12.5.
- Increased cross platform scope by adding the ability to download simulator runtime for WatchOS and tvOS, a single target template for multi-platform apps across various platforms, automatic icon generation for all icon sizes, a pinned code structure in the source editor, and interactive SwiftUI Previews that are now on by default.
- Additionally, Xcode 14 provided faster build performance through improved dependency analysis and increased parallelism, a new build timeline assistant, build and command package plug-ins in Swift Packages, and Objective-C and C API documentation support in Swift-DocC.
- On the Swift side, the update introduced syntax highlighting and refactoring operations for regular expressions, smarter code completion, and additional dynamic snippets.
Why do you need Xcode?
For developers targeting Apple ecosystems, Xcode stands out as the go-to tool for building high-quality applications.
Xcode offers some unique advantages that might not be available in other development platforms:
- Product-specific development
- Comprehensive development environment
- Access to Apple’s latest technologies
- App Store submission
Here’s an exploration of these advantages in detail:
- Product-specific development: Xcode is designed specifically for building software applications for Apple’s platforms. It provides developers with tools and frameworks that are optimized for the unique features and capabilities of each platform, ensuring that serious developers can access the full feature stack.
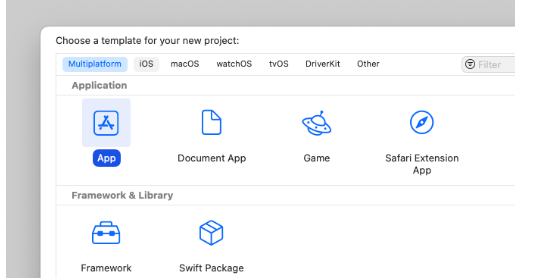
Xcode New Project Window
- Comprehensive development environment: Xcode provides developers with a full suite of tools that cover the entire software development process, from writing code to testing and debugging, as well as tools for managing project files and resources.
- Access to Apple’s latest technologies: Xcode is regularly updated with the latest technologies and features from Apple, including new frameworks, APIs, and tools. By using Xcode, developers can ensure that their applications are up to date with the latest platform features.
- App Store submission: Xcode provides a streamlined process for submitting apps to the App Store. Developers can use Xcode to create an archive of their app, validate it against App Store guidelines, and submit it for review.
There is most likely always a trade-off in performance, security, or configurability when building for Apple outside Xcode. However, these cross platform approaches are viable alternatives for developers who want to build cross-platform apps and don’t have access to a macOS development setup.
Having said that, Xcode is built only for macOS, hence it’s notoriously difficult to use on other platforms like Windows, Linux.
There are some cross-platform approaches to building Apple apps on non-Apple development setups like:
- Visual Studio: Microsoft’s integrated development environment (IDE) supports the development of cross-platform apps using Xamarin. With Xamarin, developers can use C# and .NET to build native iOS, Android, and Windows apps.
Read More: How to set up Selenium on Visual Studio
- React Native: Facebook’s open-source framework enables developers to build cross-platform apps using JavaScript and React. With React Native, developers can build native iOS and Android apps using a single codebase.
- Flutter: Google’s mobile app SDK enables developers to build cross-platform apps using Dart, a client-optimized programming language. With Flutter, developers can build high-performance native iOS, Android, and web apps from a single codebase.
Read More: Flutter vs React Native: A Comparison
While these and other cross-platform approaches offer the benefit of allowing developers to use non-Apple development setups, it’s important to note that they may not provide the same level of integration and optimization as Xcode can.
Features of Xcode
Below is a list of the key features of Xcode explained in detail.
Some of the key features and capabilities of Xcode are:
- Integrated Development Environment (IDE)
- Simulator
- Instruments
- Create ML
- Reality Composer
- Build System
- Swift Packages
- User Interface Design
- Debugging
- Analyze Traffic with Instruments
- Accessibility
- Diagnosing Issues with Entitlements
- Diagnosing memory, thread, and crash issues early
- Diagnosing issues using crash reports and device logs
- Xcode Cloud
Here are the explanation of the features in detail:
- Integrated Development Environment (IDE): Xcode is a complete IDE that provides developers with a unified workflow for designing user interfaces, coding, testing, and debugging applications for Mac, iPhone, iPad, Apple TV and Apple Watch.
Also Read: How to perform UI testing using Xcode
- Programming Languages: Xcode includes the Swift programming language, which is safe, fast, and modern. It also supports C/C++/Objective-C compilers for legacy code or other use cases.
- Simulator: This allows developers to test and prototype their apps in a simulated environment when a real device is not available. Simulator provides environments for iPhone, iPad, Apple Watch, and Apple TV devices with different settings, files, and operating system versions.
- Instruments: This tool is used to profile and analyze apps, improve performance, and find memory problems. Instruments collects data and presents the results using different tools.
- Create ML: Developers can create and train custom machine learning models for their app using this tool.
- Reality Composer: This tool allows developers to construct 3D compositions and augmented reality (AR) experiences.
- Build System: Developers can port their macOS apps to Apple Silicon and create a version of their macOS app that runs on both Apple silicon and Intel-based Mac computers. Developers can compile their code into a binary format and customize their project settings to build their code.
- Swift Packages: Developers can create reusable code, organize it in a lightweight way, and share it across Xcode projects and with other developers.
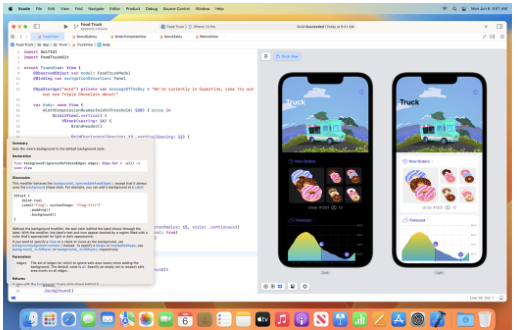
- User Interface Design: Xcode offers several tools to help developers design intuitive user interfaces, such as SwiftUI, a declarative framework that uses Swift code to describe interfaces, and Interface Builder, which builds UI views graphically using a library of controls and modifiers.
SwiftUI Design Tools
- Debugging: Xcode allows developers to inspect their running app to isolate bugs, locate crashes, identify excess system resource usage, visualize memory bugs, and investigate view layout problems. They can set breakpoints to pause their running app and find the cause of bugs by watching variables change as they step through their source code in the debugger.
- Analyze Traffic with Instruments: Xcode allows developers to measure HTTP-based network performance and usage of their apps.
- Accessibility: Xcode supports designing and developing applications with accessibility features such as VoiceOver, AssistiveTouch, and Switch Control, enabling a wider range of users to enjoy your applications.
- Diagnosing Issues with Entitlements: Developers can verify their app’s entitlements at every stage of development to track down errors during distribution.
- Diagnosing memory, thread, and crash issues early: Developers can identify runtime crashes and undefined behaviors in their app during testing using Xcode’s sanitizer tools.
- Diagnosing issues using crash reports and device logs: Developers can use crash reports and device logs to diagnose issues with their app.
- Xcode Cloud: It is a new service from Apple that is currently in beta testing and is expected to be released later in 2023. It is a cloud-based continuous integration and delivery service that will integrate with Xcode, allowing developers to build, test, and deploy their applications in the cloud.
Xcode Cloud promises several benefits to developers, such as:
- Scalability: Xcode Cloud will allow developers to build and test their applications on Apple’s cloud infrastructure, which can scale to accommodate large projects and high volumes of testing.
- Collaboration: Xcode Cloud will provide collaborative tools that enable developers to work together on a project, share code, and communicate effectively. This will help improve team productivity and streamline the development process.
- Automation: Xcode Cloud will automate many tasks related to building, testing, and deploying applications, which can save developers time and reduce the risk of errors.
While Critics make statements like :
- Apple is late to add cloud
- Apple is only catching up with android till now
- Apple is a walled garden with only crash exits, etc.
However, Apple has announced plans for building all layers of their product ecosystem in-house, starting with chips, boards, products, OS, device/app form-factors all the way to CICD provider. Which could only mean one thing, that Apple is expanding the scope of its product optimizations.
While, Windows is like a Swiss Army Knife, offering a wide range of features and customization options, but lacking in terms of optimization and security. Android, on the other hand, is like a modular system, offering a high degree of customization and flexibility, but with some trade-offs in terms of stability and security.
Apple, with its integrated approach, is more like a finely tuned sports car, offering a seamless and optimized experience across all layers of its ecosystem. While some may argue that this approach is too closed and limiting, it is clear that Apple’s focus on optimization and integration has resulted in a consistently high level of quality and user experience across its products.
With its plans to build all layers of its ecosystem in-house, it is clear that Apple’s approach has resonated with a large segment of the market, who value the seamless experience and high level of quality that the company provides. And for folks aiming to grow with Apple, understanding and utilizing Xcode, in context with all their products, to its highest potential is the main way to ensure success.
How to Install Xcode
Here’s how you can install Xcode:
Prerequisites for running Xcode
For installing Xcode, you should take care of the following prerequisites:
- A Mac computer running macOS 10.15.4 or later
- Enough free disk space to download and install Xcode and related components
- An Apple ID to download and install Xcode from the App Store
- Membership in the Apple Developer Program to access certain features such as app distribution and code signing
Installing Xcode
There are two main parts to install Xcode completely:
Main app from the App Store:
- Open the App Store app on your Mac
- Search for “Xcode” and click on the Xcode app in the search results
- Click on the “Get” or “Download” button to begin the installation process
- Enter your Apple ID and password when prompted
- Once the installation is complete, Xcode will be available in your Applications folder
Install Command line tools using terminal :
- Open Terminal on your Mac
- Enter command
xcode-select –install
- A prompt will appear asking if you want to install the command line developer tools. Click “Install” to begin the installation process
- Once the installation is complete, Xcode and related components will be available on your Mac
With Xcode installed, you’re ready to start developing great applications for Mac, iPhone, iPad, Apple TV, and Apple Watch.
Additional features like various simulators, libraries and dependencies can be installed and configured as per specific project needs.
How to use Xcode?
Here is the step-by-step process to use Xcode
Creating and deploying projects:
- Open Xcode and click on Create a new Xcode project or File > New > Project
- Choose the template for the type of project you want to create, such as iOS App, macOS App, watchOS App, or tvOS App.
- Fill in the required information for your project, such as the project name, organization name, and bundle identifier.
- Choose the location where you want to save the project and click Create.
- To deploy your project, select the device or simulator you want to run your app on and click the Run button.
Managing Projects:
- To manage your Xcode projects, you can use the Project navigator, which can be accessed from the left-hand panel.
- You can organize your files and folders within your project by dragging and dropping them in the navigator.
- You can also use the navigator to manage your project settings, such as build settings, signing and capabilities, and targets.
Updating Workflows:
- Xcode has built-in support for version control systems such as Git, so you can use Git to update your workflows.
- To update your workflow, you can create a new branch, make your changes, commit your changes, and then merge your changes back into the main branch.
- Xcode also supports continuous integration and continuous delivery workflows through integration with services such as Jenkins or Travis CI.
Adapting to new paradigms and methodologies:
- Stay in-tune with all latest products and announcements by Apple on their events page.
- Apple is a highly opinionated company, so get ready to read a lot, through resources and communities online and find non trivial best practices as part of routine practice for Xcode and Swift.
- When designing Apps, consider following Apple guide on Human Interaction Design.
Backward Compatibility:
- Xcode supports backward compatibility by allowing you to set the deployment target for your project. By setting a lower deployment target, you can ensure that your app can run on older versions of the operating system.
Test your application on older devices
Performance and security:
- Xcode includes tools such as the Instruments app for profiling your app’s performance and identifying areas for optimization.
- Xcode also provides built-in security features such as code signing and App Transport Security (ATS) to help you secure your app.
Test with advance device level controls on the latest range
Interface Overview of XCode
The Xcode interface can be overwhelming at first, but once you become familiar with it, it becomes easier to use. Here is an overview of the Xcode interface:
- Toolbar: The toolbar at the top of the Xcode window contains buttons to run your app, stop your app, and perform other tasks like building your project.
- Navigation area: The navigation area is on the left side of the Xcode window. It contains a file navigator, which lets you navigate through your project’s files and folders.
- Editor area: The editor area is where you write and edit your code. It’s the largest part of the Xcode window and can be split into multiple panes.
- Debug area: The debug area is at the bottom of the Xcode window. It displays information about your app’s performance and any errors or warnings that occur.
- Utility area: The utility area is on the right side of the Xcode window. It contains inspectors that let you configure various aspects of your app, such as the project settings, interface builder, and source control.
- Toolbar and Library: The toolbar and Library can be found at the top right of the Xcode window. The Library contains pre-built UI components, media files, and code snippets that you can drag and drop into your project.
The toolbar contains buttons to toggle between the standard and assistant editors, and to show or hide the navigator and utility areas. - Console area: The console area is at the bottom of the Xcode window. It displays output from your app, such as log statements and error messages.
To use Xcode effectively, you’ll need to be familiar with all of these areas and learn how to use them together to develop your app.
How to boost productivity in Xcode?
- Use keyboard shortcuts: Xcode has a lot of keyboard shortcuts that can help you navigate and work faster. Learn some of the most common ones and use them regularly. List of Xcode keyboard shortcuts
- Customize your workspace: You can customize the layout of Xcode to fit your workflow. You can add or remove panels, adjust their size and position, and even create your own custom workspaces.
- Use code snippets: Xcode comes with a library of code snippets that you can use to speed up your coding. You can also create your own snippets and save them for later use.
- Use autocomplete: Xcode has a powerful autocomplete feature that can save you a lot of typing. As you type, Xcode will suggest code completions based on the context of your code.
- Use debugging tools: Xcode comes with a variety of debugging tools that can help you find and fix issues in your code. Learn how to use these tools and use them regularly.
- Use version control: Xcode integrates with popular version control systems like Git, SVN, and Perforce. Use version control to keep track of your changes and collaborate with other developers.
- Use code profiling: Xcode has built-in code profiling tools that can help you find performance issues in your code. Use these tools to optimize your code and make it run faster.
- Use documentation: Xcode has built-in documentation for many APIs and frameworks. Use this documentation to learn how to use new APIs and to get a better understanding of the ones you already use.
- Take advantage of third-party tools and plugins: Xcode has a large ecosystem of third-party tools and plugins that can extend its functionality. Explore these tools and plugins to find ones that can help you be more productive.
Advantages of using Xcode
Understanding the key advantages of using Xcode can leverage its full potential, making app development faster, more efficient, and seamlessly integrated with Apple’s ecosystem.
Advantages:
- Integrated Development Environment
- Swift Programming Language
- Interface Builder
- Testing Tools
- Continuous Integration and Deployment
- Large Developer Community
Here’s a look at the advantages in details:
- Integrated Development Environment: Xcode is an integrated development environment that provides a comprehensive set of tools for developing apps for Apple’s platforms. It includes a code editor, debugging tools, and interface builders, among other features.
- Swift Programming Language: Xcode supports the Swift programming language, which is a powerful and modern programming language that makes it easier to write safe, fast, and interactive code.
- Interface Builder: Xcode includes a graphical interface builder that allows you to design your app’s user interface visually, making it easier to create and customize your app’s user interface.
- Testing Tools: Xcode includes a suite of testing tools that makes it easy to test your app’s functionality and performance, ensuring that your app works as expected.
- Continuous Integration and Deployment: Xcode provides built-in support for continuous integration and deployment, making it easy to automate your build, test, and release process.
Run automated tests on real devices
- Large Developer Community: Xcode has a large and active developer community that provides support and resources to developers. This community includes Apple’s developer documentation, Stack Overflow, and other forums.
Disadvantages of using Xcode
Despite its strengths, Xcode has drawbacks, which developers should consider before fully committing to the platform.
While Xcode offers numerous benefits, it also comes with certain limitations:
- Limited Platform Support
- Steep Learning Curve
- Large File Sizes
- Big projects are expensive
To better understand the disadvantages, here is a deep dive into the details:
- Limited Platform Support: Xcode is only available for developing apps for Apple’s platforms such as macOS, iOS, watchOS, and tvOS. This limits the scope of projects that can be developed using Xcode.
- Steep Learning Curve: Xcode can be overwhelming for new developers due to its wide range of features and tools. It takes time to learn how to use Xcode effectively.
- Large File Sizes: Xcode can be a large download, and its projects can take up a lot of space on your computer, especially if you’re working on large projects.
- Big projects are expensive: Xcode can sometimes be slow, especially when working with large projects or complex code, and since it utilizes macOS, affording a powerful enough Mac computer could be a wallet cleaner.
Useful Resources for Xcode
- How to enable Xcode Code Coverage?
- How to Download, Install and Update Xcode on Mac
- Using Xcode iOS Simulator for Responsive Testing
- What is Xcode Cloud and How to use it?
- All about Working with Xcode Previews
- Xcode Python: The Ultimate Development Environment for Python on Mac
- How to test App on iPhone using Xcode?
Conclusion
Xcode helps you to handle the entire development workflow; right from developing and testing your app to optimizing it and uploading it to the App Store.
Apple is continuously striving to make Xcode more user-friendly, faster, efficient, and stable with regular updates to make it the top choice for native development on Apple platforms.
Test your apps on both Xcode and on real-devices. Unlike a simulator, testing on a real device cloud gives you access to hundreds of real devices and helps you understand exactly how your app works in real user conditions.
