TestNG simplifies test creation, manages execution flow, and supports advanced features like parallel testing, grouping, and parameterization.
Overview
What is TestNG
TestNG is an open-source Java Testing testing framework for automation testing. It is built on the foundation of JUnit and NUnit.
Beneficial Features of TestNG
- Annotations Support
- Parameterization
- Configuration via testng.xml
- Dependency Management
- Parallel Execution
- HTML Reporting
TestNG Annotations
- @BeforeSuite
- @AfterSuite
- @BeforeClass
- @AfterClass
- @BeforeTest
- @AfterTest
- @BeforeGroups
- @AfterGroups
- @Test
- @BeforeMethod
- @AfterMethod
- @Parameters
- @Listeners
Learn what is TestNG, how to execute it, the best practices and more with this detailed guide.
What is TestNG
TestNG is one of the most widely used open-source testing frameworks used in the automation testing suite. This framework is built upon the foundation of JUnit and NUnit thus introducing some new functionalities that make it more powerful and easier to use.
TestNG allows you to easily define test case dependencies, annotations, grouping, test sequencing and data-driven testing.
Advantages of TestNG
Below are some of the advantages of TestNG:
- TestNG supports annotations (such @BeforeSuite, @AfterSuite, @BeforeTest, etc.) which you can use to define methods and the execution order.
- TestNG supports parameterization, which allows you to run the same method with different sets of data. It has built-in support for data-driven testing, which allows you to fetch data from external sources such as CSV files, Excel sheets, etc.
- Through testing.xml file, TestNG allows you to configure the test cases to define specific dependencies among test methods, parallel execution of test methods/classes/tests, grouping of test cases, parameterization and many more.
- To ensure test cases are executed in a specific order based on their dependencies, TestNG can be used to specify such configurations with the help of “dependsOnMethods” and “dependsOnGroups”.
- TestNG can be used to run test methods/classes/tests/suites to run in parallel mode which can significantly reduce the overall test execution time.
- TestNG can be used to generate detailed HTML reports which contain details such as test results, execution time, logs, etc. These reports are super easy to understand and analyse.
- TestNG can be easily integrated with build tools such as Maven/ Ant and continuous integration tools such as Jenkins.
TestNG vs JUnit: Core Differences
TestNG and JUnit are frameworks that integrate with Selenium
| JUnit | TestNG |
|---|---|
| It is open-source testing framework | It is open-source Java based testing framework |
| It supports unit testing | It supports unit, functional, integration, and end-to-end testing |
| It does not support advanced annotations such as @BeforeGroups and @AfterGroups | It supports advanced annotations such as @BeforeGroups and @AfterGroups |
| It uses @RunWith, @Suite to run the test suite | It uses an XML file to run the test suite |
| It does not support dependency in test cases | It supports dependency in test cases by using dependsOn and dependsOnGroup attributes with @Test annotation |
| It does not support grouping of test cases | It supports grouping and execution of test cases together |
| It can be integrated with Maven to generate HTML reports | It has built-in HTML reports |
| It supports listeners through Listeners API | It supports listeners through annotations |
| It has limited support for parallel execution | It has built-in support for parallel execution at various levels such as methods/classes/tests |
TestNG Annotations
TestNG annotations provide a way to control the execution of tests and are used to define the behaviour and configuration of test methods and test classes. A special symbol “@” is used followed by the name of the annotation.
Below are the annotations widely used in TestNG.
- @BeforeSuite: Method associated with this annotation will run before the execution of all the test methods in the suite.
- @AfterSuite: Method associated with this annotation will run after the execution of all the test methods in the suite.
- @BeforeClass: Method associated with this annotation will be executed before the first @Test method execution.
- @AfterClass: Method associated with this annotation will be executed after all test methods in the current class have been run.
- @BeforeTest: The annotated method will run before any test method of the class inside the <test> tag
- @AfterTest: Method associated with this annotation will be executed when all the @Test annotated methods complete the execution of those classes inside the <test> tag in the testing.xml file.
- @BeforeGroups: This method will run before the first test run of that specific group only once.
- @AfterGroups: This method will run after all the test methods of that specific group complete their execution.
- @Test: This annotation designates a method as a test case. You can specify additional characteristics, highlight dependencies, and enable or deactivate tests using this annotation.
- @BeforeMethod: @BeforeMethod allows the method to execute before the execution of each @Test method.
- @AfterMethod: @AfterMethod is executed after the execution of each @Test method.
- @Parameters: This annotation is used to pass parameters from the testing.xml file or from other sources into the test methods.
- @Listeners: This annotation is used to specify one or more listener classes for the test suite that should be alerted of test events.
What is a Test suite in TestNG?
In TestNG, a test suite is defined with the <suite> element in a special configuration file called testng.xml.
This XML file outlines which test classes or methods should be run together. The suiteXmlFile attribute specifies the name and location of this configuration file, which acts as the blueprint for executing a group of test cases.
Unlike test cases defined in the source code, a suite is not written in Java. it exists purely for execution purposes and offers a flexible way to configure test execution.
The <suite> tag is the root element of the testng.xml file. It can contain one or more <test> sections, each representing a set of classes or methods to be run.
Here are all the legal attributes that the <suite> tag accepts in TestNG’s testng.xml file:
| Attribute | Description |
|---|---|
| name | The name of the test suite. |
| verbose | Sets the verbosity level of logging (0 to 10). |
| parallel | Defines how to run tests in parallel. Values: tests, classes, methods, etc. |
| thread-count | Specifies the number of threads to use for parallel execution. |
| data-provider-thread-count | Sets the number of threads for data providers. |
| annotations | Allows using JDK 5 annotations or Javadoc (values: JDK, Javadoc). |
| configfailurepolicy | Defines behavior when a configuration method fails (skip or continue). |
| group-by-instances | If true, methods from the same instance are grouped together in parallel runs. |
| preserve-order | If true, maintains the order of <test> elements during execution. |
| skipFailedInvocationCounts | If true, skips counting failed invocations multiple times. |
| allow-return-values | If true, allows test methods to return values. |
How to Create a Test Suite in TestNG
To create a test suite in TestNG, you need to write an XML configuration file named testng.xml.This file defines which test classes or methods should be executed together.
Step 1: Create Your Test Classes
Create Java classes with TestNG test methods via annotations like @Test.
// Example: LoginTest.java

import org.testng.annotations.Test;


public class LoginTest {

    @Test

    public void loginWithValidUser() {

        System.out.println("Login successful");

    }

}
Step 2: Create the testng.xml File
This XML file outlines your test suite and the tests to run.
<!DOCTYPE suite SYSTEM "https://testng.org/testng-1.0.dtd" >

<suite name="MyTestSuite">

    <test name="FunctionalTests">

        <classes>

            <class name="com.example.tests.LoginTest"/>

            <class name="com.example.tests.SearchTest"/>

        </classes>

    </test>

</suite>
Step 3. Test Suite Execution
Run the suite using:
IDE (like IntelliJ or Eclipse): For this you can right-click testng.xml → Run as → TestNG Suite
Command Line:
java -cp "path-to-testng-jar;your-compiled-classes" org.testng.TestNG testng.xml
How To Create A TestNG XML File To Execute TestNG Test Suites?
The testng.xml file is used to configure and manage test execution in TestNG. It defines the test suite, specifies the test classes or packages to be run.
Step 1. Create Your Test Classes
Ensure the test classes use TestNG annotations like @Test.
// File: LoginTest.java

import org.testng.annotations.Test;


public class LoginTest {

    @Test

    public void validLogin() {

        System.out.println("Login successful");

    }

}
// File: SearchTest.java
import org.testng.annotations.Test;
public class SearchTest {
@Test
public void searchProduct() {
System.out.println("Search successful");
}
}Step 2: Create the testng.xml File
Create this file manually in your project directory.
<!DOCTYPE suite SYSTEM "https://testng.org/testng-1.0.dtd">

<suite name="MyTestSuite">

  <test name="AppTests">

    <classes>

      <class name="LoginTest"/>

      <class name="SearchTest"/>

    </classes>

  </test>

</suite>
Step 3: Place the XML File in Your Project
Place the file at the root level or in a resources folder, depending on the project structure.
Step 4. Execute the XML Suite File
Run the testng.xml file using command line
java -cp "path-to-testng-jar;bin" org.testng.TestNG testng.xml
Why use TestNG with Selenium?
TestNG is primarily used for generation of reports that provide detailed information regarding number of test cases executed, passed, failed and skipped count, duration of each test case execution, and logs. Along with reporting it also provides ways to control the execution flow, test assertions, parallelisation, parameterization of tests etc.
Selenium does not have an inbuilt mechanism to generate test reports. Therefore, TestNG is used to generate comprehensive reports.
TestNG also helps to describe how the test cases should be written in a structured manner using different annotations.
Apart from these two there are several other reasons as well which are listed below:
- TestNG provides a set of annotations such as @Test, @BeforeTest, @AfterTest, @BeforeClass, @AfterClass, etc which provides control over the test methods execution. It also helps in configurations such as setting up pre-conditions and logically grouping the tests.
- TestNG allows you to organise tests into suites and groups which aids in managing large test projects.
- For speeding up the execution time of large test suites, TestNG supports parallel execution. You can configure parallel test execution at the tests, class or method level.
- With TestNG’s @DataProvider annotation you can provide data to your test methods. This is beneficial if you want to run the same tests with different sets of data.
- TestNG allows setting dependencies between tests using annotations. This is beneficial in cases where certain tests should only run if other tests have passed.
- TestNG can be integrated with build tools such as Maven and Gradle which simplifies the process of running tests as part of the build process and helps in generating reports.
Prerequisites of TestNG
To get started with TestNG below are some prerequisites you should be familiar with:
- Get familiar with the basics of Software Testing which will help you understand the concepts of test cases, test execution, and different types of testing.
- As TestNG is a Java based testing framework, you should be familiar with Java concepts such as OOPs, basic programming, and exception handling
- You should be familiar with any IDE (Integrated Development Environment) such as Eclipse, IntelliJ which have integrated support for TestNG.
How to run TestNG in Selenium: Example
To run TestNG in Selenium, you need to follow a few steps to set up the environment and create the test scripts.
Pre-requisites of running TestNG in Selenium
- Java 8 or any higher version should be installed.
- Eclipse or any similar IDE installed.
- Maven installed.
Steps to run TestNG in Selenium:
Step 1. Install TestNG plugin in Eclipse:
- Open Eclipse IDE, click on Help option > Install New Software.
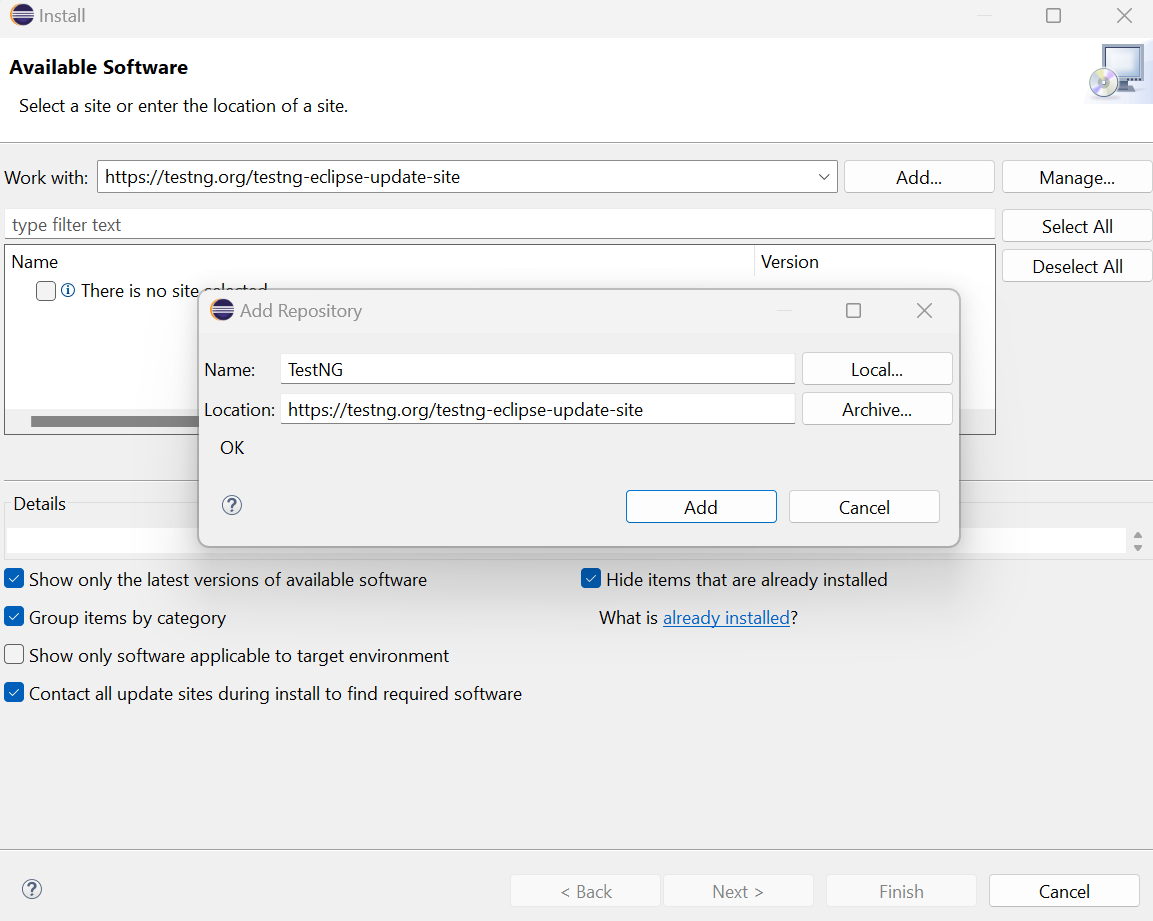
- Click on the “Add” button on the “Install” window. Enter “Name” as “TestNG” and “Location” as “https://testng.org/testng-eclipse-update-site”. Click on the “Add” button.
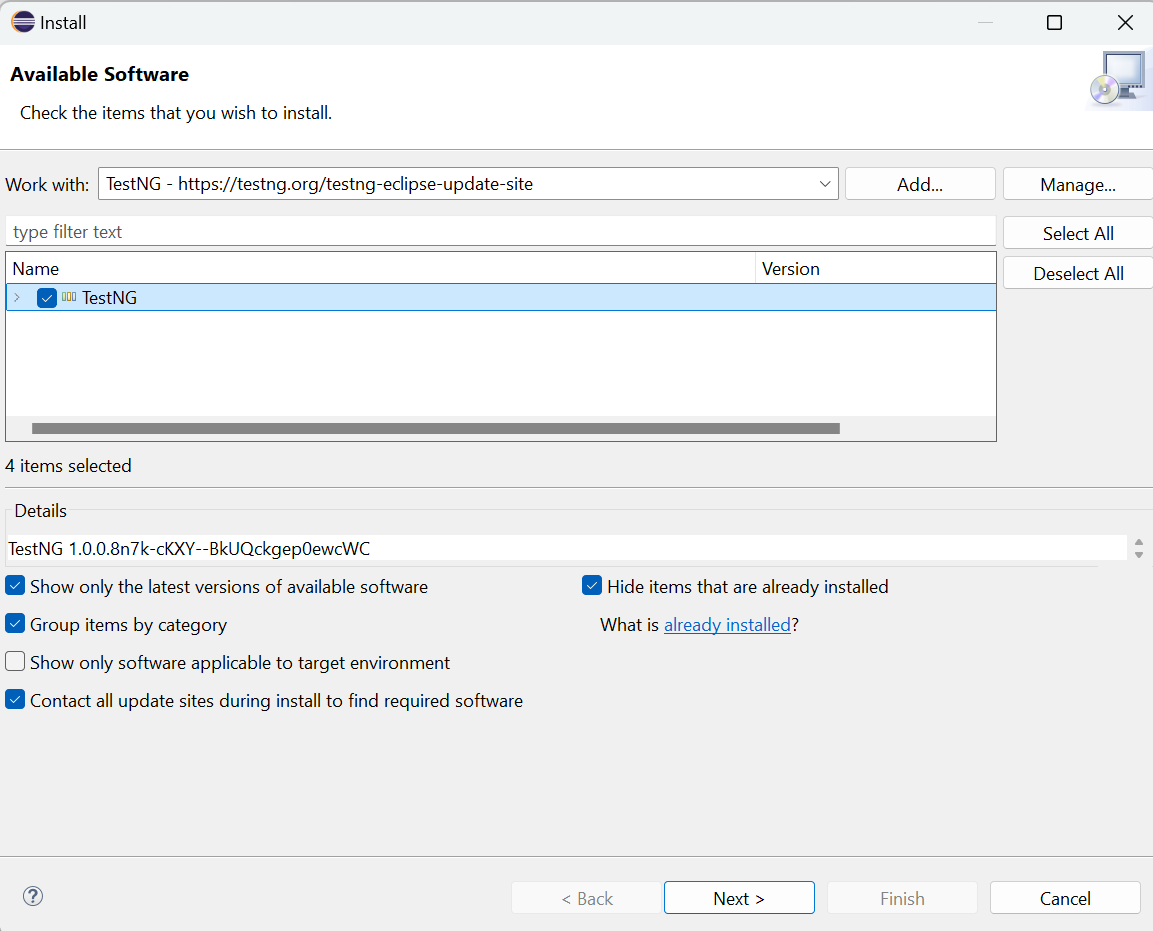
- This URL will fetch the latest TestNG plugin details from the TestNG website for installation. Make sure to select all the checkboxes and click on Next button to proceed with installation. Click on the “Next” button.
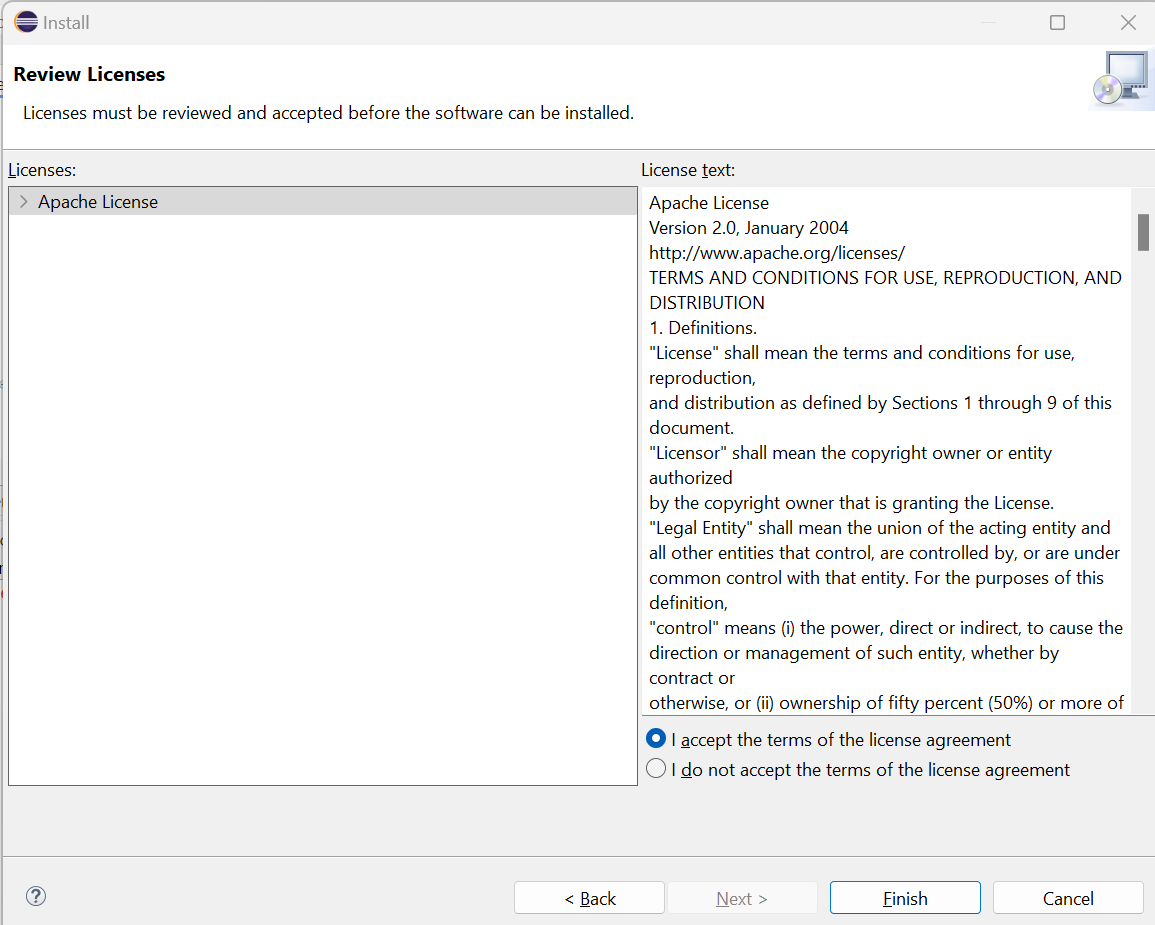
- Click on the “I accept” checkbox and click on the “Finish” button.
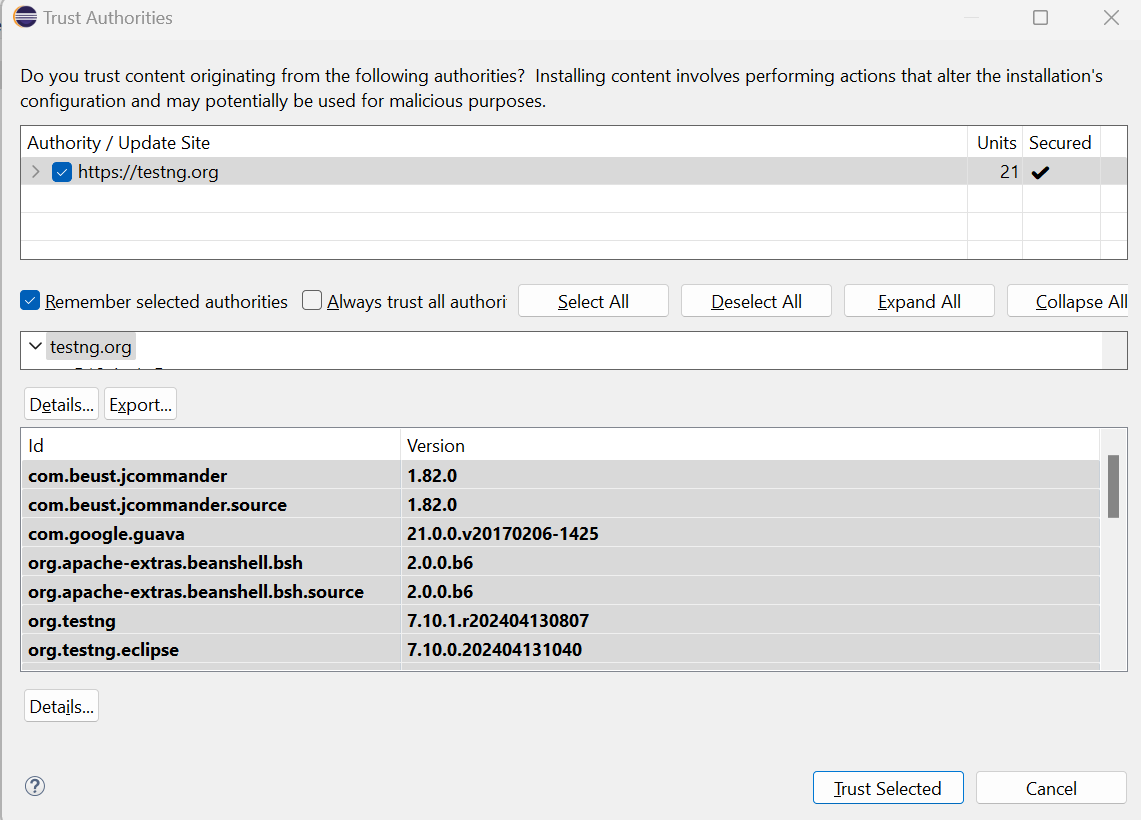
- Check the “https://testng.org” check box and click on the “Trust Selected” button to proceed.
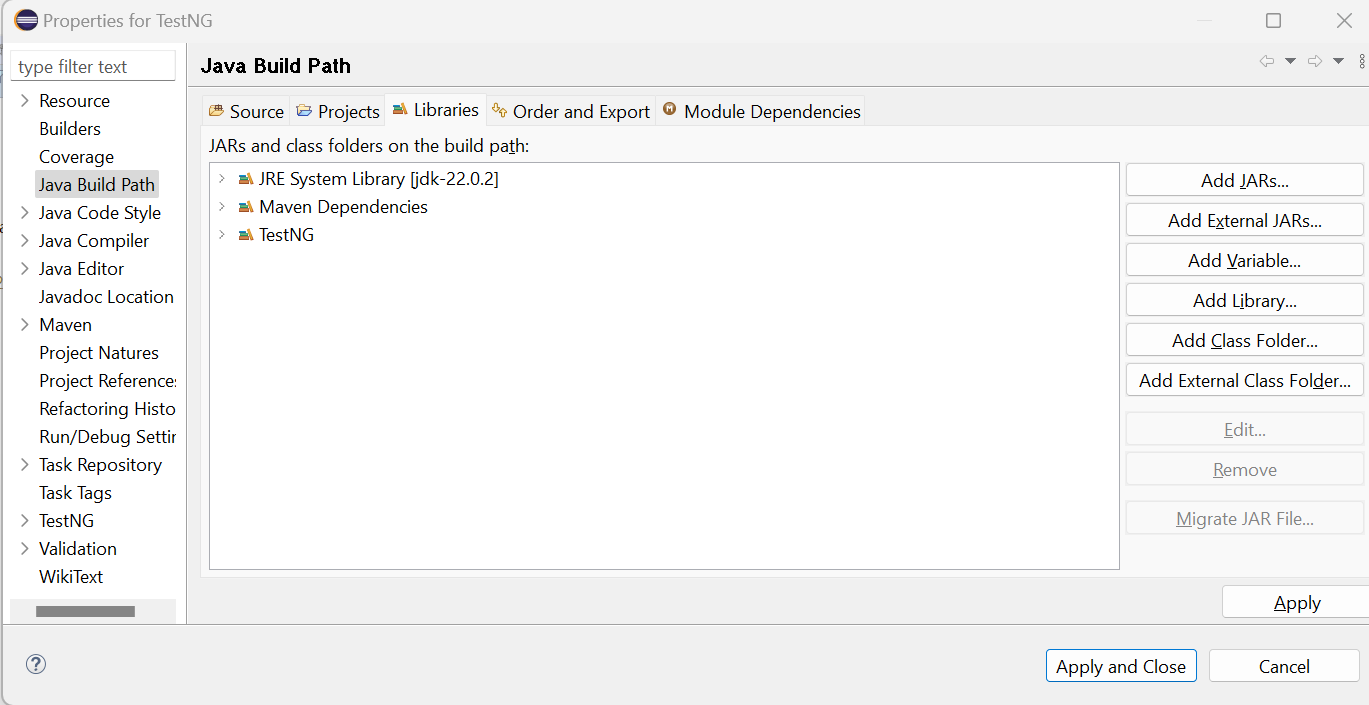
- Once the setup is complete it will prompt to restart the IDE. After restarting the IDE, you can verify the TestNG installation by right clicking on imported Maven project > Build Path > Configure build path. Click on the “Add Library” button, select TestNG and click on “Next” and then “Finish” button.
Step 2. Add TestNG and Selenium Java dependencies in Maven’s pom.xml file under dependencies tag. Save the pom.xml and verify the dependencies are listed under Maven Dependencies.
<dependencies>

                  <!-- https://mvnrepository.com/artifact/org.seleniumhq.selenium/selenium-java -->

                  <dependency>

                         <groupId>org.seleniumhq.selenium</groupId>

                            <artifactId>selenium-java</artifactId>

                            <version>4.23.0</version>

                  </dependency>


                  <!-- https://mvnrepository.com/artifact/org.testng/testng -->

                  <dependency>

                            <groupId>org.testng</groupId>

                            <artifactId>testng</artifactId>

                            <version>7.10.2</version>

                  </dependency>


       </dependencies>
Step 3. Create the TestNG test case.
- Create a Maven project and under src/test/java, create a test package. Create a class under test package as “LaunchBrowser”
package testcases;

import org.openqa.selenium.By;

import org.openqa.selenium.WebDriver;

import org.openqa.selenium.WebElement;

import org.openqa.selenium.chrome.ChromeDriver;

import org.testng.Assert;

import org.testng.annotations.AfterClass;

import org.testng.annotations.BeforeClass;

import org.testng.annotations.Test;


public class LaunchBrowser {

  WebDriver driver;


  @BeforeClass

  public void setUp() {

            driver = new ChromeDriver();

  driver.get("https://www.browserstack.com/");

  }


  @Test(priority = 1)

  public void verifyTitle() {

            Assert.assertEquals(driver.getTitle(), "Most Reliable App & Cross Browser Testing Platform | BrowserStack");

  }


  @Test(priority = 2)

  public void verifyGetStratedFree() {

            WebElement logo = driver.findElement(By.cssSelector("header#header-habitat a[title='BrowserStack Logo'] img"));

            String logoImg = logo.getAttribute("src");

            Assert.assertNotEquals(logoImg, "");

  }


  @AfterClass

  public void tearDown() {

            driver.quit();

  }

}
@BeforeClass and @AfterClass annotations are used for setup and tear down methods respectively. @Test annotation is used with priority attribute to assign the priority for each test case and therefore “verifyTitle” will run before “verifyGetStratedFree” as it has priority value as “1”.
Step 4. Run the TestNG test case
To run the test case, right click on “LaunchBrowser” and select “Run As” > “TestNG Test”. The test case will run and you can view the TestNG Result.
Step 5. Create testing.xml file to run suite of test cases
If there is a suite of test cases, testing.xml file can be used which helps in configuring and running the test cases.
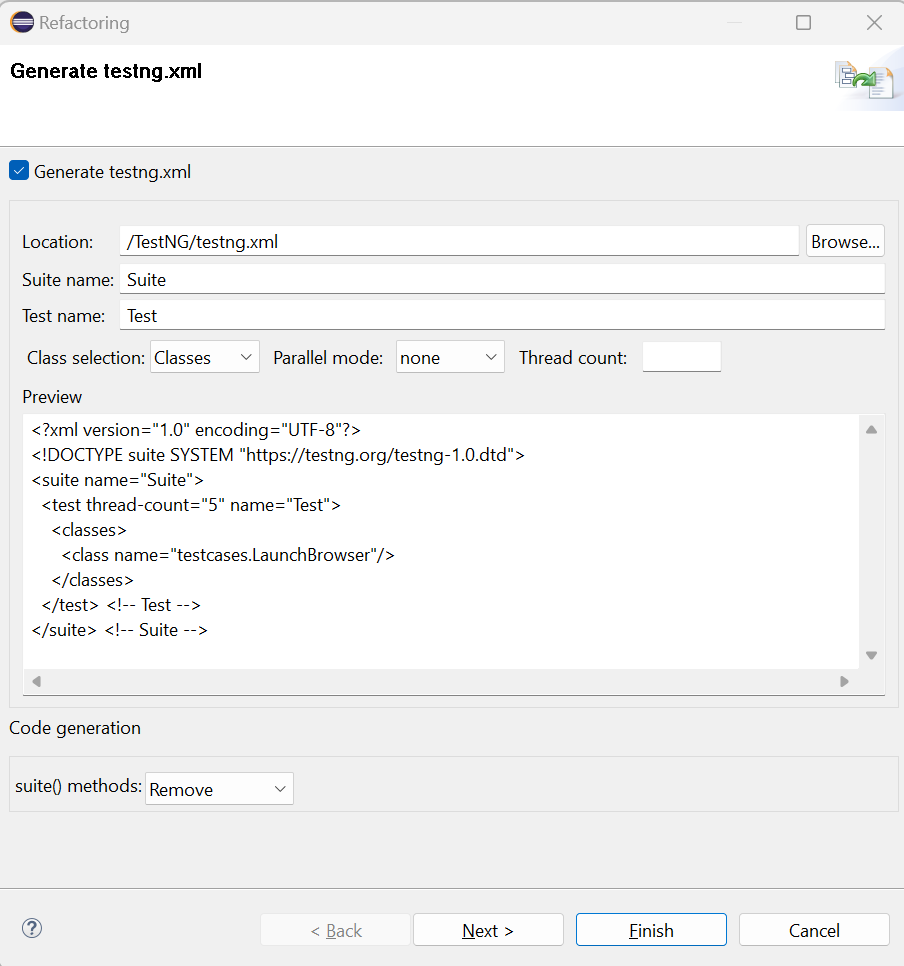
To run a suite of test cases, create a testing.xml file by right clicking on the test case from package explorer, and then selecting “TestNG” > Convert to TestNG.
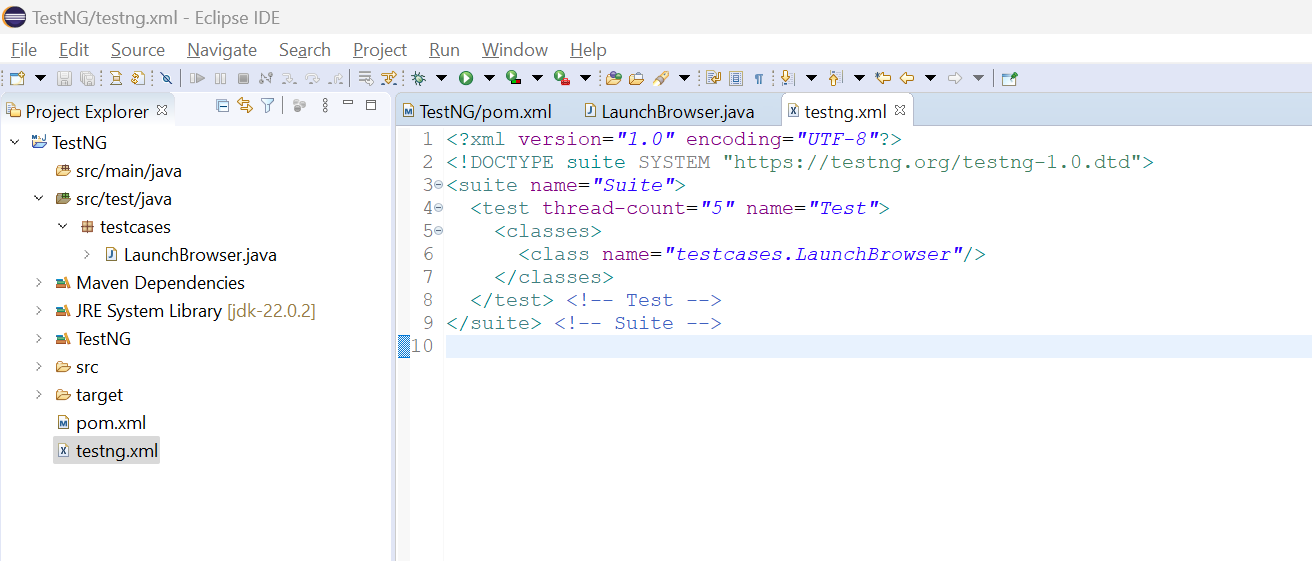
Click on the “Finish” button and check that the testing.xml file is created under the root directory of the project.
Step 6. Run the testing.xml file
Right click on the testing.xml file and select “Run As” > “TestNG suite”
Best Practices of TestNG
Below are some of the best practices to follow when using TestNG:
1. Parameterize Tests: To run tests with different inputs, use @Parameters and @DataProvider which helps in reducing code duplication and enhances test coverage. @DataProvider can also be used to supply multiple sets of data to a test method.
2. Implement parallel execution in TestNG: To speed up the test execution and run tests in parallel, you can use testing.xml file to configure. You can specify parallel execution at the method, test or suite level in the testing.xml
3. Implement TestNG listeners: To customise test execution, logging and reporting you must use ITestListener and ITestResult. It aids in capturing screenshots on failures and sending notifications.
4. Organize testcases with groups: TestNG groups allow you to perform grouping of different test methods. You should use groups when you want to access the test methods of different classes. Groups can be specified either in the <suite> tag or <test> tag.
5. Use annotations wisely: To control the test execution order and dependencies, use @Test annotation for test method with attributes such as “priority” and “dependsOnMethods”. You should also use @BeforeSuite, @AfterSuite, @BeforeClass, @AfterClass, @BeforeTest and @AfterTest annotations for setup and teardown methods.
6. Use Assertions: TestNG provides various assertion methods such as assertEquals, assertNotEquals, assertTrue, assertFalse, etc. Make use of these assertions to verify the test result.
7. Implement reporting: TestNG helps to generate testing reports for the test execution. These TestNG reporter Logs can be integrated with Allure and Extent Report for more detailed and customised test reports.
Why run TestNG Tests on BrowserStack Automate?
TestNG is a popular and most widely used testing framework for Selenium automation, as it provides ways to write the test cases in proper order, and helps in parallel execution and report generation.
If you run TestNG tests on BrowserStack Automate, it will increase the scalability and reduce the maintenance of test cases. BrowserStack provides access to a wide range of devices, browsers and operating systems to test your applications across different environments without needing to maintain complex infrastructure.
BrowserStack Automate has built-in support for TestNG making it easier to configure and run your test cases.
Conclusion
TestNG is a powerful testing framework that simplifies test configuration, execution, and reporting for Java applications. With flexible test suite management via XML files and features like annotations, parallel execution, test grouping etc, TestNG facilitates an easy-to-build, powerful and maintainable automated test suite.
You can further increase the scalability and reduce the maintenance of test cases running your TestNG tests on BrowserStack Automate.
Useful Resources for TestNG
- Database Testing using Selenium and TestNG
- How to use DataProvider in Selenium and TestNG?
- All about TestNG Listeners in Selenium
- How to run parallel test cases in TestNG
- How to use TestNG Reporter Log in Selenium: Tutorial
- Prioritizing tests in TestNG with Selenium
- JUnit Vs TestNG
- How to run parallel test cases in TestNG
- How to run failed test cases using TestNG in Selenium Webdriver?


