Creating user interfaces for Apple platforms has come a long way, especially with the introduction of SwiftUI in 2019.
Overview
What is SwiftUI?
SwiftUI is Apple’s framework for creating UIs on iOS, macOS, watchOS, and tvOS using clean, declarative syntax that replaces storyboards.
What is UI Testing in SwiftUI?
UI testing simulates user interactions with SwiftUI apps to verify interface behavior and catch bugs before release.
Best Practices for UI Testing in SwiftUI
- Assign identifiers to all interactive elements to make tests reliable and easy to maintain.
- Test one specific feature or user flow per test to simplify debugging and improve test speed.
- Reset the app to a fresh state before running tests to avoid interference from previous runs.
- Wait for elements to appear instead of assuming immediate availability to prevent intermittent failures.
- Regularly test on actual hardware using tools like BrowserStack to catch issues that simulators may overlook.
This article explores everything from SwiftUI and UI testing basics to real code examples, tools like XCUIElement, and how to test SwiftUI apps on real devices.
What is Swift UI?
SwiftUI is Apple’s framework for building user interfaces across iOS, macOS, watchOS, and tvOS using declarative Swift code. Introduced in 2019, it simplifies UI development with less code and a shared API for consistent cross-device experiences.
Even though it’s relatively new, SwiftUI feels familiar to those with experience in AppKit or UIKit. It simplifies UI development by allowing you to build powerful, responsive interfaces with far less code than traditional approaches.
Key Features of SwiftUI
SwiftUI simplifies UI development with powerful features designed for building seamless, cross-platform Apple apps:
- Declarative Syntax: Write clear, concise code that describes the UI’s behavior.
- Cross-Platform Support: One codebase for iOS, macOS, watchOS, and tvOS.
- Consistent Tools & APIs: Shared design and layout tools across all Apple devices.
- Built on Swift: Fast, safe, and modern programming language foundation.
- Accessibility-Ready: Easily supports features like VoiceOver and Dynamic Type.
- Easy Animation: Create smooth, native animations with minimal effort.
- Dark Mode & Localization: Built-in support for dark mode and multiple languages.
Also Read: How to approach Cross Platform Testing
Benefits of SwiftUI
SwiftUI offers several advantages that make app development faster, cleaner, and more efficient:
- Cleaner, More Readable Code: Uses simple, declarative syntax that’s easier to write, read, and maintain.
- Live Previews: See UI updates instantly across devices without rebuilding the app.
- Seamless Integration: Works smoothly with Combine and RealityKit for reactive programming and AR features.
- Built-in Accessibility & Localization: Automatically supports dynamic text, screen readers, and multiple languages.
- Interactive Canvas Editor: A live canvas replaces Interface Builder, reflecting code changes immediately.
- Simplified Layouts: Uses intuitive stacks (HStack, VStack, ZStack) instead of complex AutoLayout constraints.
- Code-Only UI: Eliminates storyboards for reusable views and easier team collaboration.
- Improved Data Sharing: Supports native copy-paste and sharing with the new Transferable protocol.
What is UI Testing?
UI (User Interface) Testing is the process of checking whether an app’s visual elements work correctly when a user interacts with them.
This includes testing buttons, text fields, menus, navigation, and other UI components to ensure that everything responds properly, just as a real user would expect.
Instead of manually tapping through the app every time, UI testing can be automated to simulate user actions like tapping, scrolling, typing, or swiping. This helps developers catch bugs early and ensure the app delivers a smooth experience.
What is UI Testing in Swift?
In Swift, UI testing uses XCTest and XCUITest, Apple’s official testing frameworks. With these tools, you can write test scripts that launch your app, interact with the UI, and check if the correct screens or messages appear.
Swift’s UI testing works well with SwiftUI, allowing you to test how views behave across different devices, screen sizes, and data states. You can also use elements like XCUIElement to tap buttons, enter text, and verify results – all in code.
Must Read: How to perform XCode UI testing?
When to use SwiftUI?
Here is when you should use Swift UI:
- Creating new features for use within an app is reportedly the quickest when done with SwiftUI. You can get almost the same results in considerably less time, and it involves a lot less code. The live preview functionality in SwiftUI is another factor that expedites app creation. This is why the adoption of Swift Chat SDK among iOS app developers is anticipated with such enthusiasm.
- If you’re looking for a framework to help you create outstanding transitions and animations, look no further than SwiftUI. There is a tonne of free animations available to use for developers. In addition, SwiftUI makes it simpler to switch between views.
- SwiftUI’s claimed compatibility with Apple’s mobile devices (such as the Apple Watch, iPhone, and MacBook) is a major selling point. The views in SwiftUI should scale to fit any device.
- If you want to make iOS widgets, SwiftUI is the way to go. SwiftUI and widgets make a great pair. Your developers will have to write some SwiftUI code if the app needs a widget.
Understanding XCUIElement (with Example)
In Xcode UI testing, XCUIElement represents a single on-screen UI element—like a button, text field, label, or switch.
It’s the core class used to interact with elements during testing. You can perform actions such as tap(), typeText(), swipeUp(), or check if an element exists. These simulate real user interactions to help catch UI bugs early.
Related Classes:
- XCUIApplication: Launches and controls the app during the test.
- XCUIElementQuery:Finds UI elements using accessibility identifiers or labels.
Example of a Simple UI Test Using XCUIElement
import XCTest

class MyUITests: XCTestCase {


let app = XCUIApplication()

override func setUpWithError() throws {

continueAfterFailure = false

app.launch() // Start the app

}

func testLoginButtonExistsAndCanBeTapped() {

// Query the login button by its accessibility identifier

let loginButton = app.buttons["login_button"]

// Check if the button exists

XCTAssertTrue(loginButton.exists)

// Tap the button

loginButton.tap()

}

}
Explanation:
app.buttons[“login_button”] is an XCUIElement. We check if it exists using .exists and simulate a user tap using .tap().
UI Testing in Swift
In Xcode UI testing, XCUIElement represents a single on-screen UI element—like a button, text field, label, or switch.
It’s the core class used to interact with elements during testing. You can perform actions such as tap(), typeText(), swipeUp(), or check if an element exists. These simulate real user interactions to help catch UI bugs early.
Related Classes:
- XCUIApplication: Launches and controls the app during the test.
- XCUIElementQuery: Finds UI elements using accessibility identifiers or labels.
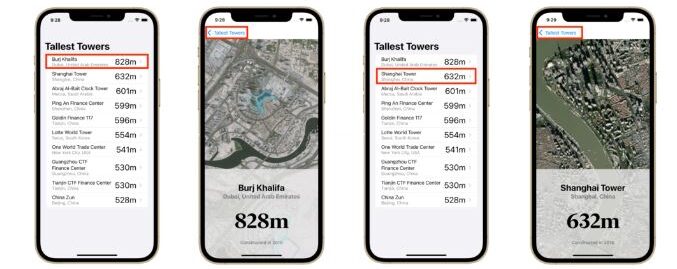
The TallestTowers app displays a ranked list of the world’s tallest buildings, each with a detailed view.
This test verifies that tapping on a tower opens the correct details screen and that using the back button returns to the main list, ensuring smooth navigation across multiple entries.
Step-by-Step Guide of UI Testing in Swift
Step 1: Download the TallestTowers app project and open it in Xcode, ensuring it runs correctly on the simulator.
Step 2: Add a UI Test Target by creating a new UI Testing Bundle and linking it to the app target.
Step 3: Open the test file (e.g., TallestTowersUITests.swift) and add the following:
import XCTest

final class TallestTowersUITests: XCTestCase {

let app = XCUIApplication()

override func setUpWithError() throws {

continueAfterFailure = false

app.launch()

}

}
Step 4: Below the setUpWithError() method, add this test:
func testNavigation() {

// 1. Find and tap the row starting with "Burj Khalifa"

let burjKhalifaPredicate = NSPredicate(format: "label BEGINSWITH 'Burj Khalifa'")

app.tables.buttons.element(matching: burjKhalifaPredicate).tap()


// 2. Tap the "Tallest Towers" back button to return to main list

app.navigationBars.buttons["Tallest Towers"].tap()


// 3. Find and tap another tower starting with "China"

let shanghaiTowerPredicate = NSPredicate(format: "label BEGINSWITH 'China'")

app.tables.buttons.element(matching: shanghaiTowerPredicate).tap()


// 4. Tap the back button again

app.navigationBars.buttons["Tallest Towers"].tap()

}
Step 5: Run the Test
- In the test file, click the play button next to testNavigation() or
- Press Cmd + U to run all tests in the class.
Source: Semaphore
How to Add UI Tests in Your App
Adding UI tests to your Swift or SwiftUI app is straightforward with Xcode. Whether testing a login screen or a navigation flow, these tests simulate user actions and help you catch bugs early.
Here’s a step-by-step guide to get started:
Step 1: Add a UI Test Target
If your project doesn’t already include a UI testing target:
- In Xcode, go to File > New > Target.
- Select iOS UI Testing Bundle.
- Name the target (e.g., MyAppUITests) and make sure it’s linked to your app’s main target.
- Xcode will generate a new UI test class with boilerplate code.
Step 2: To reliably find UI elements during tests, give your buttons, labels and other components accessibility identifiers.
Button("Login") {

// your login logic

}

.accessibilityIdentifier("login_button")


This ensures your test can locate the element using:

let loginButton = app.buttons["login_button"]
Step 3: Write a Simple Test
Open the generated test file (e.g., MyAppUITests.swift) and start by writing a basic test:
import XCTest

final class MyAppUITests: XCTestCase {

let app = XCUIApplication()

override func setUpWithError() throws {

continueAfterFailure = false

app.launch()

}

func testLoginButtonExistsAndTaps() {

let loginButton = app.buttons["login_button"]

XCTAssertTrue(loginButton.exists)

loginButton.tap()

}

}
What this test does:
- Launches the app.
- Finds the login button.
- Verifies it exists.
- Simulates a tap.
Step 4: Use Xcode’s UI Test Recorder by clicking the record button and interacting with the app to auto-generate test code; you can then edit this code manually.
Step 5: Run your tests by pressing Cmd + U or clicking the diamond icon next to the test, and review results in the Test Navigator.
Testing SwiftUI Apps on Real Mobile Devices
With App Live, you can test and debug your mobile app in real-time on actual Android and iOS devices through a cloud-based platform. It paves the way for on-the-fly testing without the complexity of setting up and maintaining a private cloud for testing devices.
Using the integrations provided by BrowserStack, upload or install your app files. In a development or staging environment, test apps safely. Use capabilities like network simulation, file and media uploads, geolocation testing, localization testing, and accessibility testing to carry out functional testing. Use development tools to debug and correct problems in your app.
BrowserStack App Live offers real device cloud, helping you scale and streamline UI testing in real user conditions.
Key Benefits of Using BrowserStack App Live
- Access real iOS and Android devices covering multiple models and OS versions.
- No need for physical device setup or maintenance of device farms.
- Perform live, interactive testing directly from your browser.
- Debug efficiently with detailed logs, screenshots, and video recordings.
- Easily upload apps and integrate with CI/CD tools like Xcode Cloud and GitHub Actions.
- Test app performance under real network conditions, including 3G, 4G, and throttled Wi-Fi.
- Collaborate in real-time by sharing test sessions with your team.
Learn More: How to perform Automated iOS UI Testing?
Advantages of UI Testing in Swift
Here are the key advantages:
- Automates repetitive manual checks, saving time and reducing errors.
- Simulates real user interactions to verify actual user flows.
- Detects regressions immediately after code changes.
- Works naturally with SwiftUI’s reactive, state-driven UI.
- Integrated into Xcode and XCTest, no extra tools needed.
- Ensures app stability across devices with real device testing.
- Builds team confidence by catching issues early during collaboration
Limitations of SwiftUI
Here are some limitations to keep in mind:
- Only supports iOS 13+ and macOS Catalina+, limiting backward compatibility.
- Complex UI behaviors like animations and gestures can be harder to test.
- Missing some advanced UIKit features for fine control and customization.
- Debugging can be difficult due to declarative code and vague errors.
- Testing tools are still evolving, sometimes requiring workarounds.
- Real device behavior may vary, emphasizing the need for thorough device testing.
Follow-up Read: Understanding what is UI Test Cases (with Examples)
Best Practices for UI Testing in Swift
Here are some proven best practices to help you get the most out of your tests:
1. Use Accessibility Identifiers Everywhere: Always assign .accessibilityIdentifier to interactive UI elements like buttons, text fields, and images. This ensures your tests are stable, readable, and not dependent on layout or label text.
TextField("Username", text: $username)

.accessibilityIdentifier("username_field")
2. Keep Tests Focused and Isolated: Each test should verify one specific flow or outcome, like logging in, navigating to a detail screen, or submitting a form. This makes failures easier to diagnose and speeds up execution.
3. Reset App State Before Each Test: Use setUpWithError() to ensure the app starts from a clean slate. This prevents previous tests from affecting current ones.
override func setUpWithError() throws {

continueAfterFailure = false

app.launchArguments.append("--uitesting")

app.launch()

}
4. Avoid Flaky Tests: Use waitForExistence(timeout:) instead of assuming elements are immediately visible. This avoids failures caused by loading delays or animations.
let button = app.buttons["submit_button"]

XCTAssertTrue(button.waitForExistence(timeout: 5))
Learn More: How to avoid Flaky Tests : Methods
5. Name Your Tests Clearly: Descriptive names like testLoginFailsWithWrongPassword() make it easier to understand what’s being tested and what went wrong if it fails.
6. Use Assertions Strategically
Don’t overdo it – assert the key things that matter. For example:
- XCTAssertTrue() to confirm an element exists
- XCTAssertEqual() to validate label content
- XCTAssertFalse() to confirm that something doesn’t appear
7. Run Tests Regularly in CI/CD: Integrate your UI tests into your CI pipeline using tools like Xcode Cloud, GitHub Actions or Bitrise. This ensures every new commit is validated before release.
8. Test on Real Devices: Use tools like BrowserStack App Live to test your SwiftUI app on real hardware. This reveals layout, gesture, and animation issues that simulators can’t always catch.
Conclusion
Writing tests with a deadline looming might be stressful, but it pays off in the end. The integrity of your app’s most important user interface flows can be protected by writing UI tests. Tests help you find regressions before they happen when adding new features or changing code, which speeds up development over time.
Planning time for setting up CI/CD for your apps is also recommended. As a result, you can stop worrying about whether or not the app’s UI has been properly tested before releasing it and instead focus on providing a stellar experience for users.


