React Native is a widely used framework that allows developers to build mobile applications for both iOS and Android using a single codebase. Its efficiency and flexibility have made it a preferred choice across various industries.
Overview
What is React Native?
React Native is an open-source framework that enables developers to build cross-platform mobile applications using a single JavaScript codebase. It leverages native components, ensuring high performance and a native-like user experience.
Importance of React Native:
- Build apps for iOS and Android with the same codebase, reducing development time.
- Hot reloading allows instant code updates without recompiling the app.
- Uses native components to ensure smooth and responsive applications.
- Backed by a large developer community with extensive libraries and resources.
- Reduces development costs by eliminating the need for separate native teams.
Use Cases of React Native
- Develop for iOS and Android with a single codebase.
- Quickly build and test Minimum Viable Products.
- Create smooth, high-performance shopping experiences.
- Enable real-time updates and interactive UIs.
- Ideal for ride-hailing, food delivery, and tracking apps.
- Build secure and responsive fintech applications.
- Power streaming, video, and music apps.
- Develop telemedicine and fitness-tracking apps.
- Optimize productivity and business workflows.
- Control and monitor connected devices.
This article explores React Native’s core features, advantages, and drawbacks and how to develop a React Native app.
What is React Native?
React Native is an open-source JavaScript framework for building mobile applications for iOS and Android with a single codebase. It combines the power of React with native platform capabilities, ensuring high performance and a seamless user experience.
With React Native, developers can create feature-rich, scalable mobile apps while maintaining efficiency and flexibility.
Also Read: Top 9 JavaScript Testing Frameworks
Use cases of React Native
Here are some key use cases of React Native:
- Develop for iOS and Android with a single codebase.
- Quickly build and test Minimum Viable Products.
- Create smooth, high-performance shopping experiences.
- Enable real-time updates and interactive UIs.
- Ideal for ride-hailing, food delivery, and tracking apps.
- Build secure and responsive fintech applications.
- Power streaming, video, and music apps.
- Develop telemedicine and fitness-tracking apps.
- Optimize productivity and business workflows.
- Control and monitor connected devices.
Importance of using React Native
Here are the key reasons why React Native is important:
- Simplifies mobile app development with a single codebase for iOS and Android.
- Reduces development and maintenance costs by eliminating the need for separate native code.
- Uses JavaScript, making it accessible for front-end developers without learning a new language.
- Open-source framework with continuous updates and community-driven improvements.
- Enhances efficiency with reusable components and faster development cycles.
- Provides near-native performance using native components and optimized rendering.
- Supports hot reloading, allowing developers to see real-time code changes without recompiling.
- Offers a rich ecosystem with third-party libraries for extended functionality.
- Enables seamless integration with existing native applications.
- Backed by a strong developer community, ensuring long-term support and innovation.
Cross-Platform Development in React Native
As many operating systems are hanging around today, such as Android, iOS, Linux, and more, creating applications for each platform was challenging yet highly costly. Performing cost-cutting in the development process became difficult until some cross-platform frameworks were invented.
- Cross-platform development refers to writing a single codebase that renders well on all operating systems.
- The idea behind implementing cross-platform development is to allow an application to work perfectly on multiple platforms to maximize the targetted audience’s coverage.
- Some other benefits include easy maintenance and deployment, the development is quick, and it serves a uniform user experience across the platforms.
How does React Native work?
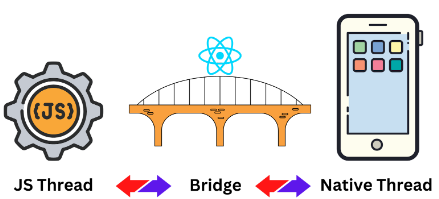
React Native operates using a bridge that facilitates communication between JavaScript and native threads. This bridge enables seamless interaction between the JavaScript logic running in the application and the native components of the target platform.
When a user triggers an event, such as a button click, React Native translates the native event into a JavaScript event via the bridge. This allows React to process and update the UI efficiently while maintaining near-native performance.
Also Read: Puppeteer: How to Click Buttons
Many businesses have leveraged React Native to build high-performance mobile applications such as Instagram, UberEats, Tesla, SoundCloud Pulse, and Wix.
How to Develop a React Native App (with Example)
Developing a React Native app involves several key steps, from setting up the environment to implementing features and debugging the application. By following a structured approach, developers can efficiently build cross-platform mobile apps with a single codebase.
Below is a practical example of how React Native applications are developed and deployed on iOS and Android.
Setting up the Development Environment
Let’s set up the environment before creating our React native project. If you’re a slight beginner in React Native, using Expo to render the output of the React Native application is a good choice; however, if you’re familiar with native development, you might use Android Studio or Xcode.
Expo is a tool built for React Native to enhance the development experience by offering several features, such as you can run the React Native app without having the actual device or emulator.
Prerequisites of the project:
- You must have the latest version of Node.js installed on your system.
- Consider any IDE of your choice, in this example, we use VSCode.
Step 1: Installing dependencies
In this step, we shall install all the required and necessary dependencies for our project. We have to install the dependencies for using the expo on the web.
npx expo install react-native-web@~0.18.9 react-dom@18.1.0 @expo/webpack-config@^0.17.2
Step 2: Create an expo App
npx create-expo-app myApp
cd myApp
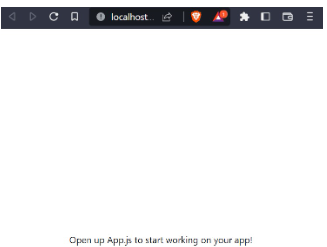
npm run webThe default application will look something like this.
Understanding React Native components
Components are the building blocks of code in a React project. These are independent blocks, which have the great feature of being reusable. As there are functions in JavaScript, there are components in React. However, it returns HTML.
Let’s create a few components in React Native and also understand props.
Creating a React component is the easiest way to create a JavaScript function.
function Welcome(props) {
return <h1>Hello World </h1>;
}
To render the above component or simply function, follow the below script in your main app.js file.
const root = ReactDOM.createRoot(document.getElementById('root'));
const element = <Welcome/>;
root.render(element);
The output will be.
A common yet efficient practice is to create separate files for each component and create a single file to call each component unless it is nested.
In React, props(stand for properties) are attributes passed into components as parameters. Consequently, properties and values help pass data into a component. The idea behind implementing props is it provides a good user experience with quickly-executable code.
Let’s implement props into our previous component.
function Welcome(props) {
return <h1>Hello {props.title}</h1>;
}

const root = ReactDOM.createRoot(document.getElementById('root'));

const element = <Welcome title="World" />;
root.render(element);

Navigation in React Native
React Navigation is a library allowing us to implement navigation functionality in the application. Navigation is often used to go from one state to another. For instance, if you are on the home screen of the application and want to switch to another screen, it is done by implementing the navigation functionality in your application.
Setting up React Native navigation
First, install the required navigation package in your React Native project.
npm install @react-navigation/native
Now, you have to install two core libraries to help implement navigation to your project, react-native-screens, and react-native-safe-area-context.
npx expo install react-native-screens react-native-safe-area-context
Finally, wrap your entry file(App.js or index.js) in NavigationContainer.
import * as React from 'react';
import { NavigationContainer } from '@react-navigation/native';

export default function App() {
return (
<NavigationContainer>{/* Rest of your app code */}</NavigationContainer>
);
}
Navigating between screens
Let’s implement navigation between screens by taking the following example: a user clicks on a button in the home screen navigates to the other screen.
import * as React from 'react';
import {NavigationContainer} from '@react-navigation/native';
import {createNativeStackNavigator} from '@react-navigation/native-stack';

const Stack = createNativeStackNavigator();

const MyStack = () => {
return (
<NavigationContainer>
<Stack.Navigator>
<Stack.Screen
name="Home"
component={HomeScreen}
/>
<Stack.Screen name="Other" component={ProfileScreen} />
</Stack.Navigator>
</NavigationContainer>
);
};
- First, in the index.js file, inside the NavigationContainer element, define multiple screens using Stack.Screen component.
- The option prop of Stack.Screen takes component props to define the screen for navigation.
const HomeScreen = ({navigation}) => {
return (
<Button
title="Switch Screen"
onPress={() =>
navigation.navigate('Other')
}
/>
);
};
const ProfileScreen = ({navigation, route}) => {
return <Text>This is Other Screen</Text>;
};
Now create two components between which you want to obtain navigation.
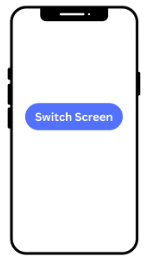
After clicking the button, the screen switches.

Using Stack Navigation
In stack navigation, the latest screen stacks on the top of a stack during the transition from one screen to another. It is implemented to save the back stack or navigation history.
To implement stack navigation, install the stack navigator with the following command.
npm install @react-navigation/stack
Then, install several libraries required by the stack navigator.
npx expo install react-native-gesture-handler
import 'react-native-gesture-handler';
Note that, you must import the package on your index file on the top of everything.
npx expo install @react-native-masked-view/masked-view
npx pod-install ios
Note that it is only required if you’re developing on MacOS for iOS platform.
import { createStackNavigator } from '@react-navigation/stack';

const Stack = createStackNavigator();

function MyStack() {
return (
<Stack.Navigator>
<Stack.Screen name="Home" component={Home} />
<Stack.Screen name="SecondScreen" component={SecondScreen} />
<Stack.Screen name="ThirdScreen" component={ThirdScreen} />
</Stack.Navigator>
);
}
Using Tab Navigation
Tab Navigation is the most common type of navigation existing in mobile applications. In this, the navigation buttons are placed on either the top of the screen as the header or at the bottom for easy navigation throughout the application.

Styling in React Native
Styling in React Native is achieved with the help of JavaScript. Alternatively, you can create an object of Style and pass it on to the components you want to apply it using props. The latter method is also called creating Stylesheet, similar to a CSS sheet by moving styles away from the render function.
import React from 'react';
import {StyleSheet, Text, View} from 'react-native';

const Styles = () => {
return (
<View style = {{flex: 1, backgroundColor: "#ffffff" }}>
<View>
<Text style={style.blueHeading}>BrowserStack blue</Text>
<Text style={style.redHeading}>BrowserStack red</Text>
<Text style={style.greenHeading}>what is react native</Text>
</View>
</View>
)
}

const style = StyleSheet.create({
blueHeading : {
fontSize: 50,
color: "blue"
},
redHeading : {
fontSize: 40,
color: "red"
},
greenHeading : {
fontSize: 35,
color: "lightgreen"
}

})
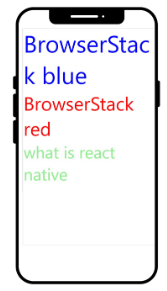
Using Flexbox
The purpose of Flexbox is simple, it is designed to achieve a consistent layout on different screen sizes. It eases the task of creating a responsive design without relying on evaluating the perfect CSS script.
Moreover, Flexbox is even more accessible in React Native than in the web as React Native defines flex as a number that is easier to work along, unlike in CSS for the web where it is treated as a string.
import React from 'react';
import {StyleSheet, View} from 'react-native';

const Flex = () => {
return (
<View
style={[
styles.container,
{
flexDirection: 'row',
},
]}>
<View style={{flex: 1, backgroundColor: 'orange'}} />
<View style={{flex: 2, backgroundColor: 'white'}} />
<View style={{flex: 3, backgroundColor: 'green'}} />
</View>
);
};

const styles = StyleSheet.create({
container: {
flex: 1,
},
});

export default Flex;

Moreover, you can also perform other operations in the above example, such as defining, Flex Direction, Layout Direction, Align Items, and more.
Also Read: How to make React Native App responsive?
Interacting with APIs
API is an abbreviation for Application Programming Interface. In our daily digital life, you may not notice, but APIs are constantly working behind the scenes to provide us smooth user experience in our favorite applications.
Simply put, APIs are messengers that deliver our requests to the server and carry the response back in real-time.
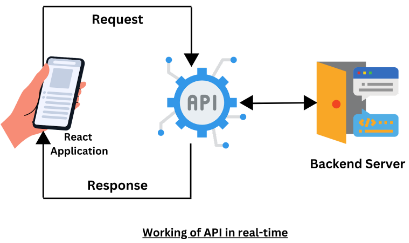
Now, let’s understand how to integrate APIs into our application with the help of ‘Fetch’ and ‘Axios’.
Using Fetch
const getMoviesApi = async () => {
try {
let response = await fetch(
'https://examples.com/data.json'
);
let json = await response.json();
return json.movies;
} catch (error) {
console.error(error);
}
};
Using Axios
import axios from 'axios';
const baseUrl = 'https://example.com';

axios({
method: 'get',
url: `${baseUrl}/api/users/1`,
}).then((response) => {
console.log(response.data);
});
axios.get(`${baseUrl}/api/users/1`).then((response) => {
console.log(response.data);
});
Debugging React Native apps
Debugging is the process of examining the code thoroughly and detecting the present errors in the React Native application. The debugging usually happens during the development stage to save cost and time if done during the production stage.
- In End to end React Native testing, debugging is done on the hardware menu on the simulator on which you’re running your application, either the Android or iOS simulator.
- Open the developer menu in the simulator by pressing CTRL + M for Android and CMD + D for iOS.
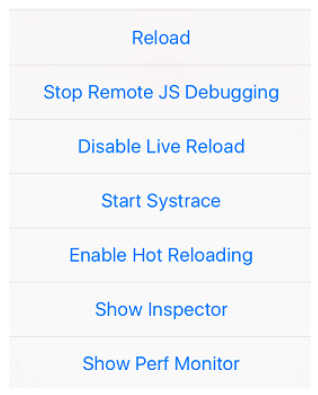
Debugging with remote debugging is achieved when you click on Debug on remote JS remotely. Other options, such as, ‘Show Perf Monitor’ is used to track the performance of your React Native application.
- With BrowserStack Test Observability, teams can access test reporting, precision debugging, and flaky test detection on the same dashboard.
- Fix faster with Smart Failure Analysis, which learns from your testing and identifies the causes of test failures.
- Drill down by test runs, unique errors, or even devices & browsers to find areas to optimize your tests
Follow-Up Read: React vs React Native: When to use which?
How to Deploy React Native apps
The final stage of development involves deploying the application to the Play Store and App Store. While React Native is a widely used cross-platform framework, it does not handle automatic building and deployment.
The next step is to understand the process of building and deploying a React Native project.
Building an iOS application
- Run the command expo build:ios
- Expo will then ask you to upload Keystore, you can either provide your own or let Expo handle it. Either way, you must have a backup.
- To backup Keystore, run the command expo fetch:ios:keystore
- The application will now start building, and once the build is complete, it will provide you a .ipa URL to download the application.
Building and deploying for Android
- Run the command expo build:android
- Expo will then ask you to upload Keystore; you can either provide your own or let Expo handle it. Either way, you must have a backup.
- To backup Keystore, run the command expo fetch:android:keystore.
- The application will now start building, and once the build is complete, it will provide you a .apk URL to download the application.
Deploying to App Store and Play Store
Your app.json file must be set up before publishing your application. Even though there are several properties, three are required and must be properly filled out.
- name
- slug: slug here is the URL slug of your application. expo.io/@username/app-name project
- sdkVersion: It is the expoSDk version of your project.
Once the app.json file is set up, run the following command to publish your project.
expo publishAfter which you will get a link to your application for Android and iOS versions.
React vs React Native
Here is a summary of the key differences between React and React Native.
| Aspect | React (for Web) | React Native (for Mobile) |
|---|---|---|
| Purpose | Build interactive user interfaces for web applications. | Build native mobile apps for iOS and Android. |
| Target Platform | Web browsers (Chrome, Firefox, Safari, etc.). | iOS and Android devices. |
| Language Engine | JavaScript (runs in the browser’s JavaScript engine). | JavaScript (runs in the mobile environment using JS engine, like V8 for Android). |
| Architecture | Follows a virtual DOM architecture. | Follows a bridge architecture between JavaScript and native components. |
| UI Components | Uses HTML and CSS for rendering UI components. | Uses native components for iOS and Android (e.g., <View>, <Text>). |
| Performance | Good for web applications but depends on browser capabilities. | Near-native performance as it uses native mobile components. |
| Cross-Platform Development | Limited to web browsers. | Cross-platform (iOS and Android) with one codebase. |
| Debugging | Debugged using browser DevTools (Chrome DevTools, etc.). | Uses React Native Debugger and mobile emulators or devices. |
| Customization | Full flexibility using HTML, CSS, and JavaScript. | Customization limited to native components and libraries. |
| Community Support | Large and mature community. | Strong but slightly smaller community than React. |
| Components | Web-based components (e.g., <div>, <span>, etc.). | Mobile-specific components (e.g., <View>, <Text>, <Image>). |
| Navigation | Browser-based navigation using libraries like React Router. | Uses libraries like React Navigation for stack and tab navigation. |
| Performance | Web rendering depends on browser speed and optimizations. | Native-like performance, faster on mobile devices compared to hybrid apps. |
| Learning Curve | Moderate learning curve for web developers. | Steeper learning curve, especially if new to mobile development. |
| Code Reusability | Limited to web apps (code reuse within the browser). | High code reuse between iOS and Android apps. |
| Dev Tools | Rich set of web development tools (Chrome DevTools, etc.). | React Native DevTools, mobile emulators, Expo. |
| Testing | Uses libraries like Jest and Enzyme for unit testing. | Uses Jest, Detox, and Appium for unit and end-to-end testing. |
| Rendering Mechanism | Virtual DOM rendering into HTML. | Renders native components directly using a bridge. |
| Deployment | Deployed to web servers and accessible via browsers. | Compiled to native mobile apps, deployed to App Store/Play Store. |
| Scalability | Scales well for large web applications. | Scales well but needs native code optimization for large apps. |
| Build Size | It is generally small, but it depends on the number of dependencies used. | Larger build size due to the inclusion of native libraries. |
Must Read: React vs React Native: When to use which?
Test React Native Apps on Real Devices
Testing React Native apps on real Android devices is crucial for ensuring accurate performance, seamless user experience, and broad compatibility. Emulators offer a controlled environment but fail to replicate real-world conditions.
A cloud-based testing platform like BrowserStack App Live enables instant access to thousands of real devices, eliminating the need for physical device labs.
- Accurate Performance Metrics: Real devices provide precise insights into CPU, GPU, battery, and memory usage, ensuring smooth app performance.
- Reliable User Interaction Testing: Native touch gestures, screen brightness, and background processes behave differently on real devices compared to emulators.
- Scalability & Compatibility: Testing on a diverse range of Android versions, screen sizes, and hardware configurations ensures the app works across multiple devices.
- Real-World Network Conditions: Simulating fluctuating bandwidth, latency, and connectivity issues helps in optimizing app performance under different network conditions.
- Comprehensive Test Coverage: Functional, performance, accessibility, and localization testing require real-world environments to ensure an optimal user experience.
- Faster Debugging & Deployment: Features like screenshots, video recording, network logs, and device logs streamline troubleshooting and improve test efficiency.
- Parallel Testing for Speed: Running tests simultaneously on multiple devices reduces execution time by up to 10X, accelerating the release cycle.
Challenges of React Native (With Solutions)
Here are some key challenges of using React Native with their solutions:
- Performance Issues: Complex animations and large data processing can cause lag. Optimizing rendering and leveraging native modules help improve performance.
- Large App Size: React Native apps can be bulky due to dependencies. Reducing package usage, optimizing assets, and enabling Hermes can significantly cut down the app size.
- Limited Native Module Support: Some platform-specific features may not have direct React Native support. Writing custom native modules or using well-maintained third-party libraries solves this limitation.
- Debugging Challenges: Identifying issues across JavaScript and native code can be difficult. Using debugging tools like Flipper and proper logging helps streamline troubleshooting.
- Third-Party Dependencies: Relying on external libraries can lead to compatibility and security issues. Regular updates and choosing actively maintained libraries ensure stability.
Also Read: End-to-End React Native Testing
Best Practices of using React Native
Below are some best practices to be considered when using React Native:
- Optimize Rendering: Structuring components efficiently and using virtualization techniques prevent unnecessary re-renders, improving app responsiveness.
- Efficient State Management: Using the right state management approach ensures seamless data handling and prevents performance bottlenecks.
- Minimize App Size: Compressing assets, optimizing dependencies, and enabling code splitting help reduce app size and improve load times.
- Ensure Cross-Platform Consistency: Designing UI components with platform-specific variations ensures a native look and feel on both iOS and Android.
- Improve Navigation Performance: Using lightweight navigation libraries and preloading screens helps deliver a smoother user experience.
- Thorough Testing on Real Devices: Testing across multiple devices, screen sizes, and network conditions ensures app stability and seamless user experience.
Useful Resources for React Native
- What is React Native? (The Essential Guide)
- Replace Android Emulator to test React Native
- End-to-End React Native Testing
- Top 5 React Native UI Components
- React vs React Native: When to use which?
- How to make React Native App Responsive?
- UI Testing of React Native Apps
- Test React Native Apps with Cypress
- React Native and Appium Tutorial
- How to Test React Native Apps on iOS and Android Devices
- React Native vs Flutter: What to Choose in 2025
Conclusion
React Native has been a hot topic of discussion ever since it rolled out in the market. It deserves the attention it is gaining, being a powerful JavaScript-based cross-platform framework for building applications for Android and iOS simultaneously. Moreover, many businesses such as Uber, Microsoft, Facebook, and more have scaled after adopting React Native for designing their application.
- React Native’s working mechanics differ from the technologies that co-existed when it was launched.
- It bridges the JavaScript threads and Native threads and establishes a communication so that each works simultaneously.
- Some amazing features that encourage developers to integrate React Native in their next project are reusable code, quicker development, an easy learning curve, frequent enhanced updates, a strong community, and more.
