Flutter allows you to build high-performance, natively compiled applications for mobile, web, and desktop from a single codebase. It simplifies UI development with its rich set of pre-built widgets and fast rendering engine.
Overview
What is Flutter?
Flutter is an open-source UI framework developed by Google for creating cross-platform applications using the Dart programming language. It enables developers to write code once and deploy it across multiple platforms.
Features of Flutter
- Cross-platform development: Write once, run on iOS, Android, web, and desktop
- Optimized performance: Converts code into native ARM, Intel, or JavaScript for efficiency
- Robust developer tools: Includes testing, debugging, and automation support
- Flexible integration: Works with existing applications and services
- Comprehensive widget library: Provides UI components for layouts, animations, and interactions
Use Cases of Flutter
- Mobile apps: Develop feature-rich applications for Android and iOS
- Web platforms: Build responsive dashboards, CMS tools, and online stores
- Prototyping: Quickly test and refine UI/UX concepts before full development
- Embedded systems: Create applications for IoT devices, smart displays, and automotive interfaces
This article explains Flutter, how it works, and how to build a cross-platform app.
What is Flutter?
Flutter is an open-source UI framework developed by Google that allows developers to build natively compiled applications for mobile (Android and iOS), web, desktop (Windows, macOS, and Linux), and embedded systems using a single codebase.
Flutter uses Dart programming language and provides a rich set of pre-designed widgets, tools, and libraries to create visually appealing and high-performance applications.
Also Read: Essential Guide to Flutter Test Automation
Who Uses Flutter?
Flutter is widely used by developers and businesses that need to build high-performance applications across multiple platforms efficiently.
Who Benefits from Using Flutter?
- Independent developers and small teams who want to create cross-platform apps without managing separate codebases.
- Product teams working on multi-platform apps that require a consistent user experience across Android, iOS, web, and desktop.
- Companies looking to prototype quickly and bring ideas to market faster without heavy development costs.
- Organizations prioritizing UI performance and customization to build visually appealing and highly interactive applications.
- Development teams maintaining complex apps that need seamless updates and scalable architecture.
Notable Companies Using Flutter
Many companies rely on Flutter as their primary framework for building applications across multiple platforms.
- Google Pay: Uses Flutter to maintain a consistent UI across Android and iOS and simplify app maintenance and scaling.
Also Read: Test payment using Google Pay
- BMW: Uses Flutter to develop in-car applications and provide a seamless digital experience for drivers.
- YouTube Create: Uses Flutter to power its interactive UI to enable smooth real-time video editing.
- Alibaba: Implements Flutter in its Xianyu app to support rapid updates and maintain a smooth user experience.
- ByteDance: It uses Flutter to create fast and interactive user interfaces for apps like CapCut and business tools.
Flutter Architecture
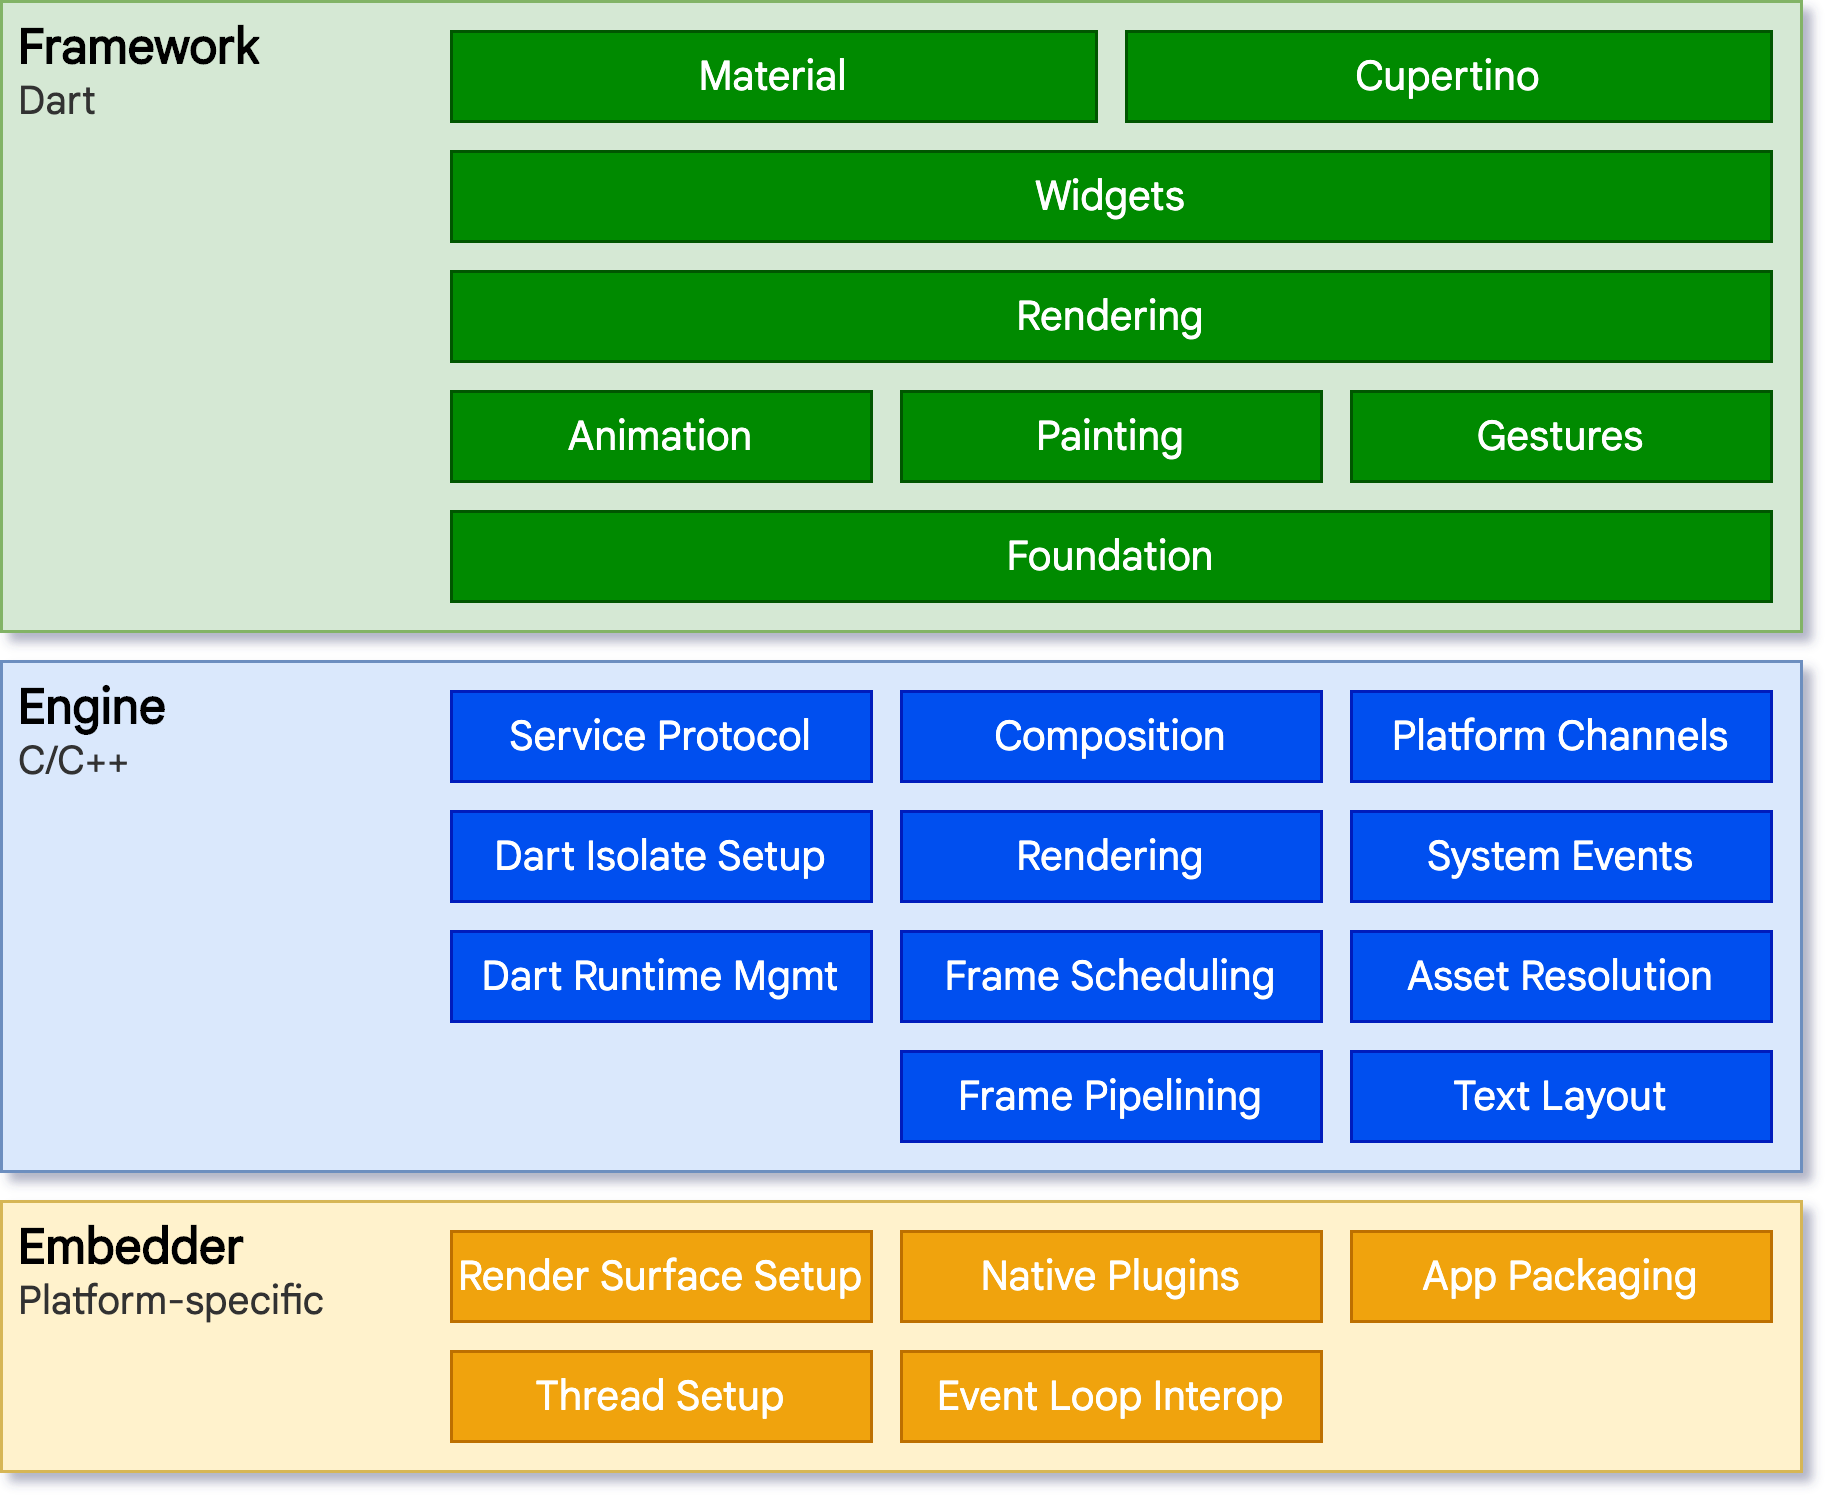
Flutter’s architecture is designed to provide maximum performance, flexibility, and ease of use. It consists of three main layers that work together to deliver a seamless development experience and high-performance applications. Let’s break down each of these layers:
1. Framework (Dart)
The Flutter Framework is at the top of Flutter’s architecture, written in Dart. It provides a wide range of pre-built, customizable widgets that allow you to build beautiful UIs. It also includes libraries for managing user input, gestures, animations, and UI elements.
The framework handles all the user-facing functionality, such as rendering content on the screen, handling user interaction, and managing app state. It enables writing platform-agnostic code, which can be compiled and executed on Android, iOS, Web, macOS, Windows, and Linux
2. Engine (C++)
Below the framework lies Flutter Engine, which is written in C++. This engine is responsible for rendering the app’s UI. It uses Skia, a powerful graphics library, to draw UI components on the screen.
The engine handles low-level tasks such as rendering graphics, managing animations, and providing smooth transitions. The engine is also responsible for interacting with the platform’s native code, allowing the app to access native APIs and features such as GPS, camera, and Bluetooth.
3. Embedder (Platform Specific)
The Embedder layer acts as the bridge between the Flutter application and the underlying operating system. It allows Flutter to interact with the native code and integrate with the platform’s APIs. The embedder is specific to each platform (Android, iOS, web, desktop) and helps Flutter run on different devices.
It handles platform-specific functionality, such as integrating with system-level services, managing the app lifecycle, and handling input devices (touch, keyboard, etc.). It also ensures that Flutter apps run smoothly across various platforms by providing necessary platform-specific integrations.
Read More: Essential Guide to Flutter Test Automation
In short, when you write code in Flutter, you primarily interact with the framework layer, where you define the UI, handle interactions, and manage the state. Once you compile your Flutter app, the Dart code is translated into native machine code that interacts with the engine. The engine renders your UI and animations, while the embedder ensures the app can access platform-specific features and functions.
Advantages of Flutter
Flutter makes app development faster, easier, and more affordable. Start-ups, large companies, and freelance developers can all use it to build high-quality apps with less effort. Here’s why so many developers and businesses choose Flutter.
- Single Codebase for Multiple Platforms: With Flutter, you can develop apps for iOS, Android, web, and desktop using a single codebase, saving time and effort.
- Hot Reload for Faster Development: One of Flutter’s most popular features, Hot Reload, allows developers to see code changes instantly without restarting the entire app, making debugging and UI adjustments easy.
- Beautiful UI with Customizable Widgets: Flutter provides a rich library of widgets that help create visually appealing and highly interactive apps. The design remains consistent across all devices since the UI is rendered using Flutter’s engine.
- High Performance: Flutter apps compile native machine code, which ensures smooth animations and faster load times, making them feel just like native apps.
- Cost-Effective: You don’t need separate teams for iOS and Android development. This means you save costs on development, maintenance, and updates.
- Open Source: Flutter is free to use and open source. This allows developers to contribute, customize, and enhance the framework, making it even more powerful and adaptable.
- Google Support and Strong Community: Flutter is created and backed by Google and constantly evolves with updates, plugins, and tools from a vast global developer community.
Limitations of Flutter
While Flutter offers many advantages, it’s important to consider its limitations when choosing it for your app development. Here are some limitations of Flutter:
- Limited Native Support for Some Features: Flutter may not have built-in support for all native device features or functionalities, which means you might need to depend on third-party plugins or write platform-specific code. This can sometimes lead to more complex and time-consuming development.
- Limited Ecosystem for Libraries and Tools: While the Flutter ecosystem is growing, it still lags behind other frameworks like React Native in terms of the number of available libraries and tools. Developers may face situations where they can’t find the plugin or package they need. This may lead to additional development efforts.
- Larger App Size: Flutter apps might have a larger file size than native apps. This is because Flutter includes its own rendering engine and necessary framework components within the app, which can make the app size significantly larger than a similar native app.
- iOS Look and Feel: Flutter uses its own rendering engine to create a consistent UI across both Android and iOS. But sometimes, this can result in an app that doesn’t always look or feel as native on iOS.
- Learning Curve for Dart: Flutter uses Dart as its primary programming language, which is not as widely known as JavaScript, Kotlin, or Swift. This could present a learning curve for developers unfamiliar with Dart.
Read More: Flutter Debugging: Top Tools and Tips
How Does Flutter Work?
Flutter uses a single codebase that gets compiled into native machine code for different platforms, such as Android, iOS, Web, and Desktop. This allows developers to write code once and deploy it everywhere, providing a consistent experience across devices.
When creating a Flutter app, you primarily build a user interface (UI) using widgets. Widgets are the building blocks of a Flutter app. Everything in Flutter is a widget, from buttons to text and layouts. These widgets are combined to create a user interface, and the code is then compiled into platform-specific code using Flutter’s engine.
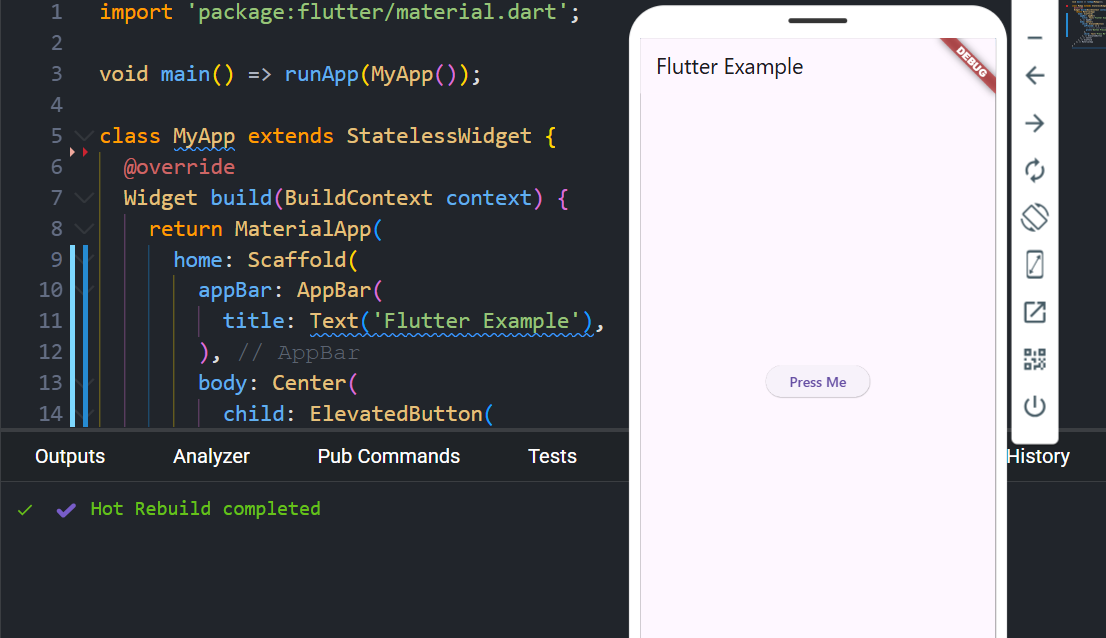
Let’s take a look at a simple example of Flutter code. Below is a basic app with a button that displays a message when pressed:
import 'package:flutter/material.dart';

void main() => runApp(MyApp());

class MyApp extends StatelessWidget {

  @override

  Widget build(BuildContext context) {

    return MaterialApp(

      home: Scaffold(

        appBar: AppBar(

          title: Text('Flutter Example'),

        ),

        body: Center(

          child: ElevatedButton(

            onPressed: () {

              // Action when button is pressed

              print('Button Pressed!');

            },

            child: Text('Press Me'),

          ),

        ),

      ),

    );

  }

}
This code sets up a basic Flutter app structure, where MaterialApp and Scaffold provide the overall layout, AppBar creates a header, and ElevatedButton adds a clickable button for user interaction. Here is the output of this code:
Steps to Build A Cross-platform App Using Flutter
Creating a cross-platform app with Flutter is a smooth and efficient process. Here’s a simple step-by-step guide to get you started:
Step 1: Set Up Flutter SDK
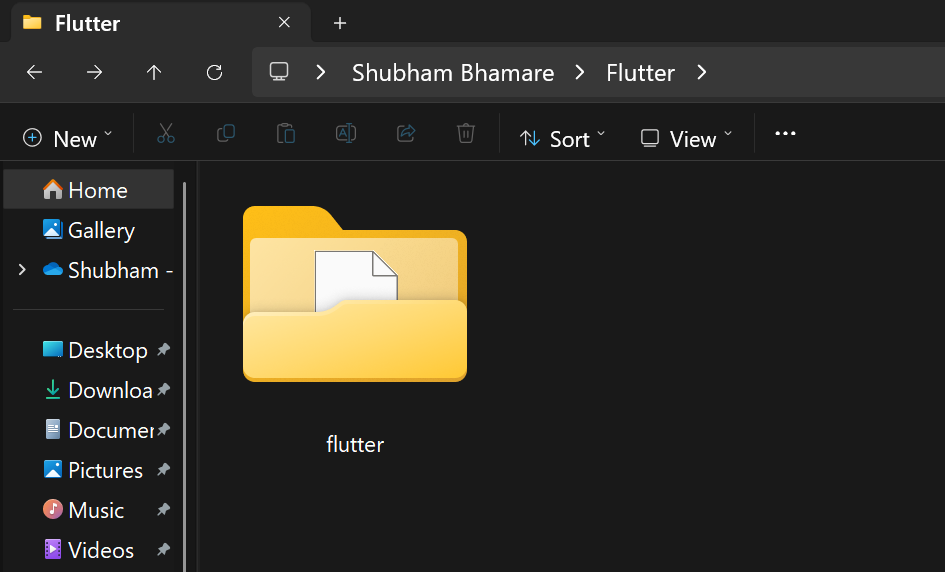
Download the latest Flutter SDK from the official Flutter website. Once the .zip file is downloaded, extract it and move the Flutter folder to a directory of your choice. This will be the base for your Flutter development setup.
In this guide, we’ll use Windows OS to demonstrate the setup.
Step 2: Add Flutter to System PATH
To make Flutter accessible from anywhere on your system, it’s a good idea to add it to your PATH variable:
- Open the Control Panel and search for Edit environment variables for your account.
- Under User Variables, check if there’s an entry named Path:
- If it exists, simply add a new entry pointing to flutter\bin.
- If not, create a new variable named Path and enter the full directory location of flutter\bin.
- After making these changes, restart your PC so they take effect.
Step 3: Install Android Studio
Flutter requires Android development tools, which come bundled with Android Studio:
- Download and install Android Studio from its official website.
- Open Android Studio and follow the on-screen instructions to install the necessary SDKs and build tools required for Flutter development.
Follow-Up Read: Flutter vs Android Studio: Core Differences
Step 4: Install Visual Studio Code
Although Android Studio is a complete development environment, many developers prefer Visual Studio Code (VS Code) for its lightweight and fast performance.
In this guide, we’ll use VS Code to demonstrate. However, you can use any code editor of your choice.
- Download and install VS Code from the official website.
- It is recommended that these two extensions be installed for a great development experience. Open VS Code and go to the Extensions tab. Search for and install Flutter and Dart extensions.
Step 5: Verify Installation with Flutter Doctor
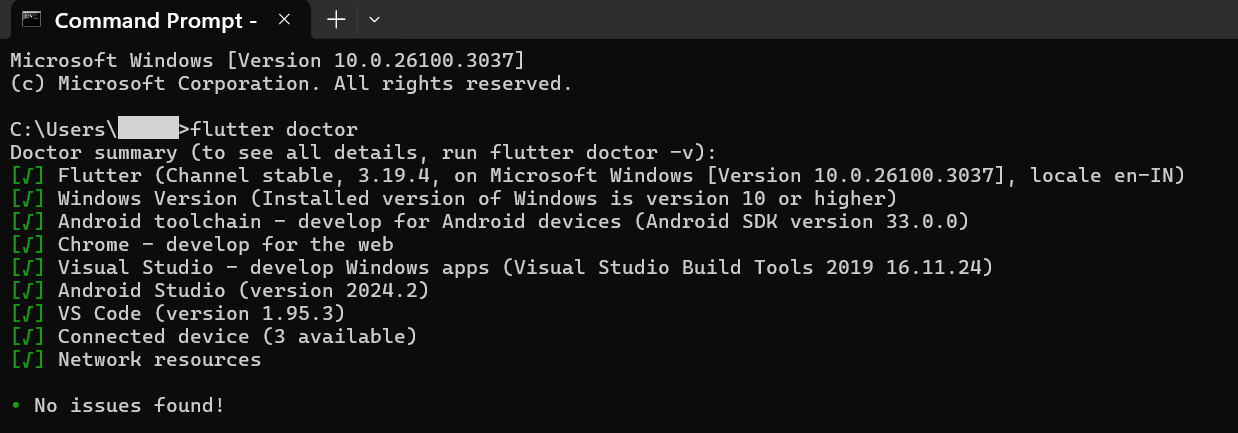
Flutter provides a built-in command-line tool called flutter doctor, which checks if everything is set up correctly:
Open CMD and run
flutter doctorThis command will scan your system and report any missing dependencies or setup issues. If any errors appear, follow the suggestions to fix them. If everything is correct, you’ll see the following output:
Step 6: Create a Flutter Project
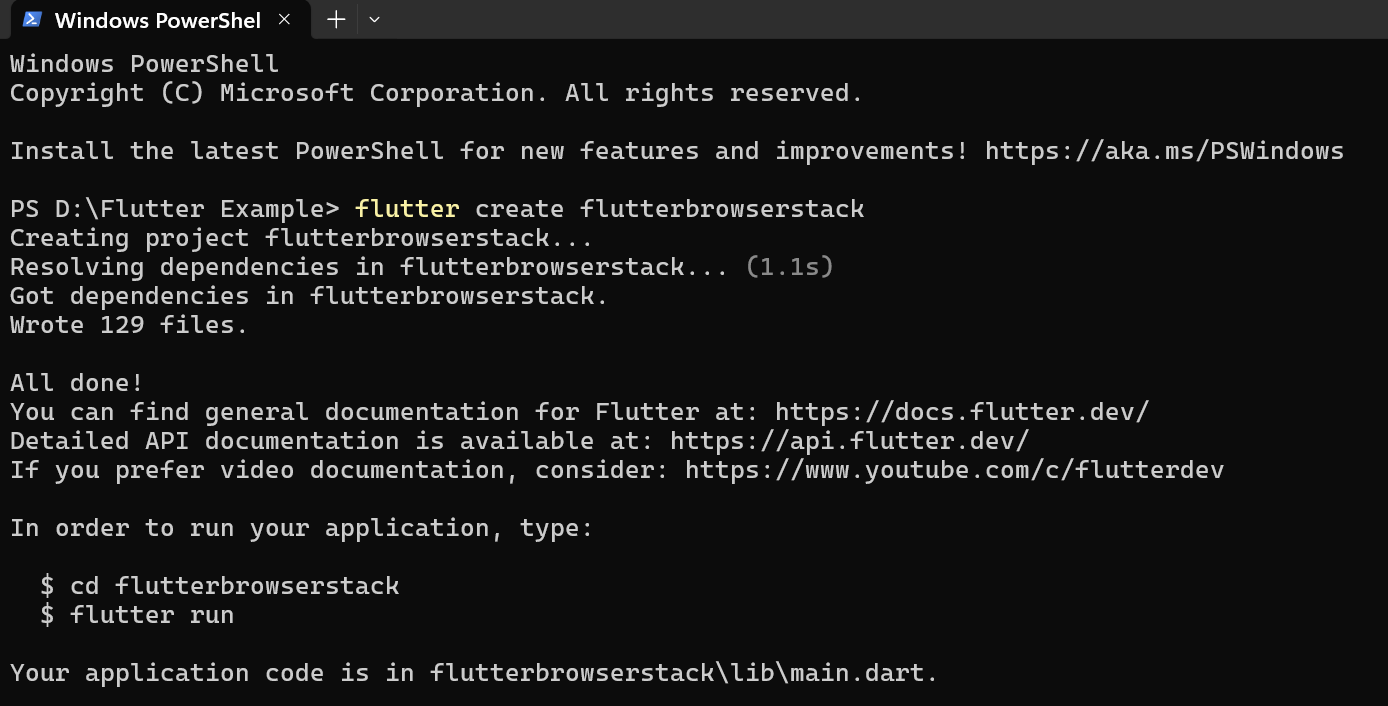
Go to the folder where you want to create your Flutter project. Right-click and select “Open in Terminal” (or open CMD in that directory). Then, type the following command:
flutter create name_of_your_projectFor example, if your project is named flutterbrowserstack, run:
flutter create flutterbrowserstackThis will create a new Flutter project with the necessary files and folder structure.
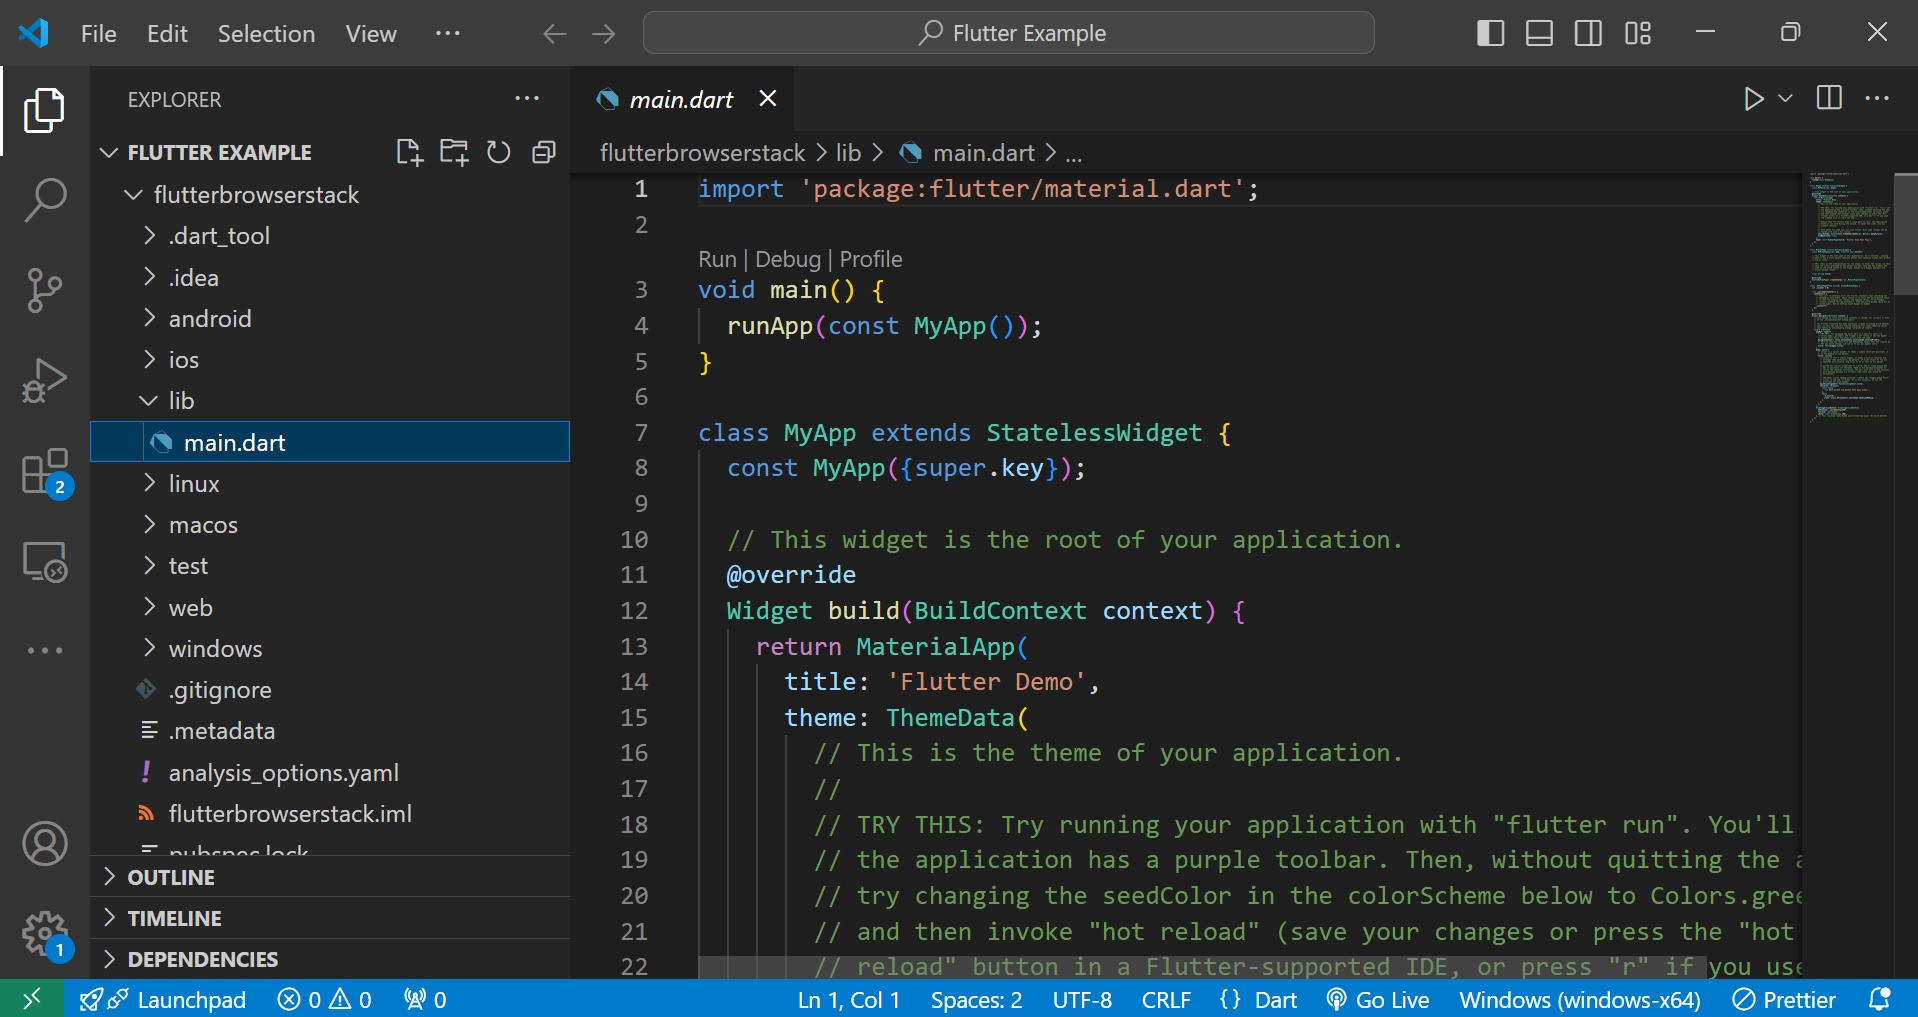
Step 7: Open Your Flutter Project in VS Code
To open your newly created Flutter project in VS Code, follow either of these methods:
- Method 1: Right-click on the flutterbrowserstack folder and select “Open with Code.”
- Method 2: Open a terminal, navigate to the project folder, and run:
codeThis will launch VS Code with your Flutter project.
Step 8: Run Your App
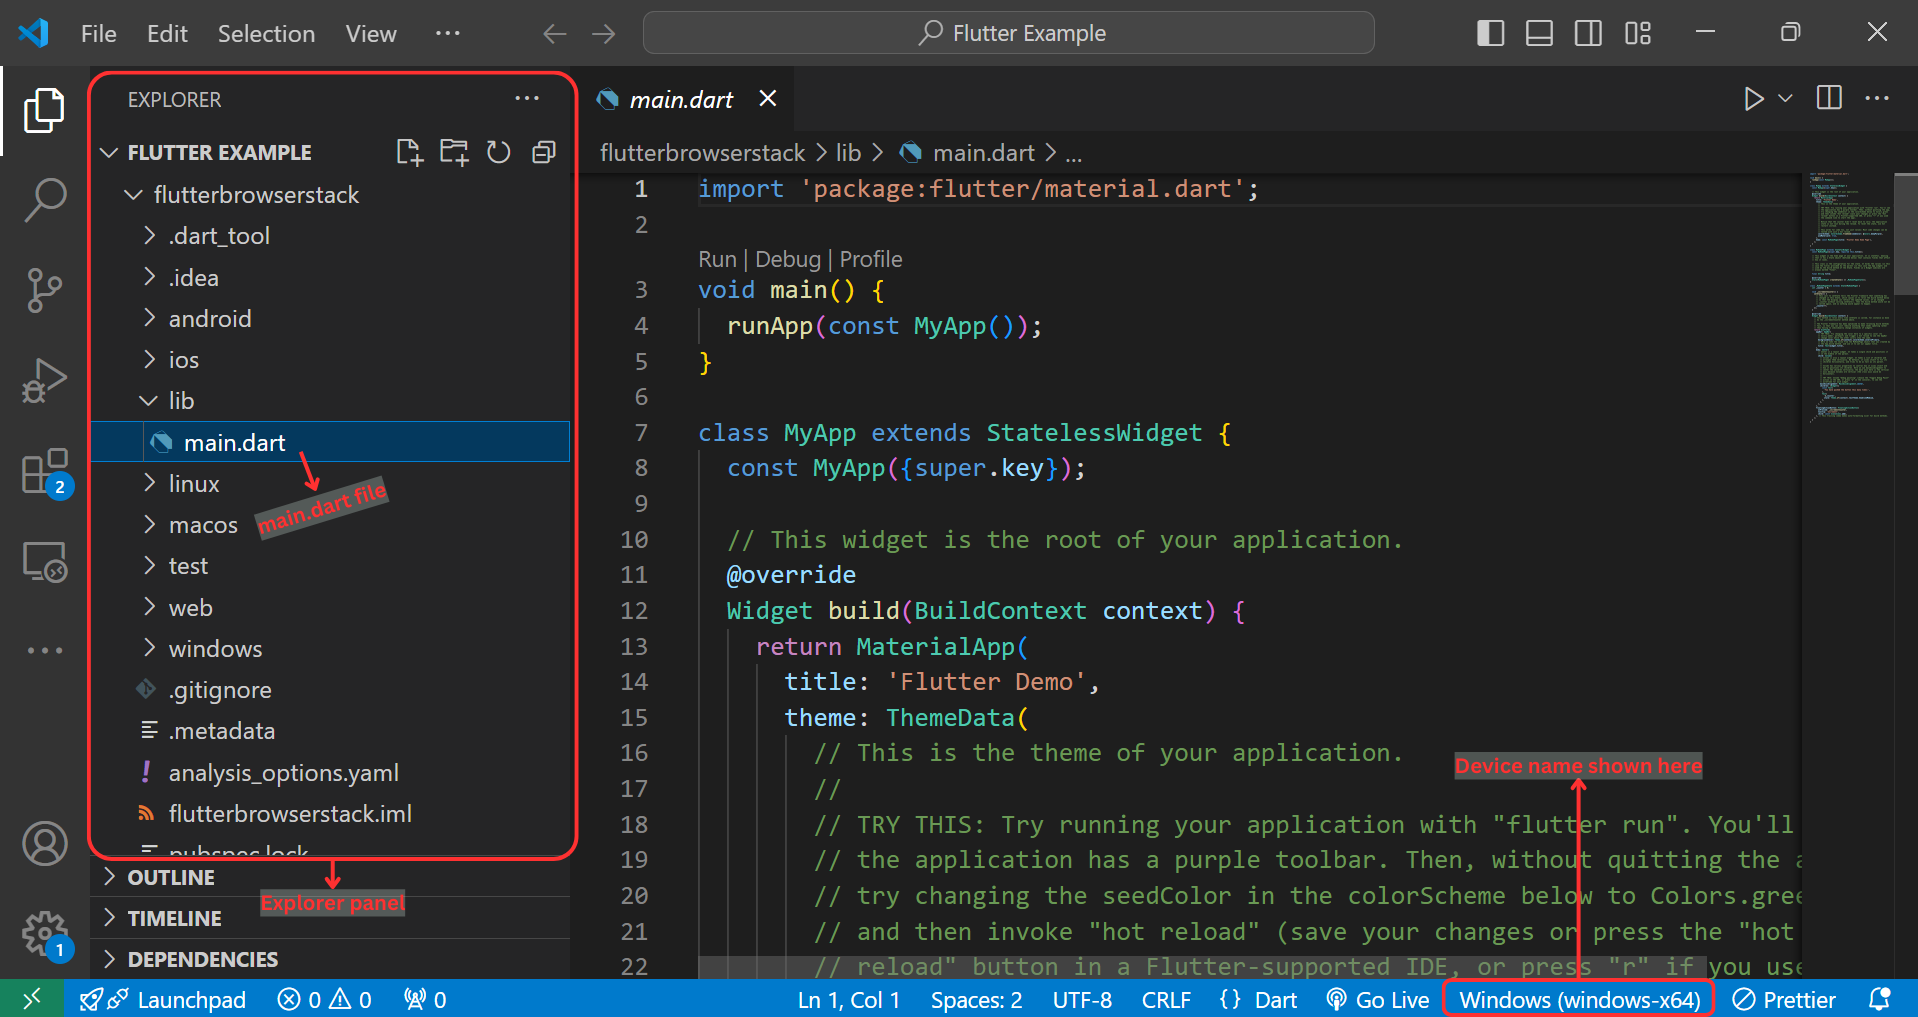
- On the left-hand side of VS Code, you’ll see the Explorer Panel. This is where all your project files and folders live. Navigate to lib > main.dart file. This is the starting point of your app. The code inside is just a simple template to get you started.
- Now, connect a physical device via USB or start an Android emulator. If everything is set up correctly, your device’s name will show up at the bottom right of VS Code.
- Open the integrated terminal by pressing CTRL + ` (Control key + backtick).
- In the terminal, type the following command and hit enter:
flutter run- The first time you run it, it might take a few minutes as Flutter may need to download dependencies and set things up in the background.
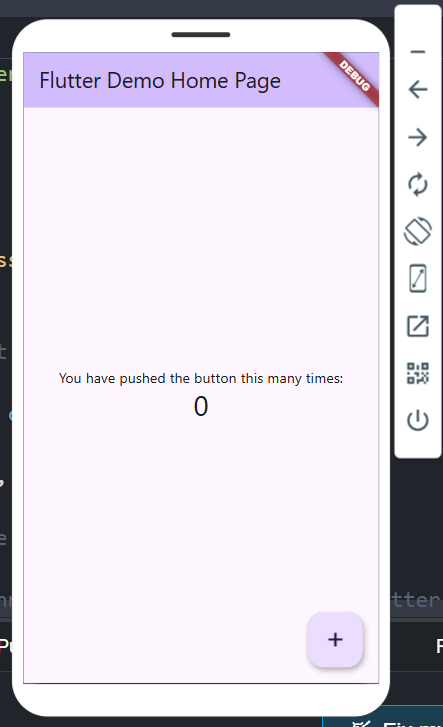
- Once the compilation is done, your app will automatically launch on the connected device.
Read More: How to make Flutter App Responsive
Why Choose Flutter for Mobile App Development
When building a mobile app, you usually have two options: Native development and Cross-platform development.
Native Development: In native development, you build separate apps for Android and iOS with separate codebases. It can be expensive as it requires two separate codebases: Kotlin or Java for Android and Swift or Objective-C for iOS. It also involves complex maintenance, as bug fixes and updates need to be done separately for each platform.
Cross-platform Development: In cross-platform development, you write code once and deploy it across multiple platforms. Flutter simplifies this by offering the speed and performance of native apps while providing the flexibility and efficiency of cross-platform development.
Follow-Up Read: Native vs hybrid app: Which one to choose?
Why Should You Test Your Flutter Apps on Real Devices?
Testing on real devices ensures that your Flutter app performs reliably across different screen sizes, operating systems, and hardware configurations. While emulators and simulators are helpful for early-stage testing, they can’t fully replicate real-world conditions like network variability, battery performance, or hardware-specific issues.
Bugs that go unnoticed in an emulator may lead to crashes or performance problems on real devices. You can identify and resolve these issues early and deliver a smooth and consistent user experience by testing on real hardware.
BrowserStack’s Real Device Cloud enables developers to test their Flutter apps on a wide range of real Android and iOS devices without needing physical hardware. Here’s how you can do it:
- Step 1: Create a BrowserStack account
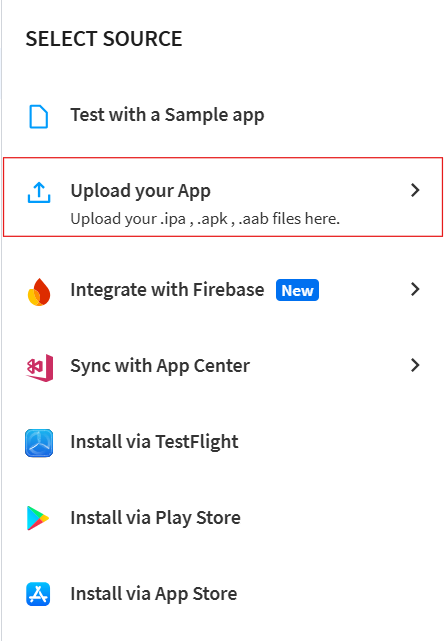
Create an account on BrowserStack and access the real device cloud. - Step 2: Upload Your App
Upload your Flutter app’s APK (for Android) or IPA (for iOS) file to the platform.
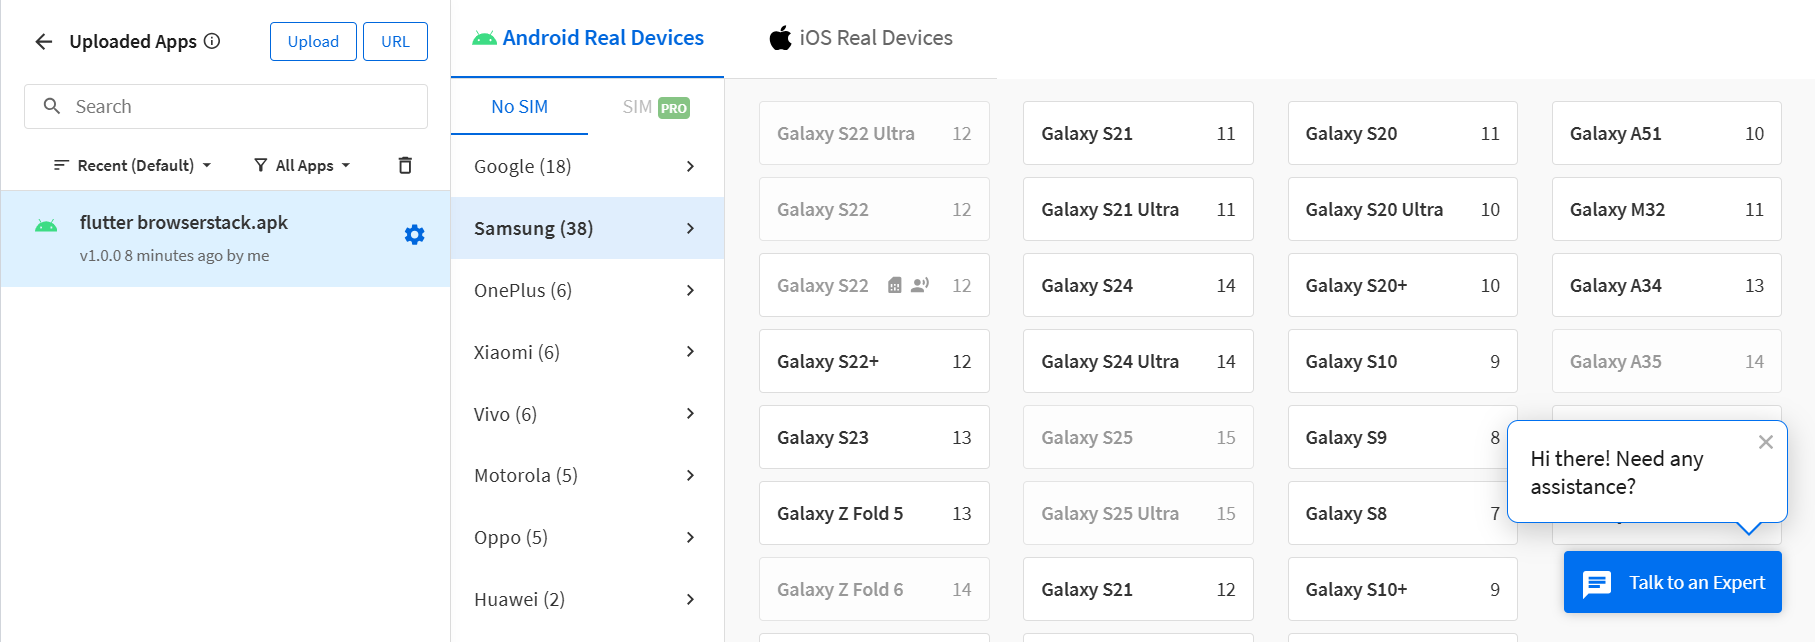
- Step 3: Select a Real Device
Choose from thousands of real mobile devices to test your app.
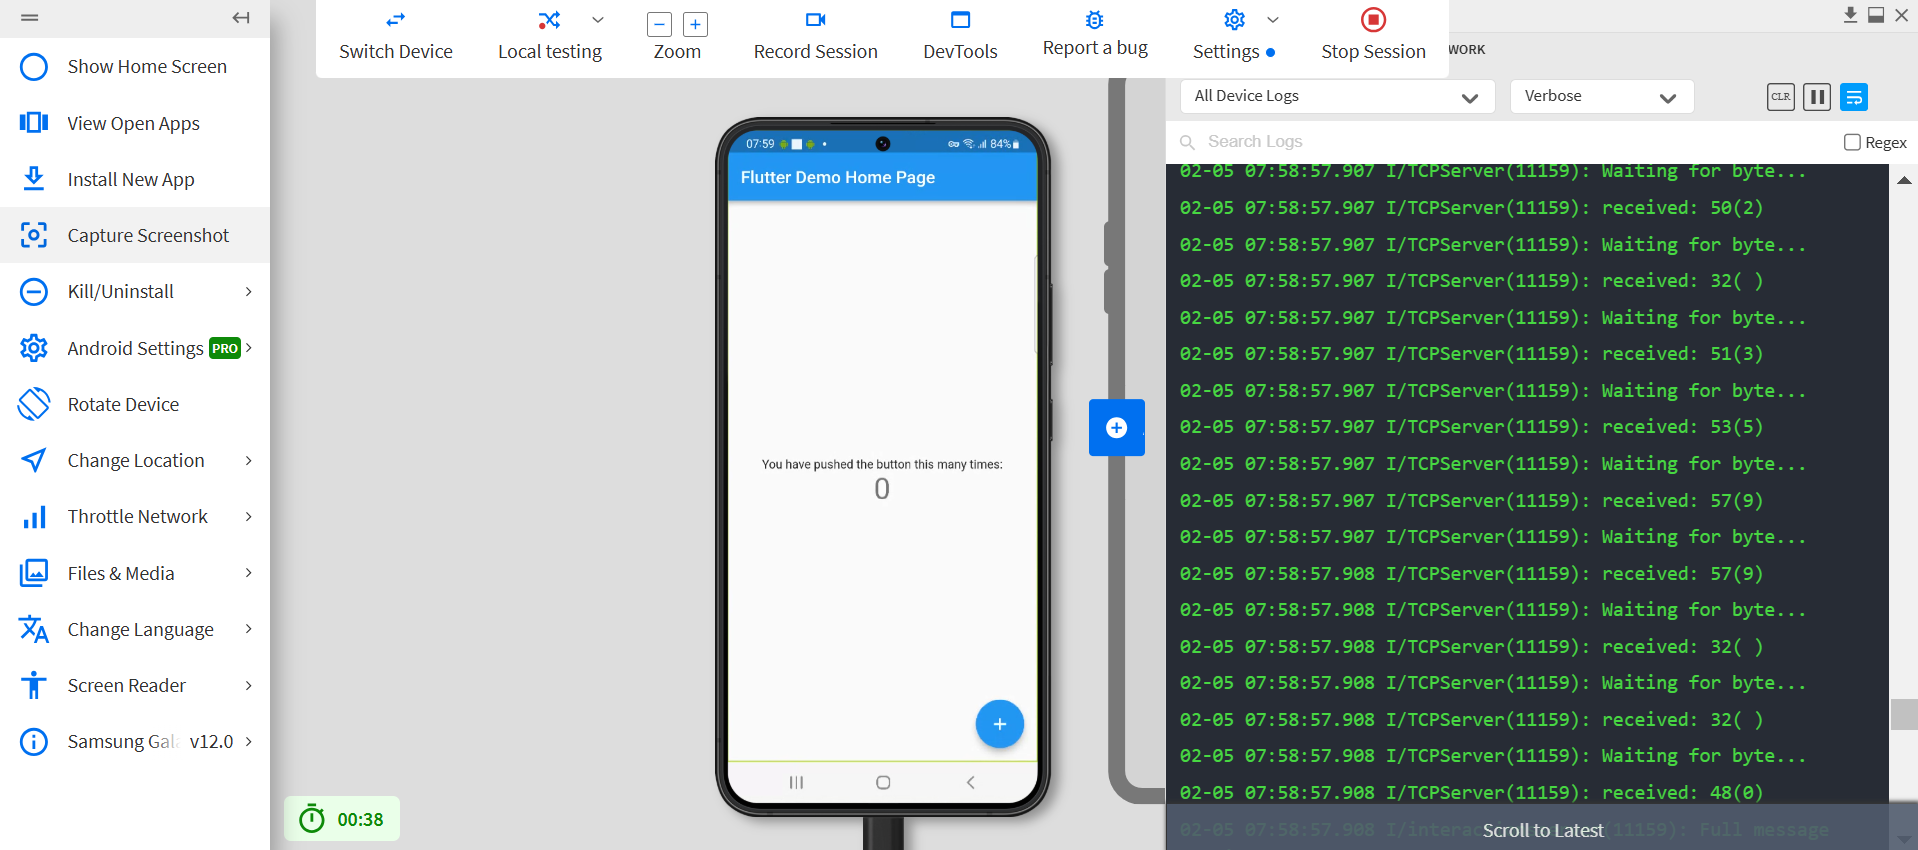
- Step 4: BrowserStack’s App Live Session Starts
Once you upload your app and select a mobile device (Android or iOS), BrowserStack’s App Live starts a testing session on that device (Samsung Galaxy S22 in this case). Once the app is installed, you can proceed to test and debug the app in real user conditions.
- Step 5: Run Automated or Manual Tests
Perform manual testing or integrate automated testing frameworks like Appium, Espresso, or XCTest to validate app performance.
Useful Resources for Flutter
- Essential Guide to Flutter Test Automation
- Flutter vs React Native: A Comparison
- How to make Flutter App Responsive
- How to Test Flutter Apps Using Appium Automation
- TDD in Flutter: How To Use Test Driven Development in Flutter
- How to run integration tests on Flutter apps
- Introduction to UI Testing in Flutter
- How to test Flutter Apps on Android Devices?
- Flutter vs Android Studio: Core Differences
- How to Test Flutter Apps on Real iOS Devices
Conclusion – Should you use Flutter in 2025?
The short answer is yes! In 2025, Flutter will continue to be a popular choice for mobile app development, offering developers and businesses a way to create fast, cross-platform apps with a single codebase. Its quick development process and features like hot reload make it a great fit for anyone looking to work efficiently. And when it comes to testing your Flutter apps, using BrowserStack’s Real Device Cloud ensures that your apps work smoothly on real devices.
Frequently Asked Questions
1. What kinds of apps can you build with Flutter?
Flutter allows you to build mobile, web, and desktop applications, including e-commerce, social media, and productivity apps.
2. Is Flutter a coding language?
No, Flutter is a UI toolkit that uses Dart as its programming language.
3. Does Flutter come with a framework?
Yes, Flutter includes a comprehensive framework that offers pre-built widgets, tools, and libraries for app development.
