Visual regression testing in Cypress compares snapshots of web pages to help identify unintended UI changes.
Overview
What is Visual Regression Testing?
A visual regression test checks what the user will see after any code changes have been executed. This is done by comparing screenshots taken before and after the code changes.
Visual Regression Testing using Cypress
Cypress is a popular test automation framework that allows a lot of extensibility. Visual Regression Testing is one of the Extensible features of Cypress. Cypress offers a lot of plugins that can be used to capture visual images and compare them.
Benefits of Cypress Visual Regression Testing
- Identify unintended visual changes before they reach production
- Automated Visual Comparisons by integrating with tools like Percy
- Seamless CI/CD Integration
- Easy to manage baseline images
- Cross-Browser Compatibility
Learn all about visual regression testing in Cypress, how to perform it and the tools that make the process easier.
What is Regression Testing?
Regression Testing is the type of software testing process conducted to ensure that the recent code changes have not negatively affected the existing features or introduced new issues.
All or part of impacted features is tested as part of the regression testing process. Any issues which come into existence due to the latest code changes should be caught in this type of testing.
Role of Automation in Regression Testing
Unlike Sanity and Smoke, the scope of regression testing is vast, since the QA has to test the entire application or subset of features in regression testing. Considering that Manual Testing for Regression involves a lot of time and effort, also it is not cost-effective. This is the reason, why most organizations are opting for automated regression testing. Regression Testing in Agile Teams often works in Risk-based approach, opting for test automation frameworks for a streamlined test process.
Types of Regression Testing
Regression Testing can be classified into Functional Regression Testing and Visual Regression Testing. Fundamentally both work differently as explained below.
Functional Regression Testing
Function Regression Testing is the type of testing where workflow or use-cases will be tested using manual or automation tools. It involves entering some values by fetching selectors from browser DOM. This also includes validating text-based values by getting them either programmatically or manually. Most of the modern testing in practice is based on this approach.
Visual Regression Testing
A visual regression test checks what the user will see after any code changes have been executed. This is done by comparing screenshots taken before and after the code changes. This is why visual regression tests are also sometimes called visual snapshot tests. Visual test highlights any visual changes that occur after the code update.
Visual tests generate, analyze, and compare browser snapshots to detect if any pixels have changed. These pixel differences are called visual diffs (sometimes called perceptual diffs, pdiffs, CSS diffs, UI diffs). You can set the threshold values, which give you the flexibility to compare images with small differences or ignore small differences.
Visual Regression Testing using Cypress
Cypress is a popular test automation framework, it allows a lot of extensibility. Visual Regression Testing is one of the Extensible features of Cypress. There are a lot of plugins available in Cypress that can be used to capture visual images and compare them. This tutorial, explains Cypress Visual Testing using Cypress Image Diff plugin.
Step by Step Tutorial of Cypress Visual Regression
To set up Cypress Visual Regression environment, you need to install the pre-requisites listed below.
Step 1: Install the cypress image diff npm package
Navigate your project Root folder (the directory where package.json is located). Enter the below command
npm i -D cypress-image-diff-js
Step 2: Configure Image Diff Plugin
Navigate to cypress/plugin/index.js and enter the commands written below
// cypress/plugin/index.js
module.exports = (on, config) => {
const getCompareSnapshotsPlugin = require('cypress-image-diff-js/dist/plugin')
getCompareSnapshotsPlugin(on, config)
}
Step 3: Import and add the Cypress image command
Navigate to cypress/support/commands.js and enter the code written below
// cypress/support/commands.js
const compareSnapshotCommand = require('cypress-image-diff-js/dist/command')
compareSnapshotCommand()
Step 4: Configure Reporter
Navigate to cypress/support/index.js and enter the code written below
after(() => {
cy.task('generateReport')
})
Step 5: Write your first Cypress Visual Test
Navigate to cypress/integration folder add new file example visual-test.js. Enter the code snippet written below
// visual-test.js
describe('Cypress Visual Testing', () => {
it('Compare fullpage of Google page', () => {
cy.visit("https://www.google.com/?hl=hi");
cy.compareSnapshot('google-page');
})
})
The above code, navigates to the Google Home page and compares if it is visually fine.
Note: When you first time run this script, it takes the base image and subsequent runs are compared with that base image.
Step 6: Run your first Visual Regression Test with Cypress
Run your Cypress Visual Test using the below command.
npx cypress run --spec "cypress/integration/visual-test.js"
Note: First Time when you run the test, it will be passed automatically as both base, and comparison images are fresh, and you might not see any difference.
Step 7: View Report
One of the key features of this plugin is that it generates the good HTML report. Once you run the test, two folders will be created i.e.:
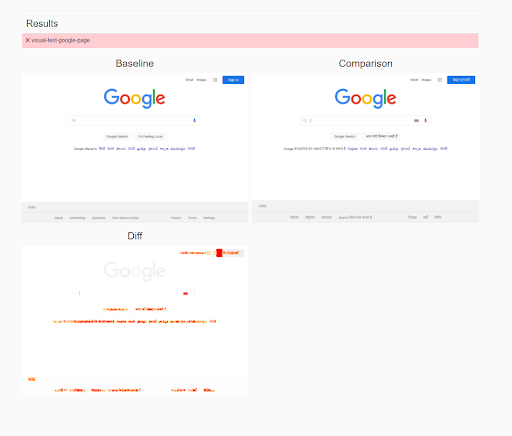
- cypress-visual-report: It contains, an HTML report, if the test passes there will not be any images shown if the test fails it will show baseline, comparison, and difference in that image.
- cypress-visual-screenshots: This folder contains three subfolders namely baseline, comparison, and diff, where each folder contains the respective image files.
Passed Test Report looks like below:
Failed Test Report Looks like the below:
How to perform Cypress Visual Testing of an element
Cypress can be used to perform visual tests on a specific element, where it compares the before and after screenshots of the specified elements as seen in the example below.
describe('Visuals', () => {
it('should compare screenshot from a given element', () => {
cy.visit('www.google.com')
cy.get('#report-header').compareSnapshot('search-bar-element')
})
})
This code snippet takes a snapshot of element #report-header and compares visually if it is same or not.
Adding Threshold to Visual Test
By default, the value of the threshold will be zero, which means it should match exactly with the base image. However, you can make it flexible by applying other threshold values.
Check out other useful functions of cypress-image-diff plugin
Executing Cypress Visual Comparison Test using BrowserStack Automate
To run Cypress Visual Comparison Tests on Real Device Cloud like BrowserStack follow the steps mentioned below.
Step 1: Install BrowserStack Cypress plugin
Step 2: Create browserstack.json file using browserstack-cypress init command
Step 3: Enter the below code
{
"auth": {
"username": "<my_username>",
"access_key": "<my_access_key>"
},
"browsers": [
{
"browser": "chrome",
"os": "Windows 10",
"versions": [
"latest",
"latest - 1"
]
}
],
"run_settings": {
"cypress_config_file": "./cypress.json",
"cypress_version": "9",
"project_name": "My sandbox project",
"build_name": "Build no. 1",
"parallels": "2",
"npm_dependencies": {
"cypress-image-diff-js": "^1.18.0"
}
}
}
Note:
- You can find the username and access key by logging into the browserstack website
- You can also change the browser settings and platform settings from browserstack.json file
Step 4: Configure cypress.json file to include the .js files.
{
"testFiles":["*.js"]
}
Step 5: Execute your Browserstack Test
Use the below command to execute Cypress Visual Test in Browserstack
browserstack-cypress run –sync
Run Cypress Tests on Real Device Cloud
Executing Cypress Visual Regression Test with Percy
Percy is a visual testing tool that helps in visual testing of an application. Since Percy is now a part of BrowserStack, you can access Percy Dashboard with BrowserStack credentials. You can use Percy with Cypress to perform a visual test by following the steps written below:
Step 1: Install Percy using the following command
npm install --save-dev @percy/cli @percy/cypress
Step 2: To import Percy to Cypress, navigate to cypress/support/index.js File and enter the following command
import '@percy/cypress'
Step 3: Write your first Percy Visual Test Script as shown below
describe('Cypress Visual Testing', () => {
it('Compare fullpage of Google page', () => {
cy.visit("https://www.google.com/?hl=hi");
cy.percySnapshot('Google');
})
})
This example does a visual comparison of the Google.com Page using Percy and Cypress
Run your Percy Test
Go to http://percy.io create a sample project. Once you create a Sample Project Percy will generate API key. Copy the Percy Token from there.
Enter the Percy Token using the following command for MacOS
export PERCY_TOKEN=<your_token>

For Windows OS, enter the Percy Token using the command written below
set PERCY_TOKEN=<your_token>
For powershell use below command to enter Percy Token
$env:PERCY_TOKEN ==<your_token>
Once the Percy Token is entered use below command to run your Percy Cypress Tests
npx percy exec -- cypress run
Cypress Visual Tests Starts Running and it gives you following result in command line
Why perform Cypress Visual Testing on BrowserStack Percy?
Percy by BrowserStack is an AI-powered visual testing platform that automates visual regression testing for web applications. It helps teams maintain consistent and accurate user interfaces by capturing and comparing UI snapshots on every code change.
Integrated into CI/CD pipelines, Percy quickly identifies layout shifts, styling problems, and unintended content updates using advanced AI. This reduces review effort, lowers false positives, and supports faster and more reliable releases.
- Effortless Visual Regression Testing: Works smoothly with CI/CD pipelines using a simple integration step. Supports functional test suites, Storybook, and Figma to enable early visual testing across the development workflow.
- Automated Visual Regression: Takes snapshots on every commit, compares them with baselines, and detects visual issues such as broken layouts, color mismatches, or UI component errors.
- Visual AI Engine: Uses advanced algorithms and AI Agents to filter out visual noise caused by animations, dynamic banners, anti-aliasing, and unstable page elements. It tracks only meaningful visual changes that affect user experience. Features like Intelli ignore and OCR help distinguish important UI changes from minor pixel shifts and significantly reduce false positives.
- Visual Review Agent: Highlights detected changes with clear bounding boxes, provides human-readable summaries, and speeds up review cycles by up to three times.
- No-Code Visual Monitoring: Visual Scanner makes it easy to scan and monitor thousands of URLs across more than 3500 browsers and devices. Supports on-demand scans, scheduled runs, dynamic region ignoring, and environment comparisons such as staging versus production.
- Flexible and Comprehensive Monitoring: Enables scheduled scans at any frequency, maintains historical results, and supports comparisons across any environment. Works with authenticated pages, local testing, and helps teams detect issues before they reach users.
- Broad Integrations: Compatible with all major frameworks, CI tools, and common development workflows. Offers SDKs for simple onboarding and scalable visual testing across teams.
App Percy is the AI-powered visual testing solution for native iOS and Android apps. It runs tests on real devices to ensure consistent UI across different screen sizes and operating systems. AI-driven handling of dynamic content reduces flakiness and avoids unnecessary false positives.
With an integration that requires only one line of code, App Percy supports frameworks such as Appium, WebdriverIO, Java, and Python. Parallel execution speeds up build times, and a unified dashboard provides screenshots, logs, videos, and compliance with essential data privacy standards.
Pricing Details of Percy:
- Free Plan: Includes up to 5,000 screenshots per month and is suitable for smaller teams or initial evaluations.
- Paid Plan: Starts at 199 USD and includes advanced features, with enterprise pricing available for larger teams.
Best Practices for Visual Regression Testing in Cypress
While running visual regression tests using Cypress, you can follow the given best practices to run efficient and accurate tests:
- Leverage a reliable visual testing library: Cypress does not come with in-built visual testing capabilities, so it is best to utilize third-party libraries like cypress-image-snapshot and percy-cypress as per your project needs.
- Baseline images should be set up properly: Once the stable state of UI is confirmed, you can capture baseline snapshots. Store the baseline images in version control to ensure consistency.
- Avoid flaky visual tests: In order to reduce flaky tests you can wait for UI elements to fully load by using cy.wait() or cy.intercept() where necessary. Also, ensure environment consistency when it comes to browser, viewport size, resolution etc.
- Test stable elements only: You should avoid testing highly dynamic elements like timestamps, carousels, or live data feeds. Exclude untable regions in snapshots if necessary.
- Execute tests in controlled environment: Obtain consistent results across different runs by using Docker or a CI/CD pipeline. For better accuracy, you can run tests in headless mode.
- Manage Tolerance level: It is important to set small tolerance levels to catch major UI changes while allowing minor pixel differences .
Read More: Angular Visual Regression Testing: Tutorial
Conclusion
Visual regression testing in Cypress helps identify and debug unexpected visual changes and thus ensures UI consistency. Combining Cypress visual regression testing with tools like Percy further simplifies this process by offering automated visual comparisons, baseline management and smooth CI/CD integration and facilitates efficient tests and accurate results.
Useful Resources for Visual Testing
- How to capture Lazy Loading Images for Visual Regression Testing in Cypress
- How to Perform Visual Testing for Components in Cypress
- How to run your first Visual Test with Cypress
- How Visual Diff Algorithm improves Visual Testing
- How is Visual Test Automation changing the Software Development Landscape?
- How does Visual Testing help Teams deploy faster?
- How to perform Visual Testing for React Apps
- How to Run Visual Tests with Selenium: Tutorial
- How to reduce False Positives in Visual Testing?
- How to capture Lazy Loading Images for Visual Regression Testing in Puppeteer
- How to migrate your Visual Testing Project to Percy CLI
- Why is Visual Testing Essential for Enterprises?
- Importance of Screenshot Stabilization in Visual Testing
- Strategies to Optimize Visual Testing
- Best Practices for Visual Testing
- Visual Testing Definitions You Should Know
- Visual Testing To Optimize eCommerce Conversions
- Automate Visual Tests on Browsers without Web Drivers
- Appium Visual Testing: The Essential Guide
- Top 17 Visual Testing Tools
Frequently Asked Questions
1. Does Cypress have built-in visual regression testing?
Cypress does not offer native visual regression testing. It can take screenshots, but it cannot compare images or generate visual diffs. If you are looking to run visual regression tests, you need a plugin or a dedicated visual testing service.
2. What are the benefits of using a cloud-based visual testing platform with Cypress?
Cloud platforms provide stable, scalable environments for visual testing. They support multiple browsers and devices, handle baseline management, use advanced comparison logic, and offer collaborative dashboards. They also integrate with CI/CD so teams can monitor UI quality continuously.
3. What are common challenges in Cypress visual regression testing?
Dynamic content, animations, and loading delays often create inconsistent screenshots. Managing baselines can be time-consuming, and distinguishing real issues from noise is difficult without the right tooling. Large suites can slow down test execution due to high screenshot volume.
4. How can I make my Cypress visual regression tests more robust?
Wait for the UI to stabilize before capturing screenshots, test specific components when possible, and use comparison thresholds to reduce false positives. Regularly update baselines and ignore unstable regions to keep results reliable as the UI evolves.
5. Why should I use an AI-powered visual testing tool like Percy with Cypress?
Percy focuses on meaningful UI changes by filtering out noise from animations and dynamic elements. It integrates quickly with Cypress, automates baseline handling, highlights diffs clearly, and scales across browsers and devices. This helps teams catch visual issues earlier and release them with confidence.
