Selenium can support visual regression testing when paired with visual comparison tools, helping catch unwanted UI changes beyond functional issues.
Overview
How it works:
- Capture baseline screenshots of key pages or components to establish the expected UI state.
- After code updates, repeat the same navigation steps and capture fresh screenshots.
- Use a visual diff tool to compare the new images against the baseline and detect UI differences.
- Review highlighted discrepancies to confirm whether they are intentional changes or visual bugs.
Benefits of Running Visual Testing using Selenium in Javascript
- Facilitates cross-browser testing
- Visual validation
- Seamless working with frameworks
- Supports regression testing
- Maximizes test coverage
- Integrates seamlessly with CI/CD pipeline
- Supports parallel testing
Using Selenium with JavaScript strengthens visual regression testing by pairing powerful UI automation with visual comparison tools to spot unexpected UI changes. This guide walks through how to perform visual regression testing with Selenium in JavaScript.
Benefits of Visual Regression Testing with Selenium
Visual Regression Testing is essential for maintaining UI quality in agile development. By integrating it with Selenium, you gain a powerful, automated approach to visual validation.
- Early Bug Detection (Shift Left): Catches visual inconsistencies and layout issues as soon as they’re coded, preventing costly bugs from advancing toward deployment and reaching end-users.
- Guarantee Consistent UI: Ensures your website’s User Interface (UI) remains pixel-perfect and cohesive across every target browser, device, and screen resolution, protecting your brand’s image.
- Drastically Reduce Manual Effort: Automates the tedious process of visually inspecting countless web pages, freeing up QA teams to focus on complex functional testing.
- Build Confidence in Deployments: Provides an objective “visual safety net,” giving your team the certainty that new code changes haven’t accidentally broken the existing look and feel of the application.
How to Perform Visual Testing using Selenium in Javascript [With Example]
Learn how to use Selenium and Javascript to execute the visual regression tests with the step-by-step tutorial given below:
Steps to Perform Visual Testing using Selenium in Javascript:
Step 1: Install Percy node packages
Step 2: Write Selenium Visual Tests
Step 3: Set the PERCY_TOKEN
Step 4: Execute Percy Test
Prerequisite:
Start by setting up Selenium Javascript framework
Step 1: Install Percy node packages
As you have already configured Selenium and required dependencies as part of the prerequisite step. Install the Percy node packages to integrate Selenium into Percy.
Install Percy CLI: The Percy CLI is a command line tool that takes care of visual test execution and communicates with Percy infrastructure to upload screenshots after test execution.
Install Percy CLI using the below command
npm i @percy/cli
Install Percy Selenium web driver SDK
The Percy provides SDKs for every tool; The Selenium SDK provides visual testing API or commands that can be used in our tests. In short, this is the dedicated library for Visual Testing using Selenium.
Install Percy Selenium SDK for Javascript
npm i @percy/selenium-webdriver
Step 2: Write Selenium Visual Tests
Consider two scenarios below
Scenario 1:
Navigate to Browserstack home page
Verify for Visual Defects
Scenario 2:
Click on Pricing Page
Visually validate the Pricing page.
Considering the above two scenarios, here are the steps to follow:
- Navigate to the Browserstack home page.
- Add the Percy command to visually test the home page
- Simulate the click on the Pricing menu
- Once the page is loaded using the Percy command to verify the Pricing menu
Percy Selenium Visual Test Code
require('chromedriver')

const { Builder, By} = require('selenium-webdriver');

const percySnapshot = require('@percy/selenium-webdriver');

const {expect} = require('chai')

describe("Selenium Visual Test Demo", async function () {

    var driver;

    this.timeout(0);

    before(function () {

      driver = new Builder().forBrowser("chrome").build();

      driver.get("https://browserstack.com");

    })

    it("Should verify home page", async function () {

      const isLogoDisplayed = await driver.findElement(By.id('logo')).isDisplayed();

      expect(isLogoDisplayed).to.be.true;

      await percySnapshot(driver, 'Browserstack-Homepage');

    });


    it("Should verify Pricing page", async function () {

      await driver.findElement(By.css('li.pricing-menu-link')).click();

      const headerText = await driver.findElement(By.css('H1')).getText()

      expect(headerText).to.be.eq('Real device cloud of 20,000 + real iOS & Android devices, instantly accessible');

      await percySnapshot(driver, 'Pricing-Page');


    });

    after(async function() {

      await driver.quit();

    });

})
In the above code, there are two it() blocks,
First, it() block takes the screenshot of the home page.
await driver.get("https://browserstack.com");the driver.get() is used for navigating to the Browserstack home page. Once it is navigated, it is ensured that the Browserstack logo is displayed and the screenshot is taken using the following Percy command
await percySnapshot(driver, 'Browserstack-Homepage');
In the second it() block the Pricing page is verified to ensure there are no visual defects.
The driver.findElement().click is used for clicking on the Pricing menu from the home page, then it navigates to the Pricing page. It is ensured that the header is displayed correctly and then the screenshot is taken for Visual validation using the Percy command
await percySnapshot(driver, 'Pricing-Page');
Step 3: Set the PERCY_TOKEN
Percy uploads all the screenshots to its infrastructure and then using visual testing algorithm it compares the screenshot. For this complex process Percy needs to identify your project, the PERCY_TOKEN uniquely identifies your project.
- Login to Percy
- Navigate to Project settings
- Copy the PERCY_TOKEN
- Set the PERCY_TOKEN based on the command line tool you are using
//Linux and macOS terminal

export PERCY_TOKEN=<your_token>

//Windows command line tool

set PERCY_TOKEN=<your_token>

//Powershell tool

$env:PERCY_TOKEN ='<your_token>'
Step 4: Execute Percy Test
The execution command follows the below syntax:
npx percy exec -- <your functional test execution command>
In this tutorial, as part of the pre-requisite, you are setting up the Selenium NodeJS framework with Mocha so you can execute the Percy Visual test using the below command.
npx percy exec -- npx mocha <name-of-test.js
Once you enter the above command the test starts executing, and results will be shown in the command prompt.
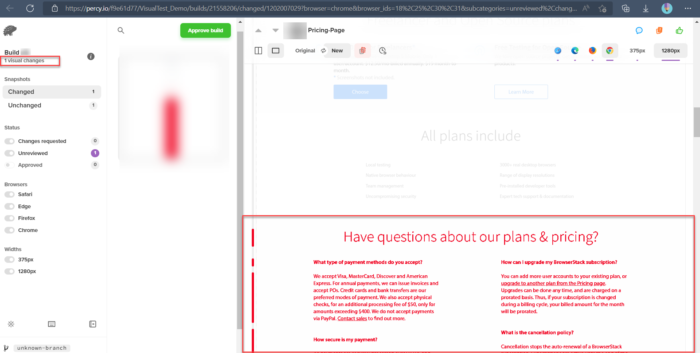
The above command line output shows the Finalized build with the build URL, using this URL you can easily navigate to Percy’s build and view the detailed result.
If there is no Visual Difference, Percy shows the message “No Changes”
If there is any difference, then Percy shows the difference by highlighting it in red color.
Tools and Libraries for Visual Regression Testing with Selenium
Tools and libraries for visual regression testing with Selenium automate UI comparison, spotting visual changes across browsers and devices. They enhance Selenium by catching design issues early and ensuring consistent, high-quality interfaces throughout development.
1. BrowserStack Percy
Percy by BrowserStack is an AI-powered visual testing platform designed to automate visual regression testing for web applications, ensuring flawless user interfaces on every code commit.
Integrated into CI/CD pipelines, Percy detects meaningful layout shifts, styling issues, and content changes with advanced AI, significantly reducing false positives and cutting down review time for fast, confident releases.
- AI-Powered Accuracy: Visual AI and Intelli-ignore filter noise from animations, banners, and anti-aliasing, reducing false positives.
- Fast Visual Reviews: Highlights key UI changes, adds clear explanations, and speeds approvals by up to 3x.
- No-Code Visual Monitoring: Scan thousands of URLs across 3,500+ browsers/devices, schedule or trigger scans, and ignore dynamic areas.
- Flexible Environment Coverage: Compare staging vs. production, analyze history, and test authenticated or local pages.
- Wide Ecosystem Support: Works with major frameworks, CI tools, and SDKs for seamless setup and scaling.
App Percy is BrowserStack’s AI-powered visual testing platform for native mobile apps on iOS and Android. It runs tests on a cloud of real devices to ensure pixel-perfect UI consistency, while AI-driven intelligent handling of dynamic elements helps reduce flaky tests and false positives.
Pricing
- Free Plan: Available with up to 5,000 screenshots per month, ideal for getting started or for small projects.
- Paid Plan: Starting at $199 for advanced features, with custom pricing available for enterprise plan.
2. Applitools Eyes
Applitools Eyes uses AI-powered computer vision to mimic human eye perception, providing precise visual validation across browsers and devices. It offers extensive integrations and greatly reduces false positives through advanced algorithms.
Key Features:
- AI-driven visual validation
- Cross-browser and device support
- Advanced image comparison
- Integrates broadly with test frameworks
Best For: Enterprises needing highly accurate AI visual testing.
Cannot: Fully automate without manual baseline approvals; costly for small teams.
3. SeleniumBase (Visual Testing Module)
SeleniumBase is a Selenium extension that provides built-in visual testing with screenshot comparison and layout difference detection. It is open-source and straightforward for combining functional and simple visual tests.
Key Features:
- Screenshot comparison & layout detection
- Seamless Selenium integration
- Multi-browser support
- Open-source and easy setup
Best For: Developers wanting basic visual tests within Selenium scripts.
Cannot: Match AI accuracy or handle complex UI diffs well.
4. AShot
AShot is an open-source Java library that captures element-level and full-page screenshots within Selenium tests. It supports image stitching and detailed difference highlighting for Java-based visual validations.
Key Features:
- Element and full-page screenshot capture
- Selenium integration for Java tests
- Image stitching & diff highlighting
- Detailed regression reports
Best For: Java teams needing customizable screenshot testing.
Cannot: Provide AI noise reduction or cross-browser consistency handling.
5. Galen Framework
Galen Framework focuses on automated layout and responsive design testing, verifying element positioning and alignment across different screen sizes. It uses a domain-specific language for test specs and integrates with Selenium Grid for cross-browser testing.
Key Features:
- Layout and responsive design validation
- Human-readable test specification language
- Cross-browser testing with Selenium Grid
- Detailed HTML reports with screenshots
Best For: Web layout and responsive design testing.
Cannot: Detect pixel-level visual differences or do AI-based validations.
6. Needle
Needle is a Python-based visual regression tool integrating with Selenium and nose, focusing on CSS and element positioning accuracy. It captures screenshots of webpage portions and compares them against a baseline for regression detection.
Key Features:
- Screenshot comparison of webpage portions
- CSS and element position validation
- Supports multiple WebDrivers
- Customizable viewport sizes
Best For: Python teams verifying CSS and layout rendering.
Cannot: Perform cross-device rendering or AI-driven noise reduction.
Best Practices for Conducting Visual Testing Using Selenium in JavaScript
Here are some best practices you can follow to successfully conduct visual testing using Selenium in Javascript:
- Since Selenium does not come with built-in visual testing features, you can integrate your testing efforts with robust visual testing tools like Percy for advanced image comparisons.
Read More: Top 17 Visual Testing Tools
- For easier tracking and consistency, create baseline images early on and save them in version control.
- Do optimize screenshot captures. Mask dynamic elements like ads and timestamps to prevent false positives, capture full pages, and make sure viewport sizes are consistent.
- Run cross-browser tests across diverse browsers to ensure consistent working of your apps across diverse browsers.
- Automate image comparisons to spot visual regressions efficiently.
- Integrate your visual tests with your CI/CD pipeline via tools like Jenkins, Circle CI etc. to detect issues early on.
Read More: How to build an effective CI CD pipeline
- Validate the expected design changes, maintain a clear changelog and only then update baseline images.
Why use Percy for Visual Regression Testing?
Percy is the visual testing platform that provides the feature to test the web application visually. It captures snapshots, makes pixel-by-pixel comparisons against baselines, and detects visual bugs in your UI with every commit
- Percy supports many automation frameworks, including Selenium for Javascript.
- As traditional visual testing approaches compare the two screenshots, results will be less accurate and more false failures. Percy has a robust visual testing algorithm that reduces false failures and provides accurate results.
- Percy supports mobile-based visual testing; you can enable Android/iOS devices by navigating to Percy Project Settings and choosing the options under Browser Management
- Percy supports CI integrations with tools like GitHub Actions, GitLab CI, Jenkins, Azure, CirecleCI, etc. which automates the Visual Testing Process.
- Review any visual changes online using Percy’s platform and you can request the changes instantly on the build page
- Share your builds by changing the Privacy settings to the public option inside the Project Settings. Which helps to share the reports with required stakeholders without any additional effort
Conclusion
Visual Testing is the most challenging part of testing as manual visual testing is less accurate as it depends on the testers’ attention to detail. On the other hand, the automation tools are less accurate and still need manual review. Only a robust visual testing algorithm can provide an accurate result.
- Percy is one such tool that has a sound visual testing algorithm in the backend and intelligently checks for visual differences.
- Unlike other tools, Percy provides visual testing as a service, which brings all the features such as review, commenting, and approval part of the process online without spending on third-party tools.
- The popular testing tools Selenium and Percy make an incredible visual testing framework without switching away from the functional testing framework.
Useful Resources for Visual Testing
- How to capture Lazy Loading Images for Visual Regression Testing in Cypress
- How to Perform Visual Testing for Components in Cypress
- How to run your first Visual Test with Cypress
- How Visual Diff Algorithm improves Visual Testing
- How is Visual Test Automation changing the Software Development Landscape?
- How does Visual Testing help Teams deploy faster?
- How to perform Visual Testing for React Apps
- How to Run Visual Tests with Selenium: Tutorial
- How to reduce False Positives in Visual Testing?
- How to capture Lazy Loading Images for Visual Regression Testing in Puppeteer
- How to migrate your Visual Testing Project to Percy CLI
- Why is Visual Testing Essential for Enterprises?
- Importance of Screenshot Stabilization in Visual Testing
- Strategies to Optimize Visual Testing
- Best Practices for Visual Testing
- Visual Testing Definitions You Should Know
- Visual Testing To Optimize eCommerce Conversions
- Automate Visual Tests on Browsers without Web Drivers
- Appium Visual Testing: The Essential Guide
- Top 17 Visual Testing Tools


