Node.js projects often depend on third-party packages to function efficiently. However, keeping dependencies up to date is essential to ensure security, fix bugs, and take advantage of performance improvements or new features. Failing to update can lead to build failures or unexpected behavior in your application.
While npm (Node Package Manager) simplifies installing and managing dependencies, updating them can be challenging due to issues like breaking changes, deprecated packages, and version conflicts.
This guide outlines the steps necessary to update all dependencies in a Node.js project while minimizing issues and ensuring application stability and security.
How Packages Become Dependencies?
Node.js projects rely on various libraries and utilities that can be reused across multiple projects. npm serves as the package manager and registry, allowing Node.js packages to be published and shared, similar to Java packages in the Maven Central Repository.
These published packages can be downloaded and used across multiple projects. When they need to be used in a specific project (rather than globally), they can be added as dependencies in the package.json file.
There are three types of dependencies:
- Regular Dependencies (dependencies): Required for production applications
- Development Dependencies (devDependencies): Used for development (e.g., testing frameworks, linters)
- Peer Dependencies (peerDependencies): Expected to be installed by the end-user for compatibility
Understanding Dependency Update Behaviors
npm handles dependency updates to ensure the stability and security of a Node.js project. This section explains how dependency updates work, the different commands and versioning symbols, and their implications.
Command:
npm update
The npm update command is used to update the project’s packages to the latest versions that satisfy the version ranges specified in the package.json file. It respects the semantic versioning (semver) rules defined for each dependency.
Command Syntax:
bash

npm update [<package-name>...]
- Without any arguments, npm update will update all dependencies in the node_modules folder to their latest versions based on the specified semver ranges.
- If a specific <package-name> is provided, only that package will be updated.
Example:
Suppose your package.json includes the following dependencies:
json

"dependencies": {

  "express": "^4.17.1",

  "lodash": "~4.17.20"

}
Running npm update will update express and lodash to the latest versions that match their specified version ranges. You can also use different symbols to better control and restrict dependency updates.
1. Caret (^) Dependencies
The caret symbol (^) is used in package.json to specify dependencies that are compatible with the current version, allowing updates that do not change the leftmost non-zero digit.
Behavior:
- For versions 1.0.0 and above, ^ allows updates to the most recent minor and patch versions.
- For versions below 1.0.0, the behavior changes, which we’ll discuss in the next section.
Example:
json

"dependencies": {

  "express": "^4.17.1"

}
With this configuration, npm update can update express to any version less than 5.0.0, such as 4.18.0 or 4.17.2.
Read More: Config File In Java: Explained
2. Caret (^) Dependencies Below 1.0.0
For packages with versions below 1.0.0, the caret symbol (^) behaves more conservatively:
- ^0.2.3 allows updates to 0.2.x versions, but not 0.3.0 or higher.
- ^0.0.3 allows updates to 0.0.x versions, but not 0.1.0 or higher.
Example:
json

"dependencies": {

  "some-package": "^0.2.3"

}
Here, npm update can update some-package to versions like 0.2.4 or 0.2.5, but not to 0.3.0.
3. Tilde (~) Dependencies
The tilde symbol (~) allows updates to the most recent patch version within the specified minor version.
Behavior:
- ~1.2.3 permits updates to versions up to but not including 1.3.0.
- ~0.2.3 allows updates to versions up to but not including 0.3.0.
Example:
json

"dependencies": {

  "lodash": "~4.17.20"

}
With this setting, npm update can update lodash to versions like 4.17.21 or 4.17.22, but not to 4.18.0.
Sub- Dependencies
Sub-dependencies are the dependencies of your project’s direct dependencies. When you run npm update, npm also checks and updates these sub-dependencies to their latest versions, satisfying the parent package’s version constraints.
Behavior:
- Sub-dependencies are updated based on the semver ranges specified by their parent dependencies.
- Direct dependencies’ version constraints can influence which sub-dependency versions are installed.
Example:
If your project depends on packageA, which depends on packageB@^2.1.0, running npm update will ensure that packageB is updated to the latest version compatible with ^2.1.0, such as 2.3.0.
Why Should You Keep Dependencies Updated?
When npm packages are updated regularly, it helps maintain your application’s security, stability, and performance. Here are some key reasons why staying up to date is crucial:
- Security Fixes: Using outdated packages can expose your application to security vulnerabilities. For example, if your project relies on an older version of Express with a known security flaw, attackers could exploit it. Updating to the latest version ensures that these vulnerabilities are patched and mitigated.
- Compatibility Issues: As Node.js and other dependencies evolve, older packages may become incompatible and break functionality. Updating dependencies ensures seamless compatibility with the latest Node.js versions and related libraries.
- Performance Enhancements: Package updates often include optimizations such as reduced memory consumption, faster execution times, and improved efficiency. Upgrading to the latest versions can enhance your application’s overall performance.
- New Features: Updating packages gives access to newly introduced functionalities, tools, and enhancements that can streamline development and improve overall project capabilities.
- Bug Fixes: If a package has a known issue affecting your project, an update may contain patches or fixes that resolve those problems and reduce unexpected errors.
How to Use npm outdated Command?
A Node.js project can have many dependencies, and updating all of them at once may lead to issues such as security vulnerabilities or compatibility problems. It is important to check which dependencies are outdated before updating them to avoid these issues. The npm outdated command lists all packages that have newer versions available to ensure a smoother and more controlled update process.
Use the Command:
npm outdated
Example Output:
Here’s what the output means:
- Current: Installed version
- Wanted: Latest version allowed by package.json
- Latest: The most recent version is available
Read More: Unit testing for NodeJS using Mocha and Chai
Methods to Update Dependencies in npm
There are two primary methods to update dependencies using npm.
1. Updating All Packages
By default, running the npm update command updates all dependencies listed in package.json to their latest versions based on the defined version tags.
If executed with the -g flag, it will also update all globally installed packages to their latest versions.
Command:
npm update
Aliases:
up, upgrade, update
Example Output:
2. Updating a Single Package
To update a specific package within a project or system, use the npm update command followed by the package name.
This is useful when you want to update only a particular dependency while keeping others unchanged, as it minimizes the risk of compatibility issues with other dependencies.
Command:
npm update <package-name>
Example Output:
How to Use npm-check-updates for More Control?
npm-check-updates (ncu) is a CLI tool that allows you to check for and upgrade dependencies beyond the version constraints specified in package.json. It’s particularly useful when managing projects with many dependencies that must be updated to their latest versions.
Key Benefits of npm-check-updates
- Upgrades packages even if their versions exceed the constraints defined in package.json.
- Provides a detailed changelog of version differences before applying updates.
- Enables batch updating of multiple dependencies at once, simplifying the upgrade process.
Check for Outdated Packages
Run the following command to check for all outdated packages in the project:
sh
ncu
Output:
This command will check all the packages mentioned as dependencies in the project’s package.json and list all the outdated packages with their latest versions.
Update a Specific Package
To update a specific package from the list of outdated packages, run the following command:
sh
ncu -u <package-name>
Output:
Note: The above command only upgrades the version of packages in the package.json file. This update has not yet been installed in the project.
Installing npm-check-updates Globally
To install npm-check-updates globally on your system, run the following command:
sh
npm install -g npm-check-updates
Output:
How to Use Interactive Mode with npm-check-updates?
Once the package.json file has been updated with the latest versions, you can run npm install to update all packages to their latest versions or use interactive mode for a more controlled upgrade process. In interactive mode, you can selectively update packages based on your preferences.
sh
ncu -i
Output:
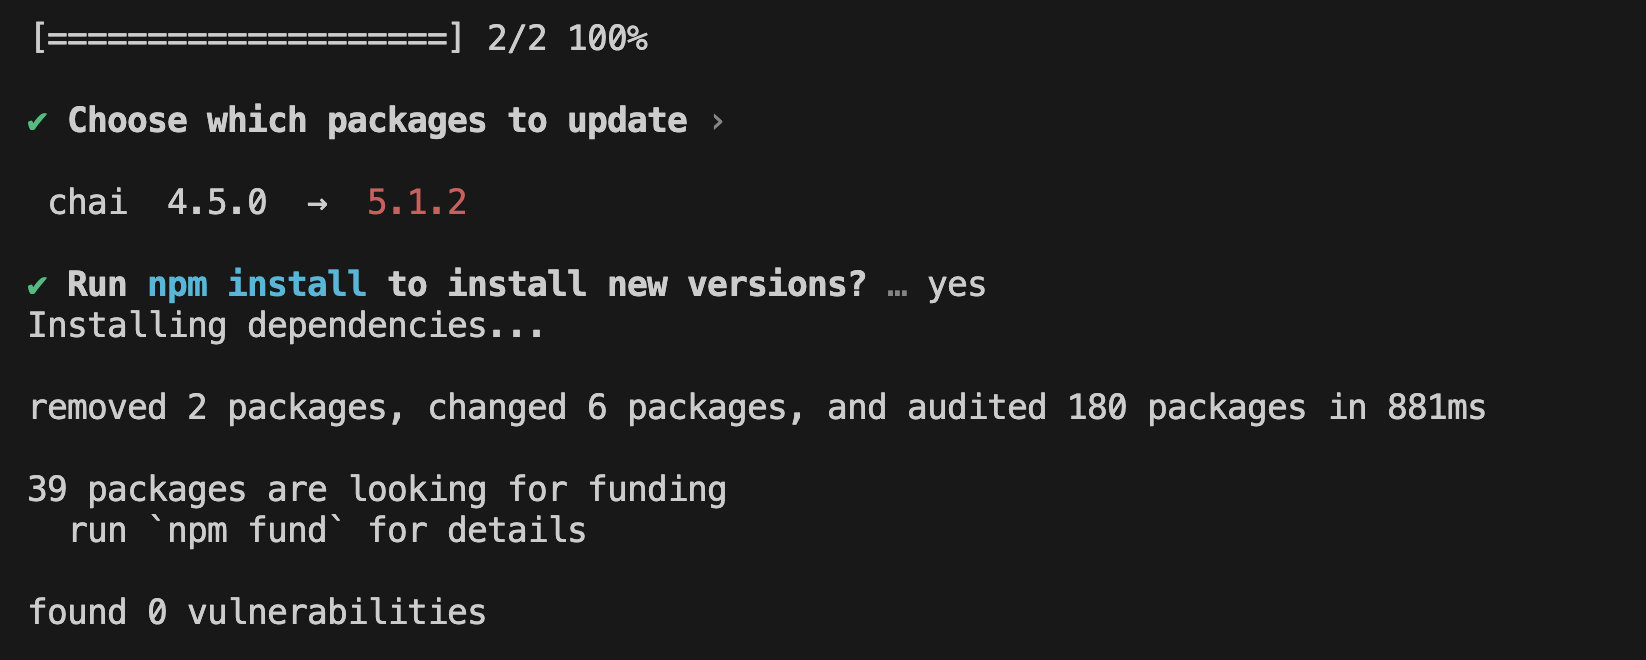
As displayed in the above command output, this will list all the outdated packages and let the developer choose which package needs to be updated. All packages are selected by default, and you can toggle their selection by pressing the Space key. Below are all the interactions that you can do:
- Up/Down Arrow keys: Select a package
- Space: Toggle selection
- ‘a’ key: Toggle all
After selecting the relevant packages, press the ‘Enter’ Key to update them to the latest versions.
Steps to Update All Dependencies with npm
As discussed in the previous section, you can update the dependencies in a controlled manner. However, if you prefer to update packages according to the version restrictions defined in package.json without going through a selective process, follow the steps below.
1. Update a Specific Dependency: If you need to update only a specific dependency due to reasons like compatibility or security, run the following command:
npm update <package-name>
Replace <package-name> with the dependency name you want to update.
2. Update All Dependencies to Latest Compatible Versions: To update all dependencies listed in package.json to their latest compatible versions, use:
npm update
This updates all packages in both dependencies and devDependencies.
3. Update Dependencies and Reflect Changes in package.json and package-lock.json: If you want to update all dependencies and reflect the changes in both package.json and package-lock.json, use:
npm update --save or npm update --save-dev
4. Test After Updating: After updating, ensure that you test your project to verify that everything works as expected and address any issues that may arise.
Updating Globally Installed Packages
In Node.js, packages can be installed in two ways:
- Locally Installed Packages: Installed within a specific project directory (node_modules) and only accessible within that project.
- Globally Installed Packages: Installed system-wide and accessible from any project or terminal session.
Global packages are useful for tools like linters, test runners, and CLIs (e.g., nodemon, eslint, typescript). In most cases, dev dependencies used in many projects can be installed as global.
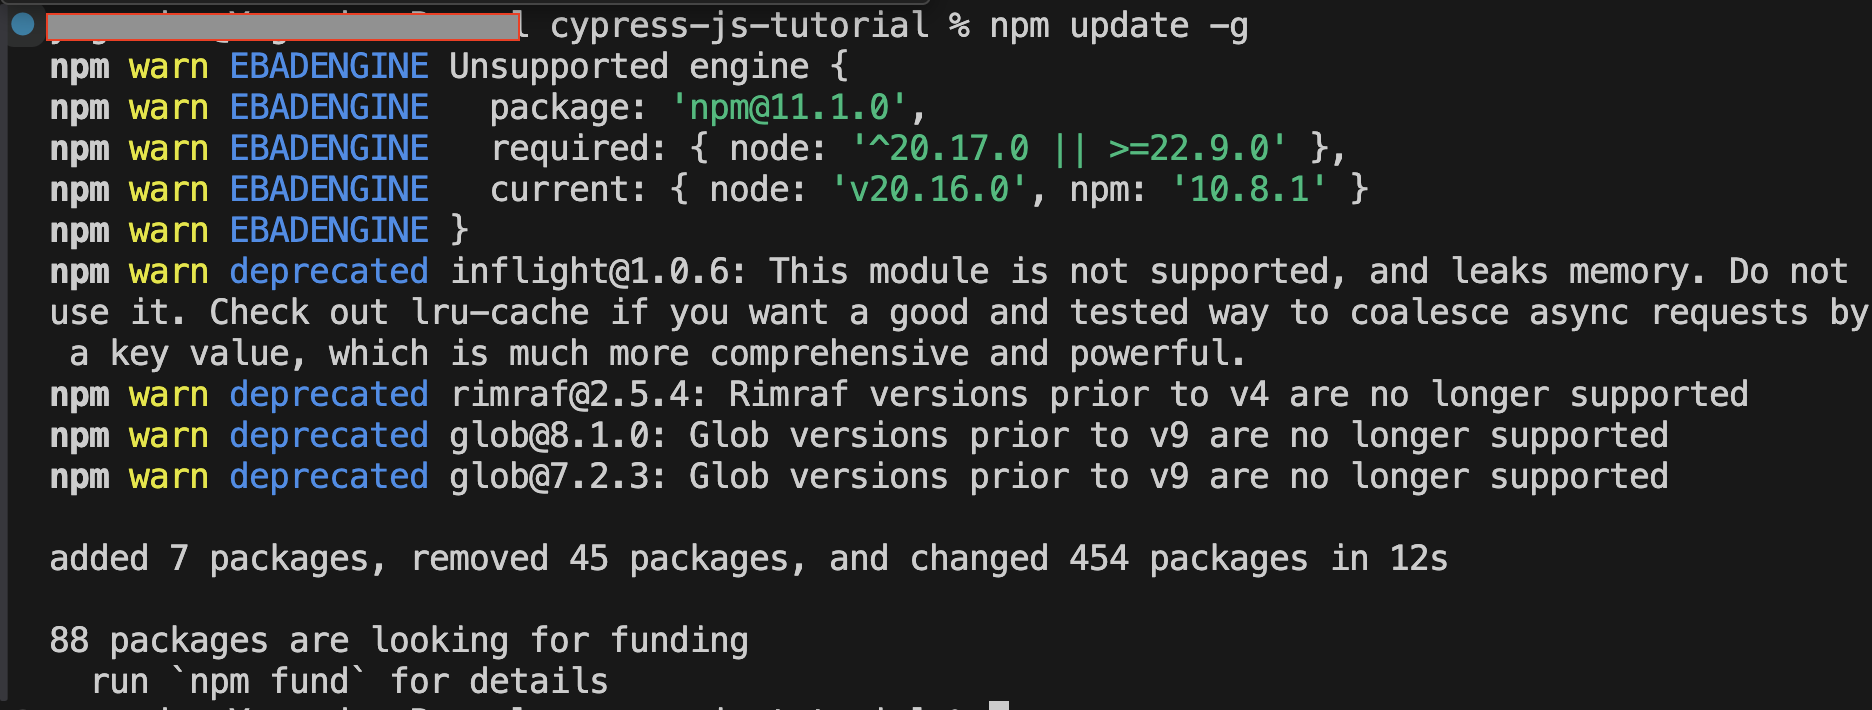
Run the same command with option ‘-g’ to update globally installed packages.
To update all global packages to their latest versions, run the following:
sh

npm update -g
This will update all globally installed packages to their latest versions.
Output:
Why Test Updated Packages on Real Devices with BrowserStack?
Testing updated packages is crucial to ensure that new changes do not introduce issues or regressions in your application. This helps maintain the app’s stability, functionality, and performance and ensures it works seamlessly across different devices, OS versions, and browsers.
BrowserStack gives you access to 3,500+ real devices over the cloud (across Android and iOS) to test under real user conditions. This helps identify device-specific issues that may not be visible in emulators or simulators and gives you more accurate insights into your app’s performance.
Key features of BrowserStack:
- Cross-Platform Testing: Test on multiple devices and browsers to ensure platform compatibility.
- Parallel Test Execution: Simultaneously execute tests on multiple devices for faster results and broader coverage.
- Seamless Integration: Integrate testing directly into your CI/CD pipeline to automate tests and ensure quality with every code change.
- Intelligent Test Reporting: Get detailed insights into key performance metrics and accelerate releases with quality gates.
- Test on Local Environments: Test websites and applications hosted in development environments with zero setup.
Conclusion
Regularly updating npm dependencies is essential for security, performance, and compatibility. Using commands like npm outdated and npm update, you can efficiently manage package versions and prevent potential vulnerabilities. At the same time, understanding version constraints ensures that these updates are safe and compatible with your project, avoiding any breaking changes.
Test these updates in a controlled environment to further mitigate the risk of issues. Use cloud-based platforms like BrowserStack to validate application behavior across browsers and real devices. With features like parallel testing, network simulation, localization testing, and AI self-healing, you can ensure your app works seamlessly across devices.
Frequently Asked Questions
1. How can I update each dependency in package.json to the latest version?
To update all dependencies in your package.json to the latest version, use one of the following methods:
- Using npm update (Respects Version Constraints): This updates dependencies within their allowed version ranges in package.json.
- Using npm-check-updates (Forcing Latest Versions): Update all dependencies with the below sequence of commands:
ncu -u
npm install
This modifies package.json to use the latest versions and reinstalls dependencies.


