NodeJS is a free, open-source, and cross-platform runtime environment that allows developers to run JavaScript outside the browser, making it ideal for building scalable backend services and APIs. To ensure reliability and maintainability, unit testing plays a crucial role by verifying small, isolated pieces of code. Mocha and Chai are popular frameworks that simplify unit testing in NodeJS, offering asynchronous support, expressive assertions, and strong community backing.
Overview
What is NodeJS Unit Testing?
- Tests small, isolated parts of a NodeJS app.
- Detects bugs early in the SDLC.
- Improves code quality and confidence in new features.
What is Mocha Framework
- JavaScript test framework for NodeJS and browsers.
- Supports asynchronous testing.
- Runs tests serially for accurate reporting.
- Highly customizable and flexible.
Chai Assertion Library
- Works seamlessly with Mocha.
- Provides BDD (expect, should) and TDD (assert) styles.
- Makes tests readable and expressive.
Key Benefits of Mocha + Chai
- Handles async testing in NodeJS apps.
- Readable, natural-language test assertions.
- Strong community support and ecosystem.
Core Testing Methods
- describe() → Groups related tests (test suite).
- it() → Defines individual test cases.
- Assertions:
- expect() → BDD-style assertions.
- should() → BDD, attaches properties to objects.
- assert() → TDD-style, classical approach.
This guide explains how to set up and run unit tests in NodeJS using Mocha and Chai, along with best practices for testing on real devices with BrowserStack.
What is NodeJS Unit testing?
Test-driven development is a powerful tool for preventing bugs within your application. NodeJS Unit testing tests small and isolated pieces of code in your NodeJS application. This helps in improving the quality of the code and assists in finding bugs early on in the development life cycle. This also provides an added advantage to the users because they can add any new features without breaking any other part of their application.
For your NodeJS applications, Mocha and Chai can be used together for Unit Testing.
Introduction to Unit Testing with Mocha and Chai
Mocha is a widely used JavaScript test framework running on NodeJS and browsers. It supports asynchronous testing running the tests serially, allowing for more flexible and accurate reporting. It is a highly customizable framework that supports different assertions and libraries.
Chai is an assertion library that is used chiefly alongside Mocha. It can be used as a BDD / TDD assertion library for NodeJS and with any JavaScript testing framework. It has several interfaces that a developer can choose from and looks like writing tests in English sentences. BDD provides an expressive and readable language style via Should & Expect, whereas TDD provides a more Classical approach via Assert.
Read More:BDD vs TDD vs ATDD: Key Differences
Benefits of using Mocha and Chai for Unit Testing in Node.js
1. Asynchronous testing support: Node.js applications often involve asynchronous operations, such as network requests or database interactions. Mocha handles asynchronous testing gracefully, allowing you to write tests involving asynchronous code without additional libraries or complex setups.
2. Readable and expressive assertions: Chai integrates seamlessly with Mocha, providing many assertion styles and expressive syntax options. It offers several assertion styles, including the commonly used `expect`, `assert`, and `should`, allowing you to choose the style that suits your preference and readability needs.
3. Community support: Mocha and Chai have gained significant popularity in the Node.js community as they have a large user base and a thriving ecosystem, so you can find ample resources, tutorials, and community support when using these frameworks.
How to write Unit tests?
There are two main methods (also used in the example discussed in this guide) to write Unit Tests as seen below:
- describe() – It is a suite of Test scripts that calls a global function with two parameters: a string and a function.
- it() – It is the smallest unit test case that is written to be executed. it() calls a global function with two parameters i.e. a string and a function. You can write multiple it() statements inside a describe() method.
The third method used in a Unit Test is based on the developer’s choice. Every it() statement has one of the below functions, which take a value and expect a return in true form:
- expect() – It is a BDD-style library. Natural language assertions are chained together here. This is mainly used with non-descript topics such as booleans or numbers.
- should() – It is a BDD-style library. Natural language assertions are chained together in this case as well. However, it extends each object with a should property to start the chain.
- assert() – It is a TDD-style library. It provides additional tests and is browser compatible.
Installing Mocha and Chai
Step 1: Create a new directory for your project file using the following command:
mkdir Chai
Step 2: Go to the new directory and execute the below command to initialize a project with Default configurations:
cd Chai
npm init -y
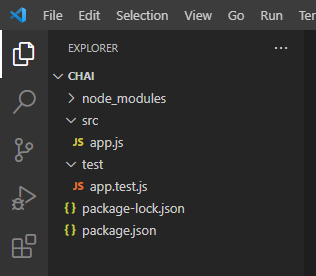
Step 3: The above step creates a package.json file as seen in the image below. Launch this project in any of the source-code editors (Using VS Code here).
Step 4: Create two folders named src and test respectively. While src stores the main file where the program’s source code is written, the test folder stores test cases for unit testing.
Step 5: Create an app.js file under the src folder and app.test.js file under the test folder (as seen in the image above).
Step 6: Open the package.json file and change the “scripts” block to “mocha” as seen in the code below:
{
"name": "chai",
"version": "1.0.0",
"description": "",
"main": "index.js",
"scripts": {
"test": "mocha"
},
"keywords": [],
"author": "",
"license": "ISC",
}
Step 7: In the terminal, type the following for installing mocha and chai:
For Global installation of Mocha:
npm install mocha -g
For Project installation of Mocha:
npm install mocha -- save-dev
For installation of Chai:
npm install chai -- save-dev
Step 8: The package.json file will look like this once both Chai and Mocha are installed:
{
"name": "chai",
"version": "1.0.0",
"description": "",
"main": "index.js",
"scripts": {
"test": "mocha"
},
"keywords": [],
"author": "",
"license": "ISC",
"devDependencies": {
"chai": "^4.3.6",
"mocha": "^9.2.2",
}
}
Creating a Simple NodeJS App
Let us start by creating a Simple NodeJS application that calculates a Cube’s side length, surface area, and volume. For the source code, paste the following snippet under the app.js file:
class Cube {
constructor(length) {
this.length = length;
}

getSideLength () {
return this.length;
}

getSurfaceArea () {
return (this.length * this.length) * 6;
}

getVolume () {
return Math.pow(this.length,3);
}
}

module.exports = {
Cube:Cube
}
Read More: Unit Testing Frameworks in Selenium
NodeJS Unit Testing with Mocha and Chai: Example
For the test cases, paste the following snippet under the app.test.js file:
const Cube = require('../src/app').Cube;
const expect = require('chai').expect;

describe('Testing the Cube Functions', function() {
it('1. The side length of the Cube', function(done) {
let c1 = new Cube(2);
expect(c1.getSideLength()).to.equal(2);
done();
});

it('2. The surface area of the Cube', function(done) {
let c2 = new Cube(5);
expect(c2.getSurfaceArea()).to.equal(150);
done();
});

it('3. The volume of the Cube', function(done) {
let c3 = new Cube(7);
expect(c3.getVolume()).to.equal(343);
done();
});

});
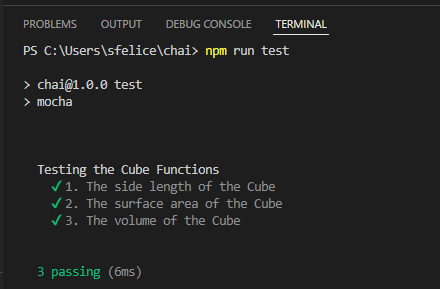
Now, let’s run the above test file using the command:
npm run test
Test Result
A successful result will look something like the below screenshot:
Negative Unit Test
Now, let’s break the test on purpose. Update the app.test.js file to the following code snippet and see if it throws a failed test result
const Cube = require('../src/app').Cube;
const expect = require('chai').expect;

describe('Testing the Cube Functions', function() {
it('1. The side length of the Cube', function(done) {
let c1 = new Cube(2);
expect(c1.getSideLength()).to.equal(2);
done();
});

it('2. The surface area of the Cube', function(done) {
let c2 = new Cube(5);
expect(c2.getSurfaceArea()).to.equal(50); //Updated to fail
done();
});

it('3. The volume of the Cube', function(done) {
let c3 = new Cube(7);
expect(c3.getVolume()).to.equal(100); //Updated to fail
done();
});

});
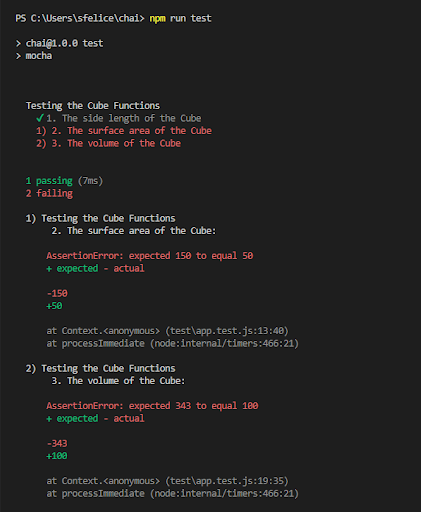
The second and third tests were updated to throw an error.
Rerun the test using the below command
npm run test
Test Result
A failed result will look something like the below screenshot:
Similarly, multiple Unit test cases can be written for your NodeJS application.
Read More: Best Practices for Unit Testing
Conclusion
Unit testing is the easiest way to improve the quality of your NodeJS applications since it helps find bugs and defects in your code. Moreover, the early discovery of Code bugs in the SDLC reduces the overall development cost because less time is spent on bug fixing in the later stage of the project. This leads to overall customer satisfaction and helps in gaining more trustworthy clients.
Testing On BrowserStack
Once the unit testing is done, it is suggested to test the application end to end on real devices and browsers to identify bottlenecks in the user experience. Using a real device cloud, like BrowserStack, allows you to test on 3000+ browser device combinations, under real user conditions.
- BrowserStack is compatible with automation frameworks like Selenium, Cypress, Playwright, Puppeteer, etc.
- It is also compatible with CI/CD tools like Jenkins, Travis CI, CircleCI, Bamboo, etc. facilitating Agile Teams to test on real browsers and devices, thus accelerating the software development cycle.
- It also supports parallel testing to save time by running tests on multiple browsers and devices simultaneously.
Run Unit Tests on Real Devices
FAQs
1. Are Mocha and Chai the same?
No, Mocha and Chai are not the same. They are two separate JavaScript testing frameworks that serve different purposes in the testing ecosystem.
- Mocha is a flexible JavaScript test framework used for running tests that provides a testing framework and test runner that allows you to write and execute tests in various environments, such as Node.js or web browsers.
- Chai is an assertion library commonly used with Mocha but can also be used with other testing frameworks.
2. Which is better, Chai or Mocha?
Mocha and Chai are not directly comparable as they serve different purposes.
Mocha provides a robust testing framework, while Chai enhances the readability and expressiveness of test assertions. The choice depends on your specific project needs and preferences.
