Touch actions in Appium objects contain a chain of events. In all the Appium client libraries, touch actions are created and are given a chain of events. First, you must initialize the TouchAction object with your WebDriver and then chain your steps to perform the action. You can demonstrate a variety of gestures such as:
- Tap
- Press (Long, Short)
- Swipe (from coordinate a to b)
Touch Action is important in testing because sometimes you’d need to perform like scroll swipe and press and button action to redirect in the app between different pages and screens. Touch action is performed like the touch a finger so appium provides that feature in Appium touch actions methods.
Understanding Touch Actions in Appium
There are some appium touch actions in Appium such as:
- Swipe
- Tap
- Long Press
- Multi-touch
1. Swipe
Press by using x,y coordinates, and duration (in seconds) Horizontal swipe by using the start and end percentage of the phone screen and a point for the height—vertical swipe by using the start and end percentage of the screen and an anchor for the width. Swipe one element to another element. The swipe has a start and endpoints. The start point of swipe is the most important.
The following elements may prevent swipe start: application interface/menu e.g. header or footer – an element that is waiting for tap and do not pass touch to scroll view
This is best to start swipe actions at the center point of the screen to make them more stable.
2. Tap
Tap and click sometimes suffer from the elements not being valid anymore and returning “not able to tap element”.
That said, we normally use taps on buttons. Whenever we get any problem with tapping on visible elements (but appium states they aren’t visible, etc.) we use TouchAction.new.press on Element. So no take-care costs and it always presses on the spot even when tap/click does not work.
3. Long Press
The act of pressing one’s finger down on an element or other part of the screen for a few seconds, as to activate a task or access additional options. When we need to rotate any app icon on the screen then we need long press that app icon and then scroll it on a phone screen.
4. Multi-touch
Multi-touch allows you to touch the screen with multiple fingers and perform action. Multi-touch is usually used for gestures like Zoom-in, Zoom-out, Drag and Drop. In Appium, multi-touch actions can be performed using the MultiTouchAction class. This class allows you to create complex touch actions involving multiple fingers on the touch screen.
Differences between Android and iOS touch actions in Appium
iOS and Android both use touch actions that have a common operation – swiping, tapping, pinch, and zoom. Both OS boot to a home screen, which is similar to a computer desktop. While an iOS home screen only has rows of app icons, Android allows the use of widgets, which display auto-updating details such as weather and email. The iOS user UI features an idea where users can pin their most frequently used applications.
A status bar runs across at the upper side on both iOS and Android, offering information such as the time, WiFi or cell signal, and battery life; on Android, the status bar also visible the number of new coming emails, messages, and reminders.
Installing and Setting Up Appium
1. Install JDK
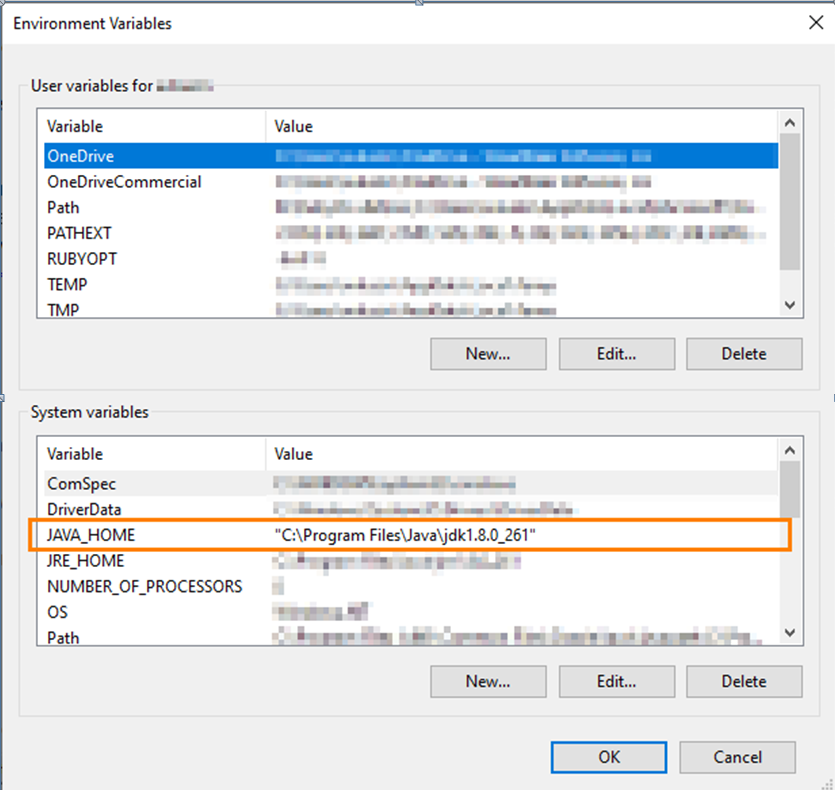
Specify the path to the JDK version in the JAVA_HOME environment variable. To do this, open the Control Panel, search for environment variables, in the dialog, click Environment Variables, and then set the variable and put the value:
3. Install Appium using the below command
npm install -g appium
After the installation, start Appium to confirm it is working fine.
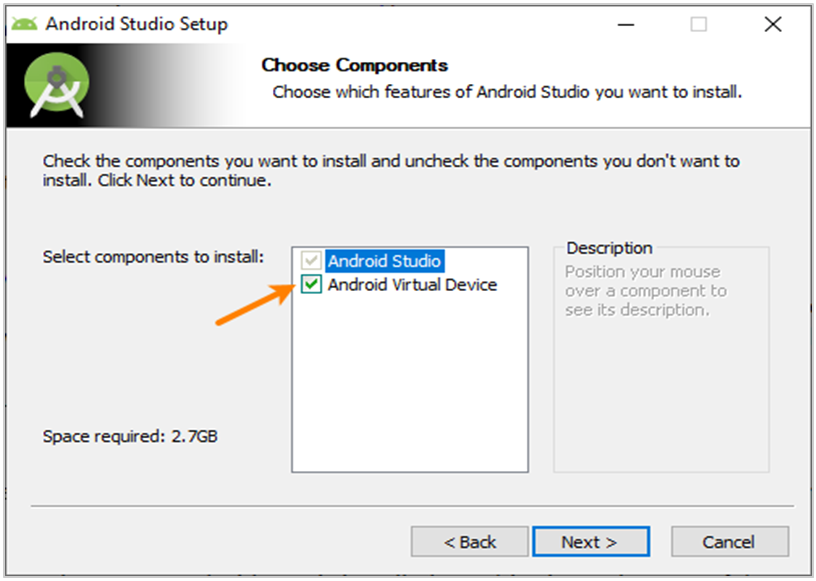
Note: When installing, take care to select the Android Virtual Device component as seen in the image below
5. Configure Android Virtual Devices
- Start Android Studio.
- In the First dialog, select Configure > SDK Manager.
- On the SDK Window, select the SDKs that are needed for testing. Select at least one SDK.
- Switch to the SDK Tools tab and confirm the following tools are selected there:
- Android SDK Build-tools
- Android SDK Platform-Tools
- Intel x86 Emulator Accelerator (HAXM installer)
- Copy the path of the Android SDK Location box at the up side of the SDK Manager dialog. We will need this value later:
- Close the SDK Manager.
- Switch to the SDK Tools tab and confirm the following tools are selected there:
- Now, in the First dialog, select Configure > AVD Manager. This will open the AVD Manager dialog where you can create and start new Android virtual devices (emulators).
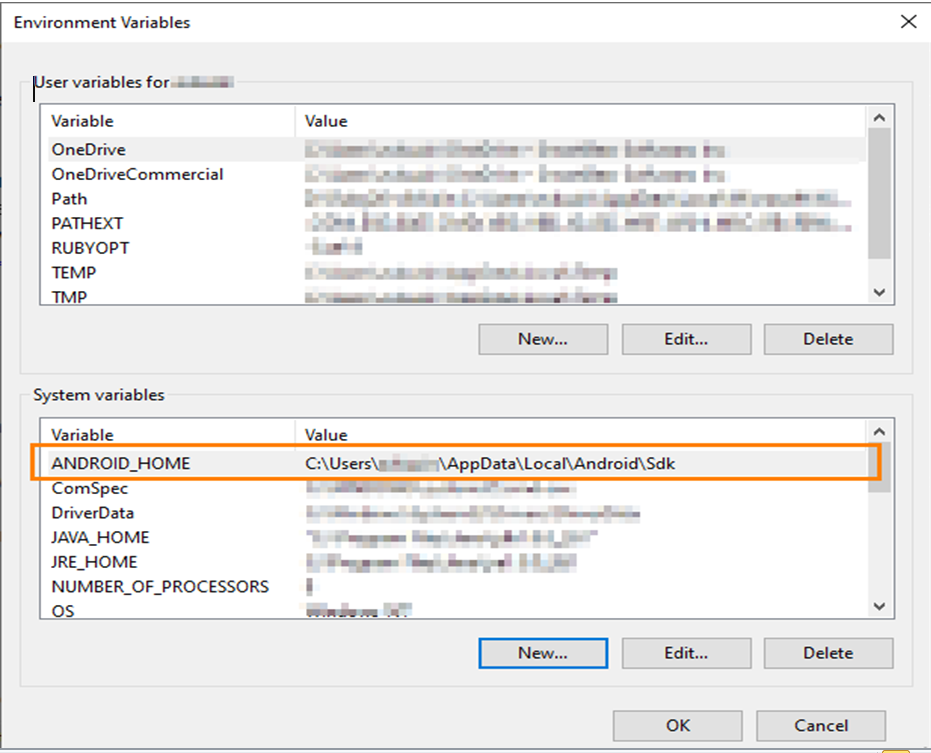
If the dialog box doesn’t list the device you need, click Create Virtual Device and create the required device emulator. - To create and run tests, you need to give the path to Android SDK files in the ANDROID_HOME environment variable: open the Control Panel, search for “environment variables”, in the subsequent dialog, click Environment Variables, and then set the variable value. If the variable doesn’t have in list, add it to the “System variables” list:
Creating Basic Test Script For Touch Actions
Here, we will explain how you can use different touch actions in Appium using Python by creating a basic test case for each of them.
1. Using Tap Touch Action in Appium: Example
The below code helps you can perform the Tap Touch action in Appium
from appium import webdriver
from appium.webdriver.common.touch_action import TouchAction
from appium.webdriver.common.appiumby import AppiumBy
import time
# Step 1 : Create "Desired Capabilities"
desired_caps = {}
desired_caps['platformName'] = 'Android'
desired_caps['platformVersion'] = '10'
desired_caps['deviceName'] = 'Pixel3XL'
desired_caps['appPackage'] = 'com.browserstack.demo.app'
desired_caps['appActivity'] = 'host.exp.exponent.MainActivity'
desired_caps['udid'] = 'emulator-5554'
# Step 2 : Create "Driver object"
driver = webdriver.Remote("http://127.0.0.1:4723/wd/hub", desired_caps)
time.sleep(8)
ele = driver.find_element(AppiumBy.XPATH,'//android.widget.TextView[@content-desc="filter-btn"]')
# Step 3 : Create the object the TouchAction class
actions = TouchAction(driver)
# Step 4 : Call the tap() method and pass the arguments.
actions.tap(ele).perform()
time.sleep(5)
driver.quit()
2. Using Long Press Touch Action in Appium: Example
The below code helps you can perform Long Press touch action in Appium
from appium import webdriver
from appium.webdriver.common.touch_action import TouchAction
from appium.webdriver.common.appiumby import AppiumBy
import time
# Step 1 : Create "Desired Capabilities"
desired_caps = {}
desired_caps['platformName'] = 'Android'
desired_caps['platformVersion'] = '10'
desired_caps['deviceName'] = 'Pixel3XL'
desired_caps['appPackage'] = 'com.browserstack.demo.app'
desired_caps['appActivity'] = 'host.exp.exponent.MainActivity'
desired_caps['udid'] = 'emulator-5554'
# Step 2 : Create "Driver object"
driver = webdriver.Remote("http://127.0.0.1:4723/wd/hub", desired_caps)
time.sleep(8)
ele = driver.find_element(AppiumBy.XPATH,'//android.widget.TextView[@content-desc="filter-btn"]')
# Step 3 : Create the object the TouchAction class
actions = TouchAction(driver)
actions.long_press(ele)
actions.perform()
time.sleep(5)
driver.quit()
3. Swipe without Touch Action
Code :
from appium import webdriver
import time
# Step 1 : Create "Desired Capabilities"
desired_caps = {}
desired_caps['platformName'] = 'Android'
desired_caps['platformVersion'] = '10'
desired_caps['deviceName'] = 'Pixel3XL'
desired_caps['appPackage'] = 'com.browserstack.demo.app'
desired_caps['appActivity'] = 'host.exp.exponent.MainActivity'
desired_caps['udid'] = 'emulator-5554'
# Step 2 : Create "Driver object"
driver = webdriver.Remote("http://127.0.0.1:4723/wd/hub", desired_caps)
time.sleep(8)
# Step 1 : Find the device width and height
deviceSize = driver.get_window_size()
screenWidth = deviceSize['width']
screenHeight = deviceSize['height']
# Step 2 : # Step 6 : Find the x,y coordinate to swipe
# # *********** down to up ************* #
startx = screenWidth/2
endx = screenWidth/2
starty = screenHeight*8/9
endy = screenHeight/9
driver.swipe(start_x=startx, start_y=starty, end_x=endx, end_y=endy, duration=100)
time.sleep(5)
driver.quit()
4. Swipe with touch action in Appium
Here’s the code to swipe using touch action in Appium
from appium import webdriver
from appium.webdriver.common.touch_action import TouchAction
from appium.webdriver.common.appiumby import AppiumBy
import time
# Step 1 : Create "Desired Capabilities"
desired_caps = {}
desired_caps['platformName'] = 'Android'
desired_caps['platformVersion'] = '10'
desired_caps['deviceName'] = 'Pixel3XL'
desired_caps['appPackage'] = 'com.browserstack.demo.app'
desired_caps['appActivity'] = 'host.exp.exponent.MainActivity'
desired_caps['udid'] = 'emulator-5554'
# Step 2 : Create "Driver object"
driver = webdriver.Remote("http://127.0.0.1:4723/wd/hub", desired_caps)
time.sleep(8)
ele = driver.find_element(AppiumBy.XPATH,'//android.widget.TextView[@content-desc="filter-btn"]')
# Step 3 : Find the device width and height
deviceSize = driver.get_window_size()
print("Device Width and Height : ",deviceSize)
screenWidth = deviceSize['width']
screenHeight = deviceSize['height']
# Step 4 : Find the x,y coordinate to swipe
# *********** Left to Right ************* #
startx = screenWidth*8/9
endx = screenWidth/9
starty = screenHeight/2
endy = screenHeight/2
# *********** Right to Left ************* #
startx2 = screenWidth/9
endx2 = screenWidth*8/9
starty2 = screenHeight/2
endy2 = screenHeight/2
actions = TouchAction(driver)
# Step 5 : perform the action swiping from left to Right
actions.long_press(None,startx,starty).move_to(None,endx,endy).release().perform()
# Step 6 : perform the action swiping from Right to Left
actions.long_press(None,startx2,starty2).move_to(None,endx2,endy2).release().perform()
time.sleep(2)
driver.quit()
Advanced Touch Actions
Using advanced touch actions like multi-touch actions such as:
- Pinch – Zoom in using multi-touch
- Pinch Zoom-out using multi-touch
- Drag & Drop
- Drag & Drop using an inbuilt function
Here’s the detailed code for each of these complex touch actions.
1. Pinch – Zoom in using multi-touch
To make any image, web page, etc. more visible and clear to the viewer, the zoom operation maximises and minimises the window.
Or, to put it another way, when you zoom in, the coordinates (x, y) from one place change as it moves to another spot, causing a shift in coordinates that enlarges the window and improves user clarity.
from appium import webdriver
from appium.webdriver.common.touch_action import TouchAction
from appium.webdriver.common.multi_action import MultiAction
from appium.webdriver.common.appiumby import AppiumBy
import time
# Step 1 : Create "Desired Capabilities"
desired_caps = {}
desired_caps['platformName'] = 'Android'
desired_caps['platformVersion'] = '10'
desired_caps['deviceName'] = 'Pixel3XL'
desired_caps['appPackage'] = 'com.browserstack.demo.app'
desired_caps['appActivity'] = 'host.exp.exponent.MainActivity'
desired_caps['udid'] = 'emulator-5554'
# Step 2 : Create "Driver object"
driver = webdriver.Remote("http://127.0.0.1:4723/wd/hub", desired_caps)
time.sleep(8)
ele = driver.find_element(AppiumBy.XPATH,'//android.widget.TextView[@content-desc="filter-btn"]')
# Step 3 : Find the device width and height
xx = driver.get_window_size()['width']/2
yy = driver.get_window_size()['height']/2
#Step 4 : Perform zoom-in
action1 = TouchAction(driver)
action2 = TouchAction(driver)
zoom_action = MultiAction(driver)
# Zoom
action1.long_press(x=xx, y=yy).move_to(x=0, y=50).wait(500).release()
action2.long_press(x=xx, y=yy).move_to(x=0, y=-50).wait(500).release()
zoom_action.add(action1, action2)
time.sleep(2)
driver.quit()
2. Pinch Zoom-out using multi-touch
A zoom-out operation reduces the size of the window for any image, webpage, etc. so that the user can see it more clearly and easily.
Or, to put it another way, when you zoom out, the coordinates (x, y) from one point change and are shifted to another point location, which causes a change in coordinates. This action enlarges the window and improves user clarity.
from appium import webdriver
from appium.webdriver.common.touch_action import TouchAction
from appium.webdriver.common.multi_action import MultiAction
from appium.webdriver.common.appiumby import AppiumBy
import time
# Step 1 : Create "Desired Capabilities"
desired_caps = {}
desired_caps['platformName'] = 'Android'
desired_caps['platformVersion'] = '10'
desired_caps['deviceName'] = 'Pixel3XL'
desired_caps['appPackage'] = 'com.browserstack.demo.app'
desired_caps['appActivity'] = 'host.exp.exponent.MainActivity'
desired_caps['udid'] = 'emulator-5554'
# Step 2 : Create "Driver object"
driver = webdriver.Remote("http://127.0.0.1:4723/wd/hub", desired_caps)
time.sleep(8)
ele = driver.find_element(AppiumBy.XPATH,'//android.widget.TextView[@content-desc="filter-btn"]')
# Step 3 : Find the device width and height
xx = driver.get_window_size()['width']/2
yy = driver.get_window_size()['height']/2
#Step 4 : Perform zoom-out
action1 = TouchAction(driver)
action2 = TouchAction(driver)
zoom_action = MultiAction(driver)
# Zoom
action1.long_press(x=xx-50, y=yy-50).move_to(x=0, y=50).wait(500).release()
action2.long_press(x=xx-50, y=yy-50).move_to(x=0, y=-50).wait(500).release()
zoom_action.add(action1, action2)
time.sleep(2)
driver.quit()
Complex Actions using Touch Action and Multi-touch Action
Here, we are performing some complex actions using touch action and multi-touch in appium
3. Drag & Drop
Moving an element from one place to a specific or defined place requires the simultaneous use of the two actions of drag and drop.
An element’s location, or more specifically its x and y coordinates, change throughout the drag and drop event and it is placed in a new location with new x and y coordinates.
In order to do drag-and-drop actions inside mobile applications, Appium offers a set of instructions. The moveTo method, which is part of the Touch Action Class, helps drop the element to its intended place based on x and y coordinates by long-pressing the element to be dragged.
Read More: How to perform Drag and Drop using Appium
Code to perform Drag and Drop using Touch Actions in Appium
from appium import webdriver
from appium.webdriver.common.touch_action import TouchAction
from appium.webdriver.common.multi_action import MultiAction
from appium.webdriver.common.appiumby import AppiumBy
import time
# Step 1 : Create "Desired Capabilities"
desired_caps = {}
desired_caps['platformName'] = 'Android'
desired_caps['platformVersion'] = '10'
desired_caps['deviceName'] = 'Pixel3XL'
desired_caps['appPackage'] = 'com.browserstack.demo.app'
desired_caps['appActivity'] = 'host.exp.exponent.MainActivity'
desired_caps['udid'] = 'emulator-5554'
# Step 2 : Create "Driver object"
driver = webdriver.Remote("http://127.0.0.1:4723/wd/hub", desired_caps)
time.sleep(8)
# Step 3: Find element for drag and drop
drag_ele = driver.find_element(AppiumBy.XPATH,'<Xpath>')
drop_ele = driver.find_element(AppiumBy.XPATH , '<Xpath>')
action = TouchAction(driver)
action.press(drag_ele).move_to(drop_ele, 100, 100).release().perform()
time.sleep(2)
driver.quit()
4. Drag & Drop using an inbuilt function
from appium import webdriver
from appium.webdriver.common.touch_action import TouchAction
from appium.webdriver.common.multi_action import MultiAction
from appium.webdriver.common.appiumby import AppiumBy
import time
# Step 1 : Create "Desired Capabilities"
desired_caps = {}
desired_caps['platformName'] = 'Android'
desired_caps['platformVersion'] = '10'
desired_caps['deviceName'] = 'Pixel3XL'
desired_caps['appPackage'] = 'com.browserstack.demo.app'
desired_caps['appActivity'] = 'host.exp.exponent.MainActivity'
desired_caps['udid'] = 'emulator-5554'
# Step 2 : Create "Driver object"
driver = webdriver.Remote("http://127.0.0.1:4723/wd/hub", desired_caps)
time.sleep(8)
# Step 3: Find element for drag and drop
drag_ele = driver.find_element(AppiumBy.XPATH,'<Xpath>')
drop_ele = driver.find_element(AppiumBy.XPATH , '<Xpath>')
action = TouchAction(driver)
action.tap(drag_ele).perform()
driver.drag_and_drop(drag_ele, drop_ele)
time.sleep(2)
driver.quit()
Read More: How to perform Drag and Drop using Appium
Best Practices for using Touch Actions in Appium
Listed below are some of the key best practices that you can follow when using touch actions in Appium:
- Drag and drop operations can be performed using the TouchAction and MultiTouchAction classes.
- Press, waitAction and moveTo methods should be called in sequence to perform drag and drop
- Using the getLocation function, we can locate the Point of Source and Destination elements.
- Lastly, drag and drop action may be carried out using the MultiTouchAction class’s perform function.
- The same principles apply when dragging and dropping an element. The only distinction is that there is no destination element. We can use destination point in this situation.
- In a similar manner, we may carry out this action on iOS.
Common issues / Challenges with Touch Actions in Appium
Here are some of the common issues / challenges that you may encounter with touch actions in Appium:
- Unrestricted X Path Usage: Although excessive X Path usage has been observed in the Selenium world as well, it has more absurd repercussions in the Appium world since X Path is a more dynamic technique to uncover the elements. Xpaths and the type of Xpath we are just using must be considered while working with touch actions in appium. Attempt to utilise a dynamic Xpath to ignore element not visible problems.
- Neglected usage of Accessibility IDs: To read an individual identifier for a UI element, the accessibility ID locator strategy was developed. The best way to retrieve an element for touch actions on iOS and Android is by its accessibility ID. Because every element have your own unique id which is provided by developers.
- Query for every element visibility: Another option to shorten the run-time of the Appium test scripts is to avoid inquiring for each element’s visibility. As a result, Appium experiences an increased volume of calls and wait times throughout each action of fetching an element. By just asking the element characteristics that matter from the test code’s point of view, the lag can be decreased.
Read More: How to perform Debugging in Appium
Conclusion
So, In this article, we have touch action, multi-touch action, and action chain uses with different points of view and operations in applications for testing any app. Here we have swipe, scroll, drag & drop operations, Zoom In, and Zoom out. Next, we can try these operations by using W3C Protocol in appium. BrowserStack also provides the environment for performing these operations with different devices and versions.
