Android Toast is a small message displayed on the screen, similar to a tooltip or similar popup notification. It is displayed on top of the main content of an activity and only remains visible for a short time period.
Overview
What is testing Toast messages?
Testing Toast messages involves verifying that the correct message appears when a user triggers an action. Since Toasts are ephemeral and not tied to a specific UI element, you need to use Espresso’s UIAutomator or other workarounds to capture and assert their presence.
Why test Toast messages?
Toast messages provide necessary feedback, such as success confirmations or error alerts. Toast messages must be displayed correctly to maintain a good user experience and prevent potential UI bugs in production.
This article explains how to toast messages in Espresso and run the toast message test in Espresso.
How to Test Toast Message in Espresso
Before you can start testing toast message in Espresso, first you need to create a decorView variable and assign it before tests. The DecorView is the view that actually holds the window’s background drawable.
Here’s how you can create decorView:
private View decorView;
    @Before
    public void setUp() {
        activityRule.getScenario().onActivity(new ActivityScenario.ActivityAction<YourActivity>() {
            @Override
            public void perform(YourActivity activity) {
                decorView = activity.getWindow().getDecorView();
            }
        });
    }
Below is the Test case with assertion that would test Toast Message.
onView(withText("R.id.ToastText"))
                .inRoot(withDecorView(Matchers.not(decorView)))// Here you use decorView
                .check(matches(isDisplayed()));
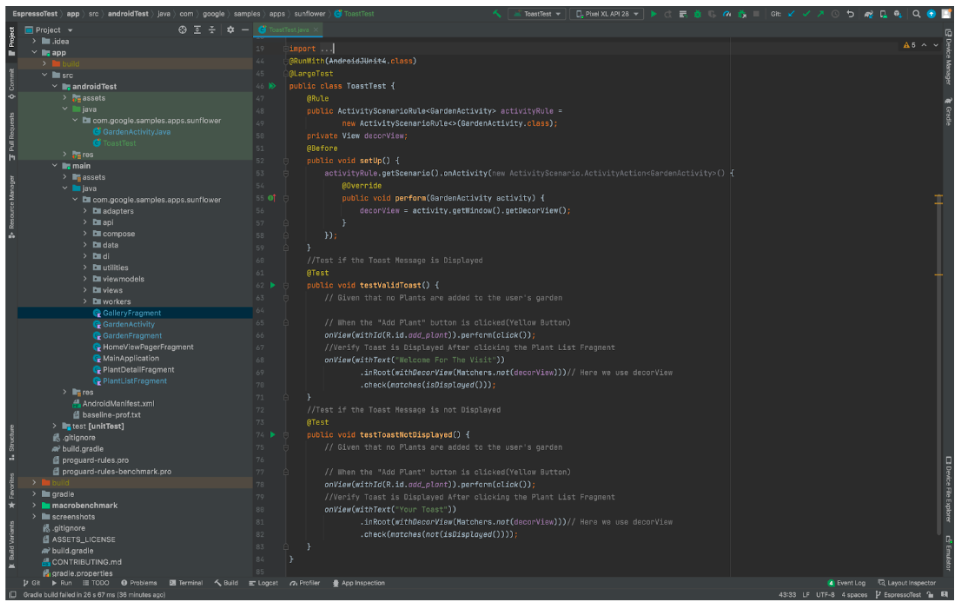
Combining decorView with the Test case with assertion written to test Toast Message.
private View decorView;

@Before
    public void setUp() {
        activityRule.getScenario().onActivity(new ActivityScenario.ActivityAction<GardenActivity>() {
            @Override
            public void perform(GardenActivity activity) {
                decorView = activity.getWindow().getDecorView();
            }
        });
    }
    //Test if the Toast Message is Displayed
    @Test
    public void testValidToast() {

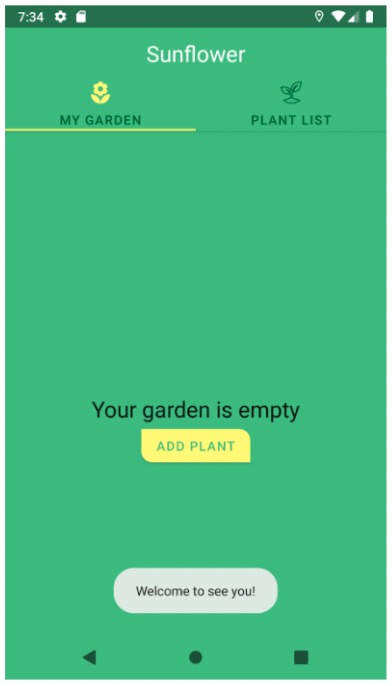
        // Given that no Plants are added to the user's garden
        // When the "Add Plant" button is clicked(Yellow Button)
        onView(withId(R.id.add_plant)).perform(click());
        //Verify Toast is Displayed After clicking the Plant List Fragment
        onView(withText("Welcome For The Visit"))
                .inRoot(withDecorView(Matchers.not(decorView)))// Here we use decorView
                .check(matches(isDisplayed()));
    }
    //Test if the Toast Message is not Displayed
    @Test
    public void testToastNotDisplayed() {
        // Given that no Plants are added to the user's garden
        // When the "Add Plant" button is clicked(Yellow Button)
        onView(withId(R.id.add_plant)).perform(click());
        //Verify Toast is Displayed After clicking the Plant List Fragment
        onView(withText("Your Toast"))
                .inRoot(withDecorView(Matchers.not(decorView)))// Here we use decorView
                .check(matches(not(isDisplayed())));
    }
For official documentation of BrowserStack, visit Espresso test on BrowserStack App Automate.
Run Espresso Tests on Real Devices
Run Toast Message Test in Espresso
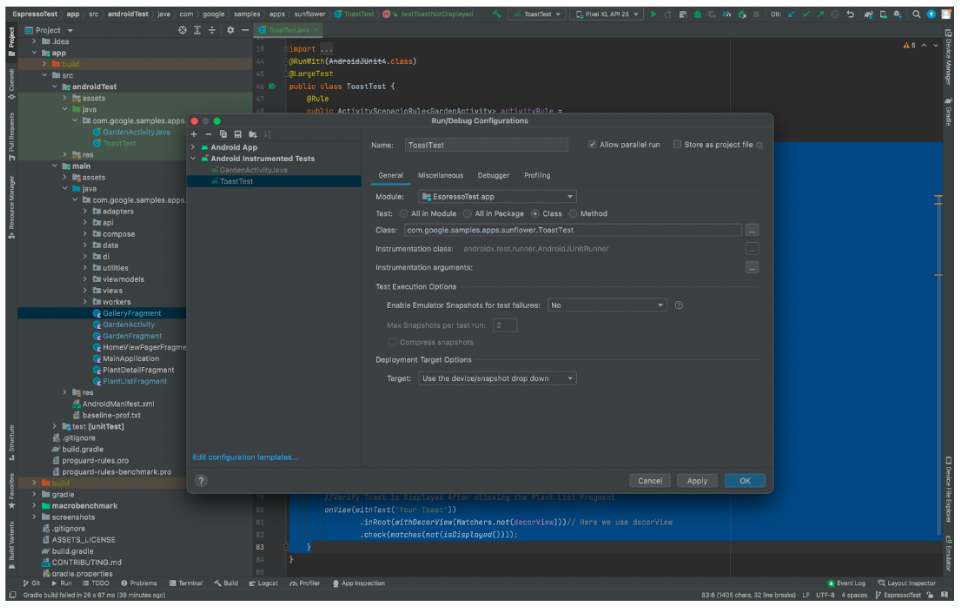
Create a test configuration In Android Studio:
- Open Run menu >> Edit Configurations
- Add a new Android Tests configuration
- Choose a module
- Add a specific instrumentation runner:
android.support.test.runner.AndroidJUnitRunner - Add your class name
Once the configuration is setup connect your device or select the emulator and directly run the configuration.
Read More: What is Espresso Testing? How does it work?
Executing Toast Message Test in Espresso with BrowserStack
For more accurate results, it is recommended to test on real devices, taking real user conditions into account.
With BrowserStack’s real device cloud you can run Espresso Toast Message on real devices by following the steps below:
Step 1 To Run your test cases on BrowserStack you need two apk files.
First one is your main app Apk and another is your androidTest Apk.
To generate both the apk run below command
- To create a .apk file for the app run the following command in the terminal:
./gradlew assembleDebug
- To create a .apk file for the test classes in the terminal run the following command:
./gradlew assembleAndroidTest
Find both .apk files under your project folder: <project-folder>\build\outputs\apk. In the apk folder you will find two files:
- app-debug.apk
- app-debug-androidTest.apk
These are the files that you will upload to the cloud when you create your Execution Plan.
Step 2 Get your access key from the BrowserStack using the below command
curl -u "<username>:<access-key>" -X POST
"https://api-cloud.browserstack.com/app-automate/upload" -F
"file=@/path/to/app/file/Application-debug.apk"
Output
Please note the App URL (bs://<hashed appid>) returned in the response of this call:
{"app_url":"bs://<hashed appid>"}
Step 3 Upload the app by running below command on your terminal
curl -u "<username>:<access-key>" -X POST
"https://api-cloud.browserstack.com/app-automate/espresso/test-suite" -F
"file=@/path/to/test/file/Application-debug-test.apk"
Output
Please note the Test Suite URL (bs://<hashed testID>) returned in the response of this call:
{"test_url":"bs://<hashed testID>"}
The Test ID returned in the response will be used to execute your test.
Note: Go through the BrowserStack Docs for detailed information on Espresso
Execute Toast Message Espresso Test
To execute the test in Espresso, run the following command:
curl -u "<username>:<access-key>" \

-X POST "https://api-cloud.browserstack.com/app-automate/espresso/v2/build" \
-d '{"class": ["Test-Class-Name"], "devices": ["Samsung Galaxy S8-7.0"], "app": "bs://<hashed appid from Step 1>", "testSuite": "bs://<hashed testID from Step 2>"}' \
-H "Content-Type: application/json"
//Test-Class-Name for the above github project com.google.samples.apps.sunflower.ToastTest
The test results are available on the command-line interface, as well as the App Automate dashboard. You have now run your first Espresso test on BrowserStack App Automate.
Conclusion
Testing Toast messages ensures they appear with the correct text and timing to improve app reliability. Espresso helps verify that these messages display as expected. Adding Toast message tests to your UI testing strategy helps catch issues early and enhances the user experience.
With BrowserStack’s real device cloud, you can run Espresso tests for Toast messages on real Android devices. This ensures accurate results across different OS versions, screen sizes, and device configurations without managing physical devices.
