TDD in Flutter is a development approach where tests drive code implementation, ensuring cleaner, maintainable, and bug-resistant applications. By applying the Red–Green–Refactor cycle, Flutter developers can build stable cross-platform apps with confidence.
Overview
What is TDD in Flutter?
- Test-Driven Development follows the Red → Green → Refactor cycle.
- Write a failing test, implement code to pass, then refactor for cleaner design.
- Ensures fewer bugs, eliminates redundant scripts, and improves long-term code quality.
Why Use TDD for Flutter Apps?
- Flutter’s widget-driven architecture fits perfectly with unit, widget, and integration testing.
- A single codebase supports Android, iOS, and Web, making tests scalable across platforms.
- Helps maintain modular design, supports faster debugging, and doubles as living documentation.
How to Perform TDD in Flutter
- Organize folder structure for domain, data, and presentation layers.
- Write test cases first (unit, widget, or integration) before adding logic.
- Use Flutter’s testing tools: group(), testWidgets(), pumpWidget(), and expect().
- Run tests with flutter test, refactor code until all pass.
Best Practices for TDD in Flutter
- Start testing early and run tests frequently.
- Keep tests small, targeted, and easy to read.
- Validate on real devices (via BrowserStack App Live & App Automate) to ensure true cross-platform compatibility.
This article explains TDD in Flutter, its importance, step-by-step implementation, and best practices to build cleaner, scalable apps.
What is Test Driven Development
Test-Driven Development (TDD) is a software development methodology that emphasises the creation of unit test cases prior to writing the real code. It mixes programming, the creation of unit testing, and refactoring in an iterative manner.
The TDD methodology has its origins in the Agile manifesto and Extreme programming. As its name implies, testing drives software development. In addition, it is a structuring strategy that enables developers and testers to obtain code that is efficient and durable through time.
In TDD, developers begin developing small test cases for each feature based on their initial comprehension. The purpose of this strategy is to only modify or write new code if the tests fail. This eliminates duplicate test scripts.
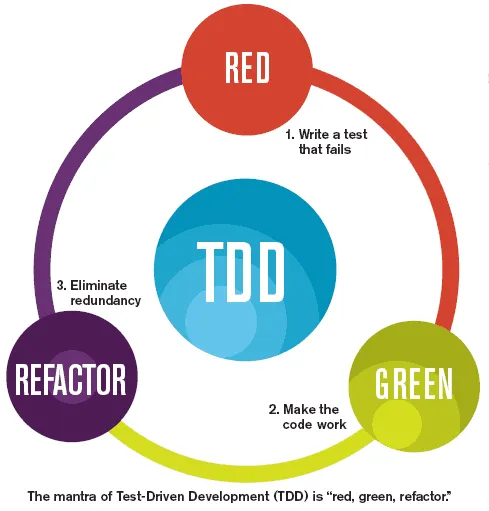
TDD can be visualised by means of the Red-Green-Refactor Cycle
It consists of 3 key steps –
- Create a test that will fail (Red)
- Create code that will pass a test (Green)
- Refactorize your code to get excellent code quality (Refactor)
But what does it actually mean? Before writing any code for a newly established project, you should be able to write a test that fails, then write the code required for the test to pass, then rework the code if necessary and restart the cycle by writing another test.
Obviously, it is not always necessary to test every aspect of your application, especially when building in Flutter; you will rarely need to test your complete UI and confirm that each AppBar is presented correctly, for instance. Nonetheless, it may be worthwhile to unit test some API calls if your application is ingesting data from an external service or to conduct database-related tests if your application heavily utilizes the database. Ultimately, TDD will significantly enhance the stability and quality of your code, particularly if you maintain or contribute open-source code.
What is Flutter? How Does it Work?
Due to its ability to develop cross-platform applications, Flutter has garnered enormous popularity recently. Flutter applications are developed only once, and their codebase is compiled to provide applications for Android, iOS, and the web. It is supported by a global technology titan, Google.
The Flutter test framework is built on the creation of widgets. It requires Dart programming, which may be compiled into a variety of native programs. Google invented the programming language Dart, which is comparable to JavaScript but includes static testing and robust node functionality.
In 2021, according to Statista, Flutter was one of the most popular cross-platform mobile frameworks utilised by software developers worldwide.
Flutter is a mobile app SDK that enables the development of high-quality, native iOS and Android applications. It is also the principal method for developing cross-platform applications for Google’s forthcoming Fuchsia operating system.
The Flutter framework makes it simple to create aesthetically pleasing, swift, and responsive user interfaces. Also, the framework is expandable, so you can add new features and functions with ease.
When developing a Flutter application, you will work with a widget. Widgets are the fundamental building blocks of a Flutter app, and they’re used to generate both the visual and functional parts of an app (such as buttons and text) (like Stateless Widgets).
Stateless Widgets and Stateful Widgets are the two types of widgets. According to their name, Stateless Widgets have no internal state (or “state,” for short). These are the simplest widgets and are typically used for buttons or text.
Stateful Widgets, on the other hand, have an internal state that may be modified over time and reflected in the widget’s appearance and behaviour. Stateful Widgets are utilised frequently for user input fields and animation controls.
Advantages of Flutter
There are a number of important advantages of adopting Flutter for mobile application development. They consist of:
- Flutter is quick: the Dart programming language is turned into native code, thus a JavaScript bridge is unnecessary. This leads to applications that are quick and responsive.
- Flutter produces cross-platform applications: the same code can be used to create apps for both iOS and Android devices from a single codebase, as opposed to moving between platforms. This can save much time and effort when creating mobile applications. Flutter can also be utilized for web development to create web applications.
- Flutter offers a wide variety of widgets: Widgets are the building elements of Flutter applications, and there is an extensive selection of them accessible. This facilitates the creation of attractive and individualised user interfaces.
- Flutter is an open source project: Anyone can contribute to the development of Flutter, and the number of developers using it is expanding. In addition, the Flutter community has generated numerous online guides and tutorials, which may be found on sites like as Github.
- Flutter is free: There are no licence fees associated with the development of Flutter apps. This makes it an interesting alternative for entrepreneurs and developers who wish to produce high-quality apps on a budget.
- Google backs Flutter: As a Google product, it receives substantial backing from the tech behemoth, which is always working to enhance it. This gives developers confidence that Flutter will continue to develop and maintain the platform.
- Taking inspiration from massively successful apps made with Flutter: Google AdWords, Reflectly, Xianyu by Alibaba, and Postmuse are notable examples. This is useful for developers who wish to examine Flutter’s capabilities before committing to utilising it for their projects.
- The Dart programming language provides powerful debugging tools, such as the Dart Analyzer and the DevTools suite. This facilitates the detection and elimination of issues in Flutter applications.
Read More: Essential Guide to Flutter Test Automation
What are the types of automated Flutter Testing?
The more functionality your application has, the more difficult it is to manually test. Automated tests aid in ensuring that your application operates properly prior to release, while preserving your feature and problem fix pace.
Automated testing can be divided into several categories:
- A unit test examines a single method, class, or function.
- A widget test (known as a component test in other UI frameworks) evaluates a single widget.
- An integration test examines an entire app or a substantial portion of an app.
Also Read: Introduction to UI Testing in Flutter
In general, a well-tested application has several unit and widget tests, monitored by code coverage, as well as sufficient integration tests to cover all significant use cases. This recommendation is based on the reality that there are trade-offs between various types of testing, as seen below.
Additionally there are two other types of tests which can be performed on flutter applications.
- Security Testing: The purpose of security tests is to examine the authentication, access, and code injections of the entire program. It secures an application that is ready for deployment.
- Smoke Testing: The purpose of smoke testing is to precisely examine the whole or core functioning of an application.
Pro Tip: For automation testers, a real device cloud that supports Flutter Appium automation is a fantastic option. The sole requirement for the automation tool is a collection of genuine devices and well-maintained servers.
BrowserStack App Automate provides testing on Android and iOS devices for Flutter applications. BrowserStack Supports Appium’s Flutter driver for testing Flutter applications with the Appium testing framework.
Test Flutter Apps on BrowserStack App Automate
Why is TDD important in Flutter?
- Easier code maintenance: With TDD, developers produce cleaner, more manageable, and understandable code. Also, it requires less effort to concentrate on smaller, more digestible code pieces. When transferring a project to a different individual or team, having clean code is advantageous.
- Allows for Modular Design: The focus is on a single feature at a time and does not shift until the test has been passed. These iterations make it easy to find flaws and reuse code in a project. Furthermore, adherence to these design principles improves solution architecture.
- Makes Code Refactoring easier: Refactoring is the optimization of existing code, and its sole purpose is to make it simpler to implement. If the code for a minor change or enhancement passes the initial tests, it can be refactored to acceptable standards. This is a required step in the TDD process.
- Reduces the dependency on code documentation: With the TDD methodology, time-consuming and exhaustive documentation is unnecessary. TDD involves a large number of simple unit tests that can serve as documentation. Also, these unit tests demonstrate how the code should function.
- Reduces the need for debugging: When there are fewer flaws in the code, developers spend less time correcting them. In addition, faults are easier to discover, and developers are alerted sooner when anything breaks. This is one of the primary advantages of the TDD methodology.
How To Perform TDD in Flutter
Step 1 Optimise the Folder Structure
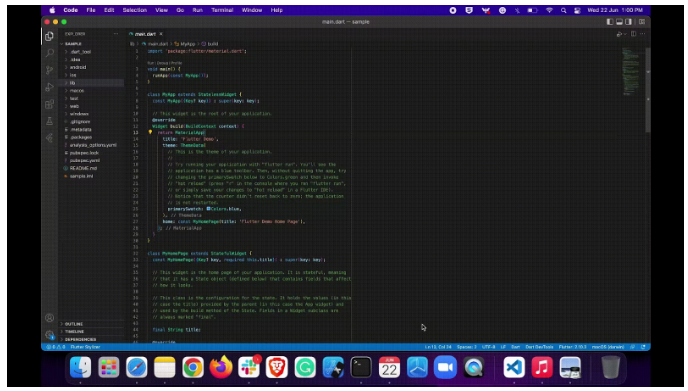
In the Flutter app, remove the test file created by the default Flutter project, widget test.dart, which contains boilerplate test code. Construct a subfolder according to the needs of your application. Include all logic and UI components associated with establishing subfolder structures for the domain layer, data layer, and presentation layer if you wish to utilize Test-Driven Development; otherwise, proceed with developing single files for each situation.
As indicated in the figure below, the test file should be named screen name test.dart.
Step 2 Finalise the tests for TDD in Flutter
Based on your needs, determine the types of tests you may need to add to your projects (data, domain, and presentation or unit tests/widgets tests/integration/security tests).
Step 3 Writing the test cases
For this article, TDD in Flutter is demonstrated using the at theme flutter pub.dev package from the atsign foundation to illustrate the implementation processes in detail.

Given there is no need for unit or security testing, we have decided to conduct solely widget testing per the package requirements. In accordance with naming conventions, we have created a folder for this purpose as a first step.
Step 4 Testing a use case
void main() {
Widget _wrapWidgetWithMaterialApp({required Widget colorCard}) {
return TestMaterialApp(home: Builder(builder: (BuildContext context) {
SizeConfig().init(context);
return colorCard;
}));
}


import 'package:at_common_flutter/at_common_flutter.dart';
import 'package:at_theme_flutter/src/widgets/color_card.dart';

import 'package:flutter/material.dart';
import 'package:flutter_test/flutter_test.dart';

import '../test_material_app.dart';

void main() {
Widget _wrapWidgetWithMaterialApp({required Widget colorCard}) {
return TestMaterialApp(home: Builder(builder: (BuildContext context) {
SizeConfig().init(context);
return colorCard;
}));
}

/// Functional test cases for Color Card Widget
group('Color Card Widget Tests:', () {
// Test Case to Check Color Card is displayed
final colorCard = ColorCard(color: Colors.orange, isSelected: true);
testWidgets("Color Card is displayed", (WidgetTester tester) async {
await tester.pumpWidget(
_wrapWidgetWithMaterialApp(colorCard: colorCard));
expect(find.byType(ColorCard), findsOneWidget);
});
});
}
Here are several crucial elements:
- group() : It accepts a collection of tests. Also, it contains the parameter description and function body.
- testWidget() : It executes a synchronous or asynchronous callback within a Flutter test environment. It contains parameters such as the function’s description and body.
- tester.pumpWidget() : It is used to render the provided widget’s user interface.
- expect() : It is used to specify the widget’s expected behavior.
Step 5 Run the test case by using the following Flutter Command
flutter test
If your test cases tend to pass all cases, the Flutter test is deemed successful; otherwise, examine the error, rewrite the code, and rerun the program until all test cases pass.
Read More: How to test Flutter Apps on Android Devices
Best Practices For TDD in Flutter
- Test frequently: The earlier you begin testing, the better. Write tests immediately after writing code. This will allow you to detect flaws earlier and prevent debugging code that is already functioning.
- Keep your tests concise and targeted: Each test should only assess a single concept. This will help you detect and correct errors faster.
- Create readable tests: The tests should be simple to read and comprehend. This will expedite the detection and correction of errors by you and others.
Conclusion
Using Test-Driven Development into Flutter applications is trustworthy and reduces bugs. Yet, it appears to be time-consuming and increases the number of lines of code. Thus, the use of this technique to the development of your apps is entirely reliant on your objectives and needs.
Even with the most stringent TDD testing in Flutter, several device-OS combinations must be allowed for UI Testing to ensure compatibility across platforms. As the number of platforms to support increases, setting and maintaining them becomes a time- and labor-intensive operation.
Yet, with BrowserStack App Live (Manual Testing) and BrowserStack App Automate (Automation Testing), you’ll have access to hundreds of popular mobile device-operating system combinations such as iPhones, Samsung Galaxy (S4 -S22), Google Pixel, and Xiaomi devices for testing their application and script automation instances.
This means that you are not responsible for purchasing hardware or implementing software updates or patches, yet you get the facility to test on real devices under real user conditions. You merely need to Sign-up for free, choose the needed device-operating system combination, and start testing their application.


