SpecFlow Tutorial for Automation Testing
By Mohit Joshi, Community Contributor - September 30, 2022
Organisations have been leveling up constantly to maintain the quality of the product they deliver, which goes through the SDLC. The utmost priority while testing is that users get a bug-free product. However, what if in achieving a common goal, there is entirely no communication gap among the project contributors?
That would help in implementing several ideas, leading towards a better-tested product. These contributors could be testers, developers, QAs, etc. Well, to achieve such a dream, technology has advanced so much to introduce test management and BDD (Behaviour Driven Development) into the conversation.
This guide will deep dive into the incorporation of BDD approaches while writing tests using SpecFlow automated testing.
What is BDD testing?
To understand BDD, let’s first go through TDD. TDD (Test Driven Development) is not any technology, however, it is a technique in which developers write code only when the test fails. On the same note, BDD is an extended version of TDD, in which the idea behind the implementation is to focus on the behavior of the project rather than testing.
- It is a strategy to build conversations among different teams of the project to unite towards identifying users’ stories.
- The approach of this technique is to use language that could be easily understood even by a non-technical personality.
- This gives an advantage of getting their contributions, which could help accomplish better testing behavior.
- BDD uses the Gherkin language, which helps determine test scenarios without technical knowledge.
Edges of BDD Testing
- BDD ensures that every contributor remains on the same page, and does not face any technical challenges while contributing to writing test scenarios.
- You don’t need to have coding knowledge while writing tests using the BDD approach, all the tests are written in simple English language.
- Anyone could maintain tests, without being an expert in automation testing.
Follow-Up Read: BDD vs TDD vs ATDD : Key Differences
What is SpecFlow?
SpecFlow is an open-source automation testing framework for .NET applications that can incorporate BDD approaches while writing tests. Apart from .NET applications, which are the applications that are created with the help of C# (C sharp) programming language, it supports Xamarin and Mono, which are the frameworks of .NET applications.
SpecFlow increases the amount of efficient collaboration, by using the BDD approach, and hence it reduces the time of development.
How to Write SpecFlow tests using BDD?
In the BDD technique, tests are written in the Gherkin language. In SpecFlow automated testing, you will use Gherkin language with predefined keywords such as scenario, given, when, then, and, but, etc. For example,
Scenario: Click on the SpecFlow tutorial link
Given I am on the Browserstack website
When I click the SpecFlow with selenium c# blog
Then I should see the SpecFlow tutorial page
- Scenario: Every test example starts with a scenario keyword, which contains one or more steps to follow further. It is optional to put a scenario title.
- Given: This states the pre-required condition for the scenario. In the above example, Given states a prerequisite, that you have to be on the BrowserStack website.
- When: It states the activity required to be executed in the scenario.
- Then: It states the outcome of the scenario. In the above example, reaching the SpecFlow tutorial page becomes the outcome, the endpoint of the scenario, which is quoted in Then.
What are Bindings?
The use of Gherkin language in BDD is just to ensure collaboration, however, we’re always using some coding language behind the scenes, therefore, the automation that connects the Gherkin specification to a source code is known as binding.
To implement, we have to use the [Binding] attribute before writing the step definitions.
Implementation of SpecFlow
Prerequisites:
- IDE: Download and install any IDE of your choice. In this tutorial, we are using Microsoft Visual Studio 2022. (Note – Visual Studio and Visual Studio code are different)
- SpecFlow: SpecFlow is installed as an extension in the IDE of your choice.
- .NET framework: Install the latest version of the .NET Framework on your machine.
- Selenium: You must have a basic understanding of Selenium and must also install Selenium on your system. In this SpecFlow tutorial, Selenium will help in automating our SpecFlow tests.
- Browser Webdriver: Install any browser Webdriver depending upon the browser you want to run your tests.
Step 1: Installing SpecFlow and required dependencies
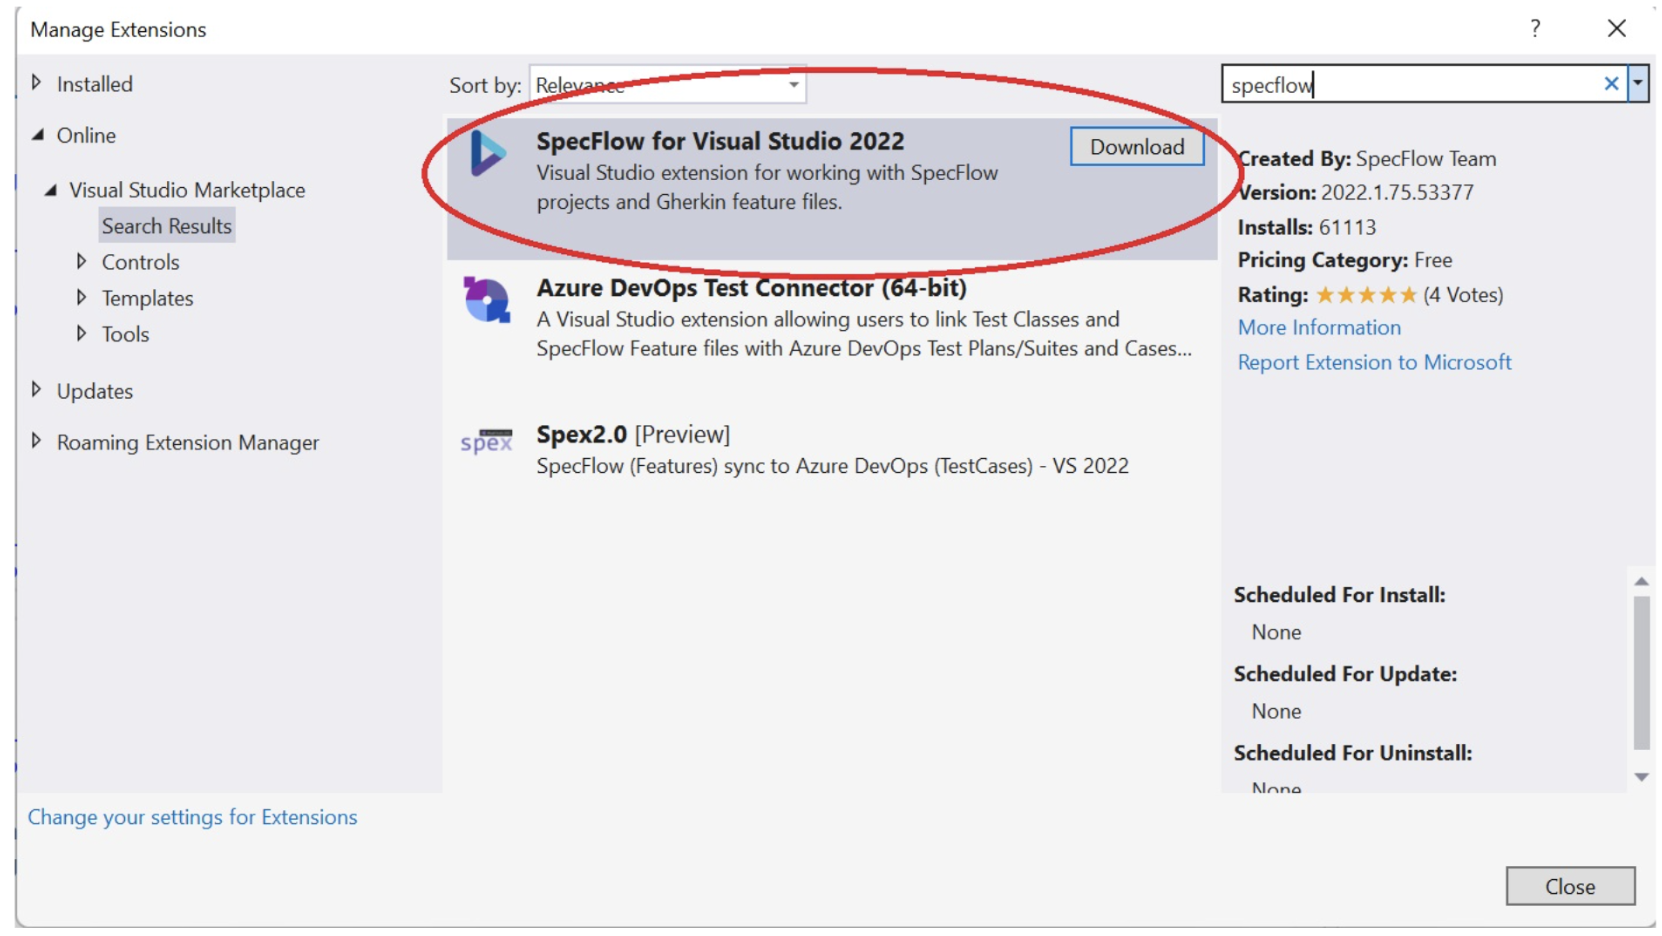
- To install SpecFlow, go to manage extensions and install the extension “SpecFlow for Visual Studio 2022”. After installing, restart your Visual Studio and create a new project using the SpecFlow template.
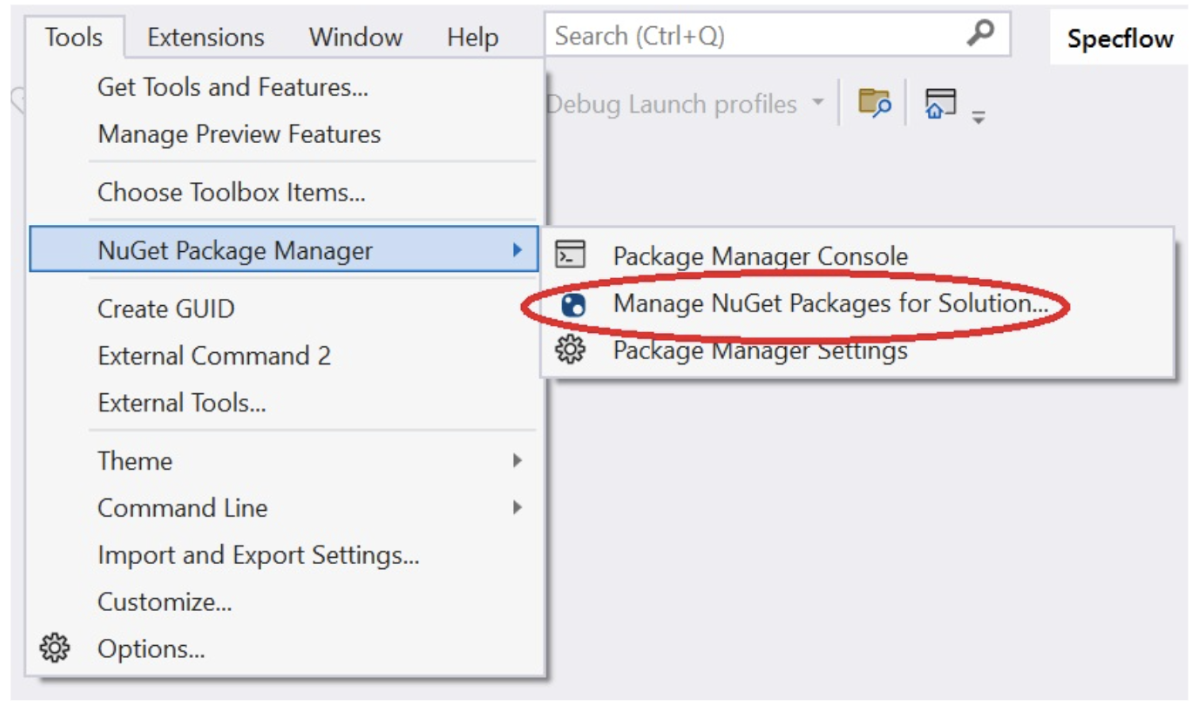
- Now, download a few packages that will serve as dependencies of your project. Navigate to Tools -> NuGet Package Manager -> Manage NuGet package for solution. Here you have to install a few more packages:
- SpecFlow.NUnit
- SpecFlow.Tools.MsBuild.Generation
- NUnit test adapter
- Selenium.Webdriver
- Selenium Webdriver.ChromeDriver
Search for each package and install them one by one.
Step 2: Folder structure of our project
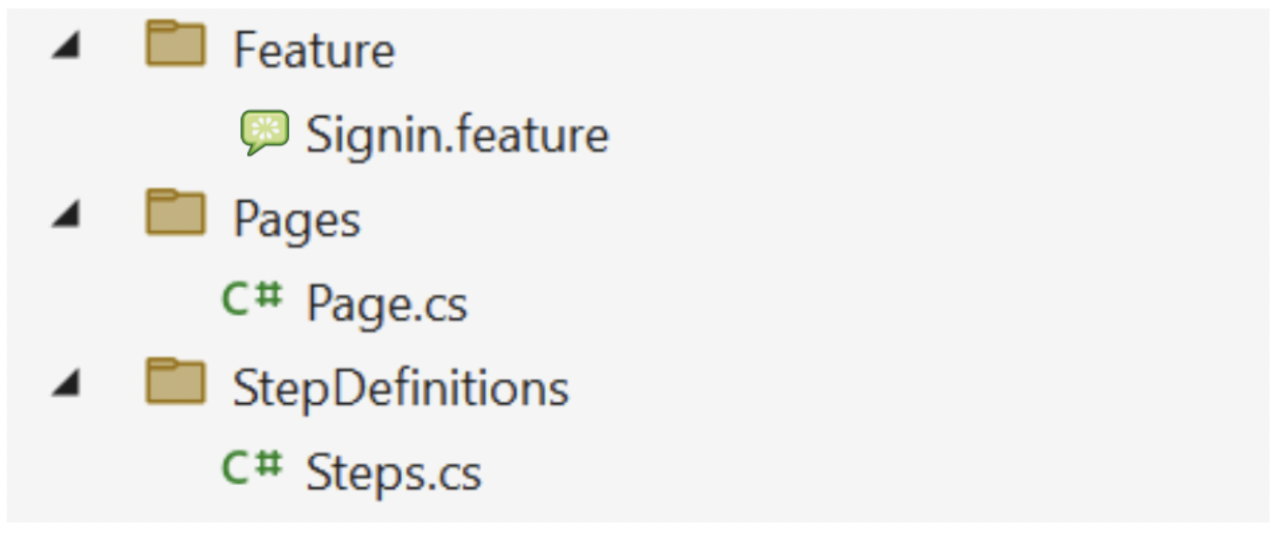
We are going to create a test, where a login will be occurring on the bstackdemo website. Also, we are going to use Page Object Model in Selenium to maintain our tests. This will remain the file structure for our project.
Step 3: Writing Code
- We will start by creating the most interesting part, adding scenarios in the feature file, using the Gherkin language. Add the following script inside the feature file.
Feature: Signin

@smoke
Scenario: Signin to bstackdemo website
Given I open bstackdemo homepage
And I click signin link
And I enter the login details
And I click login button
Then Profile Name should appear
- Now, let’s create the Page.cs file. Here you must be aware of Selenium. Add the following code inside the Page.cs file. We are creating this file to implement the Page object model using Selenium.
using OpenQA.Selenium;

namespace SpecFlowTutorial.Pages
{
public class Page
{
public IWebDriver webDriver { get; }
public Page(IWebDriver webDriver)
{
WebDriver = webDriver;
}
public IWebElement SignInLink => WebDriver.FindElement(By.LinkText("Sign In"));
public IWebElement UsernameSpace => WebDriver.FindElement(By.Id("username"));
public IWebElement UsernameOption => WebDriver.FindElement(By.XPath("//*[@id='username']/div[2]"));
public IWebElement PasswordSpace => WebDriver.FindElement(By.Id("password"));
public IWebElement PasswordOption => WebDriver.FindElement(By.XPath("//*[@id='password']/div[2]"));
public IWebElement LoginButton => WebDriver.FindElement(By.Id("login-btn"));
public IWebElement ProfileName => WebDriver.FindElement(By.LinkText("demouser"));

public IWebDriver WebDriver { get; }

public void ClickSignIn() => SignInLink.Click();

public void ClickLoginButton() => LoginButton.Submit();
public bool isProfileNameExist() => ProfileName.Displayed;

}
}
- Once the steps have been created, we will now create step definitions of the steps. Right-click on any step, then select generate step definition. This will create a new file for writing step definitions with some boilerplate code. Here replace the default script with the required code.
using NUnit.Framework;
using OpenQA.Selenium;
using OpenQA.Selenium.Chrome;
using SpecFlowTutorial.Pages;
using TechTalk.SpecFlow;
using TechTalk.SpecFlow.Assist;

namespace SpecFlowTutorial.StepDefinitions
{
[Binding]

public sealed class Steps
{
Page Page;

[Given(@"I open bstackdemo homepage")]

public void GivenIOpenBstackdemoHomepage()
{
IWebDriver webDriver = new ChromeDriver();
webDriver.Navigate().GoToUrl("https://bstackdemo.com/");
Page = new Page(webDriver);
}

[Given(@"I click signin link")]
public void GivenIClickSignInLink()
{
Page.ClickSignIn();
}

[Given(@"I enter the login details")]
public void GivenIEnterTheLoginDetails()
{
Page.UsernameSpace.Click();
Page.UsernameOption.Click();
Page.PasswordSpace.Click();
Page.PasswordOption.Click();

}

[Given(@"I click login button")]
public void GivenIClickLoginButton()
{
Page.ClickLoginButton();
}

[Then(@"Profile name should appear")]
public void ThenProfileNameShouldAppear()
{
Assert.That(Page.isProfileNameExist(), Is.True);
}

}

}
Step 4: Executing our test
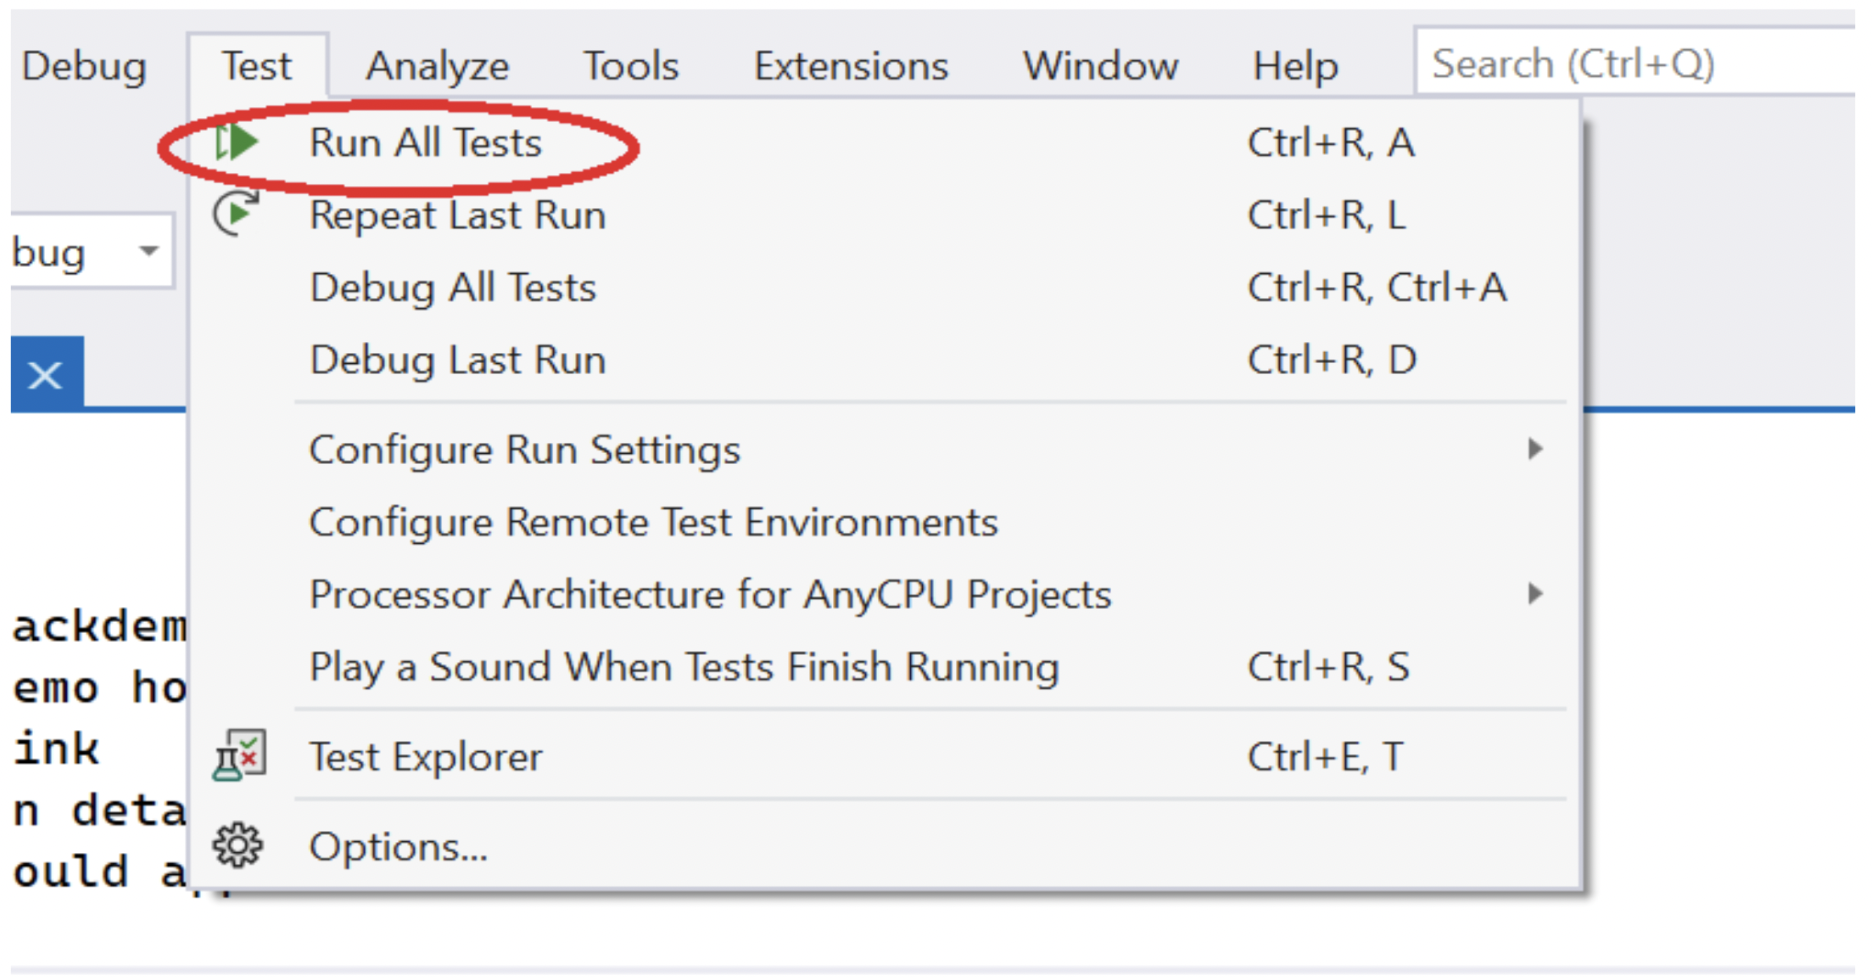
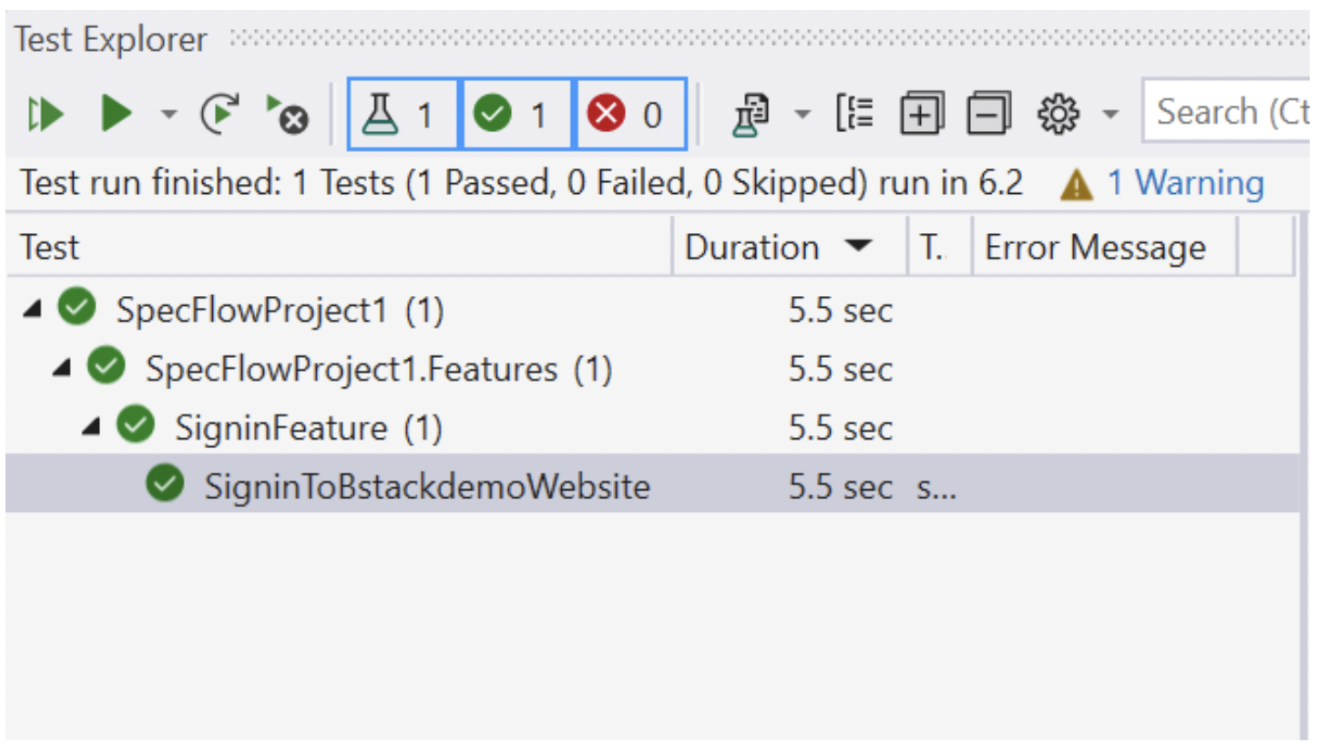
Navigate to Test -> Run All Tests.
This will launch the test explorer in Visual Studio and will perform our required test.
Summing it up
SpecFlow is an open-source testing framework for .NET applications. You can generate BDD tests using SpecFlow and automate them using Selenium at the same time.
- The use of the Gherkin language bridges the gap among the QA, BA, Developer, and stakeholders.
- It offers freedom to users to create feature files without having any technical knowledge, thereafter, a tester binds the Gherkin language to its necessary source code.
Learn More: Synchronize BA, DevOps, and QA with Cloud Testing
In this SpecFlow automated testing tutorial, we used the Selenium server on our local system and ran a test on the Google Chrome browser, however, if you want to broaden your testing, you must use the Selenium grid to run cross-browser tests using BrowserStack Automate. It’s seamless for running tests on multiple operating systems and browsers simultaneously.
More than that, you can test in real user conditions with network simulation and geolocation testing for uncompromising quality.

