Ever wonder why a website works perfectly on Chrome but breaks on Firefox, or passes on Windows but fails on macOS? If you’re manually testing every browser and OS combination, you know how quickly it becomes a nightmare.
Selenium Grid makes this manageable. It lets you run tests in parallel across multiple browsers, operating systems, and devices. Instead of waiting for one test to finish before starting the next, Grid distributes them across different environments at the same time. This means faster feedback and much wider coverage without burning out your team.
Getting a Grid set up isn’t always straightforward. You need to configure hubs and nodes correctly and make sure everything connects. Miss a step, and tests fail for the wrong reasons, wasting time and causing frustration.
This guide walks you through what Selenium Grid is, how it works, when to use it, and how to set it up for scalable, cross-browser testing.
What is Selenium?
Selenium is a framework of automation testing tools, based on the JavaScript framework. Automated Selenium testing is greatly favoured by QAs for replicating end-user actions on websites to monitor their behaviour. It drives the interactions that occur on the target web page and could run them automatically, without requiring manual inputs.
Selenium suite comprises four components:
- Selenium Grid
- Selenium IDE
- Selenium RC
- Selenium Webdriver
Read More: What is Browser Automation?
What is Selenium Grid?
Selenium Grid is a smart proxy server that enables parallel test execution across multiple machines and browser environments. It works by routing WebDriver commands (in JSON format) from a central hub to one or more remote nodes, each running different browsers or operating systems.
The hub centrally manages test distribution, allowing the same test to run simultaneously on various browsers and platforms. This makes Selenium Grid especially useful for cross-browser testing, as it simplifies comparison, improves efficiency, and reduces execution time.
Why use Selenium Grid?
Selenium Grid makes automation testing more efficient. Here’s why you set up Selenium Grid to perform tests:
- Parallel Testing: Selenium Grid lets you run multiple tests concurrently, reducing the test execution time. This is especially useful if you are handling large test suites, where running tests sequentially would consume a lot of time.
- Centralized Test Execution: The Selenium grid unifies the control of test execution via a single hub. It handles multiple nodes (machines/virtual machines) where the tests are performed, streamlining test management, particularly in larger teams.
- Cross-browser testing: It helps you ensure that the performance of your application is consistent across various browsers and browser combinations by enabling cross-browser testing.
- Scalability: Selenium Grid facilitates scalability by allowing you to add more nodes to the grid and enabling parallel tests.
- Open Source: Selenium grid is open-source and free. Additionally, the documentation is updated with every release, making it easier to install, configure, and use.
For teams that want the benefits of Selenium Grid without the complexity of setup and maintenance, BrowserStack offers a cloud-based alternative. It provides instant access to a scalable grid of real browsers and devices, enabling seamless parallel and cross-browser testing, without managing infrastructure.
Selenium Grid provides the foundation for distributed testing, but achieving stable performance across multiple nodes, browsers, and environments requires expert configuration. BrowserStack’s QA specialists can help you design optimized grid setups, manage node capacity efficiently, and integrate parallel testing seamlessly into your CI/CD workflow.
Get Expert QA Guidance Today
Schedule a call with BrowserStack QA specialists to discuss your testing challenges, automation strategies, and tool integrations. Gain actionable insights tailored to your projects and ensure faster, more reliable software delivery.
Architecture of Selenium Grid
The basic Selenium Architecture mainly consists of a hub-node model. The central hub manages multiple nodes.
- Hub: Hub is a server that accepts access requests from the WebDriver client, routing the JSON test commands to the remote drives on nodes. It takes instructions from the client and executes them remotely on the various nodes in parallel.
- Node: Node is a remote device that consists of a native OS and a remote WebDriver. It receives requests from the hub in the form of JSON test commands and executes them using WebDriver.
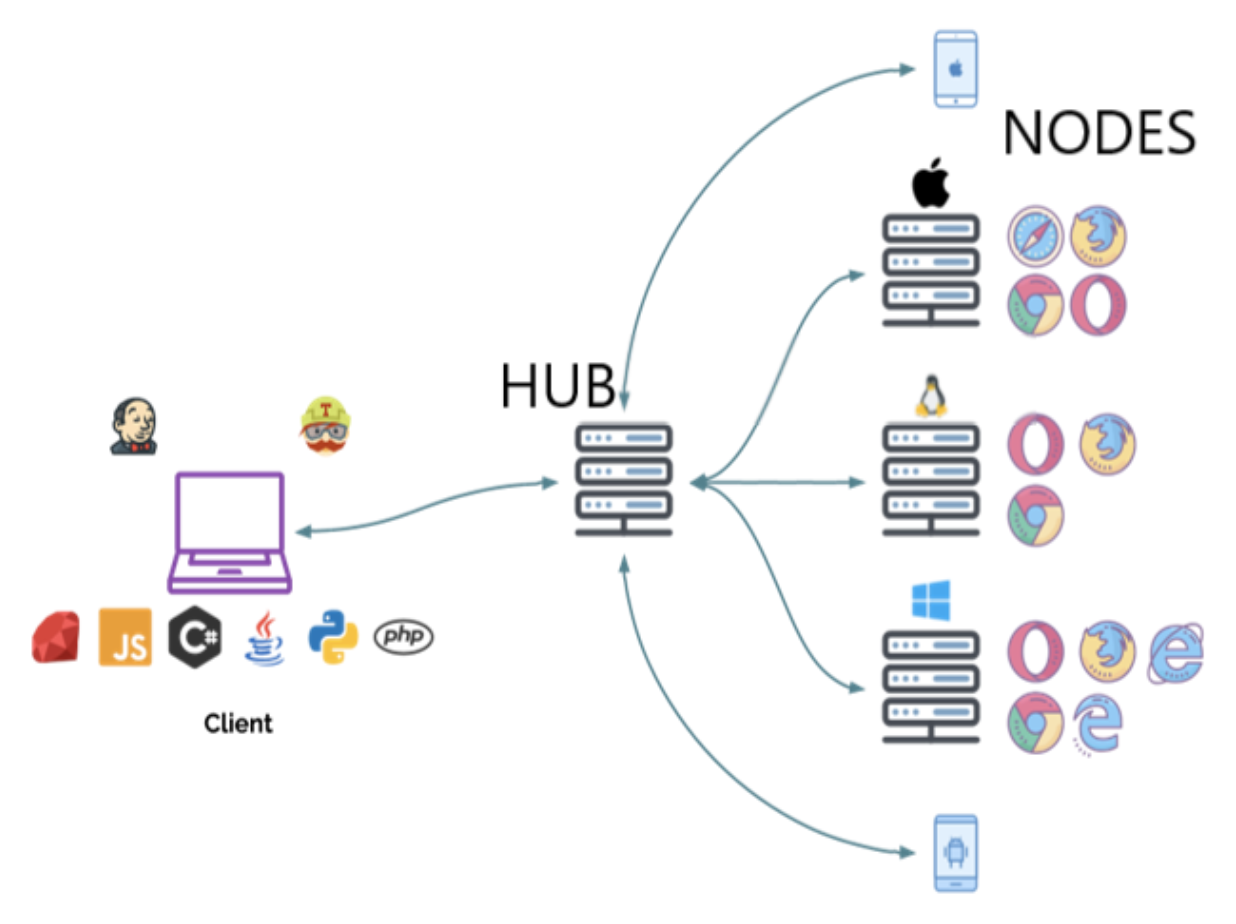
- Communication: The communication between the hub and the nodes is handled using the WebDriver protocol (either JSON Wire Protocol or W3C WebDriver protocol, depending on the Selenium version). When a test is triggered, the client sends the request to the hub, which identifies a suitable node and forwards the commands for execution.
- Scalability: Selenium Grid is designed for scalability. Additional nodes can be added to accommodate growing test demands. Nodes can be hosted on physical machines, virtual machines, Docker containers, or cloud infrastructure, allowing teams to build flexible and scalable testing environments.
When should testers use Selenium Grid?
Testers should use Selenium Grid in the following circumstances:
- To run tests on multiple browsers and their versions, different devices, and operating systems
- To reduce the time that a test suite takes to complete execution
Selenium Grid improves the turnaround time of the test results. It is especially useful when the test suite is large and takes more time to run. It offers flexibility and ensures maximum test coverage within a limited time. Since the virtual infrastructure is in use, maintenance becomes easy.
Features of Selenium Grid
Here are the features of Selenium Grid 4:
1. Architecture Support: Selenium Grid 4 supports a few additional processes that enable deployment in various ways. They are:
- Router
- Distributor
- Session Map
- New Session Queue
- Node
- Event Bus
2. Diverse Grid Roles: Selenium Grid can be configured via:
- Standalone Mode
- Classical Grid (Hub and Node)
- Fully Distributed (Event Bus, New Session Queue, Session Map, Distributor, Router and Node)
3. Docker Support: Selenium Grid offers built-in support for docker that runs on port 2375.
4. Observability: This feature helps understand and debug the internal process since it works in a fully distributed state. Traces, metrics, and logs are the three main components that provide in-depth insights.
5. GraphQL Query Support: Being the query language for APIs, graphQL is used to query and fetch the data that the user needs. Since Selenium Grid supports, GraphQL, a simple query can bring details like current session count, node and grid updates, max session count etc.
6. Node Customization: This lets you customize and update nodes as per the test execution requirements. For example, configuring a node to perform tests on a specific browser version that the test requires.
7. External Data Store: With Selenium Grid, you can save information on the currently running sessions into an external data store.
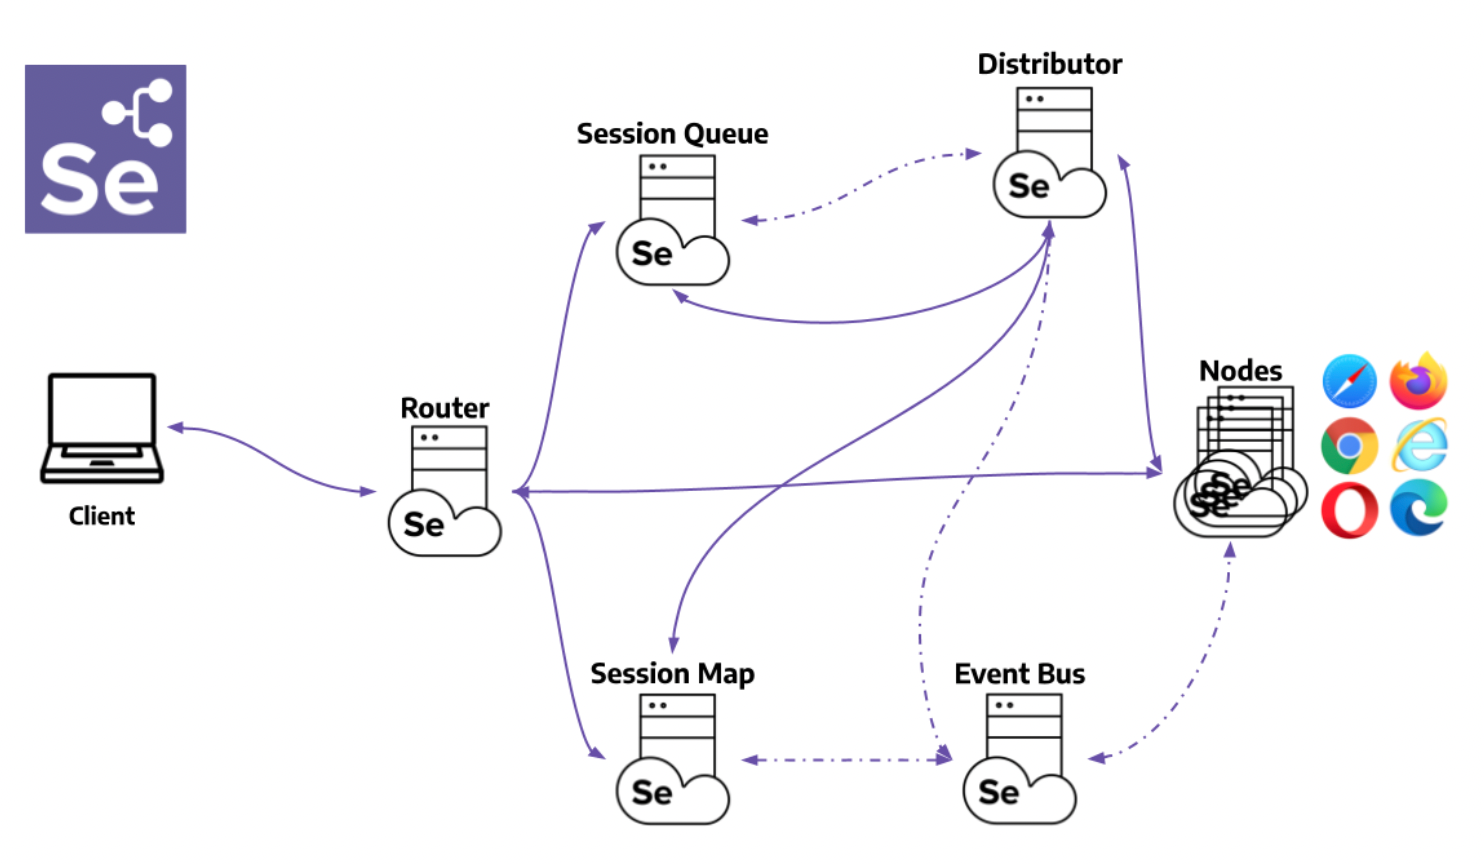
Components of Selenium Grid 4
Here are the 6 main components of Selenium Grid 4:
- Router: It serves as the gateway for the grid and receives external requests. Then, it guides them to the right component to be handled.
- Distributor: Distributor manages node registration and capabilities along with assigning new session requests to the right nodes from the Session Queue. It then updates the Grid’s model with Node status.
- Session Map: The link between Session IDs and Nodes are stored here.
- Session Queue: Incoming session requests are held in a FIFO (first in, first out) manner.
- Nodes: Facilitates test execution in a distributed network. Nodes with specific configurations must register with the Distributor to receive the right requests.
- Event Bus: Enables internal communication between the grid components using messages, thus avoiding direct HTTP calls.
How to setup Selenium Grid for Cross Browser Testing
Selenium Grid can be used to perform Cross Browser Testing at a scale, by running a test on different browser-device combinations simultaneously. Using parallel testing, you can ensure a consistent user experience across various browser versions and devices in a short period of time. With BrowserStack Cloud Selenium Grid you get access to 3500+ real device browser combinations for comprehensive cross browser testing.
To perform cross browser testing using Selenium Grid, follow the steps below for Selenium Grid configuration:
Step 1: Installation
Before getting started, download the Selenium Server Standalone package. This package is a jar file, which includes the Hub, WebDriver, and legacy RC that is needed to run the Grid. To get started with Selenium Grid, it is essential to have Java already installed, and set up the environment variables.
Step 2: Start Hub
Hub is the central point in the Selenium Grid that routes the JSON test commands to the nodes. It receives test requests from the client and routes them to the required nodes. To set up the Selenium Hub, open the command prompt, and navigate to the directory where the Selenium Server Standalone jar file is stored (downloaded in Step 1) using the following command.
java -jar selenium-server-standalone-<version>.jar -role hub
This will start the Hub automatically using port 4444 by default. Testers can change the default port by adding an optional parameter port, using
-host <IP | hostname>
while running the command. Testers need not specify the hostname as it can be automatically determined unless someone is using an exotic network configuration or networking with VPN. In that case, specifying the host becomes necessary.
To view the status of the hub, open a browser window and navigate to https://localhost:4444/grid/console
Step 3: Start Nodes
Whether testers are looking to running a grid with new WebDriver functionality or with the Selenium 1 RC functionality or running both of them simultaneously, testers have to use the same Selenium Server Standalone jar file, to start the nodes. To start nodes open the command prompt and navigate to the directory, where the Selenium Server Standalone jar file is stored.
Type the following command
java -jar selenium-server-standalone-<version>.jar -role node -hub https://localhost:4444/grid/register
When -role option that is provided is not specified, and it is not the hub, the default port is 5555. So, it is important to define the -role to be a node in this case.
Step 4: Configure Nodes
When testers start the nodes, by default, it allows 11 browsers, i.e., 5 Firefox, 5 Chrome, and 1 Internet Explorer for concurrent use. It also allows testers to conduct a maximum of 5 concurrent tests by default.
Testers can change this and other browser settings, by configuring nodes. This can be done by passing parameters to each of the -browser switches that represent a node, based on the parameters.
As soon as the -browser parameter is used, the default browser settings shall be ignored and only the parameters that are specified in the command line shall be used.
Here’s an example to set 4 Firefox version 4 nodes on a Windows machine.
-browser browserName=firefox,version=4,maxInstances=4,platform=WINDOWS
In a case where the machine has multiple versions of Firefox, map the location of each binary to the compatible version on the same machine.
Here’s an example to understand when there are two versions of Firefox, namely 3.6 and 4 on the same Windows machine that have to be used at 5 and 4 instances respectively.
-browser browserName=firefox,version=3.6,firefox_binary=/home/myhomedir/firefox36/firefox,maxInstances=5,platform=WINDOWS -browser browserName=firefox,version=4,firefox_binary=/home/myhomedir/firefox4/firefox,maxInstances=4,platform=WINDOWS
This way, testers can configure the nodes as per their cross browser testing requirements, using desired combination of browsers, their versions, and operating systems.
Must-Read: Selenium Grid 4 Tutorial
Step 5: Using Selenium Grid to run tests
Once the Selenium Grid setup is done by following the above 4 steps, testers can access the grid to run tests. If Selenium 1 RC nodes are being used, testers can use DefaultSelenium object and pass the same in the hub formation using the following command.
Selenium selenium = new DefaultSelenium(“localhost”, 4444, “*firefox”, “https://www.browserstack.com”);
If testers are using Remote WebDriver nodes, they must the RemoteWebDriver and DesiredCapabilities objects to define the browser, version, and platform. For this, create the target browser capabilities to run the test on:
DesiredCapabilities capability = DesiredCapabilities.firefox();
Once created, pass this set of browser capabilities into the RemoteWebDriver object:
WebDriver driver = new RemoteWebDriver(new URL("https://localhost:4444/wd/hub"), capability);Once this is done, the hub would assign the test to a matching node, if all the requested capabilities meet. To request any specific capabilities on the grid, specify them before passing them to the WebDriver object in the following pattern:
capability.setBrowserName();
capability.setPlatform();
capability.setVersion()
capability.setCapability(,);
If these capabilities do not exist on the Grid, the code returns no match and thus the test fails to run.
Here’s an example, to understand this, considering a node is registered with the setting:
-browser browserName=firefox,version=4,maxInstances=4,platform=WINDOWS
Then, it is a match with the following set of capabilities defined for the test:
capability.setBrowserName(“firefox” );
capability.setPlatform(“WINDOWS”);
capability.setVersion(“4”);
It would also match with the following set of capabilities defined for the test”
capability.setBrowserName(“firefox” );
capability.setVersion(“4”);
Note that the capabilities which are not specified for the test would be ignored, such as in the above example where the platform parameter is not specified and it gets a match.
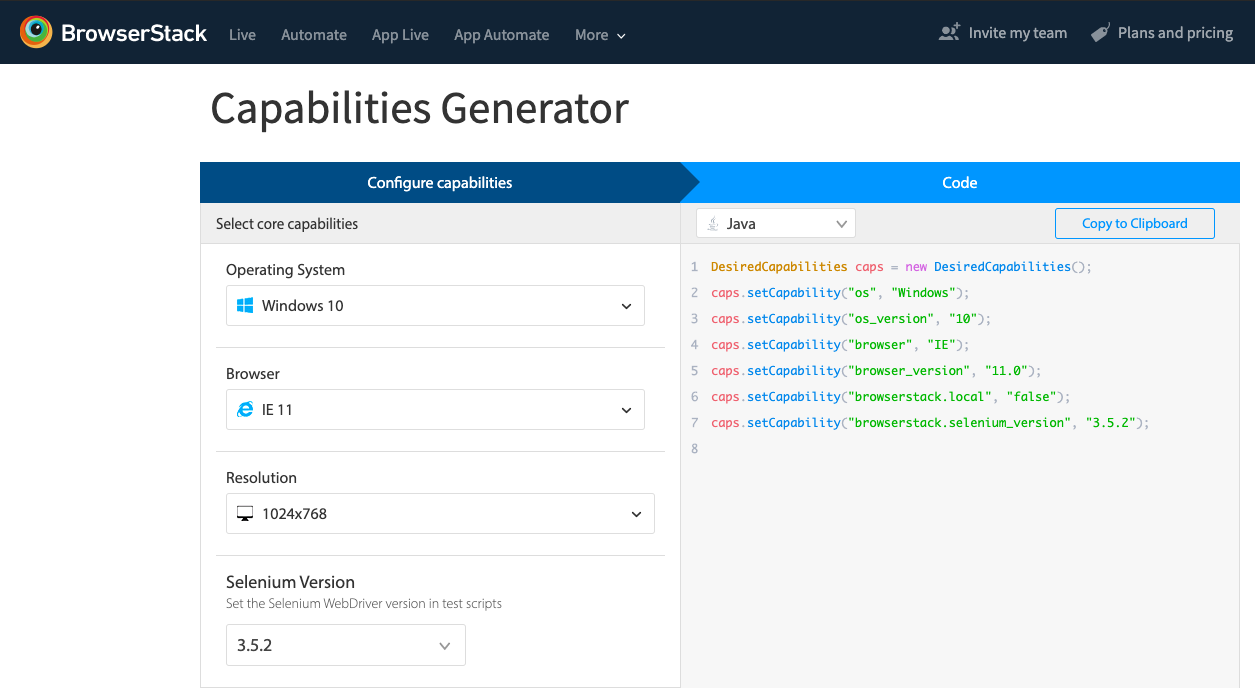
Note: You can also set Desired Capabilities by using BrowserStack Capabilities Generator
Using these steps, testers can easily set up, configure, and perform tests on Selenium Grid for concurrent execution of test suites.
How to perform Parallel Testing with Selenium Grid using Automate?
Using BrowserStack Automate, you can efficiently perform hundreds of parallel tests with Selenium Grid. Your test cases can be distributed across various nodes to run them concurrently.
The tool also supports cross-browser testing and real-device testing by offering access to a real-device cloud. Thus, it helps reduce the overall time taken for test execution and ensures maximum coverage across various environments.
For running parallel tests with Selenium Grid, you will have to first Sign up with BrowserStack to get your username and access_key.
Once it is done, the rest of the steps are quite simple. Please follow the help documentation.
Conclusion
Selenium Grid enables efficient parallel testing across various browsers, versions, and platforms, allowing teams to accelerate test execution and improve coverage. When paired with a cloud-based solution like BrowserStack Automate, this process becomes even more seamless by removing the need to manage and maintain infrastructure.
BrowserStack provides instant access to over 3,500+ real devices and browsers, including both legacy and latest versions across Windows, macOS, iOS, and Android. This ensures accurate results under real user conditions, helping teams detect issues early and deliver high-quality user experiences.
Using Selenium Grid through BrowserStack supports faster releases and aligns well with continuous delivery practices, empowering teams to test confidently and consistently.
Frequently Asked Questions
1. What is the difference between Selenium Grid and Webdriver?
Selenium Webdriver is a tool used for automation and browser interaction, while Selenium Grid is used for running parallel tests across different machines and browsers.
2. Can you use the Selenium Grid for performance testing?
No. Selenium grid cannot be used for performance testing.
Useful Resources for Automation Testing in Selenium
Methods, Classes, and Commands
- Selenium Commands every Developer or Tester must know
- Selenium WebElement Commands
- Desired Capabilities in Selenium Webdriver
- Assert and Verify Methods in Selenium
- Understanding System setProperty in Selenium
- Select Class in Selenium : How to select a value in dropdown list?
- SendKeys in Selenium WebDriver
- getAttribute() method in Selenium: What, Why, and How to use
- How does Selenium isDisplayed() method work?
- findElement vs findElements in Selenium
- Types of Listeners in Selenium (with Code Examples)
- How to set Proxy in Firefox using Selenium WebDriver?
Configuration
- How to set up Selenium on Visual Studio
- How to configure Selenium in Eclipse
- Maven Dependency Management with Selenium
- How to Build and Execute Selenium Projects
XPath
- How to use XPath in Selenium?
- How to find element by XPath in Selenium with Example
- Top Chrome Extensions to find Xpath in Selenium
Locators and Selectors
- Locators in Selenium: A Detailed Guide
- CSS Selector in Selenium: Locate Elements with Examples
- How to Create Object Repository in Selenium
Waits in Selenium
- Wait Commands in Selenium C and C#
- Selenium Wait Commands: Implicit, Explicit, and Fluent Wait
- Understanding Selenium Timeouts
- Understanding ExpectedConditions in Selenium
- Understanding Role of Thread.sleep() in Selenium
Frameworks in Selenium
- Data Driven Framework in Selenium
- Implementing a Keyword Driven Framework for Selenium: A Practical Guide
- Hybrid Framework in Selenium
Miscellaneous
- How to create Selenium test cases
- How to set Proxy in Selenium?
- Difference between Selenium Standalone server and Selenium server
- Exception Handling in Selenium WebDriver
- How to use JavascriptExecutor in Selenium
- How to run your first Selenium test script
- Parallel Testing with Selenium
Best Practices, Tips and Tricks
- Top 5 Challenges Faced During Automation Selenium Testing
- 5 Selenium tricks to make your life easier
- 6 Things to avoid when writing Selenium Test Scripts
- Best Practices for Selenium Test Automation
- Why you should pay attention to flaky Selenium tests
- How to start with Selenium Debugging
- How to make your Selenium test cases run faster
- How to upgrade from Selenium 3 to Selenium 4
- Why you should move your testing to a Selenium Cloud?
Design Patterns in Selenium: Page Object Model and Page Factory
- Design Patterns in Selenium
- Page Object Model and Page Factory in Selenium
- Page Object Model and Page Factory in Selenium C#
- Page Object Model in Selenium and JavaScript
- Page Object Model and Page Factory in Selenium Python
Action Class
- How to handle Action class in Selenium
- How to perform Mouse Hover Action in Selenium
- Understanding Click Command in Selenium
- How to perform Double Click in Selenium?
- How to Drag and Drop in Selenium?
- How to Scroll Down or Up using Selenium Webdriver
- How To verify Tooltip Using Selenium
TestNG and Selenium
- Database Testing using Selenium and TestNG
- How to use DataProvider in Selenium and TestNG?
- All about TestNG Listeners in Selenium
- How to run parallel test cases in TestNG
- How to use TestNG Reporter Log in Selenium: Tutorial
- Prioritizing tests in TestNG with Selenium
JUnit and Selenium
- Understanding JUnit assertions for Selenium Testing with Examples
- How to run JUnit Parameterized Test in Selenium
- How to write JUnit test cases
- JUnit Testing Tutorial: JUnit in Java
- How to create JUnit Test Suite? (with Examples)
Use Cases
- Handling Login Popups in Selenium WebDriver and Java
- How to Launch Browser in Selenium
- How to handle Alerts and Popups in Selenium?
- How to get Selenium to wait for a page to load
- How to Find Element by Text in Selenium: Tutorial
- How to Read/Write Excel Data using Apache POI Selenium
- How to handle Captcha in Selenium
- How to handle multiple windows in Selenium?
- How to handle Multiple Tabs in Selenium
- How to find broken links in Selenium
- How to handle Cookies in Selenium WebDriver
- How to handle iFrame in Selenium
- How to handle Web Tables in Selenium
- How To Validate Text in PDF Files Using Selenium Automation
- Get Current URL in Selenium using Python: Tutorial
Types of Testing with Selenium
- Different Testing Levels supported by Selenium
- How to perform UI Testing with Selenium
- Regression Testing with Selenium: Tutorial
- UI Automation using Python and Selenium: Tutorial
- How to Run Visual Tests with Selenium: Tutorial
- How to perform ETL Automation using Selenium
- Cross Browser Testing in Selenium : Tutorial


