The rise in the number of smartphone users globally over the years has led to the advent of Android and IOS apps. This brought a wave into the mobile market and the need to build mobile apps.

Businesses got their own apps to provide a seamless experience so that the users could avail of their services with just one click having all the apps on one single device. This made testing of mobile apps so vital that our testing community progressed towards automation testing on top of manual testing.
What does “Scroll down to the element” mean?
Since the automation tests need code to be executed, some important scenarios require special attention and need to have the test suite run without errors and glitches for a better user experience.
One such scenario is performing an action on an element that is present on an application but not visible on the current page. This case requires scrolling down the page till the element is visible and performing the required action. One such example is the food ordering app where we need to scroll down to have a glimpse of all dishes available or the OTT apps where we will be scrolling down to check out all sorts of different movie/series content.
When automating an app for testing purposes, you might need to automate the above scenario. This article discusses how to scroll down to an element and perform an action on it in Appium.
How to Scroll until Element is Visible in Appium using visibleUiScrollable
While several Mobile Test Automation tools are available in the market, the most popular among them is Appium. Appium comes up with a rich class UiScrollable, which makes it possible to scroll down to the page and perform actions on elements. It is a powerful Android class that performs element lookups in scrollable layouts. scrollIntoView class performs scroll action until the destination element is found on the screen. UiScrollable is a UiCollection and provides support for searching for items in scrollable layout elements. This class can be used with horizontally or vertically scrollable controls.
You can use UiScrollable swipe to search elements in a list or search elements outside of the screen like input field, text or button. ScrollIntoView has UiSelector as a search criteria input that allows it to find elements by text or id.
Prerequisites:
- Appium desktop client
- Android studio
- JDK
- Development IDE/Eclipse
Make sure you have all software installed and running in your system.
In this example, taking a sample APK to automate using Appium. You can get some sample test apk’s on your system on below path:
C:\Users\singe\AppData\Local\Android\Sdk\system-images\android-25\google_apis\x86\data\app
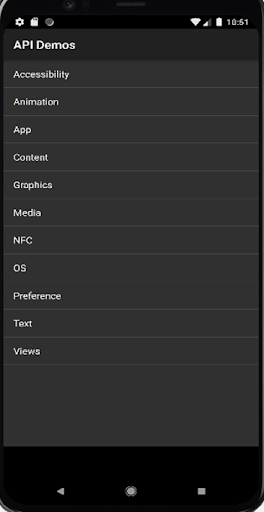
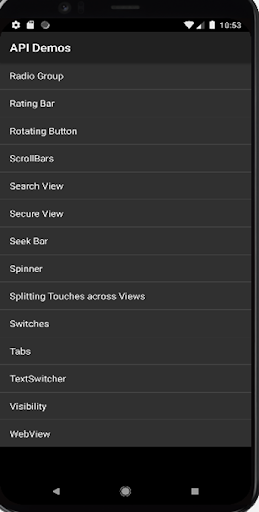
Using one such apk ‘API Demos’ for this article. Automation test will launch the app, click on ‘Views’ and will locate ‘WebView’ by scrolling down the list and clicking over it as seen in the image below.
Make sure you have all the Appium and testing dependencies configured on your system such as:
- Create a new java project.
- Create a package and a class
- Add all required capabilities
- Function to scroll down and take action
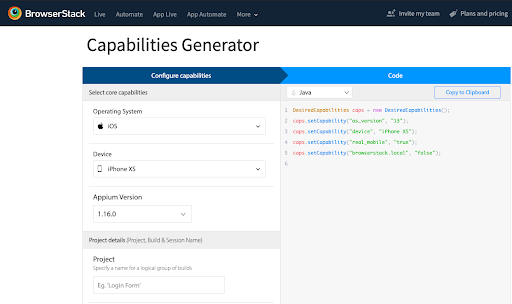
Pro Tip: Use BrowserStack’s Capabilities Generator for Appium to add all the capabilities
Code to Scroll Down until Element is Visible in Appium
The following code uses UiScrollable(), scrollIntoView(), UiSelector(), and scrollable() to scroll down to an element until it is visible using Appium.
package testing;

import org.testng.annotations.Test;

import org.openqa.selenium.remote.DesiredCapabilities;

import io.appium.java_client.android.AndroidDriver;

import java.net.URL;

import java.util.concurrent.TimeUnit;

public class scrolldown {

   @Test

    public void scroll() {

       try {

       DesiredCapabilities caps = new DesiredCapabilities();

       caps.setCapability("deviceName", "Google pixel 4"); //Give your device/emulator name

       caps.setCapability("udid", "emulator-5554"); // Go to adb location i.e.    C:\Users\singe\AppData\Local\Android\Sdk\platform-tools in command prompt and execute ‘adb devices’ to get udid

       caps.setCapability("platformVersion", "8.1.0"); //Give android version of your device. (Check ‘about phone’ section)

       caps.setCapability("appPackage", "com.hmh.api"); //provide app package name. Apkinfo can be used or execute dumpsys window windows | grep -E ‘mCurrentFocus’ command in adb shell in cmd in C:\Users\singe\AppData\Local\Android\Sdk\platform-tools

       caps.setCapability("appActivity", "com.hmh.api.ApiDemos");

       AndroidDriver driver = new AndroidDriver(new URL("http://127.0.0.1:4723/wd/hub"), caps); //Create driver object

       driver.manage().timeouts().implicitlyWait(10, TimeUnit.SECONDS); //Implicit wait of 10 seconds


       driver.findElementByXPath("//*[contains(@text,'Views')]").click();

       driver.findElementByAndroidUIAutomator("new UiScrollable(new    UiSelector().scrollable(true).instance(0)).scrollIntoView(new UiSelector().textContains(\"WebView\").instance(0))").click(); //scroll down to the element and click

       Thread.sleep(10000); //wait of 10 seconds


       driver.quit(); //closes the driver session

    } catch (Exception e) {

       // TODO Auto-generated catch block

       e.printStackTrace();

    }

     }

}
By following the above example, you can automate any scroll scenarios using Appium. For accurate results, it’s advisable to make use of cross-platform testing tools and increase test coverage by a hundred times by testing your app on multiple versions of operating systems and different Android and iOS devices. Real Device Cloud like Browserstack provides this platform where you can integrate your Appium tests with thousands of available real devices using App Automate.
Run Appium Tests on Real Devices
After integration with BrowserStack App Automate, the code will look like below:
package testing;

import java.net.URL;

import java.util.List;

import java.util.function.Function;

import java.net.MalformedURLException;

import io.appium.java_client.MobileBy;

import io.appium.java_client.android.AndroidDriver;

import io.appium.java_client.android.AndroidElement;

import org.openqa.selenium.support.ui.ExpectedConditions;

import org.openqa.selenium.support.ui.WebDriverWait;

import org.openqa.selenium.WebDriver;

import org.openqa.selenium.remote.DesiredCapabilities;

import org.testng.annotations.Test;

public class BrowserStackSample {

public static void main(String[] args) throws MalformedURLException, InterruptedException {

DesiredCapabilities caps = new DesiredCapabilities();

// Set your access credentials

caps.setCapability("browserstack.user”, <user-name>);

caps.setCapability("browserstack.key", <access-key>);

// Set URL of the application under test

caps.setCapability("app", "bs://d74ed9c2bd06fb02d7b863b3f1a7f8dfe97092b7" );


// Specify device and os_version for testing

caps.setCapability("device", "Samsung Galaxy S5");

caps.setCapability("os_version", "4.4");


// Set other BrowserStack capabilities

caps.setCapability("project", "First Java Project");

caps.setCapability("build", "browserstack-build-1");

caps.setCapability("name", "first_test");

// Initialise the remote Webdriver using BrowserStack remote URL

// and desired capabilities defined above

AndroidDriver<AndroidElement> driver = new AndroidDriver<AndroidElement>(

new URL("http://hub.browserstack.com/wd/hub"), caps);

// Test case for the BrowserStack sample Android app.

// If you have uploaded your app, update the test case here.

//driver.findElementByName("Cancel").click();

driver.findElementByXPath("//*[contains(@text,'Views')]").click();

driver.findElementByAndroidUIAutomator("new UiScrollable(new UiSelector().scrollable(true).instance(0)).scrollIntoView(new UiSelector().textContains(\"WebView\").instance(0))").click();

Thread.sleep(5000);

// Invoke driver.quit() after the test is done to indicate that the test is completed.

driver.quit();

}

}
Test Results
Test results can be viewed on App Automate Dashboard once the test execution is completed. By clicking on individual tests will give you a detailed report for each test including steps, text logs, Appium logs, execution video logs, and other details for better debugging of failed tests.
