Puppeteer, a Node.js library for browser automation, supports Firefox alongside Chrome, enabling cross-browser testing. It provides developers with tools to automate tasks like UI testing, performance monitoring, and web scraping. Integrating Firefox with Puppeteer allows you to expand your test coverage and ensure compatibility for a wider range of users.
This guide explains how to set up Puppeteer with Firefox and run automated tests to ensure seamless functionality across browsers.
What is Puppeteer?
Puppeteer is a NodeJS-based framework, it is Open source and maintained by Google. Puppeteer allows us to write the tests using Javascript or Typescript.
The Chrome DevTools protocol is an API specification that allows you to interact with the Chromium and Blink-based browsers. The puppeteer uses the DevTools Protocol to provide the automation capability by using a thin wrapper around it.
Puppeteer is successful in the UI Test automation world because of its core advantages:
- Speed: Puppeteer provides good speed for automation tests.
- Security: Puppeteer provides security over malicious pages.
- Stability: Puppeteer tests are more stable compared to any other framework, more stable also means that your tests are less flaky
- Simplicity: Puppeteer provides a thin wrapper around chrome DevTools Protocol, which makes it easy to understand, debug and use.
When compared with Selenium, Puppeteer was initially designed to perform functional testing for Chromium-based browsers with high reliability. However, Selenium is more focused on cross-browser capability.
Read More: Cross Browser Testing in Selenium: Tutorial
Due to high demand from users, Puppeteer extended its support to Firefox. However, Puppeteer Firefox support is still in the experimental stage, Puppeteer tests can be run on Firefox Nightly build.
Why Use Puppeteer with Firefox?
Firefox, being one of the most widely used browsers, ensures that web applications function seamlessly for a broader user base.
Using Puppeteer with Firefox has many benefits, some of them are:
- Enhanced Cross-Browser Testing: Using Puppeteer with Firefox enables effortless cross-browser testing, ensuring web applications work seamlessly for a wider audience.
- Early Detection of Issues: Integration helps identify browser-specific issues early, improving application reliability.
- Consistent API: Puppeteer’s Firefox support offers a consistent API similar to Chrome, allowing developers to reuse scripts with minimal changes.
- Time and Effort Savings: Reusing existing Puppeteer scripts reduces development effort and speeds up the testing process.
- Streamlined Testing: Combining Puppeteer and Firefox ensures efficient and accurate testing across multiple browsers.
Also Read: Cross Browser Testing in Puppeteer: Tutorial
How to run Puppeteer tests in Firefox
Running Puppeteer tests in Firefox allows developers to expand their testing capabilities to one of the most widely used browsers. With Puppeteer’s built-in support for Firefox, you can write and execute automated scripts seamlessly.
Prerequisites for Puppeteer tests in Firefox
To get started, ensure you have a basic Puppeteer framework set up in your project. This involves installing Puppeteer via Node.js and verifying that your Puppeteer version supports Firefox.
Steps to run Puppeteer tests in Firefox
Step 1: To run Puppeteer tests with Firefox, set the environment variable for Puppeteer firefox using:
Windows Command Line
set PUPPETEER_PRODUCT=firefox
Windows Powershell / Visual Studio Code Terminal
$env:PUPPETEER_PRODUCT=firefox
Mac/ Linux terminal
export PUPPETEER_PRODUCT=firefoxStep 2: After setting the environment variable, install Puppeteer again using the following command
npm i puppeteer
After executing the above command, Puppeteer should download Firefox nightly builds binaries on your local machine.
Note: If npm install puppeteer doesn’t install the firefox binaries, then delete your node_modules folder and run the npm install puppeteer command again.
Step 3: Navigate to your project, jest-puppeteer.config.js file, and change the “product” option to firefox using the following command
// jest-puppeteer.config.js

module.exports = {

launch: {

  headless: false,

  product: 'firefox',

   defaultViewport :{width: 1700, height: 800 }

  },

  browserContext: 'default',

}
Once you make the above configuration in your jest-puppeteer.config.js file, Puppeteer Firefox is ready to execute the tests.
Step 4: Execute your Puppeteer-Jest tests with firefox using the below command.
npx jest -c ./jest.config.js
Tests start executing and you will see the results on the command line.
Common Issues and Troubleshooting
You may encounter a few issues while setting up and using Puppeteer with Firefox. Below are some of the most common problems users face and their solutions to help you troubleshoot effectively.
1. Firefox Not Launching
When trying to launch Puppeteer with Firefox, the browser may fail to start, or you might receive an error related to finding the Firefox executable.
Solution:
Ensure you have Firefox Nightly installed, as this is the version supported by Puppeteer for Firefox. Puppeteer requires Firefox Nightly to work correctly with its APIs. You can download it from the official site and ensure it’s properly installed.
If you’ve already installed Firefox Nightly, check your configuration and make sure the path to the Firefox executable is correct. You can explicitly specify the path using the executablePath option when launching Puppeteer, as shown below:
const browser = await puppeteer.launch({

  product: 'firefox',

  executablePath: '/path/to/your/firefox/nightly'

});
2. Puppeteer Not Found in Your Project
You might encounter an error where Puppeteer itself isn’t found, even though it’s been installed.
Solution:
First, make sure you have installed Puppeteer and Puppeteer Firefox Nightly correctly. If you have any issues, reinstall Puppeteer by running:
npm install puppeteer

npm install puppeteer-firefox
After installing, try rerunning your script. If the issue persists, double-check that the node modules folder (node_modules/puppeteer and node_modules/puppeteer-firefox) is present.
3. Errors Due to Missing Dependencies
If you receive errors related to missing libraries or dependencies when running Puppeteer with Firefox, this is typically an issue with Firefox Nightly’s dependencies.
Solution:
Ensure your operating system has all the necessary dependencies installed to run Firefox Nightly. For Linux users, dependencies can vary depending on the distribution, but common dependencies include:
- libx11-xcb1, libdbus-glib-1-2, and others for Ubuntu/Debian-based systems.
Use the following command to install missing dependencies:
sudo apt-get install -y libx11-xcb1 libdbus-glib-1-2
For macOS, make sure you have the latest version of Xcode Command Line Tools installed:
xcode-select --install
4. Page Load Failures or Timeouts
Sometimes, Puppeteer may fail to load a page or time out, particularly with pages with heavy resources or long load times.
Solution:
Increase the default timeout for page navigation and resources. For example, you can add a longer timeout to page.goto():
await page.goto('https://example.com', { waitUntil: 'load', timeout: 60000 }); // 60 secondsAdditionally, consider using page.setDefaultNavigationTimeout() to increase timeouts globally for all navigation commands.
5. Firefox-Specific Test Failures
Puppeteer with Firefox Nightly might behave slightly differently from Chrome due to Firefox’s own rendering engine. Some tests that work in Chrome may fail in Firefox.
Solution:
If a test works in Chrome but fails in Firefox, ensure the issue is specific to Firefox and not a problem in your test setup. You can run the same test in headless Chrome to compare results and narrow down the cause.
To further isolate Firefox-specific issues, run your tests in non-headless mode to observe the behavior more easily:
const browser = await puppeteer.launch({

  product: 'firefox',

  headless: false

});Execute a Puppeteer Firefox Tests on BrowserStack
To run the Puppeteer Firefox Test on real devices and browsers, SignUp on BrowserStack and follow the below steps.
Step 1: Configure jest-puppeteer.config.js
Once tests execution on your machine are successful, you can execute the same tests on
BrowserStack with a few additions listed below
jest-puppeteer.config.js.
In the jest-puppeteer.config.js file add capabilities, and connect. The complete jest-puppeteer.config.js file looks like the one below.
// jest-puppeteer.config.js

const caps_firefox = {

  'browser': 'firefox',

  'browser_version': 'latest',

  'os': 'windows',

  'os_version': '10',

  'name': 'Puppeteer-jest test on Firefox',

  'build': 'puppeteer-jest-build-3',

  'browserstack.username': process.env.BROWSERSTACK_USERNAME || ' 'your_user_name',

  'browserstack.accessKey': process.env.BROWSERSTACK_ACCESS_KEY || ' your_access_key'

};


module.exports = {

  launch: {

    headless: false,

    product: 'firefox',

    defaultViewport :{width: 1700, height: 800},

    devtools:true

 },

  browserContext: 'default',

   connect: {

     browserWSEndpoint: `wss://cdp.browserstack.com/puppeteer?caps=${encodeURIComponent(JSON.stringify(caps_firefox))}`,

   }

}
Note: Copy ‘browserstack.username’ and ‘browserstack.accessKey’ from BrowserStack Account page. Github Page Documents all different sets of capability options.
Step 2: Add the test case as seen below
//demo.test.js

describe('Browserstack Demo', () => {

    jest.setTimeout(50000);

    beforeAll(async () => {

        await page.goto('https://www.browserstack.com/')

    })

    it('Verify Product Submenus', async () => {

        await page.click('#product-menu-toggle');

        const el = await page.$('ul[class="horizontal-list product-menu"] > li > div > div  > ul ');

        const text = await page.evaluate(el => el.innerText, el);

        await expect(text).toContain('Interactive cross browser testing')

        await expect(text).toContain('Percy')

        await expect(text).toContain('Automate')

        await expect(text).toContain('Percy New')

        await expect(text).toContain('Visual testing & review')

    })

})
Step 3: Execute your scripts
If you have configured a shortcut in package.json enter the test command to execute the tests.
npm run test
Alternatively, you can also specify
npx jest -c ./jest.config.js
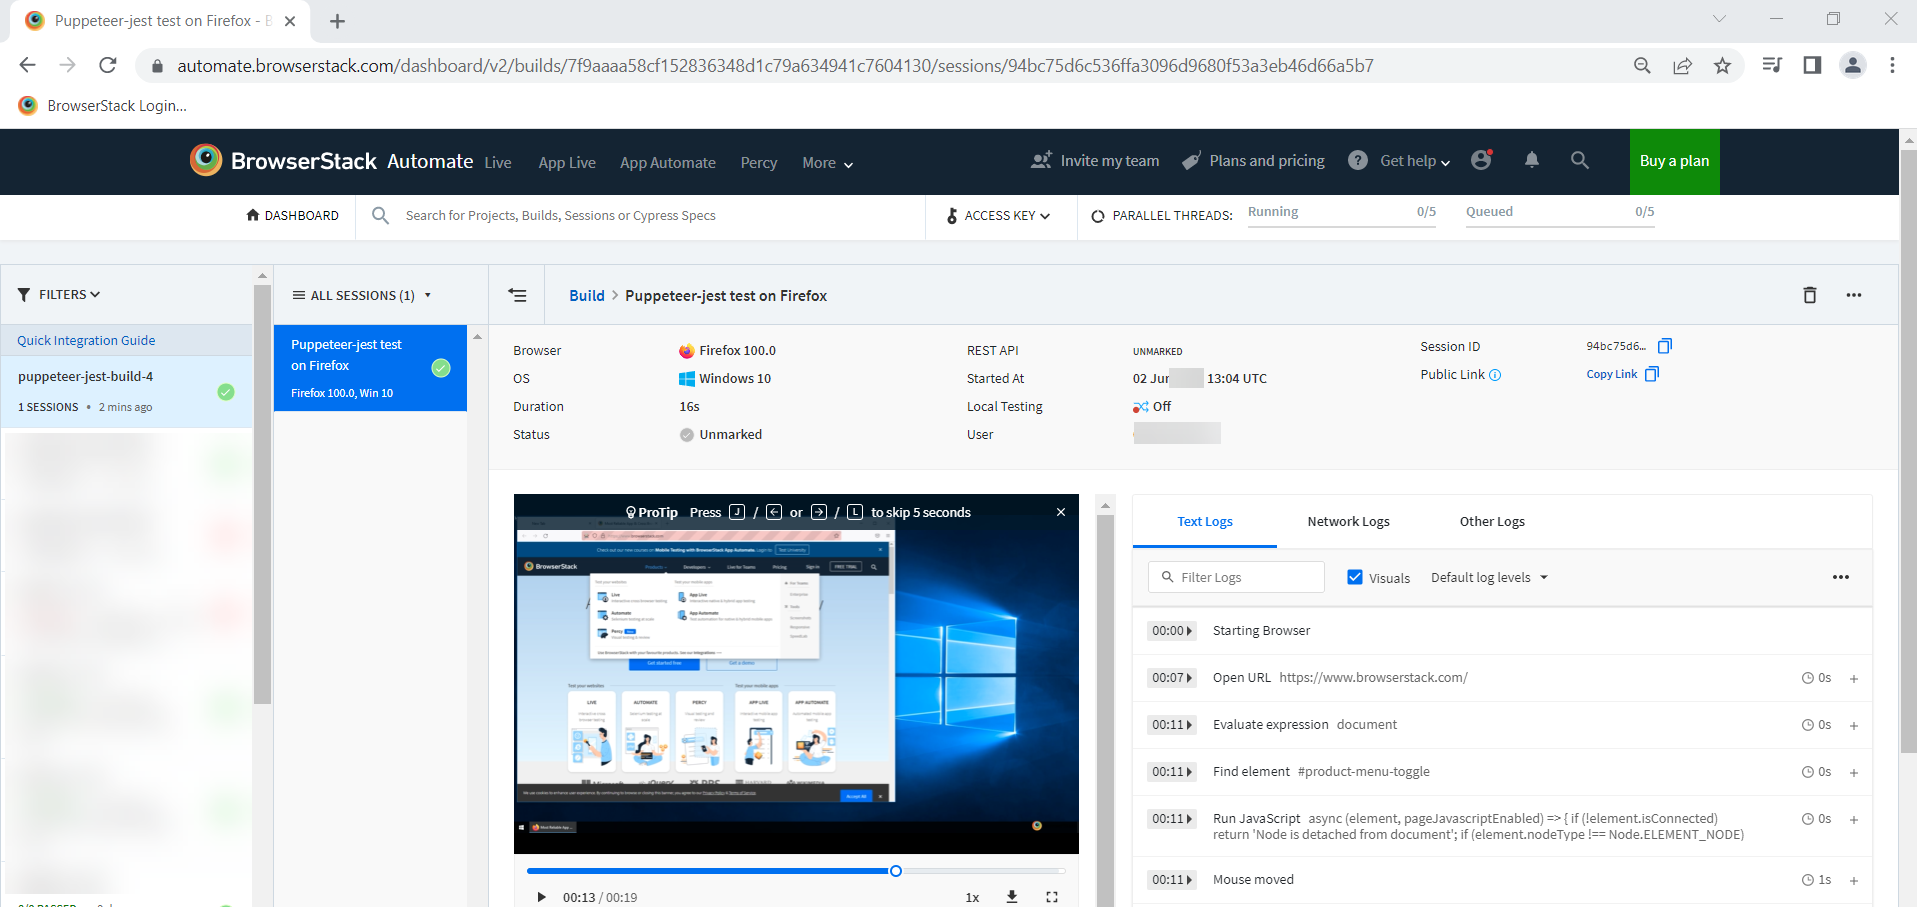
After completion of execution, we can see the result in the Browserstack Dashboard
Read More: How to start with Puppeteer Debugging
Step 4: To view the Results in the Browserstack dashboard,
Login to BrowserStack and navigate to BrowserStack Automate Dashboard >> Choose the build, and you will see the complete snapshot of your test.
Advanced Use Cases and Customization
Once you’ve set up Puppeteer with Firefox and completed some basic tests, you might want to customize your testing workflow or explore more advanced use cases. Here are a few advanced techniques to extend your Puppeteer-Firefox setup.
1. Customizing Browser Behavior (User Agents and Device Emulation)
Customizing browser behavior helps test how your site behaves on different devices or under various conditions. Puppeteer allows you to emulate devices, adjust screen sizes, or simulate specific user agents.
For example, if you want to test how your site looks on mobile devices, you can set the viewport size and user agent like so:
const browser = await puppeteer.launch({ product: 'firefox' });

const page = await browser.newPage();


// Emulate a mobile device

await page.setViewport({ width: 375, height: 667 }); // iPhone 6 size

await page.setUserAgent('Mozilla/5.0 (iPhone; CPU iPhone OS 10_3_1 like Mac OS X) AppleWebKit/537.51.2 (KHTML, like Gecko) Version/10.0 Mobile/14E304 Safari/602.1');


await page.goto('https://example.com');

await page.screenshot({ path: 'mobile-view.png' });


await browser.close();
2. Handling Dynamic Content with Puppeteer and Firefox
When testing web pages that load content dynamically (like single-page applications), you may want to wait for certain elements to appear before performing actions. Puppeteer offers several ways to handle these scenarios.
You can use page.waitForSelector() to wait for an element to appear:
await page.goto('https://example.com');

await page.waitForSelector('.dynamic-content'); // Wait for dynamic content to load

await page.click('.submit-button'); // Interact with content after it has loaded
This ensures that Puppeteer doesn’t try to interact with elements that haven’t fully loaded, preventing errors during testing.
3. Running Tests Across Multiple Pages or Tabs
Puppeteer allows you to manage multiple pages or tabs within the same browser instance. This can be useful for testing scenarios where your app opens multiple windows or tabs.
Here’s how you can work with multiple pages:
const browser = await puppeteer.launch({ product: 'firefox' });

const [page1, page2] = await Promise.all([

  browser.newPage(),

  browser.newPage()

]);


await page1.goto('https://example.com');

await page2.goto('https://example2.com');


await page1.click('#button1');

await page2.click('#button2');


await browser.close();
4. Performance Testing and Profiling
Puppeteer can also gather performance metrics for pages you’re testing. This can be particularly useful when analyzing load times or resource usage.
Here’s how you can use Puppeteer to gather performance metrics from Firefox:
const browser = await puppeteer.launch({ product: 'firefox' });

const page = await browser.newPage();


await page.goto('https://example.com');


// Collect performance metrics

const metrics = await page.metrics();

console.log(metrics);


await browser.close();
This will provide data on various metrics, such as memory usage, CPU time, and network activity.
5. Automating Authentication Flows
Automating login flows or user authentication is common in end-to-end testing. Puppeteer provides various ways to handle authentication, such as using cookies or localStorage to simulate a logged-in user.
Here’s an example of using cookies to log in to a site:
const browser = await puppeteer.launch({ product: 'firefox' });

const page = await browser.newPage();


// Set cookies to simulate logged-in user

await page.setCookie({

  name: 'auth-token',

  value: 'your-auth-token',

  domain: 'example.com'

});


await page.goto('https://example.com/dashboard'); // Now the user is logged in

await browser.close();
Best Practices for Testing with Puppeteer and Firefox
Here are some key best practices for testing with Puppeter and Firefox:
- Keep Puppeteer and Firefox Updated: Use the latest versions to ensure compatibility and access new features.
- Enable Debugging: Use debugging tools to identify and resolve test issues effectively.
- Handle Firefox-Specific Quirks: Be aware of differences in Firefox’s behavior and adapt your scripts accordingly.
- Use Modular Test Design: Write reusable and maintainable test functions to simplify script updates.
- Monitor Network Requests: Track and validate all API calls and static file loads to catch errors early.
Useful Resources for Puppeteer
Understanding Puppeteer:
- Puppeteer Framework Tutorial: Basics and Setup
- How to start with Puppeteer Debugging
- How to install and setup Puppeteer with npm (NodeJS)
- Puppeteer Type Command: How to type a text in input box in Puppeteer
- Cross Browser Testing in Puppeteer: Tutorial
- Understanding Puppeteer Headless
- How to run UI Automation Testing using Puppeteer
- How to capture Lazy Loading Images for Visual Regression Testing in Puppeteer
- How to use Proxy in Puppeteer?
- How to run Tests in Puppeteer with Firefox
- How to Perform Visual Regression Puppeteer
- Handling Alerts and Popups in Puppeteer
- Pyppeteer Tutorial: Guide to Puppeteer in Python (with Examples)
Tools Comparisons:
- Puppeteer vs Selenium: Core Differences
- Cypress vs Selenium vs Playwright vs Puppeteer: Core Differences
- Cypress vs Puppeteer: Core Differences
- Playwright vs Puppeteer: Which to choose in 2024?
- Top 10 Puppeteer Alternatives
Conclusion
Running tests in Puppeteer with Firefox allows developers and testers to ensure that their web applications function correctly across different browsers. You can configure Puppeteer Firefox Nightly to automate tests and address Firefox-specific rendering issues to ensure accurate test results.
However, managing multiple browser environments can become challenging as you scale your testing efforts. This is where BrowserStack steps in. It allows you to run your Puppeteer tests on Firefox (and other browsers) across real devices and different OS environments to ensure your application performs as expected in real user conditions.


