Selenium is the most popular open-source framework for web automation. It allows teams to simulate user actions, validate workflows, and ensure applications work across different browsers and platforms. If you’re starting your automation journey, running your first Selenium script is a key milestone.
Overview
What Do You Need Before Running a Selenium Script?
- Java (JDK) installed on your system.
- Eclipse IDE (or any supported editor).
- Selenium Client and WebDriver bindings for your preferred language.
- Basic setup of Selenium WebDriver integrated with your project.
How to Run Your First Selenium Script?
- Step 1: Create a free BrowserStack Automate account.
- Step 2: Log in, navigate to the Automate tab, and copy the auto-generated username and access key.
- Step 3: Use the Capability Generator to set browser, OS, and version preferences.
- Step 4: Paste the generated code into your IDE (e.g., Eclipse) and execute.
- Step 5: View execution results and logs on the BrowserStack dashboard.
What Are Best Practices for Writing Selenium Scripts?
- Use explicit waits instead of implicit waits.
- Prefer CSS selectors over XPath for speed and readability.
- Follow the Page Object Model (POM) for clean code.
- Keep tests independent and atomic to avoid cascade failures.
- Add logging, screenshots, and externalized test data for easier debugging.
- Integrate scripts into CI/CD pipelines for automated runs.
This article explains how to set up prerequisites, run your first Selenium script on BrowserStack, and apply best practices—helping you launch a scalable, reliable automation testing journey.
Introduction to Selenium
Selenium is the first thing that comes to mind when one is planning to automate the testing of web applications. Selenium is not only open source but also a portable software testing framework for web applications that support multiple languages like Java, C#, Ruby, Python, etc. Choosing the right language depends on the application under test, the supporting community, available test automation frameworks, usability, elegance, and of course, seamless build integration.
Note: BrowserStack is now the first cloud test automation platform to announce complete support for Selenium 4, and it’s BiDi APIs. Learn More.
Prerequisites for Selenium Installation
Before configuring Selenium, one must configure various other dependencies as well. The following components are required to get started with Selenium automation:
- Java (JDK)
- Eclipse
- Selenium Client and WebDriver Language bindings
- Configuring Selenium Webdriver with Eclipse
- Creating and Running the first test
Learn how to configure and execute the first test in Selenium using Java with the help of this Selenium with Java article.
How to run your first Selenium Test Script
All Selenium tests must be run on a Selenium grid. In this article, the test will be run using the cloud Selenium grid offered by BrowserStack.
To get started with the basics of Selenium testing, have a look at the video below. It discusses in detail what Selenium is, how you can set up and write your first test, what to look for in frameworks, and how to pick the best framework for you.
BrowserStack enables developers and testers to test their websites and mobile applications across 3500 + real browsers, operating systems, desktop, and mobile devices. This is possible for users having to install or maintain an internal lab of virtual machines, devices, emulators, or simulators.
If you are just starting out with Selenium, try out Test University, BrowserStack’s online learning platform that aims to help software quality professionals. It comprises fine-grained, practical, and self-paced online courses to enhance your skill set, along with an interactive learning portal that lets you learn at your own pace, and track your progress effortlessly. Additionally, it provides ready-to-use code samples – implementation samples from Github to better understand the features, patterns, and best practices.
Access the Test University portal by creating a free account with BrowserStack. Explore courses, a guided learning path, and all the resources required to get started with your Selenium learning journey.
Now learn how to write the first Selenium test script.
Run First Selenium Test Script for Free
First, one needs to sign up for a free Browserstack account. The next set of steps will go as follows:
Steps to execute the test case:
Here are step-by-step instructions to execute Selenium Test Case:
- After logging into the account, choose the Automate tab from the home page.
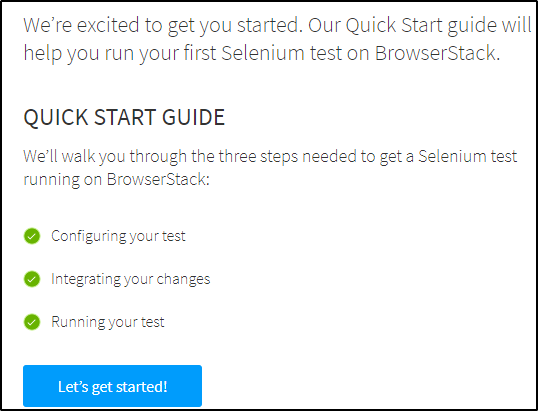
- After that, the user will be navigated to execute your test case as shown below.
- Click on Let’s get started! Note: Before using Browserstack, make sure Selenium has been configured on the system.
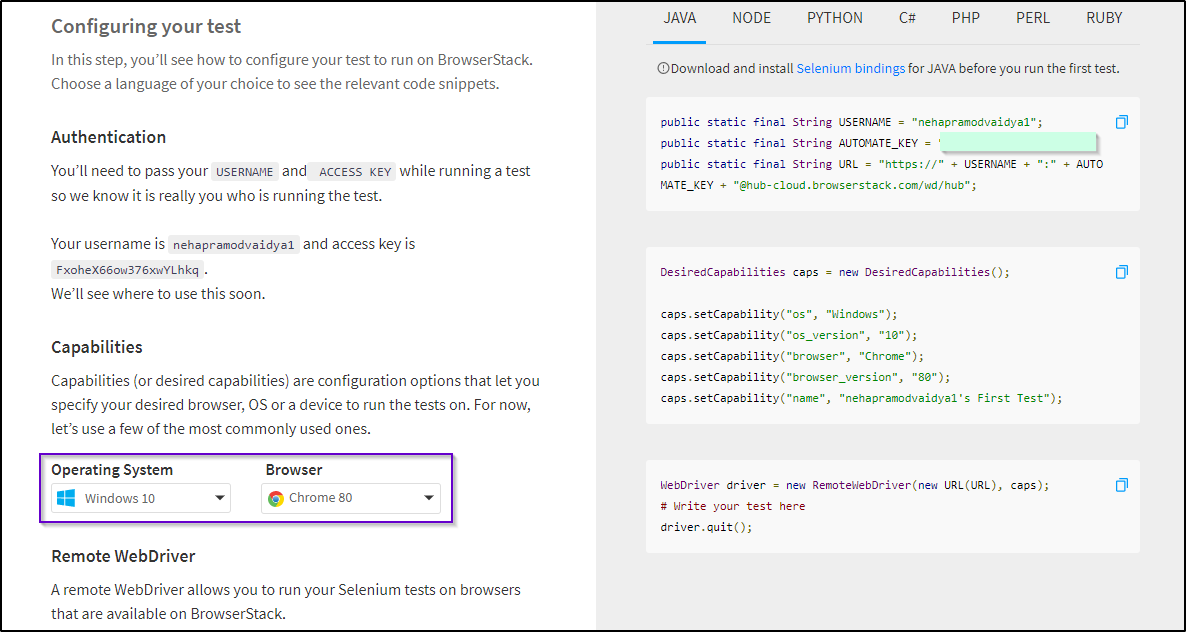
- On signing up for the first time, Browserstack by default will provide an access key and the username. Throughout the test execution, it will remain the same.
As you can see in the snapshot above, while configuring the tests, the user can choose and set the operating system and browser of their choice or necessity.
On the RHS of the snapshot, see how the AUTOMATE_KEY and the URL are being set by default. Also, the desired capabilities and driver settings are configured by BrowserStack. This makes it very easy to write test cases on BrowserStack.
One can check the Capability Generator for the BrowserStack Automate too.
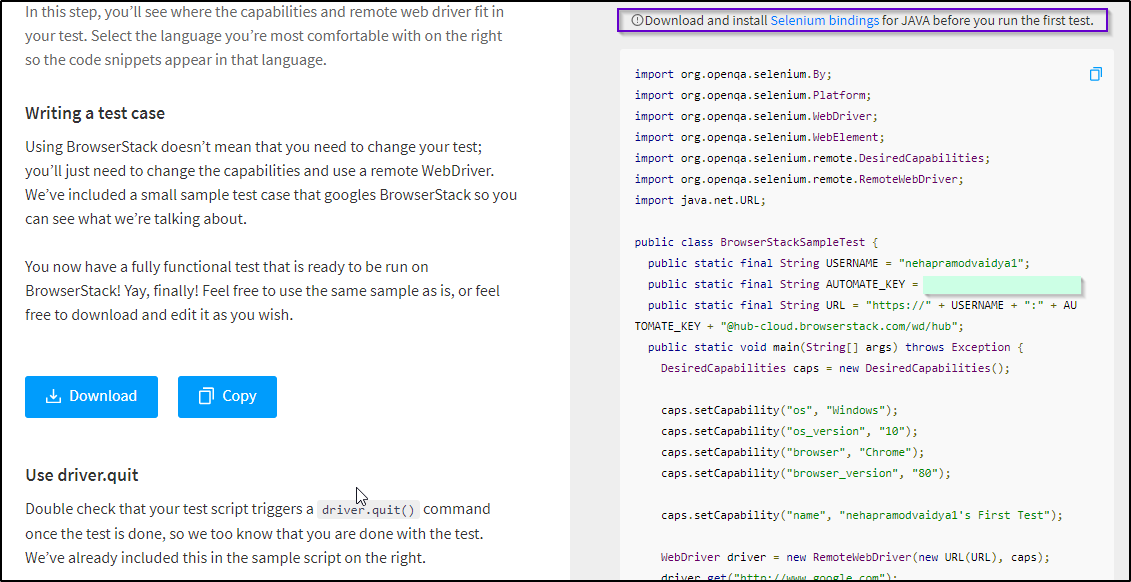
- Integrate these changes and proceed further to get the entire program/test case in one shot as shown in the snapshot below.
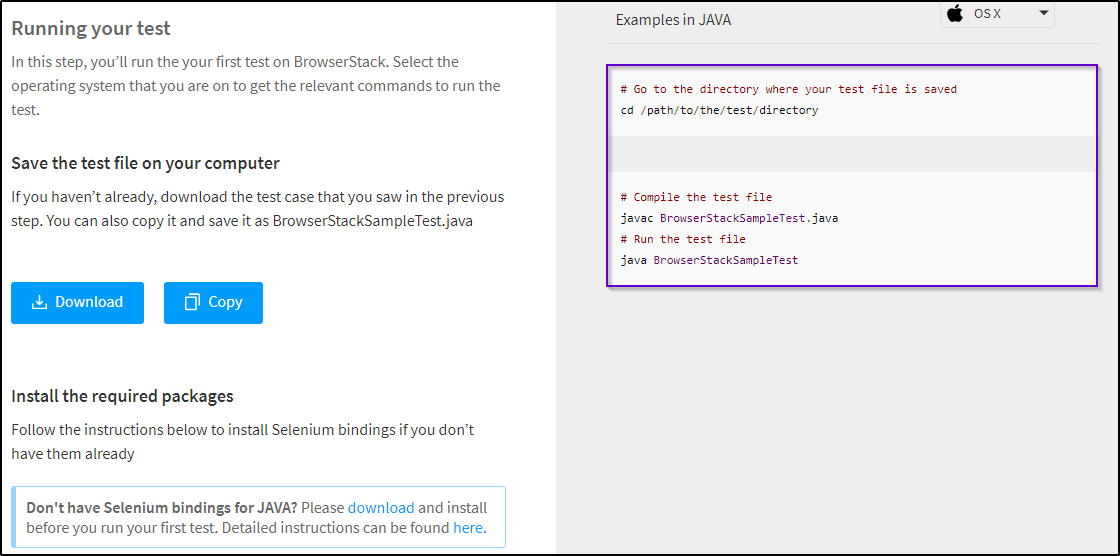
- After this, download or copy the code and paste it into the local IDE like Eclipse. One can also execute it directly on the command prompt as shown in the snapshot below.
Note: It is necessary to import or configure Selenium Jar into the project. If Selenium is not configured, it will throw an error. In case someone is using a maven project, add the following dependency into the pom.xml file.
<!-- https://mvnrepository.com/artifact/org.seleniumhq.selenium/selenium-java -->
<dependency>
<groupId>org.seleniumhq.selenium</groupId>
<artifactId>selenium-java</artifactId>
<version>3.141.59</version>
</dependency>
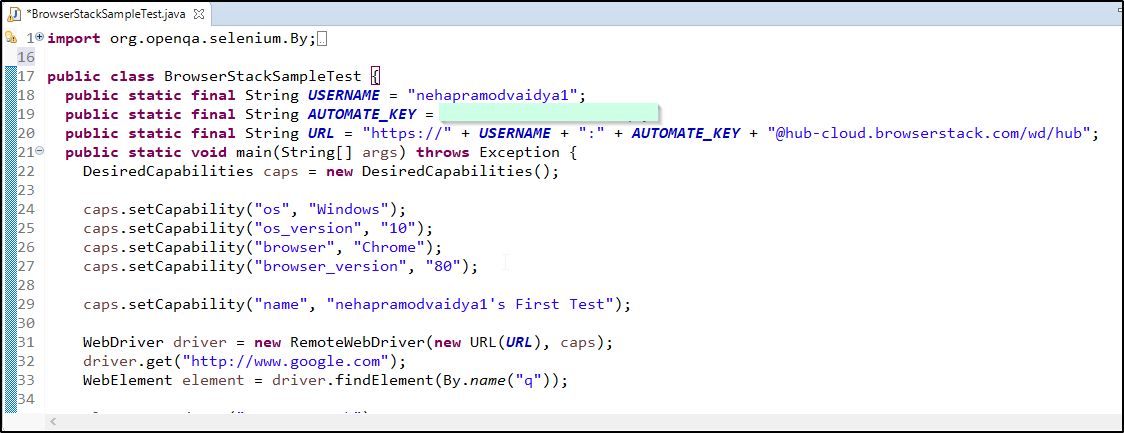
- In this case, Eclipse IDE has been used to execute the test case. Simply copy the code and paste on the Eclipse platform as shown in the snapshot below.
Here is the first test case – a Google Search of “Browserstack”
Code Snippet for the above example:
import org.openqa.selenium.By;
import org.openqa.selenium.Platform;
import org.openqa.selenium.WebDriver;
import org.openqa.selenium.WebElement;
import org.openqa.selenium.remote.DesiredCapabilities;
import org.openqa.selenium.remote.RemoteWebDriver;
import java.net.URL;

import org.openqa.selenium.By;
import org.openqa.selenium.Platform;
import org.openqa.selenium.WebDriver;
import org.openqa.selenium.WebElement;
import org.openqa.selenium.remote.DesiredCapabilities;
import org.openqa.selenium.remote.RemoteWebDriver;
import java.net.URL;

public class BrowserStackSampleTest {
public static final String USERNAME = "";
public static final String AUTOMATE_KEY = "";
public static final String URL = "https://" + USERNAME + ":" + AUTOMATE_KEY + "@hub-cloud.browserstack.com/wd/hub";
public static void main(String[] args) throws Exception {
DesiredCapabilities caps = new DesiredCapabilities();

caps.setCapability("os", "Windows");
caps.setCapability("os_version", "10");
caps.setCapability("browser", "Chrome");
caps.setCapability("browser_version", "80");

caps.setCapability("name", "nehapramodvaidya1's First Test");

WebDriver driver = new RemoteWebDriver(new URL(URL), caps);
// Navigating through the URL
driver.get("http://www.google.com");
//Locating the search box of google
WebElement element = driver.findElement(By.name("q"));
// Sending browserstack keyword for search
element.sendKeys("BrowserStack");
element.submit();

System.out.println(driver.getTitle());
driver.quit();
}
}
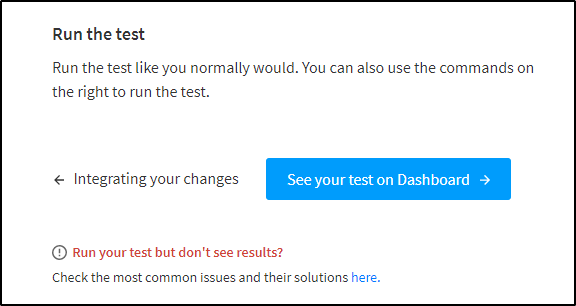
On executing this selenium test case, the next thing to do is open Browserstack and click on Run the test. The screen below will be displayed:
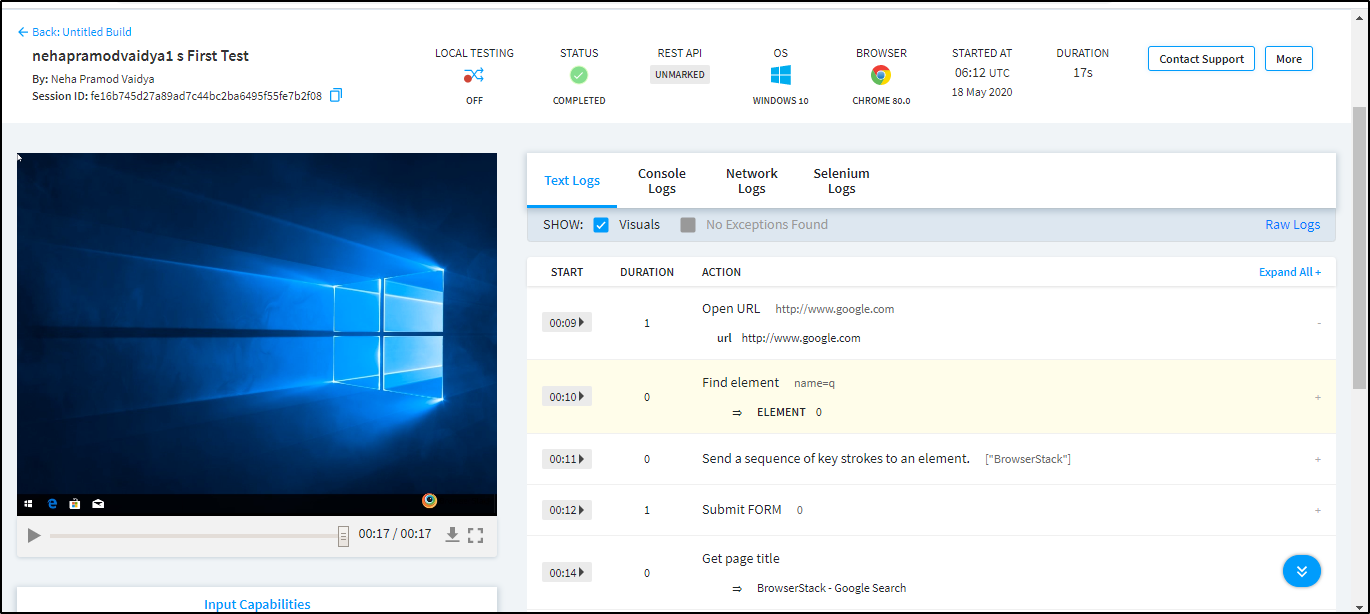
Now go to the dashboard to view the test.
- The user will see the tests and their various features as displayed in the snapshot below.
The user can play the test that has been performed. They can also download the test case. Browserstack provides a wide range of capabilities that detail every step in detail along with the time of execution.
Run the test, and start using Selenium on BrowserStack to create error-free, user-friendly websites with minimal time and effort. By following the instructions in this article, take the first step into automation testing success.
Best Practices for Writing Selenium Scripts
Implementing best practices ensures your Selenium scripts are reliable, maintainable, and scalable:
1. Use Explicit Waits Over Implicit Waits: Avoid flaky tests by waiting only when needed with WebDriverWait and ExpectedConditions.
2. Prefer CSS Selectors Over XPath: CSS is typically faster and more readable in most browsers.
3. Use Page Object Model (POM): Keep locators and test logic separate for easier maintenance and reusability.
4. Write Independent, Atomic Test Cases: Each test should stand on its own to avoid cascade failures.
5. Handle Dynamic Elements Gracefully: Use robust locator strategies or regular expressions to deal with changing element IDs or classes.
6. Use Meaningful Assertions: Validate key elements and not just page titles to catch actual user-impacting issues.
7. Add Logging and Screenshots: Helps in debugging failed test cases during CI runs or remote execution.
8. Keep Test Data Externalized: Use JSON, Excel, or CSV files to feed dynamic data into scripts.
9. Always Clean Up After Tests: Close sessions and reset test states to avoid test contamination.
10. Use Version Control and CI/CD: Collaborate efficiently and ensure your scripts run automatically in pipelines.
Why choose BrowserStack to execute Selenium Tests?
Testing Selenium scripts on real devices and browsers is essential to simulate true end-user conditions. BrowserStack Automate makes this seamless:
- Real Device Cloud Access: Run your Selenium scripts on 3,500+ real devices and browsers — no emulators or simulators.
- Parallel Execution for Faster Feedback: Significantly speed up test cycles with concurrent test execution.
- Zero Setup Infrastructure: No need to maintain local grids or browser versions — everything is cloud-hosted.
- Geolocation Testing: Simulate different locations to ensure compliance and localization.
- Seamless CI/CD Integration: Works with Jenkins, GitHub Actions, GitLab CI, CircleCI, and more.
- Automatic Screenshots and Video Logs: Debug failures with logs, screenshots, and video recordings of each test session.
- Cross Platform Testing: Write once, test across Windows, macOS, Android, and iOS.
- Secure Testing Environment: Enterprise-grade security and VPN/firewall testing support.
Conclusion
Running your first Selenium test script is just the beginning of your automation journey. With the right setup and test practices, you can quickly scale from basic validations to full regression suites.
To accelerate your testing further, run your Selenium scripts on real browsers and devices with BrowserStack Automate. It eliminates setup hassles, ensures cross-browser compatibility, and speeds up releases with parallel testing, making your automation efforts faster, more reliable, and production-ready.


