React is the go-to JavaScript library for building fast, dynamic UIs. Its component-based architecture boosts reusability and efficiency, but ensuring these components work flawlessly is crucial.
Proper testing prevents bugs, enhances stability, and ensures a smooth user experience.
Overview
Why Testing React Components is Important?
- Ensures Stability: Detects bugs early and prevents regressions.
- Improves User Experience: Ensures components behave as expected.
- Boosts Maintainability: Simplifies debugging and refactoring.
- Supports Confident Deployment: Reduces risks before production release.
Types of React Tests
- Unit Tests: Test individual components in isolation (e.g., button clicks, state changes).
- Integration Tests: Verify interactions between multiple components.
- End-to-End (E2E) Tests: Simulate real user behavior across the app.
- Snapshot Tests: Ensure UI consistency by comparing component renders.
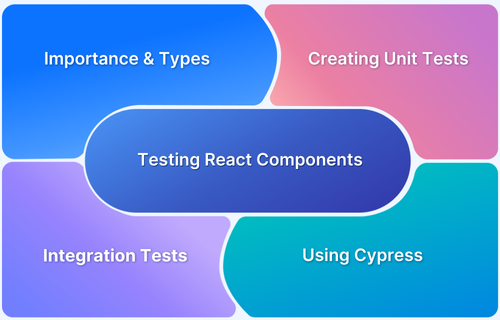
This guide covers the essentials of React testing, best practices, and tools to help you build reliable applications.
Why testing React Components is important?
The basic idea behind implementing React testing on your application is to ensure it works as intended. However, the broader idea behind conducting tests on your React application is to make it less prone to errors and deliver a good user experience. Furthermore, applications are typically updated frequently; testing ensures the application doesn’t break and the code is still reliable.
React Testing Library is a JavaScript testing utility that provides a set of utility functions that allow developers to interact with the components, such as clicking buttons, entering text, and checking for the presence of certain elements.
The library encourages developers to write tests that are more focused on user behavior and less focused on implementation details.
Read More: Top React Testing Libraries in 2023
Types of React Tests
Whenever you’re set to perform React testing, it becomes difficult to deal with the prospect and often left puzzled, but it doesn’t have to be when you have the right tests in your kit. Knowing the different types of tests unlocks the power of testing and helps you deliver better code to ensure your application is reliable, functional, and efficient.
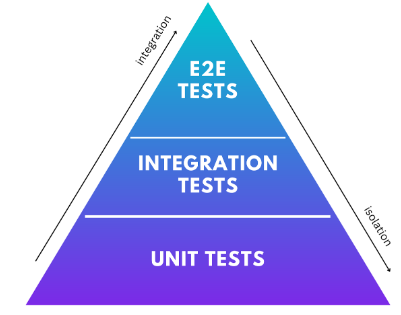
Three types of tests can be written for React applications:
- Unit tests: These types of tests are performed to test the functionality of an individual component in isolation.
- Integration tests: These tests ensure the proper functioning of different components working together. It tests the interaction between the parent and child components or when the components contain some dependencies.
- E2E tests: These tests ensure a proper user experience is received from the user perspective by testing an entire application.
Setting up the Environment for Testing
Prerequisites
- Install the latest version of Node.js on your system. The latest version of React, version 18 requires node.js version 14 or higher.
- Install any IDE of your choice. In this example, Visual Studio Code is used.
Writing Unit Tests for React Components
Unit tests are performed to test an individual component in isolation. The idea behind implementing unit tests for React components is to ensure each component works as intended regarding its design specifications.
The anatomy of unit tests follows the AAA approach, which stands for:
- Arrange: In this section, as the name suggests, prepare the system for testing. It involves configuring the necessary dependencies and creating required objects.
- Act: In this section, you operate on the system that is under test. It may involve calling a function.
- Assert: In this part, ensure the outcome matches the expected result. It involves making assertions on the system’s behavior that is under test to ensure its outcome.
React Testing Components with Jest
Jest is a popular testing framework for React that is simple and powerful enough to write and execute unit tests in React. Jest offers a variety of features for testing React components, such as mocking, snapshot testing, and more.
Now, perform testing of React Components with the help of Jest. In this example, you shall test the ‘HelloWorld’ component which contains the text ‘helloworld’.
Step 1: Install Jest
npm install --save-dev jest
Step 2: Write a Test
Create a .test.js file and paste the following test script inside the file. Write the test with the ‘it’ or ‘test’ function offered by the Jest library.
import React from 'react';
import { render } from '@testing-library/react';
import HelloWorld from './HelloWorld';

test('renders a message', () => {
const { getByText } = render(<MyComponent message="Hello, World!" />);
const messageElement = getByText(/Hello, World!/i);
expect(messageElement).toBeInTheDocument();
});
Step 3: Execute the Test
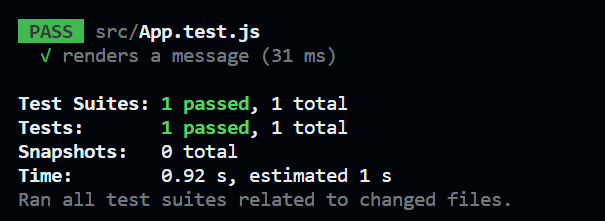
To execute the test, run the following command in the terminal. This test case tested if the application contains the ‘helloworld’ text.
npx jest HelloWorld.test.js
Snapshot Testing
Snapshot testing is generally performed for the testing purposes of the user interface. While running the Snapshot test, Jest creates a series of components compared with the previously saved snapshot. If the snapshot matches the previous one, the test passes otherwise, the test fails.
First Install the latest version of React test renderer with the following command:
npm install react-test-renderer
Write a Snapshot test for the previous test.
import React from 'react';
import renderer from 'react-test-renderer';
import HelloWorld from './HelloWorld';

test('renders correctly', () => {
const component = renderer.create(<HelloWorld />);
const tree = component.toJSON();
expect(tree).toMatchSnapshot();
});
Mocking dependencies is the procedure followed to ensure the system under test is isolated from external dependencies or interaction with other modules by replacing the module’s implementation or a function with the mock implementation we define.
Consider a practical example of how to mock dependencies in Jest.
const fetchUser = async (userId) => {
const response = await fetch(`https://api.example.com/users/${userId}`); const data = await response.json();
return data; };

const fetch = require('node-fetch');

jest.mock('node-fetch');

describe('fetchUser', () => {

it('returns the user data', async () => {

const mockResponse = { name: 'example' };

fetch.mockResolvedValueOnce({

json: jest.fn().mockResolvedValueOnce(mockResponse),

});

const result = await fetchUser(123);

expect(fetch).toHaveBeenCalledTimes(1);

expect(fetch).toHaveBeenCalledWith('https://api.example.com/users/example');

expect(result).toEqual(mockResponse);
});

});
- In this example, jest.mock() is used to mock the node-fetch module.
- Then, in the test, fetch.mockResolvedValueOnce() is used to create a mock answer for the fetch() call inside of fetchUser().
Best Practices for Writing Unit Tests
Here are some of the Unit Testing best practices that must follow to ensure higher reliability, functionality, and efficiency of your unit tests.
- Unit tests are conducted solely to test the individual component without the interference of any other component. Therefore, each component that you put under unit tests must be independent and not rely on any other component or have any dependency.
- To keep the unit test focussed, you must test one thing at a time and should test a specific behavior of a component.
- You must invest some time in writing the test names to identify and fix issues if the test fails. You should use descriptive names that specify what you’re testing in a component and what should be the expected outcome.
- Make use of CI/CD pipelines to automate your tests, ensuring the software is always working.
Writing Integration Tests for React Components
In integration testing, the aim is to verify that different system components can work together correctly. To put it another way, an integration test is performed to evaluate how well various components interact.
The anatomy of an integration test involves four parts, setup, test, assertion, and teardown.
- Setup: In this part, set up the environment for the system that is to be tested. This may involve configuring dependencies, components, and load data to ensure they are ready for smooth testing.
- Test: This is the part where the integration test is performed. This may include calling out multiple functions in a test file to verify the behavior of components working in combination.
- Assertion: Ensure the outcome matches the expected result in this part. It involves making assertions on the system’s behavior under different conditions to ensure the expected outcome.
- Teardown: In this part, eliminate the resources used solely for testing purposes. It may involve deleting temporary data or shutting down the unnecessary components required during the testing.
React Testing with Enzyme
Enzyme is a JavaScript testing library for React that offers a variety of tools for testing React components. Install Enzyme and understand how to perform integration testing with the help of Enzyme.
Step 1: Install Enzyme and Enzyme adapter
npm install --save-dev @cfaester/enzyme-adapter-react-18
Step 2: Import Enzyme and configure Enzyme adapter
import Enzyme from 'enzyme';
import Adapter from '@cfaester/enzyme-adapter-react-18';

Enzyme.configure({ adapter: new Adapter() });
Shallow Rendering
Shallow rendering is a process of performing React testing in complete isolation without interfering with any of its child components. It is quicker than full rendering, which renders the entire component tree.
In this example, we’re using Enzyme’s shallow() function to render the HelloWorld component and then using Enzyme’s find() function to locate the <p> element within the component and check its text content.
Create a test file and continue with the following script.
import React from 'react';
import Enzyme, { shallow } from 'enzyme';
import Adapter from '@wojtekmaj/enzyme-adapter-react-18';
import HelloWorld from './HelloWorld';

Enzyme.configure({ adapter: new Adapter() });

describe('HelloWorld', () => {
it('renders correctly', () => {
const wrapper = shallow(<MyComponent />);
expect(wrapper.find('p').text()).toEqual('Hello, world!');
});
});
Mounting and Full Rendering
Mounting and Full Rendering is a process of rendering an entire component in a test, including its child components into the DOM. In Full Rendering, the actual rendering of child components occurs whereas, in Mounting only initialization happens.
Consider a similar practical example to understand Mounting and Full Rendering while testing React components.
import React from 'react';
import Enzyme, { mount, render } from 'enzyme';
import Adapter from '@wojtekmaj/enzyme-adapter-react-18';
import HelloWorld from './HelloWorld';

Enzyme.configure({ adapter: new Adapter() });

describe(‘HelloWorld', () => {
it('mounts correctly', () => {
const wrapper = mount(<HelloWorld />);
// test component behavior
expect(wrapper.find('button').text()).toEqual('Click me');
});

it('renders correctly', () => {
const wrapper = render(<HelloWorld />);
// test component output
expect(wrapper.find('button').text()).toEqual('Click me');
});
});
Snapshot Testing
Here is an example of performing Snapshot testing with the help of Enzyme.
import React from 'react';
import { shallow } from 'enzyme';
import HelloWorld from './HelloWorld';

describe('HelloWorld', () => {
it('should render correctly', () => {
const wrapper = shallow(<MyComponent />);
expect(wrapper).toMatchSnapshot();
});
});
Best Practices for Writing Integration Tests
Here are some of the best practices that must follow to ensure higher reliability, functionality, and efficiency of your integration tests.
- Integration tests can be very time-consuming, therefore, it is a good practice to automate the testing process to save time and prevent any slight human error.
- You must fabricate proper documentation of your Integration tests to ensure they are repeatable and easy to grasp. Documentation is also a necessary aspect as it helps gradually upgrade the overall quality of tests.
- The entire idea behind implementing Integration tests is to ensure the proper functioning of interaction among different components. Therefore, you must test the system as a whole.
- Try to incorporate data that reflects upon real-world scenarios for finding out the product’s best and worst use cases.
Read More: Unit Testing vs Integration Testing
Writing End-to-End Tests for React Components
End-to-end testing, often known as E2E testing, involves testing an application’s complete lifecycle, including all of its levels and components. In E2E testing, the software is expected to work as intended while being put under real-world scenarios.
The anatomy of E2E testing for React components includes:
- Identifying test scenarios: In this step, test scenarios are identified based on the application’s requirements.
- Set up the test environment: The testing environment should be similar to the production environment, to replicate the real-world scenarios as closely as possible. It involves having the same configurations on the testing and production end.
- Write test scripts: Various testing frameworks are available to run automated test scripts simulating real user interactions with the application.
- Execute the test scripts: Automated test scripts must be executed in a suitable testing environment to ensure higher reliability of tests.
- Analyze the test results: This part involves generating reports on how to test went to identify various issues and defects in the application.
React Testing with Cypress
Cypress is an end-to-end testing framework based on Node.Js that supports JavaScript/TypeScript as the programming language. Cypress is popular for its ease while performing web application testing.
Now, consider the practical implementation of Cypress while testing React components.
Step 1: Installing Cypress
You can use any IDE of your choice for performing testing using Cypress. This example, uses Visual Studio IDE.
To install Cypress, follow the command in the terminal.
npm install cypress --save-dev
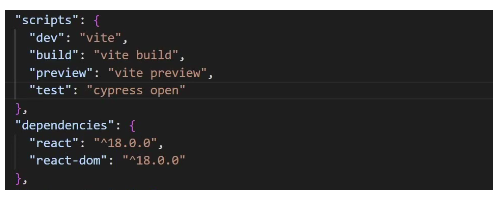
After installing Cypress, open the package.json file and paste the following script inside the script tag.
Now run the command to open the Cypress.
npx run testStep 2: Create a test file
To create a test file, create a new file with the extension .spec.js in the project directory, cypress/integration.
Making Assertions and Interacting with React Components
For example, visit a demo website and click a button that adds the item to a shopping cart. Let’s write a test that verifies that the item is added to the cart after the button is clicked.
Here is how you may carry out it using Cypress assertions:
// Navigate to the page with the shopping cart button
cy.visit('https://bstackdemo.com/')

// Click the shopping cart button
cy.get('#2').click()

// Assert that the item was added to the cart
cy.get('#cart-items')
.should('contain', 'iPhone12')
.should('contain', '$799')
.should('contain', '1')
Conclusion
The software development process includes React testing as a crucial step. This detailed tutorial demonstrated how to perform React testing using a variety of libraries, including Jest, Enzyme, and Cypress. These frameworks crucially aid unit tests, integration tests, and E2E testing of React components.
- No matter which React testing library is chosen, it is essential to test under real user conditions.
- BrowserStack’s Real Device Cloud allows you to run tests on 3500+ real devices and browsers for real user condition testing.
- Testing your React application before releasing it to real-world users has several advantages, including ensuring that all users have a positive experience with it.
