What if you could run end-to-end tests across browsers in seconds — without the flaky failures or slow setups most frameworks struggle with? That’s exactly what Playwright delivers.
Built by Microsoft, Playwright has quickly become a favorite among QA engineers and developers for its speed, reliability, and versatility. In fact, with over 45% of QA teams now automating the majority of their testing efforts, frameworks like Playwright are driving the next wave of smart, scalable automation.
This tutorial, walks you through everything from setup to advanced capabilities — including parallel testing, API validation, and handling dynamic web elements — so you can build faster, more reliable pipelines and deliver high-quality software with confidence.
Learn in detail about Playwright automation in this guide covering the features, architecture, advantages, limitations, and more.
What is Playwright?
Playwright is an open-source test automation library initially developed by Microsoft contributors. It supports programming languages like Java, Python, C#, and NodeJS. Playwright comes with Apache 2.0 License and is most popular with NodeJS with Javascript/Typescript. This Playwright tutorial will help set up NodeJS using Visual Studio Code.
Features of Playwright Automation
Here are the main features of Playwright Automation:
- Cross-Browser Testing: Playwright offers cross-browser testing capability and supports browsers like Chromium, Firefox, and WebKit with a single API.
- Multi-Language Support: Playwright supports JavaScript, TypeScript, Java, Python, and .NET.
- Auto-Waiting: The open-source framework waits automatically for elements to be ready
- Headless and Headed Modes: Run tests in visible or headless mode efficiently.
- Mobile and Device Emulation: Can seamlessly emulate devices, screen sizes and geolocation.
- Network Interception and Mocking: Playwright supports the interception of API calls and mocks responses for improved test control.
- Built-in Test Generator: Record actions to auto-generate code for test scripts.
- Visual and Screenshot Testing: Playwright supports visual and screenshot testing helping you capture full-page screenshots, element snapshots, and video recordings.
Why choose Playwright Automation?
Though Playwright is new to the market, we can hardly list the limitations as it supports multiple languages. People who want to migrate from Selenium to Playwright can do it quickly since Playwright support C#, Java, and Python. Programming languages are not a barrier. Playwright’s first release was in January 2020, and it has gained much popularity ever since.
- It leverages the DevTools protocol to write powerful, stable automated tests.
- It can see into and control the browser rather than relying on a middle translation layer; it allows for the simulation of more insightful and relevant user scenarios.
Read More: Playwright Vs Selenium
To take your Playwright automation to the next level and ensure optimal test execution, it’s essential to have expert insights.
Get Expert QA Guidance Today
Schedule a call with BrowserStack QA specialists to discuss your testing challenges, automation strategies, and tool integrations. Gain actionable insights tailored to your projects and ensure faster, more reliable software delivery.
Growing Popularity of Playwright Framework
As of 2023, the current snapshot of Microsoft Playwright on Github:
- Active Users: 23.2k
- Forks (copy of a repository that you manage): 2.4k
- Releases: 94 (This shows how active they are in fixing and releasing new features)
NPM Trends of Playwright Framework:
- Weekly Downloads: 1,244,085
Advantages of Playwright Automation
Playwright contributors are highly active in releasing new features every month, which are listed below:
- Easy Setup and Configuration: Being a Test Automation Framework, it just needs a configuration as the installation doesn’t take much time. Depending on the language we use with Playwright, the installation steps might change
- Multi-Browser Support: Chromium family browsers (Chrome, Edge), Webkit (Safari), and Firefox are all supported.
- Multi-Language Support: Playwright supports Java, C#, Python, Javascript/ Typescript making it a popular choice. Most of the modern open-source test automation frameworks miss this feature.
- Types of Testing: Playwright supports Functional, End to End, and API Testing. With a third-party plugin, Playwright can be integrated with Accessibility Testing.
- Parallel Browser Testing: Playwright also supports the execution of simultaneous tests (AKA parallel testing) through Browser Context and can run parallel tests with multiple browsers. This scales up testing and comes in handy when multiple web pages must be tested simultaneously.
- Support for Multiple Tab/Browser Window: Playwright supports multi-tab and multi-window. Some test cases must verify the scenario by launching a new window and returning to the parent window. Playwright supports all different types of test cases.
- Built-in Reporters: Playwright framework, by default, comes with many valuable reporters like List, Dot, Line, JSON, JUnit, and HTML Reporters. The exciting part is that with Playwright, one can create custom reporters. Playwright also supports third-party reporter Allure Report.
- Typescript Support out of the box: Zero configuration is required for typescript language support as it understands your typescript and javascript code.
- CI/CD Integration Support: Playwright supports CI/CD integration. It even provides docker images for some language bindings.
- Debugging Tools Support: Playwright testing supports different debugging options making it developer-friendly. Some debugging options are Playwright Inspector, VSCode Debugger, Browser Developer Tools, and Trace Viewers Console Logs.
Limitations of Playwright Automation
- Playwright is new, and it’s still evolving—scope for improvement.
- No Support for IE11
- Playwright doesn’t support Native Mobile Apps
- Though Playwright documentation is excellent, we cannot expect much regarding community support. Since Playwright is new to the market user base is still growing.
Getting Started with Playwright Setup
This Playwright tutorial explains how to set up with NodeJS easily.
Pre-Requisites:
- Install Visual Studio Code: Download and Install Visual Studio Code(VSCode).
- Install NodeJS: Download and Install Node JS
How to Install and run Playwright Test Script
Follow the below steps to install and run Playwright Test Script:
Step 1: Create a fresh new directory (ex: PlaywrightDemo) in VSCode
Step 2: Open Directory in Visual Studio Code. From VS code,
Click on File > Open Folder > Choose newly Created Folder (PlaywrightDemo)
Step 3: From the VS Code, Click on Terminal Menu > Click on New Terminal
Step 4: Enter the below command to start the Playwright installation
npm init playwright@latest
Note: The above command asks a set of questions. Please provide appropriate inputs. In this tutorial, we are using typescript language.
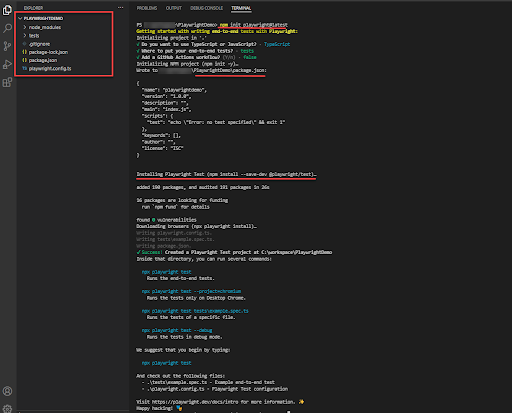
The above command does the following operation:
- Creates Package.json
- Installs npm library
- Sets up basic Files and Folders
- tests folder: This folder contains actual test scripts. By default, an example.spec.ts file will be created inside this folder.
- .gitignore: This file helps if you are using git repository
- package.json and package-lock.json: This file helps to track dependencies, create a shortcut for running tests, etc.
- playwright.config.ts: This is the global configuration file for the Playwright, which you can configure with available options.
Step 5: Install Browsers
However, Playwright is configured to run on existing browsers, which might create issues while running tests, so it is recommended to use the Playwright browsers. Using the below command, you can install all different browsers in Playwright.
npx playwright install
The above command installs the Playwright version of Chromium, Firefox, and Webkit browser.

Step 6: Create the first Playwright test
Navigate inside the tests folder and create a test spec file ex: demo.spec.ts
Let’s start a test case with the below scenario
Scenario:
- Navigate to https://www.browserstack.com/
- Click on Sign In
- Enter wrong credentials
- Verify Error Message is displayed or not.
The demo.spec.ts is our Playwright test script as follows
//demo.spec.ts

import { test, expect, Page } from '@playwright/test';

test.beforeEach(async ({ page }) => {

  await page.goto('https://www.browserstack.com/');

});

test.describe('Demo Test', () => {

    test('Verify Login Error Message', async ({ page }) => {

        await page.waitForSelector('text=Sign in',{state:'visible'});

        await page.locator('text=Sign in').first().click();

        await page.waitForSelector('#user_email_login')

        await page.locator('#user_email_login').type('example1@example.com');

        await page.locator('#user_password').type('examplepassword');

        await page.locator('#user_submit').click();

        const errorMessage = await (await page.locator("//input[@id='user_password']/../div[@class='error-msg']").textContent()).trim();

        console.log("Browserstack Login Error Message: "+errorMessage);

        expect(errorMessage).toBe('Invalid password');

    });

});
Step 7: Execute Playwright Test Script
As discussed above, during installation, Playwright creates playwright.config.ts (playwright.config.ts is the global configuration file) which will have some settings. By default, the global configuration contains the value to run on all the browsers. It runs on all three different browsers when you execute the Playwright test. We don’t need it, so we need to remove that option.
- Navigate to playwright.config.ts. Comment the option which starts with projects: [
If you are finding to do the above, copy and paste the below line of code to playwright.config.ts
//playwright.config.ts

import type { PlaywrightTestConfig } from '@playwright/test';

const config: PlaywrightTestConfig = {

  testDir: './tests',

  timeout: 30 * 1000,

  expect: {

    timeout: 5000

  },

  reporter: 'html',

  use: {

    actionTimeout: 0,

    trace: 'on-first-retry',

  },

};

export default config;
So, you have configured the playwright.config.ts, we are all set to execute the first Playwright test script.
Execute Playwright Spec using the below command
npx playwright test demo.spec.ts –headed
Let’s understand the above command:
- We are specifying which test file we need to run i.e. demo.spec.ts. Do not mention any spec file name if you want to run all the spec files inside the tests folder, do not mention any spec file name.
- Playwright runs in headless mode by default, so we specify the –headed to run on headed mode.
- We are not mentioning any browser name; by default, the Playwright test runs in the Chromium browser
Once you execute the above command, the Playwright tests start executing in the Chromium browser.
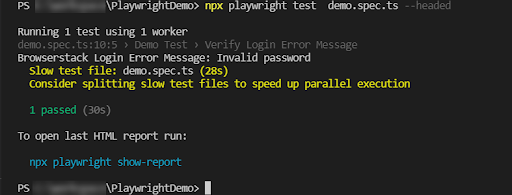
Step 8: View the report
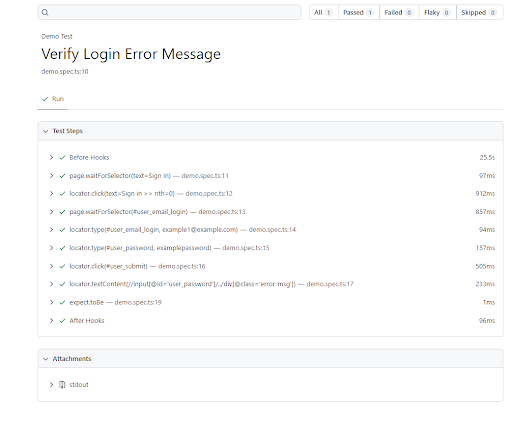
In our playwright.config.ts, we specify the HTML report, so after executing the Playwright test, the HTML report gets generated automatically in the playwright-report folder.
To view generated HTML report simply type:
npx playwright show-report
Playwright Testing on BrowserStack
One can run all your playwright-test tests on BrowserStack as well. Follow the steps below to run the sample tests in this repository:
Step 1: Clone this repository using git clone https://github.com/browserstack/playwright-browserstack.git
Step 2: Go inside the directory playwright-test using
cd playwright-test
Step 3: Install the dependencies using
npm install
Step 4: Put in your credentials in the file fixtures.js in the caps part.
Step 5: To run your tests on BrowserStack, you must ensure you correctly configured the projects in the playwright.config.js file.
Step 6: Run the sample test script using the
npm test
This command runs all the tests inside the tests directory across five browsers in BrowserStack.
Step 7: If you want to test against localhost or other private websites, run the sample test script using the command
npm run test:local
Step 8: To run your tests locally, you must configure the projects without the name @browserstack in playwright.config.js file.
For complete details, visit the Github page.
How to Use Playwright with Java in Eclipse
Playwright supports Java through its official client. Here’s how you can use it with Eclipse:
1. Install Java & Eclipse:
Ensure you have installed Java JDK 11 or higher. Also install Eclipse IDE for Java Developers.
2. Set Up Maven Project in Eclipse
- Open Eclipse. Then create a new Maven Project.
- Add the given dependency to your pom.xml:
<dependency>

  <groupId>com.microsoft.playwright</groupId>

  <artifactId>playwright</artifactId>

  <version>1.44.0</version> <!-- Check for latest version -->

</dependency>
3. Install Playwright Browsers
Once you resolve the dependency, run the following in your terminal to download Chromium, Firefox, and WebKit browsers for Playwright.
mvn exec:java -e -Dexec.mainClass=com.microsoft.playwright.CLI -Dexec.args="install"
4. Sample Test
Create a class like PlaywrightTest.java in src/main/java:
import com.microsoft.playwright.*;


public class PlaywrightTest {

  public static void main(String[] args) {

    try (Playwright playwright = Playwright.create()) {

      Browser browser = playwright.chromium().launch(new BrowserType.LaunchOptions().setHeadless(false));

      Page page = browser.newPage();

      page.navigate("https://example.com");

      System.out.println("Page title: " + page.title());

    }

  }

}
5. Run the test
- Right-click the file> Run As> Java Application.
- This will launch a browser, open the page, and print the title.
Playwright JavaScript example
Here’s a Playwright JavaScript example to open a page and print the title:
// playwright-example.js

const { chromium } = require('playwright');  // Or 'firefox' or 'webkit'


(async () => {

  // Launch browser

  const browser = await chromium.launch({ headless: false }); // Set to true for headless mode

  const context = await browser.newContext();

  const page = await context.newPage();


  // Navigate to a website

  await page.goto('https://example.com');


  // Print the page title

  const title = await page.title();

  console.log(`Page title: ${title}`);


  // Close browser

  await browser.close();

})();
You can run this by:
1. Initializing a Node.js project:
npm init -y
2. Install Playwright
npm install -D playwright
3. Run the Script
Read More: Performing NodeJS Unit testing using Jest
How to Integrate Playwright with CI/CD Tools
Integrating Playwright into your CI/CD pipeline facilitates the execution of automated tests with every code change. Here’s a general method to integrate Playwright with popular CI/CD tools:
Basic Setup
Make sure the project has playwright installed via npm. Als, the tests should be located in a folder like /tests. You should also have a test script in package.json:
"scripts": {

  "test": "npx playwright test"

}
Install Playwright browsers (needed for CI)
npx playwright install --with-deps
Example with Jenkins
pipeline {

  agent any

  stages {

    stage('Install') {

      steps {

        sh 'npm ci'

        sh 'npx playwright install --with-deps'

      }

    }

    stage('Test') {

      steps {

        sh 'npx playwright test'

      }

    }

  }

}
Why run Playwright Automation Tests on BrowserStack Real Device Cloud?
You should run Playwright Automation Tests on a real device cloud like BrowserStack Automate for below reasons:
- Realistic Testing Conditions: Real device clouds provide access to a broad spectrum of devices and environments, ensuring tests reflect actual user conditions accurately.
- Enhanced Security: Maintained with high security standards, real device clouds offer secure, isolated testing environments, minimizing data breach risks.
- Broad Browser and OS Coverage: Helps identify compatibility issues across various browsers and operating systems, enhancing user experience.
- Performance Insights: Real devices yield authentic performance data essential for optimizing application responsiveness.
- Scalability and Accessibility: Facilitates scalable and accessible testing, suitable for distributed teams.
- CI/CD Integration: Integrates smoothly with CI/CD pipelines for continuous testing and early issue detection.
- Cost-Effectiveness: Although initially more costly, it saves on long-term expenses related to fixes and support.
Conclusion
Playwright is a solid test automation framework that allows you to perform end-to-end testing across major browsers. It is equipped with multiple features, such as resiliency, auto-wait, capturing test trace, and so on, supported with BrowserStack.
- BrowserStack’s real device cloud provides 3500+ real browsers and devices for instant, on-demand testing.
- The cloud also provides integrations with popular CI/CD tools such as Jira, Jenkins, TeamCity, Travis CI, and more.
- Additionally, in-built debugging tools let testers identify and resolve bugs immediately.
Run hundreds of Playwright tests in parallel in minutes. Focus on testing – not test infrastructure – with zero setups and maintenance.
Frequently Asked Questions
1. Is Playwright better than Selenium and Cypress?
Choosing between Playwright, Selenium, and Cypress depends on your project requirements. All three frameworks have their strength and weaknesses.
- Playwright is a new tool, so you may not find extensive community support or online resources as compared to Selenium and Cypress, which are more established.
- Playwright works well at automating complex web applications and integrates seamlessly with CI/CD pipelines.
- Selenium offers extensive browser support, community support, along with greater scalability, making it a great choice for enterprise-level or legacy projects.
- Cypress offers a seamless developer experience for frontend testing but lacks cross-browser testing capabilities beyond Chromium.
Overall, Playwright is a great tool for testing modern, dynamic apps while Cypress and Selenium fulfills broader use cases and provides better community support.
Useful Resources for Playwright
- Playwright Automation Framework
- Playwright Java Tutorial
- Playwright Python tutorial
- Playwright Debugging
- End to End Testing using Playwright
- Visual Regression Testing Using Playwright
- Mastering End-to-End Testing with Playwright and Docker
- Page Object Model in Playwright
- Scroll to Element in Playwright
- Understanding Playwright Assertions
- Cross Browser Testing using Playwright
- Playwright Selectors
- Playwright and Cucumber Automation
Tool Comparisons:

