How to Scroll to Element in Playwright
By GH, Community Contributor - September 16, 2024
Playwright is a modern, open-source web automation tool from Microsoft. It offers features like auto-waiting, scrolling, mouse hover, and iFrame actions.
One of Playwright’s key features is its scrolling capability, allowing interactions with elements outside the visible area. It supports both horizontal and vertical scrolling, offering multiple ways to navigate web pages seamlessly.
- Setting up Playwright
- Why is it necessary to Scroll an Element?
- Different ways to achieve Playwright scroll to element?
- How to use Playwright to scroll to a specific element Vertically?
- Implementing Horizontal Scroll using Playwright
- Challenges in Playwright Scroll to the Element
- Running Playwright Tests on BrowserStack
Setting up Playwright
Playwright offers a straightforward installation process. Ensure NodeJS and VSCode are installed on your system, then begin the installation with the following commands.
npm init playwright@latestAfter running the command, follow the on-screen instructions to complete the Playwright setup. Alternatively, refer to the BrowserStack Playwright Automation Tutorial for a quick and easy guide to fully setting up Playwright.
Read More: Mastering end-to-end testing with Playwright
Why is it necessary to Scroll an Element?
Web applications often have pages too large to fit in a single view, and attempting to interact with elements outside the visible area can result in “element not found” errors. This occurs because modern web apps load resources only for the current view.
Scrolling to the desired area makes the element visible, enabling smooth interaction without errors.
There are two types of scroll:
- vertical (top to bottom or vice-versa)
- horizontal (left to right or vice-versa).
Depending on the page design, you may need to use Playwright’s scrolling capabilities to interact with elements effectively.
Read More: Playwright vs Puppeteer – Which to choose
Different ways to achieve Playwright scroll to element?
As mentioned earlier, Playwright supports both horizontal and vertical scrolling. Each type of scrolling can be performed in different ways.
Implementing Vertical Scroll using Playwright
- Scrolling to a Specific Element
- Scrolling by a Certain Amount
- Scrolling to the Bottom of the Page
- Scrolling with Keyboard Shortcuts
- Scrolling with Mouse
- Scrolling with Touchscreen
Implementing Horizontal Scroll using Playwright
- Scrolling to a Specific Element
- Scrolling with Mouse
- Scrolling with Keyboard Shortcuts
Playwright provides a functional scrollIntoView() method for the default scrolling, this is the most used and it works for both horizontal and vertical scroll. However, based on the use cases you may need to choose specific scroll mechanisms.
Read More: Understanding Playwright assertions
How to use Playwright to scroll to a specific element Vertically?
Playwright has an inbuilt function, scrollIntoViewIfNeeded(). This method needs to be chained with the Playwright locator object, and then Playwright automatically scrolls the page into the element.
Code
import { test, expect } from '@playwright/test';

test('scroll to specific element', async ({ page }) => {

  await page.goto("https://www.imdb.com/chart/top/");

  let dJanagoMovieLink = await page.locator("//h3[contains(text(),'55. Django Unchained')]");

  await dJanagoMovieLink.scrollIntoViewIfNeeded();

  await dJanagoMovieLink.click();

  expect(await page.locator('h1 span').textContent()).toEqual('Django Unchained')

});
In the above code, navigate to the IMDb website and scroll into a specific element that contains “//h3[contains(text(),’55. Django Unchained’)]” To perform this action use the playwright function scrollIntoViewIfNeeded()
Scrolling by a Specific Amount
Scrolling by a specific amount can be useful when simulating human-like behavior. For instance, if you’re searching for an image by name on a website, you might need to scroll until the image is visible.
In cases where images load only after scrolling, continuous scrolling is necessary to interact with the image. The window.scrollBy() function is ideal for achieving this.
Example
import { test, expect } from '@playwright/test';

test('scroll to certain amount', async ({ page }) => {

  test.setTimeout(500000);

  await page.goto("https://www.flickr.com/search/?text=Green+nature");

  let imageLink = await page.locator("div[title='green vision by Princess Sissi']");

  let scrollCount = 1;

  while(scrollCount<=20){

    console.info("Scroll Count: "+scrollCount)

    if(await imageLink.isVisible()){

      await imageLink.click();

      await page.waitForTimeout(5000)

      let isAuthorVisible = await page.locator("//h1[contains(text(),'Princess Sissi')]").first().isVisible();

      expect(isAuthorVisible).toBeTruthy();

      break;

    }

    else{

     await page.evaluate(() => window.scrollBy(0, 500));

     await page.waitForTimeout(2000)

    }

    scrollCount++;

  }

});
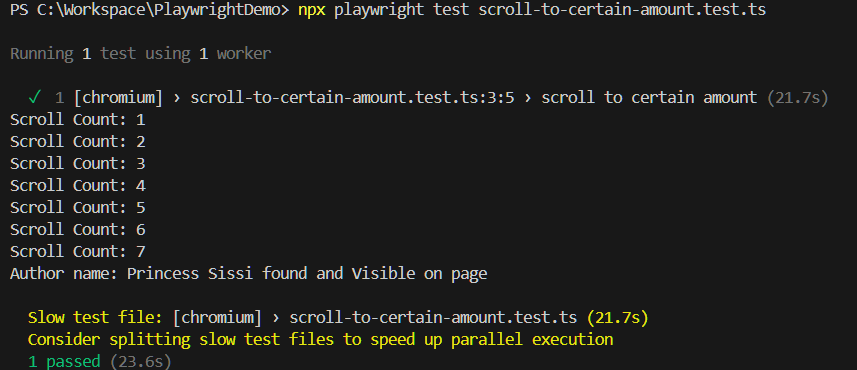
In the above example,
- The browser navigates to the Flickr website to search for a specific image.
- A while loop is used to limit the number of scrolls to a maximum of 20.
- If an image becomes visible or imageLink.isVisible() returns true, the script clicks on the image to retrieve the author’s name.
- If the image is not visible, the script continues scrolling.
- The scrolling is achieved using the function await page.evaluate(() => window.scrollBy(0, 500));, which scrolls the page by 500 pixels vertically each time.
Output
Read More: Test automation with Playwright Java
Scrolling to the Bottom of the Page
While automating some of the scenarios, you may already know that a specific element is at the bottom of the screen. In such scenarios, you can directly scroll the page to the bottom without performing step-by-step scrolls. The window.scrollTo() function can be used to perform this action.
Example
import { test, expect } from '@playwright/test';


test('scroll to bottom', async ({ page }) => {
await page.goto("https://stackoverflow.com/questions/tagged/playwright");
await page.evaluate(() => window.scrollTo(0, document.body.scrollHeight));
await page.waitForTimeout(5000)
expect(await page.locator("//a[contains(text(),'Next')]").isVisible()).toBeTruthy();
});
In this code:
- The browser navigates to the StackOverflow Playwright tag page at https://stackoverflow.com/questions/tagged/playwright.
- The await page.evaluate(() => window.scrollTo(0, document.body.scrollHeight)); function is called to scroll the page.
- The window.scrollTo() function takes two parameters: x (horizontal) and y (vertical) coordinates, both specified in pixels.
- In this case, the x coordinate is set to 0 because only vertical scrolling is needed.
- The y coordinate is dynamically fetched using the JavaScript function document.body.scrollHeight, which returns the full height of the content within the document’s body, enabling the page to scroll all the way to the bottom.
- A 5-second timeout (await page.waitForTimeout(5000);) is added to allow the page to load any additional content after scrolling.
- The script checks if the “Next” button is visible using expect(await page.locator(“//a[contains(text(),’Next’)]”).isVisible()).toBeTruthy();, ensuring the page has scrolled correctly.
This example demonstrates how to control scrolling using Playwright, making it easy to navigate through pages and interact with elements that are initially out of view.
Read More: Visual regression testing with Playwright
Scrolling with Keyboard Shortcuts
The previous example, used JavaScript functions such as scrollBy() and scrollTo() to scroll the page. The playwright also provides the capability to scroll the page using the keyboard Keys. The page.keyboard.press() function can perform this action.
Example
import { test, expect } from '@playwright/test';

test('scroll keyboard shortcut', async ({ page }) => {

  test.setTimeout(500000);

  await page.goto("https://www.flickr.com/search/?text=Green+nature");

  let imageLink = await page.locator("div[title='green vision by Princess Sissi']");

  let scrollCount = 1;

  while (scrollCount <= 20) {

    console.info("Scroll Count: " + scrollCount)

    if (await imageLink.isVisible()) {

      await imageLink.click();

      await page.waitForTimeout(5000)

      let isAuthorVisible = await page.locator("//h1[contains(text(),'Princess Sissi')]").first().isVisible();

      let authorName =  await page.locator("//h1[contains(text(),'Princess Sissi')]").first().textContent();

      expect(isAuthorVisible).toBeTruthy();

      console.info("Author name: "+authorName?.trim()+" found and Visible on page")

      break;

    }

    else {

      await page.keyboard.press("Space");

      await page.waitForTimeout(2000)

    }

    scrollCount++;

  }

});
In this example:
- The browser navigates to Flickr at the URL
https://www.flickr.com/search/?text=Green+nature, searching for images of “Green nature.” - The script looks for a specific image with the title ‘green vision by Princess Sissi’ using let imageLink = await page.locator(“div[title=’green vision by Princess Sissi’]”);.
- A while loop limits scrolling to a maximum of 20 iterations using scrollCount.
- If the image is found and becomes visible (await imageLink.isVisible()), it is clicked, and the script verifies the presence of the author’s name (“Princess Sissi”) using expect(isAuthorVisible).toBeTruthy();.
- If the image is not visible, the script simulates a key press with await page.keyboard.press(“Space”);, scrolling the page down.
- page.keyboard.press() simulates pressing any key, in this case, the “Space” key, which mimics a page scroll. This is repeated until the image is found or the scroll count exceeds 20.
- The author’s name is displayed if found, and the script ends once the specific image is visible.
This method is useful for simulating human-like scrolling behavior using keyboard shortcuts, especially when interacting with dynamic web content.
Scrolling with Mouse
Playwright also provides the capability to scroll the page using mouse options. It has a method page.mouse.wheel() that can be used to scroll the page using mouse actions programmatically.
Example
import { test, expect } from '@playwright/test';

test('scroll with mouse', async ({ page }) => {

  test.setTimeout(500000);

  await page.goto("https://www.flickr.com/search/?text=Green+nature");

  let imageLink = await page.locator("div[title='green vision by Princess Sissi']");

  let scrollCount = 1;

  while (scrollCount <= 20) {

    console.info("Scroll Count: " + scrollCount)

    if (await imageLink.isVisible()) {

      await imageLink.click();

      await page.waitForTimeout(5000)

      let isAuthorVisible = await page.locator("//h1[contains(text(),'Princess Sissi')]").first().isVisible();

      expect(isAuthorVisible).toBeTruthy();

      break;

    }

    else {

      await page.mouse.wheel(0, 500);

      await page.waitForTimeout(2000)

    }

    scrollCount++;

  }

});
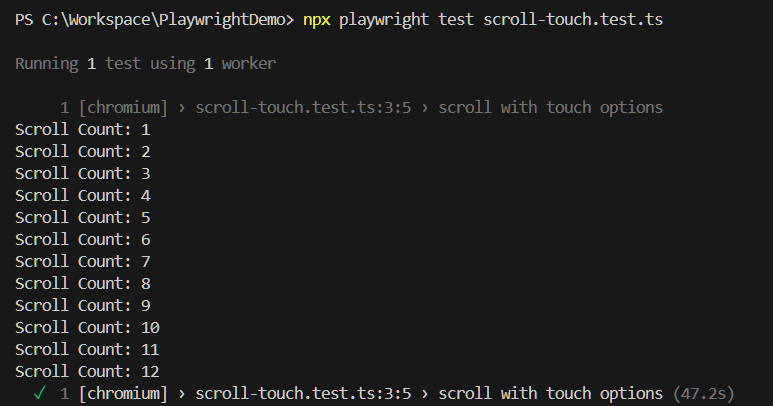
This code is similar to the earlier “Scroll to a Certain Amount” example, but here the page.mouse.wheel() method is used for scrolling.
Playwright’s page.mouse.wheel() accepts two parameters: deltaX for horizontal scrolling in pixels and deltaY for vertical scrolling in pixels.
In the example page.mouse.wheel(0, 500), deltaX is set to zero (no horizontal scroll), and deltaY is set to 500, meaning the page will scroll 500 pixels vertically.
Read More: Playwright vs Selenium
Scrolling with Touchscreen
Scrolling with the touchscreen option is not available in Playwright. However, you can perform the scroll using the JavaScript methods, and then the click action can be performed using the tap() function.
To use this, the “hasTouch” flag should be set to true.
Example
import { test, expect } from '@playwright/test';


test('scroll with touch options', async ({ page }) => {
test.setTimeout(500000);
await page.goto("https://www.flickr.com/search/?text=Green+nature");
let imageLink = await page.locator("div[title='green vision by Princess Sissi']");
let scrollCount = 1;


while (scrollCount <= 20) {
console.info("Scroll Count: " + scrollCount)
if (await imageLink.isVisible()) {
await imageLink.tap();
await page.waitForTimeout(5000)
let isAuthorVisible = await page.locator("//h1[contains(text(),'Princess Sissi')]").first().isVisible();
expect(isAuthorVisible).toBeTruthy();
break;
}
else {
await page.mouse.wheel(0, 500);
await page.mouse.move(20, 40);
await page.waitForTimeout(2000)
}
scrollCount++;
}
});
Note: To use the tap() function, set the hasTouch flag to true in your playwright.config.ts file. This simulates touch-based interactions.
- Tap Action:
- Similar to click(), the await imageLink.tap() function triggers a touch interaction on a touchscreen. It’s useful when testing on devices that use touch rather than a mouse.
- Mouse Wheel and Move for Scroll:
- await page.mouse.wheel(0, 500);: This simulates vertical scrolling by 500 pixels.
- await page.mouse.move(20, 40);: This mimics touch movement on the screen.
This approach allows you to test touchscreen-based interactions in Playwright by simulating scrolling and tapping actions for touchscreens.
Implementing Horizontal Scroll using Playwright
Though modern websites avoid horizontal scrolling to provide good user experiences, there may be scenarios where you need to implement horizontal scrolling. The horizontal scroll can be performed similarly to the vertical scroll. Like Vertical scroll, there are many different methods to perform the horizontal scroll.
Scrolling to a Specific Element Horizontally
The Playwright scrollIntoViewIfNeeded() method is smart and powerful. It intelligently detects which type of scroll is needed and performs the action accordingly. The scrollIntoViewIfNeeded() can also be used for horizontal scrolling.
Example
test('horizontal scroll demo', async ({ page }) => {

  test.setTimeout(500000);

  await page.goto("https://www.w3schools.com/howto/tryit.asp?filename=tryhow_css_menu_hor_scroll");

  await page.waitForTimeout(10000)

  const locator = await

  page.frameLocator('#iframeResult').locator('div[class="scrollmenu"]').locator('a[href="#work"]');

  await locator.scrollIntoViewIfNeeded();

  await page.waitForTimeout(10000)

});
In the above method,
- The playwright navigates to one of the example pages, which has a horizontal scroll
- The menu item work is outside of the visible scope
- Using page.frameLocator() fetches the locator of the menu item
- locator.scrollIntoViewIfNeeded() This scrolls horizontally to the element in scope.
Scrolling Horizontally using the Keyboard
Like vertical scroll, horizontal scroll can also be performed using the Keyboard. page.keyboard.press(‘ArrowRight’) or page.keyboard.press(‘ArrowLeft’) can be used for this operation.
Example
test('horizontal scroll demo keyboard', async ({ page }) => {

  test.setTimeout(500000);

  await page.goto("https://www.w3schools.com/howto/tryit.asp?filename=tryhow_css_menu_hor_scroll");

  await page.waitForTimeout(10000)

  const locator = await page.frameLocator('#iframeResult').locator('div[class="scrollmenu"]');

  await locator.click()

  await page.keyboard.press('ArrowRight');

  await page.waitForTimeout(5000)

  await page.keyboard.press('ArrowRight');

  await page.waitForTimeout(10000)

});
The above code uses the keyboard function to scroll horizontally. page.keyboard.press() is the playwright function that accepts the keyboard key as a parameter.
In the above example, ‘ArrowRight’ is specified as the key. The playwright navigates to the page and presses the ArrowRight in turn, it scrolls the page to the right.
Scrolling Horizontally using the Mouse
The Playwright supports horizontal scrolling using mouse actions. The mouse wheel() method is provided for this purpose.
Example
test('horizontal scroll demo mouse', async ({ page }) => {

  test.setTimeout(500000);

  await page.goto("https://www.w3schools.com/howto/tryit.asp?filename=tryhow_css_menu_hor_scroll");

  await page.waitForTimeout(10000)

  const locator = await page.frameLocator('#iframeResult').locator('div[class="scrollmenu"]');

  await locator.hover()

  await page.mouse.wheel(300, 0);

  await page.waitForTimeout(10000)

});
In the above code, page.mouse.wheel(300, 0) is used to scroll the page horizontally using the playwright. The page.mouse. wheel () accepts two parameters, deltaX and deltaY ().
The deltaX() and deltaY() are the amount of scroll in pixels for horizontal and vertical scrolling, respectively.
The above code uses deltaX as 300 pixels and deltaY is 0 as the intention is to only scroll horizontally, vertical scroll value can be zero.
Read More: Cross-browser testing using Playwright
Challenges in Playwright Scroll to the Element
Implementing scroll functionality in automation scripts comes with several challenges:
- Dynamic Content: Scrolling may encounter issues if the website contains a lot of dynamic content that loads asynchronously.
- Lazy Loading: Waiting for elements to load can be difficult when lazy loading is implemented, as elements may not appear immediately.
- Lack of Unique Attributes: Scrolling to a specific element requires a unique identifier, but not all elements have distinctive attributes, making it challenging to locate the desired element.
- Browser Compatibility: Scrolling behavior may vary across browsers and could be dependent on native operating system features, complicating cross-browser automation.
- Trial and Error: Identifying the best scrolling method often requires experimentation, as not all techniques are universally effective across all browsers and web pages.
Running Playwright Tests on BrowserStack
When working with Playwright, running tests efficiently across different browsers and platforms is crucial. BrowserStack Automate allows you to run hundreds of Playwright tests in parallel, saving time and eliminating the hassle of maintaining infrastructure.
Follow these simple steps to run your Playwright tests seamlessly on BrowserStack:
Step 1. Integrate with BrowserStack
- Download and install the BrowserStack SDK.
- Migrate your existing Playwright test suites to BrowserStack’s cloud using the SDK in just a few minutes.
Step 2. Run Your Tests
- Trigger your test builds from your local machine or CI/CD tool.
- Watch your tests execute in parallel, significantly speeding up your test cycle.
- View the results quickly on BrowserStack’s Automate Dashboard.
Step 3. Debug Test Results
- Access rich insights and detailed logs for each test run.
- Gain access to framework, console, screenshot, or network logs to help identify and resolve issues efficiently.
Step 4. Scale Your Testing
- Scale up your test coverage effortlessly with BrowserStack’s cloud capacity.
- No need to maintain any on-premise infrastructure. Run tests across 3,500+ browser and device combinations with ease.
By following these steps, you can integrate, run, debug, and scale your Playwright tests more efficiently using BrowserStack.
Conclusion
As mentioned earlier, various ways exist to scroll and interact with elements on a web page. However, web page behavior may vary depending on the browser or operating system. What works in Chrome may not necessarily work in Firefox. Cross-browser testing and cross-platform testing is essential to ensure consistent product quality and deliver a smooth user experience across different browser and OS combinations.
BrowserStack Automate offers cloud-based real device testing with over 3,500 browser and OS combinations. It offers extensive support for popular languages and automation frameworks like Playwright, ensuring comprehensive test coverage and a seamless user experience across platforms.
