The ultimate Playwright Python tutorial
By Arjun M. Shrivastva, Community Contributor - February 11, 2025
Playwright in Python is a powerful automation framework designed for end-to-end testing of web applications. It allows developers to easily automate browsers, supporting multiple browsers like Chrome, Firefox, and WebKit. Playwright simplifies interactions with web pages, enabling tasks such as navigation, form submissions, and handling pop-ups or modal dialogs.
This tutorial serves as the ultimate guide to Playwright in Python. It covers its key features, installation steps, and essential test cases to help you master web automation and testing efficiently.
What is Playwright?
Playwright is a robust end-to-end (E2E) testing framework designed to automate web applications across different browsers and platforms.
Developed by Microsoft, it provides a seamless API for controlling web pages, simulating real user interactions, and validating application functionality with high accuracy.
Playwright supports multiple browsers and operating systems, ensuring consistent application behavior across environments. It enablesthe automation of complex interactions like form submissions, UI validation, and navigation.
With both headless and headful modes, it balances speed and debugging visibility. Its built-in asynchronous handling ensures smooth execution by synchronizing with the application’s state.
Key Features of Playwright
Here are a few key characteristics of the Playwright testing framework:
- The framework provides cross-browser development for Chrome, Edge, Firefox, Opera, and Safari using WebKit, Chromium, and Firefox.
- Windows, Linux, and macOS all enable cross-platform execution.
- It allows testing across multiple programming languages, including JavaScript, TypeScript, Python, Java, and .NET, ensuring comprehensive coverage of all topics and formats.
- You can easily track logs and videos using auto-wait, adaptive assertions that retry until an element is located, and test data tracing.
- It is easy to use, has a modern architecture, handles frames and browser events easily, and lets you interact with multi-page, multi-tab websites just like a real user would.
- It is compatible with the architecture of modern browsers. Hence, it is exempt from the restrictions of in-process test runners.
- Playwright provides complete test isolation with no overhead. For each test, it quickly establishes a browser context, which just takes a few milliseconds.
Must Read: Cross Browser Testing using Playwright
Benefits of using Playwright
Automating your web testing with Playwright has the following benefits:
- Supports complex testing scenarios, including multi-tab, multi-user, and iframe interactions.
- Provides powerful debugging tools like step-by-step tracing, selector exploration, and test recording, with a VS Code extension for seamless integration.
- Generates detailed HTML test reports with visual differences, screenshots, traces, error logs, and video recordings for better analysis.
- Quick and straightforward installation, with configuration steps varying based on the programming language.
- Supports multiple testing types, including end-to-end, functional, and API testing.
- Enables automated accessibility testing with third-party plugin support.
- Offers robust debugging options like Playwright Inspector, Browser Developer Tools, VS Code Debugger, and Trace Viewer.
- Includes built-in JSON, JUnit, and HTML reporters, with the flexibility to create custom reporters.
- Allows parallel test execution locally or on a Selenium grid, enabling efficient test distribution across multiple systems.
Why use Playwright Python for End-to-End Testing?
End-to-end testing is a software testing methodology that examines an application’s flow from beginning to end. End-to-end testing aims to validate the system under test and its components for integration and data integrity by simulating the real user scenario.
It is carried out end-to-end under real-world conditions, including interactions between the application and the hardware, network, database, and other applications.
These four features make it more reliable and efficient than other tools for End-to-end testing.
1. Utilize the DevTools Protocol to control the browser.
Playwright uses the Chrome DevTools protocol to interact directly with browsers. Compared to alternatives, the protocol enables a quicker and less error-prone execution. Even if we are only discussing fractions of seconds, they are advantageous!
2. Web-First Assertions, Actionability, and Auto-Waiting
You can “just” click the Playwright button to avoid waiting. The element must be actionable for the Framework to wait for it, which requires that it be in the DOM, visible, not animated, enabled, and unobscured by other elements.
This auto-waiting approach greatly streamlines UI tests, allowing you to concentrate on behavior testing rather than writing code to wait.
3. Parallelization
Your tests can be parallelized in Playwright and run in worker processes coordinated by OS processes. Set the number of workers you want to start, specify the parallel processes, and end the day. There isn’t much to it, but parallel testing will make your tests run faster.
4. Debug and Record Your Scripts
Writing new tests takes time. Therefore, code generation is useful in this situation. Run a single CLI command to begin capturing the framework for your upcoming end-to-end test.
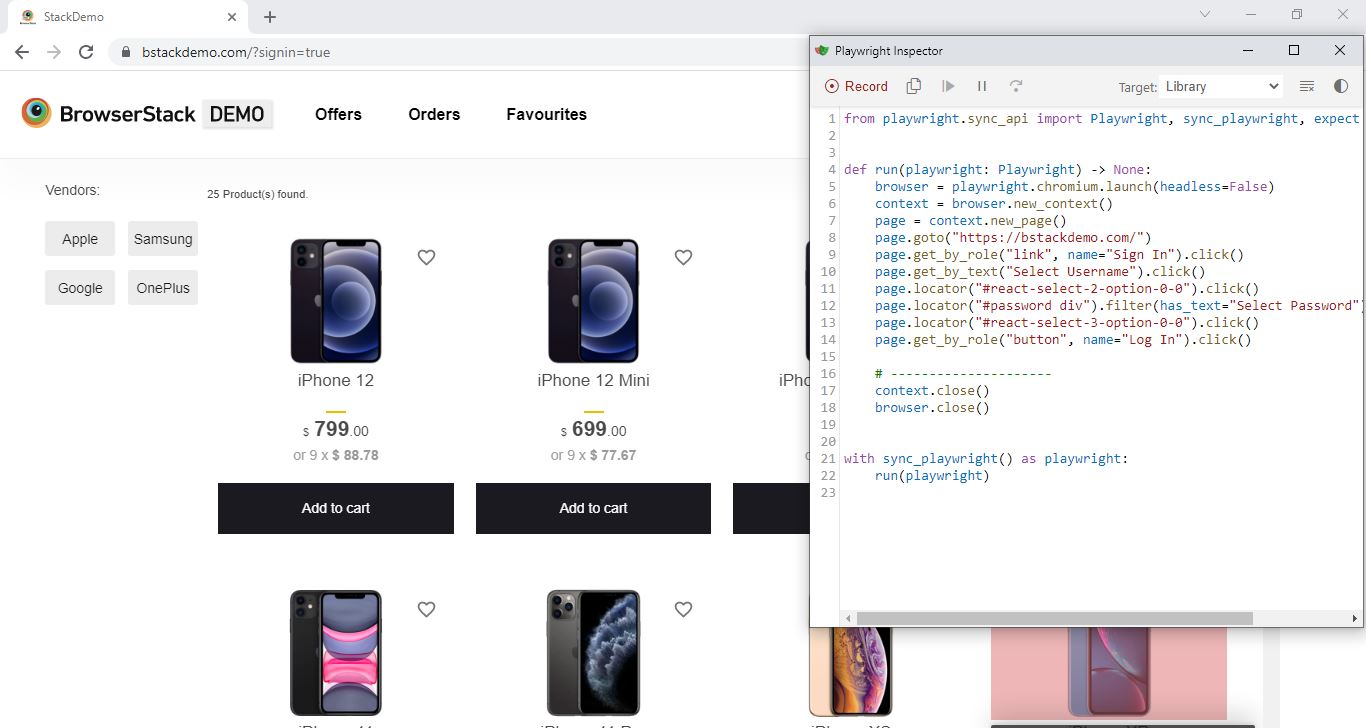
playwright codegen test_urlThe Playwright Inspector and a browser window will open due to the command. The created script will keep track of browser behaviors like link clicks and form fills. Take the script after your recording is complete, modify the selectors, add assertions, and then add the modified script to your codebase.
5. Browser Context for Realistic Testing
Playwright allows the creation of multiple browser contexts within a single instance, enabling efficient testing of different user sessions simultaneously.
This feature is particularly useful for multi-user workflows, incognito browsing, and session storage behavior testing. By leveraging browser contexts, teams can ensure their web applications handle diverse user interactions seamlessly while improving overall test efficiency.
How to set up Playwright Python for end-to-end testing?
Let’s walk through the simple setup of Playwright with Python.
Step 1: Installing Prerequisites
- Any proficient Python IDE. Here, we are utilizing VS Code.
- Download the lat versestion of Python on Python’s official website.
Step 2: Installing Playwright for Python
- To create end-to-end tests, Playwright advises utilizing the official Playwright Pytest plugin. It offers context isolation and runs out of the box on various browser setups.
- Alternatively, you can use your favorite test runner and the library to write the testing infrastructure manually.
- Although the async version of Playwright is also available through the library, the Pytest plugin uses the sync version.
pip install pytest-playwrightAdditionally, to set up the Playwright WebKit
playwright installPlaywright’s built-in WebKit is installed using the command mentioned above. This gives you the ability to test for several web browsers.
Step 3: Setting up the Project
- First, make a new folder on your computer.
- Name your folder. ( for example: playwright_tutorial)
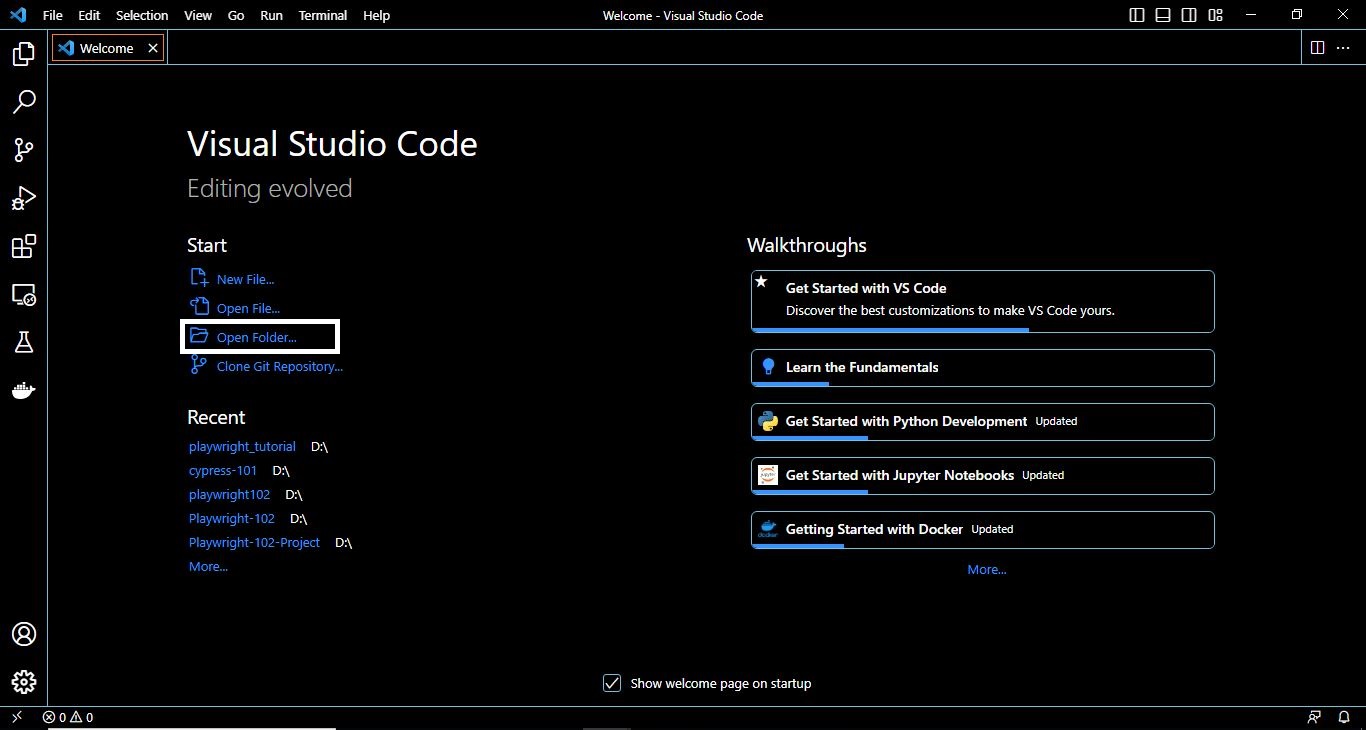
- Open the folder you previously created in your IDE.
Playwright Locators and Selectors
Selectors are used to make locators. It explains how to find any element on the page.
Numerous selectors and ways are supported by Playwright, including the Text Selector, XPath Selector, CSS Selector, etc.
Examples of Selectors
Text Selector
text=Sign InCSS Selector
#signinXPath Selector
//a[@id='signin']Locators show how to find an element or elements. These are utilized to carry out operations on elements via various methods, including click(), fill(), type(), etc. The primary component of the Playwright’s auto-waiting and retry-ability is its locators.
Syntax
page.locator(selector[, options])
The selector is the one we mentioned earlier and the option has different values that can be has, hastext, etc.
Playwright Python Example: Implementing E2E testing
On BrowserStack Demo Website, we are automating two test scenarios to show Playwright Python for end-to-end testing. The following are the scenarios for this Playwright tutorial:
Scenario-1 (User Login)
- The user launches the BrowserStack e-commerce Demo website.
- The user clicks on the Sign In button.
- The user enters the Username & Password.
- The user clicks on Log In button.
- Verify the user has successfully logged in.
Test Script
Add a new Python file to the project, first. ( for example, test_scenarios.py)

import pytest
from playwright.sync_api import Page, expect


def test_login(page:Page):
#launch browserstack demo
page.goto("https://bstackdemo.com/")
#click on sign button
page.click('#signin')
#select Username
page.get_by_text("Select Username").click()
page.locator("#react-select-2-option-0-0").click()
#select Password
page.get_by_text("Select Password").click()
page.locator("#react-select-3-option-0-0").click()
#click login
page.get_by_role("button", name="Log In").click()
#verify user have logged in
assert page.get_by_text("demouser").is_visible()
Our test script is complete for this scenario, and we can easily run it using below command:
pytestScenario-2 (Item Purchase)
- The user launches the BrowserStack e-commerce Demo website.
- The user added iPhone 11 to the cart.
- The user clicks on the checkout.
- User Logs In.
- The user enters their shipping information and hits “Submit.”
- Verify the order is successfully placed.
Test Script
import pytest
from playwright.sync_api import Page, expect


def test_item_purchase(page:Page):
page.goto("https://bstackdemo.com/")
#add to cart
page.locator("[id=\"\\35 \"]").get_by_text("Add to cart").click()
#checkout
page.get_by_text("Checkout").click()
#login
page.type("#react-select-2-input", "demouser\n")
page.type("#react-select-3-input", "testingisfun99\n")
page.get_by_role("button", name="Log In").click()
#fill shipping address
page.get_by_label("First Name").fill("Test")
page.get_by_label("Last Name").fill("Test")
page.get_by_label("Address").fill("Test address")
page.get_by_label("State/Province").fill("Test State")
page.get_by_label("Postal Code").fill("123456")
#click submit
page.locator("#checkout-shipping-continue").click()
#verify success message
page.wait_for_timeout(1000)
assert page.locator("#confirmation-message").is_visible()
Implementing Parallel Testing with Playwright Python
End-to-end testing for several browsers at once makes it easier to identify problems quickly and move on to other tasks. For testing efficiency, we shall keep the same browser setups throughout the simultaneous test.
You can emulate a cloud server instance where you can run your test cases concurrently on different cloud host machines by running them in parallel. This allows you to determine whether your app functions properly across various integration contexts.
You can run parallel tests across all browsers using Playwright. It has many capabilities supported by BrowserStack, like resiliency, auto-wait, recording test traces, and others. All you have to do is include the appropriate BrowserStack capabilities in your existing test scripts.
Let’s demonstrate how to run the test mentioned above scripts on BrowserStack:
import json
import urllib
import subprocess
import pytest
from playwright.sync_api import sync_playwright


desired_cap = {
'browser': 'chrome',
'browser_version': 'latest',
'os': 'osx',
'os_version': 'catalina',
'name': 'BrowserStack Demo',
'build': 'playwright-python-tutorial',
'browserstack.username': 'BROWSERSTACK_USERNAME',
'browserstack.accessKey': 'BROWSERSTACK_ACCESS_KEY'
}


clientPlaywrightVersion = str(subprocess.getoutput('playwright --version')).strip().split(" ")[1]
desired_cap['client.playwrightVersion'] = clientPlaywrightVersion


@pytest.mark.login
def test_login(playwright):
desired_cap['browser'] = "edge"
desired_cap['name'] = "Test Login"
cdpUrl = 'wss://cdp.browserstack.com/playwright?caps=' + urllib.parse.quote(json.dumps(desired_cap))
browser = playwright.chromium.connect(cdpUrl)
page = browser.new_page()
try:
page.goto("https://bstackdemo.com/")
page.click('#signin')
page.get_by_text("Select Username").click()
page.locator("#react-select-2-option-0-0").click()
page.get_by_text("Select Password").click()
page.locator("#react-select-3-option-0-0").click()
page.get_by_role("button", name="Log In").click()
if page.get_by_text("demouser").is_visible():
mark_test_status("passed", "User successfull logged in", page)
else:
mark_test_status("failed", "User log in failure", page)
except Exception as err:
mark_test_status("failed", str(err), page)
browser.close()


def mark_test_status(status, reason, page):
page.evaluate("_ => {}", "browserstack_executor: {\"action\": \"setSessionStatus\", \"arguments\": {\"status\":\""+ status + "\", \"reason\": \"" + reason + "\"}}");


with sync_playwright() as playwright:
test_login(playwright)


@pytest.mark.item_purchase
def test_item_purchase(playwright):
desired_cap['browser'] = "chrome"
desired_cap['name'] = "Test Item Purchase"
cdpUrl = 'wss://cdp.browserstack.com/playwright?caps=' + urllib.parse.quote(json.dumps(desired_cap))
browser = playwright.chromium.connect(cdpUrl)
page = browser.new_page()
try:
page.goto("https://bstackdemo.com/")
page.locator("[id=\"\\35 \"]").get_by_text("Add to cart").click()
page.get_by_text("Checkout").click()
page.type("#react-select-2-input", "demouser\n")
page.type("#react-select-3-input", "testingisfun99\n")
page.get_by_role("button", name="Log In").click()
page.get_by_label("First Name").fill("Test")
page.get_by_label("Last Name").fill("Test")
page.get_by_label("Address").fill("Test address")
page.get_by_label("State/Province").fill("Test State")
page.get_by_label("Postal Code").fill("123456")
page.locator("#checkout-shipping-continue").click()
page.wait_for_timeout(1000)
if page.locator("#confirmation-message").is_visible():
mark_test_status("passed", "Order placed successfully", page)
else:
mark_test_status("failed", "Order not placed", page)
except Exception as err:
mark_test_status("failed", str(err), page)
browser.close()


def mark_test_status(status, reason, page):
page.evaluate("_ => {}", "browserstack_executor: {\"action\": \"setSessionStatus\", \"arguments\": {\"status\":\""+ status + "\", \"reason\": \"" + reason + "\"}}");


with sync_playwright() as playwright:
test_item_purchase(playwright)
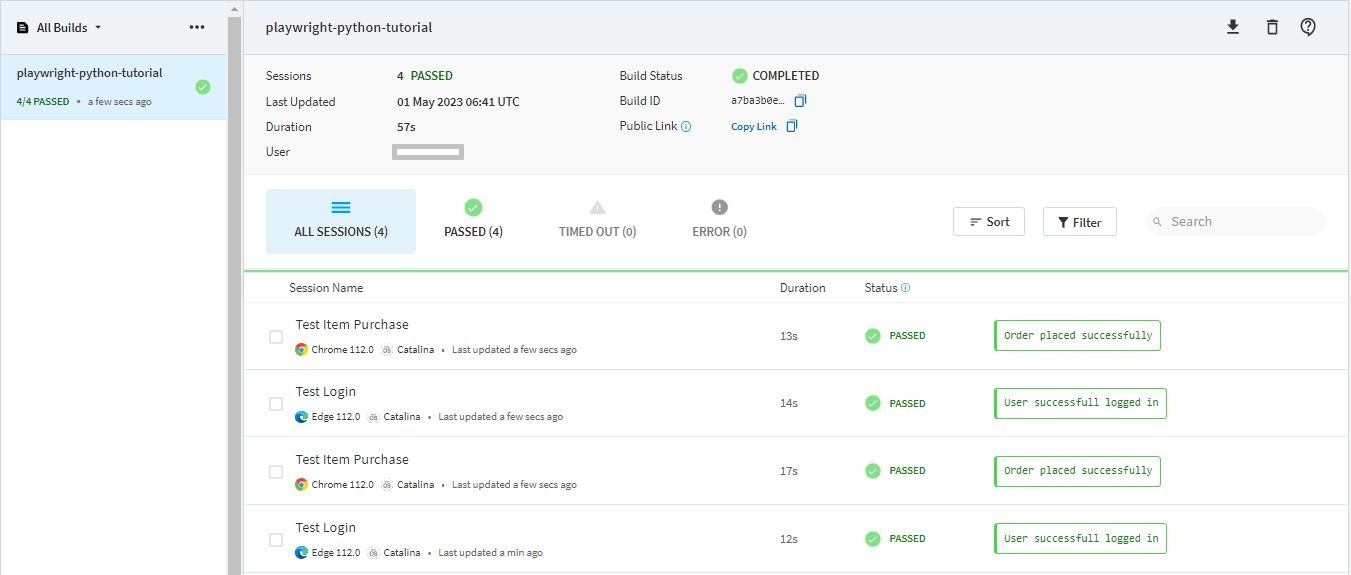
In the scenario above, two different test cases are being run on two different browsers. The test results can be viewed on the BrowserStack Automate Dashboard.
Conclusion
Due to its support for numerous browsers and streamlined API, the Python Playwright module is a fantastic option for scripting tests involving web automation. This article functions as in-depth guide for Playwright Python, along with examples. Additionally teams can execute it in parallel using BrowserStack, which makes testing 10X faster.

