DevOps is a design philosophy that merges Development and Operations utilizing a set of tools and practices. It bridges the gap between the development and operations teams and allows faster delivery while maintaining software quality.
Unlike traditional models where teams work in silos, DevOps integrates processes to avoid inefficiencies and errors. At its core is the DevOps pipeline, a streamlined workflow that ensures continuous delivery.
Overview
Benefits of DevOps Pipeline:
- Faster Software Delivery
- Improved Collaboration
- Early Bug Detection
- Higher Deployment Frequency
- Better Quality and Stability
- Reduced Manual Errors
- Continuous Feedback
- Scalability
- Enhanced Security
- Greater Efficiency
Stages of a DevOps Pipeline:
- Plan
- Develop
- Build
- Test
- Deploy
- Monitor
Steps to set up a DevOps Pipeline:
- Set up a CI/CD process
- Select the Control Environment
- Create a Build Server
- Set up tools for a robust test strategy
- Deploy Code to Production
This article explores what a DevOps pipeline is and how to build one effectively.
What is DevOps Pipeline?
A DevOps pipeline refers to the set of practices and tools that allows for greater cohesiveness between developers and IT Operations personnel in working together to build and deploy code onto a production environment.
Though different organizations have different pipeline variations, it usually includes some form of automated build integration to the codebase, some automation tests for validation and reporting, and maybe even some manual intervention gates to sanitize the codebase before the production release.
Also Read: What is the ultimate goal of DevOps?
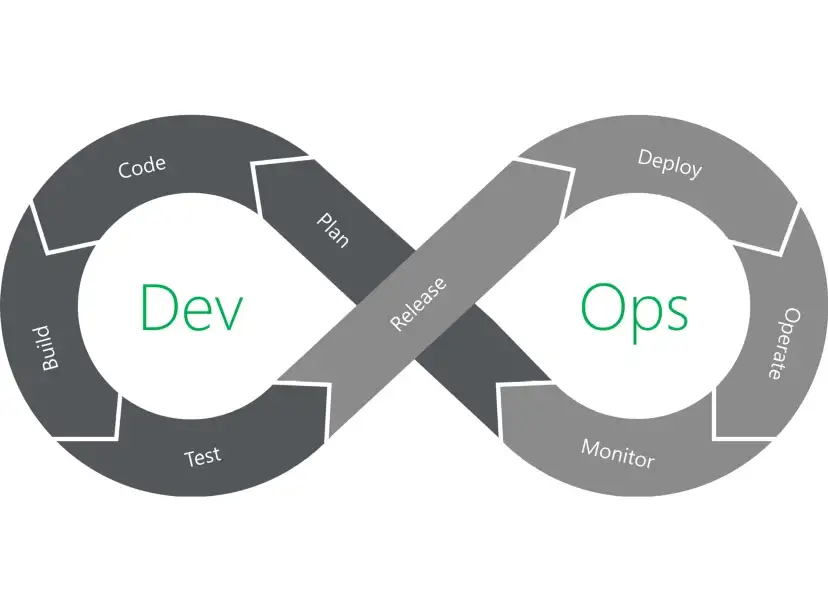
A common representation of this pipeline has six components, as shown below, divided into Dev and Ops phases
The primary focus of this pipeline is to let the entire team to be more organized and focused on the software development aspect.
An excellent way to imagine the pipeline would be to consider a car factory assembly line – instead of a unidirectional pipe, the “pipeline” represents a continuous cycle. Before a car is released, it passes through various tooling, machining, and assembly stages. The chassis is built; the motor, wheels, doors, etc., are added onto it, and then a paint job finishes the process. After every stage, a check is done to see if the assembly is going according to plan.
A DevOps process works in a similar fashion, with code being written and undergoing some basic coverage tests. Then it is tested against the functional and non-functional requirements to adjudicate its suitability before being accepted as ready for wider distribution. Thus, it can be seen as a continuous chain of build, test, and deployment.
Read more: How to fit QA into a DevOps setup
Benefits of Using a DevOps Pipeline
The traditional software development models encouraged the use of development, testing, and deployment silos in order to make the entire operation inflexible and non-responsive to quick changes. DevOps, on the other hand, seeks to make the entire process more AGILE by continuously testing, integrating, and deploying code units and implementing a continuous feedback cycle that allows for quick fixes.
- Faster Software Delivery: Automates workflows for quicker releases.
- Improved Collaboration: Bridges the gap between development and operations teams.
- Early Bug Detection: Continuous testing helps catch issues early.
- Higher Deployment Frequency: Enables frequent, reliable updates.
- Better Quality and Stability: Automated checks ensure consistent code quality.
- Reduced Manual Errors: Automation minimizes human intervention and mistakes.
- Continuous Feedback: Real-time insights for faster improvements.
- Scalability: Easily adapts to growing project demands.
- Enhanced Security: Integrates security checks throughout the pipeline (DevSecOps).
- Greater Efficiency: Streamlines processes, saving time and resources.
Considerations for building a DevOps pipeline
A DevOps pipeline varies by organization, influenced by factors like technology stack, budget, and engineer expertise. DevOps engineers need broad skills in development, operations, infrastructure, and toolchains to design an efficient pipeline.
Decisions depend on the tech stack. For example, Node.js projects may require optimizing npm installs, while containerized applications need a strategy for container registry usage and image builds.
A typical DevOps pipeline follows these stages:
- Commit
- Build
- Unit Tests
- Merge
- Integration Tests
- Staging
- Regression Tests
- Deploy
Each stage is validated before progressing, ensuring stability and fast feedback loops for continuous improvement
Key considerations include:
- Version Control & Code Integration: Efficient branching strategies and automated merging.
- Build & Artifact Management: Optimizing dependencies, managing container images, and ensuring reproducibility.
- Automated Testing: Incorporating unit, integration, and regression tests to catch issues early.
- Continuous Deployment: Managing environments, rollback strategies, and release automation.
- Security & Compliance: Embedding security checks (DevSecOps) to ensure compliance at every stage.
- Monitoring & Feedback: Real-time tracking of performance, failures, and user impact.
The Components of a DevOps Pipeline
While the actual DevOps pipeline components might vary from team to team, the below stages are usually present in one form or another:
- Plan: It requires the planning of the entire workflow before coding starts. This includes the development roadmap, getting feedback, and conceptualizing the workflow into small tasks
- Develop: This is the coding phase and requires the setting up of uniform code standards
- Build: This ensures that the codebase being built using the pipeline is error-free, and any issues are resolved before the code is pushed to production
- Test: This plans for both automated tests as well as manual tests to ensure code validity
- Deploy: This deals with pushing the code into production once the changes made to the codebase have been validated.
- Monitor: This stage deals with overseeing the infrastructure, systems, and applications that are part of the DevOps pipeline to ensure everything runs smoothly.
Must Read: How to build an effective CI CD pipeline
How to Build a DevOps Pipeline
Now that the basics of what a DevOps pipeline is, have been clarified. It is time to understand how to build a DevOps pipeline.
Though different companies have different ways of implementing DevOps pipelines, there are 5 critical steps that are omnipresent in all of these variations.
Step 1. Set up a CI/CD process
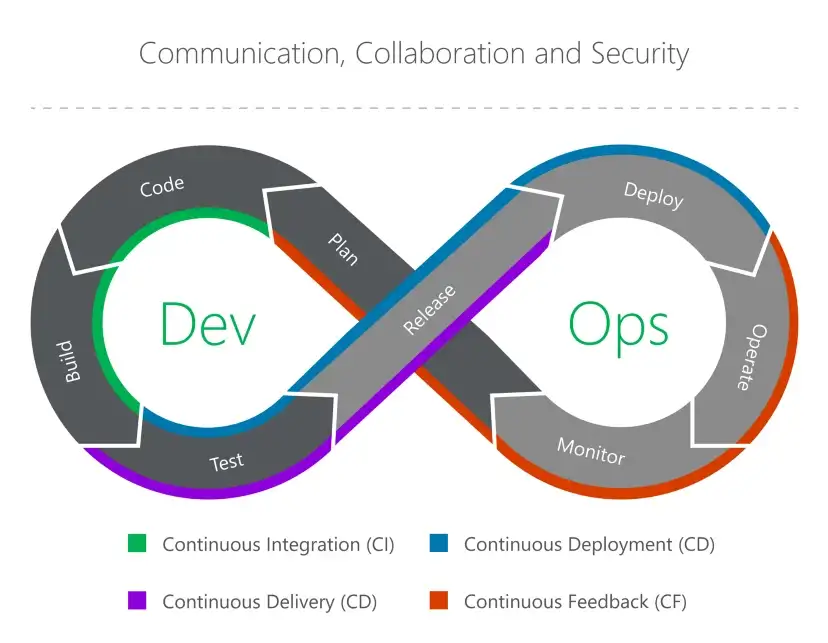
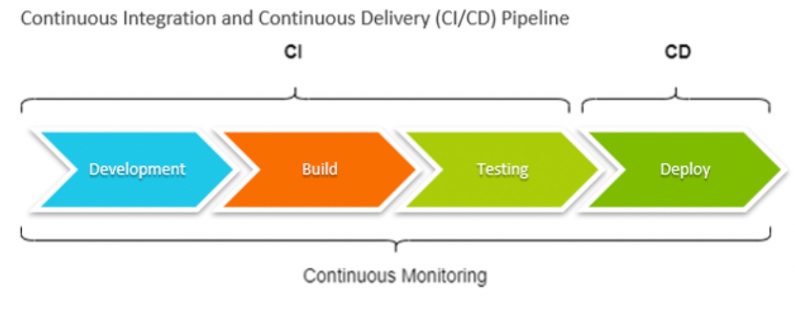
The most important step of the pipeline is to get a CI/CD process up and running. CI or Continuous Integration refers to the process where the code is written and committed to a repository after running past a battery of tests to ensure its usability and suitability. The benefits of CI include ease of code integration, increasing productivity, and speeding product velocity.
CD or Continuous Deployment refers to the process of incorporating code changes after receiving feedback to make sure that the code is tested and ready for deployment in the production environment. Sometimes there is a need for manual approval to deploy the codebase to production.
Many tools in the market currently allow the smooth creation of a Continuous deployment and continuous integration with Jenkins, Bamboo, GitLab, etc. being some front runners.
Pro Tip: Browserstack offers easy integration with Jenkins, Bamboo, Travis CI, and a host of other CI tools to help integrate and run the test suite from a Jenkins CI server or other CI Server on the BrowserStack device cloud.
The typical construction of a CI/CD pipeline requires the following steps –
- Code: The code commit is pushed to the repo
- Build: The build function is triggered, and the code is deployed to a test environment
- Test: Automated tests are executed
- Deploy: Code is deployed to the staging environment or production as deemed fit.
Step 2. Select the Control Environment
Development teams need a sandbox or control environment to store, share, versionize, and test their code to prevent merge conflicts with the main codebase. Git is very popular for this purpose, and other tools include GitLab and BitBucket.
Step 3. Create a Build Server
The CI Server or the Build Server acts as a stable and centralized environment for distributed software development. The servers allow integration points for developers and help retrieve and roll back integrated code commits from the main repo. It offers a clean environment to allow the code to be tested for compliance with functional and non-functional requirements. Jenkins and Travis CI are good options for this purpose.
Step 4. Set up tools for a robust test strategy
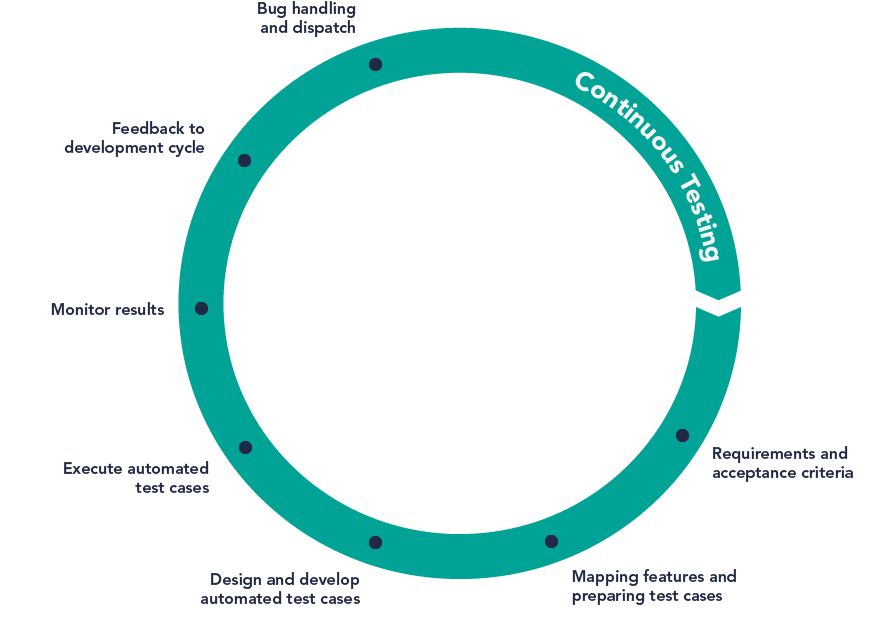
Different organizations have different DevOps test strategies, but they all focus around three pillars
The most effective manner of setting up a DevOps Test strategy is to implement one that allows tests to “fail fast.” This allows defects to be identified as close to the source as possible and prevent them from impacting other components later on in the pipeline. This also allows the isolation of the defect in terms of its context, and it requires less time to understand where things went wrong.
Continuous testing can be achieved through extensive automation as this allows any piece of code to be verified as production ready at any stage of the pipeline. It does not require human intervention and delivers more reliable results at speed.
Test frameworks like Selenium, Cypress, Appium, etc. can all help speed up the process of test execution, and ground-breaking tools like Percy by Browserstack allows for test automation in traditionally manual fields like Visual Testing.
BrowserStack Automate supports the running of Selenium, Appium, and Cypress tests using multiple frameworks across 3500+ real browsers and devices.
All of this can be speeded up by the introduction of Parallel Testing. Parallel testing allows teams the execution of automated tests against different configurations at the same time to reduce downtime and handle budget constraints while allowing for increased test coverage and ensuring quality.
This allows for an overall faster product release cycle and allows manual testers to focus more on exploratory tests and critical business aspects of the test strategy.
Step 5. Deploying Code to Production
Once the DevOps pipeline has finished building the codebase from the disparate commits and testing the code for efficiency, the codebase needs to be pushed to production. The best options in these cases are pipeline tools like Azure DevOps that work on the cloud and allow a centralized system to build and test the code, integrate with different repository tools, customize the code environment, and deploy the code to multiple targets.
Pro Tip: BrowserStack Automate allows the execution of Selenium as well as Appium tests on Azure DevOps in a few simple steps. It allows for continuous testing, build, and deployment of code and helps mitigate errors before they entire production. This entire service is based on the cloud and offers access to 3500+ devices.
Best Practices for Building a DevOps Pipeline
While implementing the DevOps pipeline it is important to keep some best practices in mind :
- Automate all tests as much as possible to save time and increase throughput
- The correct CI/CD tools need to be integrated into the pipeline as per the business requirements to get the maximum benefit
- The entire codebase must be tested using a combination of manual or automated tests.
- There should be different environments for QA, staging, and production to prevent spillover of issues and mitigating of potential issues before code deployment.
- The DevOps pipeline should be optimized to have as low a Time To Value as possible in order to speed up product release velocity
- Ensure collaboration between teams as much as possible to allow everyone to be on the same page and prevent conflicts.
Read more: Manual Testing vs Automation Testing
Examples of DevOps Pipeline Configurations
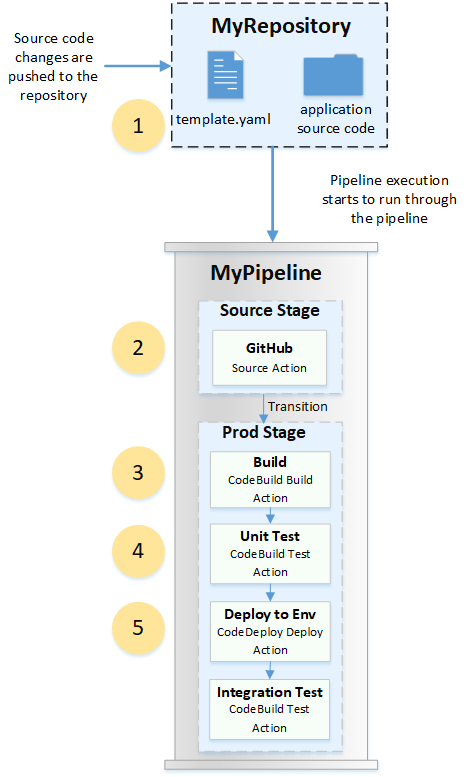
Though there are many kinds of DevOps pipelines, a simple two-stage pipeline from the AWS CodePipeline has been discussed here to allow for a better understanding of how a DevOps pipeline is constructed in reality.
The first stage is called Source, and the second is called Prod. The pipeline works as follows:
- A Developer pushes a fix into a web app’s index page, and then the source code is collected in the project repository. The pipeline detects the change performed and then starts the execution at the Source Stage. The code repository (in this case, GitHub) creates the Output artifacts, viz. The application files serve as Input artifacts for the subsequent Prod stage
- The pipeline has now moved into the Prod Stage, and a project build is created and configured as the build action. This action builds an environment image in a virtual container.
- The next stage focuses on unit testing of the code build and executes the test action.
- The final stage is of the tested code being worked on by a Deploy Action, which deploys the code to the production environment. An integration test is run subsequently that allows a check on the integration of this snippet with the rest of the codebase and ensures that nothing is broken as a result of the push.
Strategies for Maintaining and Improving the Performance of your Pipeline
Organisations implementing DevOps monitor their pipeline to drive efficiency across the entire process using a number of metrics:
- Test Pass Rate: Which is a ratio between passed test cases to the total test cases in the test stage. The lower this metric, the better.
- Number of bugs encountered
- Defect Escape Rate: This deals with the number of issues identified after the code has been pushed to production as opposed to before. The lower this metric, the better.
- Number of Code branches: This is a count of the feature components being introduced to the dev project.
- Deployment Frequency: This is a measure of the throughput of the pipeline.
- Deployment Size: This measures the efficiency of the pipeline in pushing large chunks of code in an efficient manner.
- Deployment Success: This measures the downtime/outages and any other performance issues.
- Mean Time to Failure/Repair/Diagnose: These metrics help to quantify the risk of potential pipeline failures. It is necessary to minimize this in order to have a healthy performance.
- Time to Value: Time taken to build and release the software to production. This metric ensures that the work done starts to generate value. It must be minimized as much as possible in order to increase the benefits of using DevOps.
Since the DevOps pipeline has many moving parts, it is important to keep an eye out for these metrics as they affect different parts of the system and together present a holistic overview of its function.
Why Choose BrowserStack as part of Continuous Testing in DevOps?
Integrating BrowserStack into your DevOps continuous testing framework offers several advantages:
- Real Device Cloud: Conduct tests on a vast array of actual devices and browsers, ensuring your application performs optimally across different environments.
- Supports Automated and Manual Testing: BrowserStack provides exclusive testing tools for both automated testing and manual testing across web and mobile apps.
- Seamless CI/CD Integration: BrowserStack integrates effortlessly with popular CI tools like Jenkins, GitLab CI/CD, and Azure DevOps, enabling automated testing within your existing pipelines.
- Accelerated Release Cycles: By automating tests across multiple platforms simultaneously, BrowserStack helps identify issues early, facilitating faster and more reliable software releases.
- Enhanced Collaboration: Teams can access test results in real-time, promoting better communication and quicker resolution of defects.
Conclusion
The DevOps pipeline is the foundation of modern software delivery. It enables teams to automate, streamline, and accelerate every phase of development. By adopting a well-structured DevOps pipeline, organizations can ensure faster releases, better collaboration, and high-quality software that meets user expectations.
Integrate BrowserStack into your DevOps pipeline to achieve seamless automated and manual testing for web and mobile apps. With real device testing, CI/CD integrations, and robust debugging tools, BrowserStack ensures your releases are fast, reliable, and error-free.


