In mobile test automation, structuring code for scalability and easy maintenance is as important as running the tests themselves. This is where the Page Object Model (POM) and Page Factory come into play. When applied with Appium, these design patterns simplify test automation by separating test scripts from UI locators, reducing redundancy, and making frameworks more durable.
Overview
What is Page Object Model (POM) in Appium?
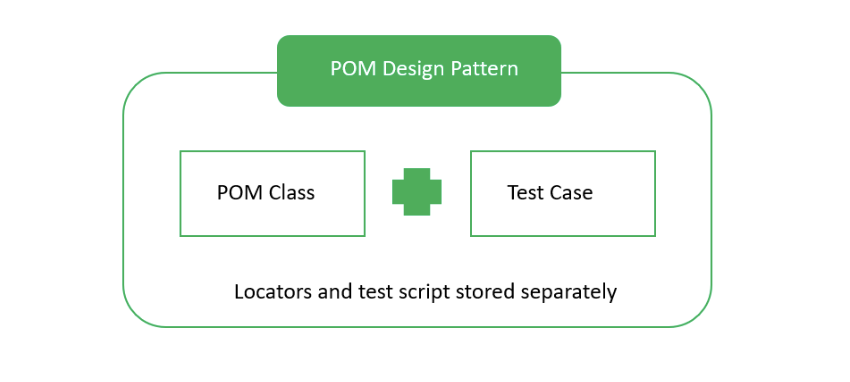
- Design pattern that separates test scripts from UI locators.
- Each page has its own page class containing elements and methods.
- Benefits include:
- Cleaner test code and easier maintenance.
- Single repository for all page-level actions.
- High reusability and readability in multi-page mobile apps.
What is Page Factory in Appium?
- An optimized implementation of POM.
- Uses @FindBy annotations to initialize elements dynamically.
- Supports AjaxElementLocatorFactory for lazy loading of WebElements.
- Frequently integrated with frameworks like BDD, Data-Driven, and Keyword-Driven testing.
How to Implement Page Object Model in Appium
- Setup Desired Capabilities: Define app path, device, OS version, and BrowserStack credentials.
- Driver Class: Instantiate Appium driver objects for Android or iOS.
- Page Classes: Example → LoginPage class with fields (username, password, login button) and methods (validate login, test invalid credentials).
- Test Classes: Call page methods (e.g., LoginTests) to validate login flows.
- Update only the page class when UI changes, instead of rewriting all test cases.
This guide explores how POM and Page Factory work in Appium, their advantages, and how to implement them effectively for robust test automation.
Introduction to Page Object Model
Page Object is a design pattern that has become popular in test automation for enhancing test maintenance and reducing code duplication.

The Page Object Design Pattern provides the following advantages:
- There is a clean separation between test code and page-specific code such as locators.
- There is a single repository for the services or operations offered by the page rather than having these services scattered throughout the tests.
- POM is best applicable for applications that contain multiple pages. Each of which has fields that can be uniquely referenced with respect to the page.
- The Page Object approach makes the automation framework in a testing – programmer friendly, more durable, and comprehensive.
Introduction to Page Factory
Page Factory is an inbuilt and optimized concept of POM (Page Object Model). Page Factory is used in many frameworks like Data Driven, Behavior Driven, Keyword Driven, etc. By integrating POM and Page Factory with the Test Case Model, you focus more on how the code is structured to get the most benefits.
Page Factory initiates the elements to create an object repository with annotations @FindBy. It is an easy way of loading WebElements with AjaxElementLocatorFactory, when they are used in any operation.
Page Object Model Implementation with Appium
Let’s now understand how to implement the Page Object Model with Appium.
Prerequisites: You should know how to execute test cases using Appium Framework. Refer to the guide on Getting started with Appium Tutorial.
Dependencies:
// Maven users can add this dependency to project’s POM
<dependency>
<groupId>io.appium</groupId>
<artifactId>java-client</artifactId>
<version>7.0.0</version>
</dependency>
Core Class for Desired Capabilities-related setup
This class we can use to write core setup-related code, which is common for executing each Appium test case.
package android;
import java.net.URL;
import java.util.List;
import java.util.function.Function;
import java.net.MalformedURLException;
import io.appium.java_client.MobileBy;
import io.appium.java_client.android.AndroidDriver;
import io.appium.java_client.android.AndroidElement;
import org.openqa.selenium.support.ui.ExpectedConditions;
import org.openqa.selenium.support.ui.WebDriverWait;
import org.openqa.selenium.WebDriver;
import org.openqa.selenium.remote.DesiredCapabilities;public class BrowserStackExample {
public static void main(String[] args) throws MalformedURLException, InterruptedException {
DesiredCapabilities caps = new DesiredCapabilities();
// Set your access credentials
caps.setCapability(“browserstack.user”, “your_username”);
caps.setCapability(“browserstack.key”, “your_password”);// Set URL of the application under test
caps.setCapability(“app”, “bs://app_url “);
// Specify device and os_version for testing
caps.setCapability(“device”, “Google Pixel 3”);
caps.setCapability(“os_version”, “9.0”);// Set other BrowserStack capabilities
caps.setCapability(“project”, ” AppiumProject”);
caps.setCapability(“build”, “browserstack-build-1”);
caps.setCapability(“name”, “test_build”);assert(allProductsName.size() > 0);
driver.quit();
}
}
Driver Class
This class instantiates the driver objects.
import io.appium.java_client.android.AndroidDriver;
public class Driver extends DriverclassExample{

protected AndroidDriver driver;

public Driver() {

this.driver = super.getDriver();

}

}
Once you have desired capabilities and the Driver class ready, the next step is creating a page class.
Page Class for Login Page
This is how a page class looks like.
import org.openqa.selenium.WebElement;
import org.openqa.selenium.support.CacheLookup;
import org.openqa.selenium.support.FindBy;
import org.openqa.selenium.support.PageFactory;
import org.testng.Assert;public class LoginPage extends Driver{
PageObjects loginPage;String userName = “”;
String passWord = “”;public LoginPage() {
super();
loginPage = new PageObjects();
PageFactory.initElements(driver, loginPage);
}public boolean validateLoginpage(){
boolean elements = false;
if(loginPage.userNameFld.isDisplayed()){
if(loginPage.passwordField.isDisplayed()){
if(loginPage.checkBox.isDisplayed()){
if(loginPage.loginBtn.isDisplayed()){
elements = true;}
}
}
}else{
elements = false;
}
return elements;}
public boolean testLoginWithoutCredentials() {
boolean loginStatus = false;
loginPage.loginBtn.click();
if (loginPage.inputError.getText().equalsIgnoreCase(“Username is mandatory”)) {
loginStatus = true;
}loginPage.userNameFld.sendKeys(userName);
loginPage.loginBtn.click();
if (loginPage.inputError.getText().equalsIgnoreCase(“Password is mandatory”)) {
loginStatus = true;}
return loginStatus;
}class PageObjects {
@CacheLookup
@FindBy(id = “login_username”)
public WebElement userNameFld;@CacheLookup
@FindBy(id = “login_password”)
public WebElement passwordField;@CacheLookup
@FindBy(id = “btnSignin”)
public WebElement loginBtn;@CacheLookup
@FindBy(name = “Invalid ID or password.”
public WebElement inputError;
@CacheLookup
@FindBy(id = “checkBox”)
public WebElement checkBox;
}
}
Test Case class for writing login page test cases
import org.junit.Test;
public class LoginTests {
@Testpublic void testLogin() {
LoginPage loginPage = new LoginPage();
if(loginPage.validateLoginpage() == true){
loginPage.testLoginWithoutCredentials();
System.out.println(“pass”);} else{
System.out.println(“Validation failed”);
}
}
}
As you can see in the above example, we have created different classes for Page, login and test class. When any change is made to the page object, the entire code need not be changed. You can just modify the page object and re-run the implementation. That’s how it works.
To perform extensive cross-platform testing for mobile apps, you can use cloud-based tools like BrowserStack App Automate which allows you to run Appium tests on 3000+ real devices. Its comprehensive and reliable real device cloud platform allows QAs to access real devices with real operating systems in order to run automated tests via Appium.
To keep up with the demands of fast and reliable testing that spans over various platforms, devices, and versions, Appium mobile testing is indispensable. Preferred throughout the industry, Appium offers feasibility, flexibility, and cost-friendliness above other testing methods, enabling teams to deliver great user experiences within the continuous delivery approach.


