In Selenium, executing the same test with multiple inputs often results in code duplication and maintenance overhead. JUnit Parameterized Tests helps overcome this by dynamically injecting test data, reducing redundancy.
Overview
JUnit Parameterized Tests in Selenium
JUnit Parameterized Tests in Selenium is a testing approach that lets you run the same test multiple times with various sets of input data. This way you can minimize code duplication and streamline tests.
Why Use JUnit Parameterized Tests in Selenium?
- Minimizes Code Duplication
- Maximizes Test CoverageF
- Simplifies Test Maintenance
- Facilitates Data-Driven Testing
- Improves Efficiency
What Are JUnit Parameterized Tests in Selenium?
JUnit Parameterized Tests in Selenium is a testing approach that lets you run the same test multiple times with various sets of input data. This way you can minimize code duplication and streamline tests.
Benefits of JUnit Parameterized Test
To achieve parameterization in Selenium, we can always use spreadsheet / excel files to hold data, read it in the automation script and perform read and write functions. However, loading such huge files to work with a small data set would be time-consuming as it takes considerable time to load while executing Selenium scripts.
JUnit parameterization comes to rescue against this problem, providing various inbuilt argument sources for parameterized tests.
Apart from this key benefit, JUnit Parameterized Test also offers various other advantages like:
- Reduce code duplication: You can write a single test method to manage all variations, instead of writing different test cases for different inputs.
- Maxmize Test Coverage: Facilitates the validation of various input scenarios, edge cases and browser configurations.
- Easy Test Maintanence: Maintenance easier since the changes in test logic has to be updated only once.
- Support for Data-driven testing: Works seamlessly with CSV files, databases and external data sources to drive dynamic test execution.
Also Read: JUnit Annotations with Selenium
How to Run JUnit5 Parameterized Test in Selenium?
JUnit5 Parameterized Test helps to run the same tests multiple times with different arguments/values. They are declared just like the regular @Test method but instead of @Test annotation @ParameterizedTest is used.
All supported argument sources are configured using annotations from the org.junit.jupiter.params.provider package.
Adding JUnit5 Dependencies
If it is a Maven project, we need to add junit-jupiter-params dependency under <dependencies> tag in pom.xml along with junit-jupiter-engine and junit-platform-launcher.
<dependencies>
<dependency>
<groupId>org.seleniumhq.selenium</groupId>
<artifactId>selenium-java</artifactId>
<version>4.3.0</version>
</dependency>

<dependency>
<groupId>io.github.bonigarcia</groupId>
<artifactId>webdrivermanager</artifactId>
<version>5.2.1</version>
</dependency>

<dependency>
<groupId>org.junit.jupiter</groupId>
<artifactId>junit-jupiter-engine</artifactId>
<version>5.9.0</version>
<scope>test</scope>
</dependency>

<dependency>
<groupId>org.junit.platform</groupId>
<artifactId>junit-platform-launcher</artifactId>
<version>1.7.0</version>
<scope>test</scope>
</dependency>

<dependency>
<groupId>org.junit.jupiter</groupId>
<artifactId>junit-jupiter-params</artifactId>
<version>5.9.0</version>
<scope>test</scope>
</dependency>
</dependencies>
Make sure to use Java version 8 or above and add JUnit5 library to the project build path before proceeding with the program.
Four widely used JUnit5 Argument Sources
Here are the four popular JUnit 5 JUnit5 Argument Sources:
- @ValueSource
- @EnumSource
- @CsvSource
- @CsvFileSource
How to write Parameterized Test in JUnit5:
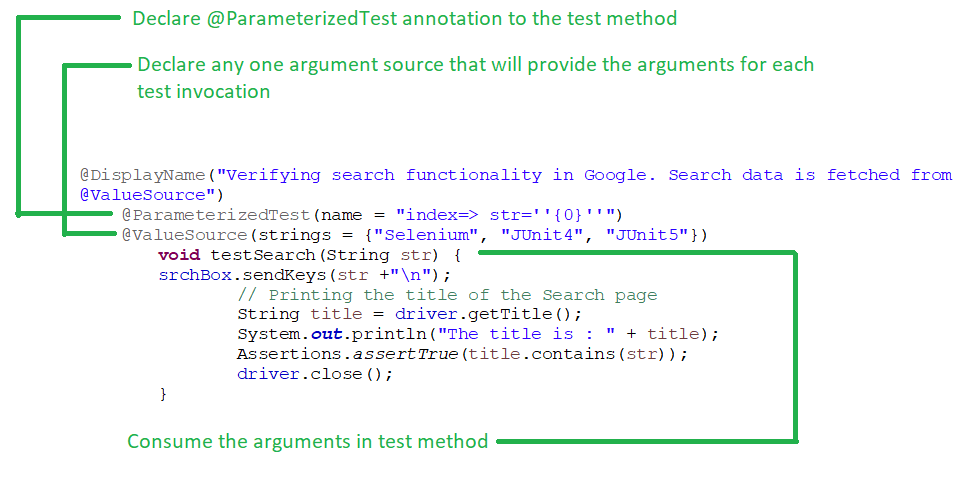
- First declare @ParameterizedTest annotation to the test method.
- Declare any one argument source that will provide the arguments for each test invocation.
- Consume the arguments in test method
Example:
@DisplayName("Verifying search functionality in Google. Search data is fetched from @ValueSource")
@ParameterizedTest(name = "index=> str=''{0}''")
@ValueSource(strings = {"Selenium", "JUnit4", "JUnit5"})
void testSearch(String str) {
srchBox.sendKeys(str +"\n");
// Printing the title of the Search page
String title = driver.getTitle();
System.out.println("The title is : " + title);
Assertions.assertTrue(title.contains(str));
driver.close();
}
@ValueSource
- @ValueSource is the simplest argument source provided by JUnit5 and it is used for simple literal values such as primitives and Strings.
- It is used for providing a single argument per parameterized test invocation.
- We cannot pass null as an argument, even for Strings and class.
- It supports literals like short, byte, int, long, float, double and char.
Let us implement all four argument sources in a Selenium test script to validate search results in Google.
In the below program, 3 values are passed as search data via @ValueSource to the test method testSearch(). Later, it is asserted via the JUnit5 Assertions class that the page title contains the string value passed.
import org.junit.jupiter.api.Assertions;
import org.junit.jupiter.api.BeforeEach;
import org.junit.jupiter.api.DisplayName;
import org.junit.jupiter.params.ParameterizedTest;
import org.junit.jupiter.params.provider.ValueSource;
import org.openqa.selenium.By;
import org.openqa.selenium.WebDriver;
import org.openqa.selenium.WebElement;
import org.openqa.selenium.chrome.ChromeDriver;
import io.github.bonigarcia.wdm.WebDriverManager;
@DisplayName("Pass the method parameters provided by the @ValueSource annotation")
class ValueSourceTest {

WebDriver driver;
WebElement srchBox;

@BeforeEach
public void init() {
WebDriverManager.chromedriver().setup();
driver = new ChromeDriver();
driver.get("https://www.google.com/");
driver.manage().window().maximize();
System.out.println("Search begins now");
//Search string in google
srchBox= driver.findElement(By.cssSelector("input.gLFyf"));
}


@DisplayName("Verifying search functionality in Google. Search data is fetched from @ValueSource")
@ParameterizedTest(name = "index=> str=''{0}''")
@ValueSource(strings = {"Selenium", "JUnit4", "JUnit5"})
void testSearch(String str) {
srchBox.sendKeys(str +"\n");
// Printing the title of the Search page
String title = driver.getTitle();
System.out.println("The title is : " + title);
Assertions.assertTrue(title.contains(str));
driver.close();
}
}
testSearch() method is parametrized with the @ParameterizedTest and @ValueSource annotation.
JUnit5 test runner executes testSearch() method three times, each time assigning different values from the @ValueSource array.
This means Google Chrome will launch three times, and each time it will search with 3 different data and assert it too.
@EnumSource
- To run a test method with different values from an Enumeration we can use @EnumSource.
- The test method will be invoked for each Enum constant at a time.
import org.junit.jupiter.api.Assertions;
import org.junit.jupiter.api.BeforeEach;
import org.junit.jupiter.api.DisplayName;
import org.junit.jupiter.params.ParameterizedTest;
import org.junit.jupiter.params.provider.EnumSource;
import org.openqa.selenium.By;
import org.openqa.selenium.WebDriver;
import org.openqa.selenium.WebElement;
import org.openqa.selenium.chrome.ChromeDriver;

import io.github.bonigarcia.wdm.WebDriverManager;

@DisplayName("Pass the method parameters provided by the @EnumSource annotation")
public class EnumSourceTest {
WebDriver driver;
WebElement srchBox;

enum SearchData{
Selenium, JUnit4, JUnit5;
}

@BeforeEach
public void init() {
WebDriverManager.chromedriver().setup();
driver = new ChromeDriver();
driver.get("https://www.google.com/");
driver.manage().window().maximize();
System.out.println("Search begins now");
//Search in goole
srchBox= driver.findElement(By.cssSelector("input.gLFyf"));
}


@DisplayName("Verifying search functionality in Google. Search data is fetched from @EnumSource")
@ParameterizedTest(name = "index=> data=''{0}''")
@EnumSource(SearchData.class)
void testSearch (Object data) {
srchBox.sendKeys(data +"\n");
// Printing the title of the new page
String title = driver.getTitle();
System.out.println("The title is : " + title);
Assertions.assertTrue(title.equals(data));
driver.close();
}
}
JUnit5 test runner executes testSearch() method three times, each time assigning different values from the @EnumSource array which is enum SearchData
The assertion will fail as we have asserted that the page title is equal to the string value passed which is not true.
Assertions.assertTrue(title.equals(data));
If we want to specify the enum values that are passed to our test method, we can specify the enum values by setting the value of the @EnumSource annotation’s names attribute.
@DisplayName("Verifying search functionality in Google. Search data is fetched from @EnumSource")
@ParameterizedTest(name = "index=> data=''{0}''")
@EnumSource(value=SearchData.class, names = {"JUnit5"})
void testSearch(Object data) {
srchBox.sendKeys(data +"\n");
// Printing the title of the new page
String title = driver.getTitle();
System.out.println("The title is : " + title);
Assertions.assertTrue(title.equals(data));
driver.close();
}
This time JUnit5 test runner will run the testSearch method only once with value as “JUnit5” and ignoring other 2 values.
Also Read: Data Driven Framework in Selenium
@CsvSource
- With @ValueSource and @EnumSource we can pass only a single argument to the test method but there are many scenarios where we wish to pass multiple arguments.
- If we need to pass multiple but limited arguments to the test method, it can be achieved by using @CsvSource.
- We need to configure the test data by using an array of Strings that needs to be comma-separated. An empty, quoted value (”) results in an empty String.
import org.junit.jupiter.api.Assertions;
import org.junit.jupiter.api.BeforeEach;
import org.junit.jupiter.api.DisplayName;
import org.junit.jupiter.params.ParameterizedTest;
import org.junit.jupiter.params.provider.CsvSource;
import org.openqa.selenium.By;
import org.openqa.selenium.WebDriver;
import org.openqa.selenium.WebElement;
import org.openqa.selenium.chrome.ChromeDriver;

import io.github.bonigarcia.wdm.WebDriverManager;

@DisplayName("Pass the method parameters provided by the @CsvSource annotation")
public class CSVSourceTest {
WebDriver driver;
WebElement srchBox;

@BeforeEach
public void init() {
WebDriverManager.chromedriver().setup();
driver = new ChromeDriver();
driver.get("https://www.google.com/");
driver.manage().window().maximize();
System.out.println("Search begins now");
//Search in goole
srchBox= driver.findElement(By.cssSelector("input.gLFyf"));
}

@DisplayName("Verifying search functionality in Google. Search data is fetched from @CsvSource")
@ParameterizedTest(name = "index=> str1=''{0}'', str2=''{1}''")
@CsvSource({
"Selenium, Testing",
"JUnit4, Testing",
"JUnit5, Testing",
})
void testSearch (String str1, String str2) {
srchBox.sendKeys(str1 + str2 +"\n");
// Printing the title of the new page
String title = driver.getTitle();
System.out.println("The title is : " + title);
Assertions.assertTrue(title.contains(str1));
driver.close();
}
}
JUnit5 test runner executes testSearch() method 3 times, each time assigning 2 parameter values from the @CsvSource array.
@CsvFileSource
- @CsvFileSource is similar to @CsvSource except we can read the CSV tokens from a CSV file instead of reading from inline tokens.
- If we need to pass multiple arguments to the test method it won’t look good to place all the data in the test file. Hence, we can use @CsvFileSource for such a large set of data.
- Like @CsvSource, it allows comma-separated values as arguments.
- The argument values from each line must use the same order as the method parameters of our test method.
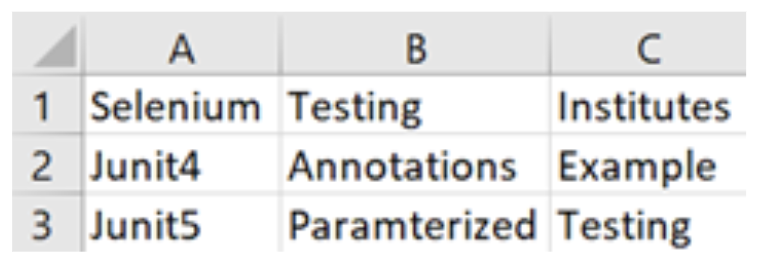
- To use @CsvFileSource argument, let us first create the CSV file and add all the required data.
- Add this file under the “src/test/resources” folder. We can create this folder by right clicking on the project on eclipse/ any java editor, click on New-> Source folder and give name as “src/test/resources”
- Finally, annotate the test method with the @CsvFileSource and configure the location of the CSV File.
import org.junit.jupiter.api.Assertions;
import org.junit.jupiter.api.BeforeEach;
import org.junit.jupiter.api.DisplayName;
import org.junit.jupiter.params.ParameterizedTest;
import org.junit.jupiter.params.provider.CsvFileSource;
import org.openqa.selenium.By;
import org.openqa.selenium.WebDriver;
import org.openqa.selenium.WebElement;
import org.openqa.selenium.chrome.ChromeDriver;
import io.github.bonigarcia.wdm.WebDriverManager;

@DisplayName("Pass the method parameters provided by the @CsvFileSource annotation")
public class CSVFileSourceTest {

WebDriver driver;
WebElement srchBox;

@BeforeEach
public void init() {
WebDriverManager.chromedriver().setup();
driver = new ChromeDriver();
driver.get("https://www.google.com/");
driver.manage().window().maximize();
System.out.println("Search begins now");
//Search in goole
srchBox= driver.findElement(By.cssSelector("input.gLFyf"));
}

@DisplayName("Verifying search functionality in Google. Search data is fetched from @CsvFileSource")
@ParameterizedTest(name = "index=> str1=''{0}'', str2=''{1}'', str3=''{2}''")
@CsvFileSource(resources = "/testdata.csv")
void testSearch(String str1, String str2, String str3) {
srchBox.sendKeys(str1 + str2 +str3+"\n");
// Printing the title of the new page
String title = driver.getTitle();
System.out.println("The title is : " + title);
Assertions.assertTrue(title.contains(str1));
driver.close();
}
}
JUnit5 test runner executes testSearch() method 3 times, each time assigning 3 parameter values from the @CsvFileSource array.
Read More: How to run JUnit 4 test cases in JUnit 5
Best Practices for Using Parameterized Tests in Selenium
Here are some best practices to follow while using parameterized tests in Selenium:
- Use Proper Inputs: Use test inputs that include real-world scenarios, edge cases and boundary value to drive comprehensive testing.
- Organize Test Data: Store test data in external files or use @CsvSource, @CsvFileSource, or @MethodSource to enhance maintainability. It’s best to avoid hardcoding values.
- Readability: Use descriptive method names to show what is being tested. Keep a structured and clear test logic for better readability.
- Avoid Excessive Paramterization: Break the test into smaller test cases if excessive parameters make it difficult to understand.
- Utilize Data-driven Testing: Leverage TestNG’s DataProvider during complex scenarios.
Conclusion
In this article, we have learned what parameterization is and why it is necessary to implement that in any automation framework. We also learned how to create parameterized tests in Selenium script using various JUnit5 argument sources.
Refer to the BrowserStack’s JUnit Repository on GitHub to learn more about executing JUnit 5 Tests on Real devices
With parallel testing also coming into the picture, instead of running tests sequentially, opt for for simultaneous test execution. By running JUnit Tests on cloud Selenium Grid of multiple real browser-device combinations simultaneously, significant time and effort can be reduced.


