Test Automation using JUnit Annotations and Selenium
By Akshay Pai, Community Contributor - February 15, 2023
JUnit is one of the leading frameworks for Java-based applications. In recent times, it has also been used to perform automation testing. Test automation involves writing test cases with JUnit annotations and Selenium Webdriver to simulate user interactions with a website’s UI. This article will demonstrate that using the automation capabilities of Selenium along with JUnit features makes life easier for automation testers.
JUnit Capabilities
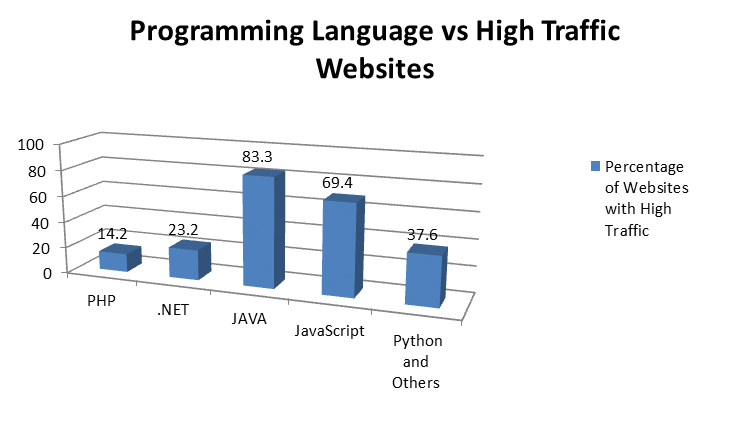
First released in 2002, the JUnit framework was designed to write Java test cases. Java is the most preferred programming language when applications are being built for scale. Research on programming languages used to build high-traffic websites reveals that they are primarily Java-based, as depicted below.
- Since it is used to build scalable platforms, the testing framework should be reliable, feature-rich, and support various testing scenarios.
- JUnit 5 has been released recently, and the framework meets all the necessary criteria to become the go-to tool for automation testing.
- An open-source framework, JUnit provides simple coding structures like annotations, a variety of assertions, and other provisions to build and maintain test cases.
- It also allows the grouping of multiple tests to enable better maintenance of test suites.
Selenium Capabilities
Selenium is an open-source browser automation tool that tests web applications on various browsers. It provides interfaces for developers so that they can emulate user behavior. It also supports various programming languages like PHP, Java, Python, and more.
At 29% market share, Selenium is a leading product for automated website testing. A few reasons for its dominant market share are :
- It has plugins for almost all the popular IDEs, allowing easier adoption.
- It supports various programming languages like Java, Python, .NET, PHP, Ruby, and more.
- Its open-source community has ensured that Selenium users have support for almost all operating systems, providing portability.
- It offers an entire testing suite consisting of a cloud Selenium Grid for distributed testing, a web driver with multi-browser support, and more.
What is JUnit in Selenium?
Through JUnit, developers can run unit tests on each software component before it goes to testers. Tests are run quickly, and failed tests are listed separately for easy debugging.
- Besides manual testing, JUnit is preferred for automation as it can also be used along with the Selenium WebDriver to automate tests for web applications.
- It provides a unique way to write structured, short, and better test cases.
- JUnit uses annotations to create different test scripts for various purposes using several methods.
Follow-up Read: JUnit Testing with Selenium Automation
JUnit Selenium Testing with Annotations
The ideal automation suite comprises a robust testing framework, a leading test automation framework, and a comprehensive set of real devices. Their strengths can be combined to build scalable multi-browser, multi-device test cases that deliver reliability to application development.
- A JUnit test annotation is meta-data that JUnit provides to determine what action should be performed by a method.
- It allows developers to organize, group, and maintain test cases. Selenium allows integration with JUnit.
- To combine the two, one has to write Selenium test code within JUnit test classes.
This Selenium JUnit tutorial delves into JUnit annotations, Selenium test cases, and how they can be combined to achieve automated website testing.
Fundamentals of JUnit Annotations
JUnit annotations are a significant reason for the framework’s popularity. Annotations are fundamental markers that allow the framework to identify a specific task that needs to be executed.
- Many tests can be combined into a single test class using this framework. A
- ll test cases might need a standard initialization procedure to be executed before the test itself.
- There might be some clean-up (closing files, freeing up of resources, etc.) required after running a test. JUnit handles these “requirements” by making use of annotations.
This way, the framework explicitly distinguishes between initialization tasks, the actual tests, and the post-execution tasks.
Let’s explore some of the most common annotations used to write a JUnit test case:
1. @BeforeClass and @AfterClass
The @BeforeClass annotation is run only once and specifically before anything else is run in the test class. This is extremely helpful for JUnit Selenium tests because the program must open a browser before running any of the Selenium tests. So, a method that initializes Selenium Webdriver and opens a browser can be annotated with the @BeforeClass annotation.
AfterClass, as the name might suggest, is the annotation used to execute tasks after all the tests have been completed. For example, @AfterClass will close the browser and free that resource once all tests within the JUnit Selenium test class have been executed.
2. @Before and @After
These two annotations help automation developers write code that executes tasks before each test is run. When writing a Selenium test class, a mandatory step might start the test from a specific web page. In that case, one can use the @Before annotation so that the required webpage is opened and ready before any test is run.
Similarly, @After annotation is used to run tasks after the execution of each test. After every test, the test results might have to be sent to a logging or monitoring service. This can be achieved by using the @After annotation on the task method.
3. @Test
The @Test annotation is used to identify the actual test case. This is required as JUnit allows multiple tests to be grouped under a single test class. The test method is where assertions are done, and the result is determined.
4. @RepeatedTest
Consider the following scenario. A web application is built to ensure caching does not occur due to highly dynamic data. So, the cache must be empty each time the webpage is loaded. To automate the testing of this scenario, one has to run the same sequence multiple times.
With JUnit 5 annotations, the @RepeatedTest annotation was added. This can be used to run a given test any number of times. This annotation takes an integer attribute that tells JUnit to run the test several times.
Attributes to JUnit Annotations
Some JUnit annotations accept parameters called attributes that are used to provide more details to the test being run. Selenium requires these parameters to apply restrictions like timeout, the number of times a test has to be executed, etc. Let’s look at an example and explore some of these annotation attributes.
@Test(timeout=5000)
@RepeatedTest(6)
public void test_search()
{
// code to search something using the search_bar
driver.findElement(By.id("search_bar")).sendKeys("Browserstack automation testing");
driver.findElement(By.name("search_btn")).click();

String first_result = driver.findElementByXPath("/html/body/result").getText();

assertEquals(first_result,”Testing and annotations”);
}
In the code snippet, two annotations @Test and @RepeatedTest being used. Each of them has been passed an attribute. The first annotation @Test has been set with the timeout (in milliseconds) attribute, which tells Selenium to set the timeout to 5 seconds. Similarly, the second annotation @RepeatedTest takes in an integer which tells JUnit to run the test called “test_search” 6 times.
Passing attributes to some annotations is optional, while for others, it’s mandatory. In the example above, the @Test annotation attribute is optional, whereas the attribute to @RepeatedTest is mandatory.
JUnit Selenium Test: A Complete Example using Annotations
Look at a simple automation test that ties up everything discussed so far. This example intends to perform the following actions:
- Submitting some details for the Sign-Up page
- Testing successive page loads and checking if page reload succeeded
import org.junit.After;
import org.junit.Before;
import org.junit.Test;
import org.openqa.selenium.WebDriver;
import org.openqa.selenium.remote.CapabilityType;
import org.openqa.selenium.remote.DesiredCapabilities;
import org.openqa.selenium.remote.RemoteWebDriver;
public class JUnitSeleniumTest {

public static RemoteWebDriver driver = null;
Public static DesiredCapabilities capabilities = null;

@Before
public void initializeSelenium() {
capabilities = new DesiredCapabilities()
capabilities.setCapability("browserName", "chrome");
capabilities.setCapability("version", "70.0");
capabilities.setCapability("platform", "win10");

driver = new RemoteWebDriver(new URL("https://google.com), capabilities);

}

@Test
public void signUp() {
driver.findElement(By.id("Name")).sendKeys("John Doe");
driver.findElement(By.id("Email")).sendKeys("johndoe@testemail.com");
driver.findElement(By.id("City")).sendKeys("Bangalore”);
driver.findElement(By.name("submit_btn")).click();

String result = driver.findElementByXPath("/html/body/response").getText();

assertEquals(result,”Sign-up Successful”);
}

@Test
@RepeatedTest(3)
public void reloadPage() {

driver = new RemoteWebDriver(new URL("https://google.com), capabilities);
assertEquals(homeUrl, "https://google.com/");
}

@AfterClass
public void cleanUp() {

driver.quit(); // close the browser
}
}
Let’s summarize the test class above. The test class consists of two tests, each annotated with @Test. The code starts by initializing Selenium Webdriver and annotating it with @Before on the initializeSelenium() method. This ensures that Selenium capabilities are initialized before running each test.
Run Selenium Tests on Real Device Cloud
Once initialization is complete, the two tests are run one after the other. The method cleanUp() is annotated with @AfterClass. This guarantees that the browser is closed only after both tests are executed entirely.
This Selenium JUnit tutorial covers the essential constructs required to test websites automatically. Both these open-source automation tools are competent and excellent tools for testers to achieve their goals.


