When writing unit tests in Jest, you often need to run the same test logic against multiple sets of data. Instead of duplicating code or looping manually, Jest provides the it.each function — a powerful way to create data-driven tests.
With it.each, you can define a table of inputs and expected outputs, and Jest will automatically generate a separate test case for each row.
Overview
it.each jest function Core Definition
- it.each() allows data-driven, parameterized testing in Jest.
- Runs the same test logic across multiple datasets.
Syntax:
it.each(table)(description, testFunction);
Why it.each jest function Matters?
- Reduces code duplication.
- Improves readability and maintainability.
- Scales easily for large sets of scenarios.
Where it.each jest function Used?
- Validating logic with multiple inputs (math ops, strings, objects).
- Async/Promise testing.
- Error handling and exception testing.
- External data-driven tests (JSON/CSV).
it.each jest function Key Features
- Supports placeholders in test names for clarity.
- Works with primitive data, objects, arrays, and complex JSON.
- Supports async/await and error assertions.
- Can use template literals for structured test tables.
This article describes in detail about it.each(), its usage, benefits, best parctices and more.
Overview of Jest Testing Framework
Jest is a fast, open-source testing library that supports various testing types across the test pyramid. It’s easy to set up with minimal configuration. Jest allows you to write tests in JavaScript and requires Node.js as a prerequisite.
Role of `it()` in Jest tests
In Jest, the it() function defines individual test cases, representing a single unit of code you want to verify. It is an alias for the test() function, so you can use either interchangeably, depending on your preference. Each it() block contains a specific scenario or condition you’re testing, ensuring that your code behaves as expected under certain conditions.
Typically, the it() function is used within the describe() function, which groups related tests into a suite. This structure makes it easier to organize your tests, as the describe() function serves as a container for multiple it() blocks. While it’s common to see it() inside describe(), you can have multiple it() blocks outside of it, depending on your test setup.
What is `it.each()`?
it.each() in Jest is a unique feature that allows one to run the same test multiple times with different data sets. It helps in code re-usability and encourages data-driven testing. The data can be primitive types, objects, arrays, etc.
It also enhances code readability and maintainability by clearly defining individual test cases. The it.each() method is highly scalable, allowing you to add more test scenarios by simply updating the data sets and eliminating the need to repeat code.
Read More: Data-driven testing in Cypress
When to use `it.each()` instead of `it()`
it.each() and it() are built to serve different purposes, it() functions are used to define different types of test cases that may or may not be similar. It.each() is used for writing test cases that use the same logic but with different sets of data. It avoids the redundancy in code and helps in maintaining readability. It.each() takes data from inline parameters or external sources such as JSON, CSV, etc.
Basic Syntax of `it.each()`
it.each() follows different syntax in comparison with it() function.
Syntax
it.each(table)(description, testFunction);
In the above Syntax,
- table: The table represents the test data. It can be an array of arrays or an array of objects
- description: A string or typically a sentence that describes the purpose of the test
- testFunction: A function that contains the logic to test the code by using the data in the table
Example
describe('Addition of Numbers', () => {

  it.each([

    [1, 2, 3],

    [4, 5, 9],

    [5, 6, 11],

  ])('addition validation: %d + %d = %d', (input1, input2, expected) => {

    expect(input1 + input2).toBe(expected);

  });

});
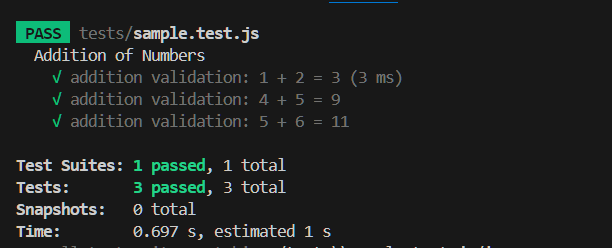
In the above example, the data is parameterized using input1, input2, and expected. These parameters are passed into it.each() method and Jest reads them by referring to the corresponding elements defined in the array.
Each test case is executed with different values, validating the addition operation without the need to write separate test cases for each scenario.
- describe(): describe function is used as a higher level function as a container to it().
- it.each: this function repeats three times while execution as there are three rows in the data array.
- addition validation: This string is a description of the test case and is printed for each test execution. It serves to explain what is being tested, making it easier to understand the results when the tests are run.
- expect(): It validates the actual and expected input and marks the test as pass or fail.
Output
Read More: Understanding testing library Jest DOM
Using Placeholders in `it.each()`
Placeholders in it.each() allows to insertion of the values dynamically in the description. This makes the output more descriptive with actual values. Additionally, if you execute multiple tests that print the same message, the placeholders help to identify the tests uniquely based on the data value.
List of Placeholders in Jest it.each()
- %s: String values
- %d or %i: integer or number values
- %f: floating values
- %o: Object or complex types of data
- %%: Used for % literals
Example Inline array in it.each()
Consider a scenario where you’re testing the length of multiple strings. While the logic for calculating the length remains the same, the string values change.
In such cases, you can use it.each() to define the test as shown below:
describe('String Length Calculation Test', () => {

  it.each([

    ['browser', 7],

    ['stack', 5],

    ['', 0],

    ['test', 4],

    ['automation', 10],

    ['random', 6],

    ['God', 3],

    ['is', 2],

  ])('checks length of string %s', (str, expected) => {

    expect(str.length).toBe(expected);

  });

});
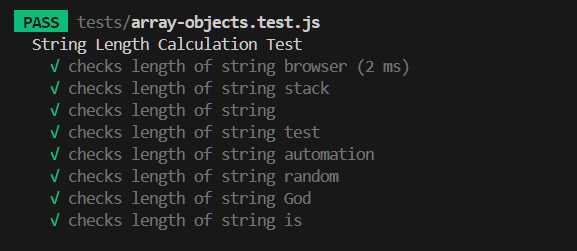
In this example:
- The array contains a list of strings and their expected lengths.
- The first column holds the string, and the second column represents the expected length.
- When the test runs, Jest reads each row from the array and compares the actual string length with the expected value.
- The %s placeholder in the description is replaced with the actual string during the test execution.
This approach simplifies testing multiple cases with varying data while keeping the core logic intact.
Output
Example Inline array of Objects
Jest also allows passing the object as a parameter. The example below shows how an array can be passed as a parameter to it.each() function.
describe('Object Property Access Tests', () => {

  it.each([

    [{ name: 'Ram', age: 30, eligibility:true },'eligibility'],

    [{ name: 'Shankar', age: 25 ,eligibility:true },'eligibility'],

    [{ name: 'Srusti', age: 16 ,eligibility:false },'eligibility'],

    [{ name: 'Keethi',eligibility:false  },'eligibility']

  ])('Checking eligilibity %s', (obj,key) => {

    isEligible = false

    console.log(Number(obj['age']))

    if(Number(obj['age'])>18)

      isEligible = true

    expect(obj[key]).toBe(isEligible);

  });

});
The objective of the above example is to test that the eligibility criteria work as expected. The array contains multiple JSON objects. Each object has a name, age, and eligibility. Here key is the eligibility.
Any element value can be fetched using the obj[‘<property>’] syntax, for example, obj[‘age’] returns the value of the age key.
Output
Parameterized Tests with Multiple Arguments
Jest allows you to easily create parameterized tests with multiple arguments using the it.each() function. You can define an array with any number of columns to validate various conditions. In the following example, age and name validation is performed:
describe('Age and Name Validation Test', () => {

    it.each([

      ['ram', 12, false],

      ['kumar', 16, true],

      ['deva',7, false],

      ['dain1',25, true]

    ])('check for valid age: %s', (name,age, isValidAge) => {

      const validateAge = (age) => age >= 13;

      expect(validateAge(age)).toBe(isValidAge);

      expect(name).not.toMatch(/\d+/)

    });

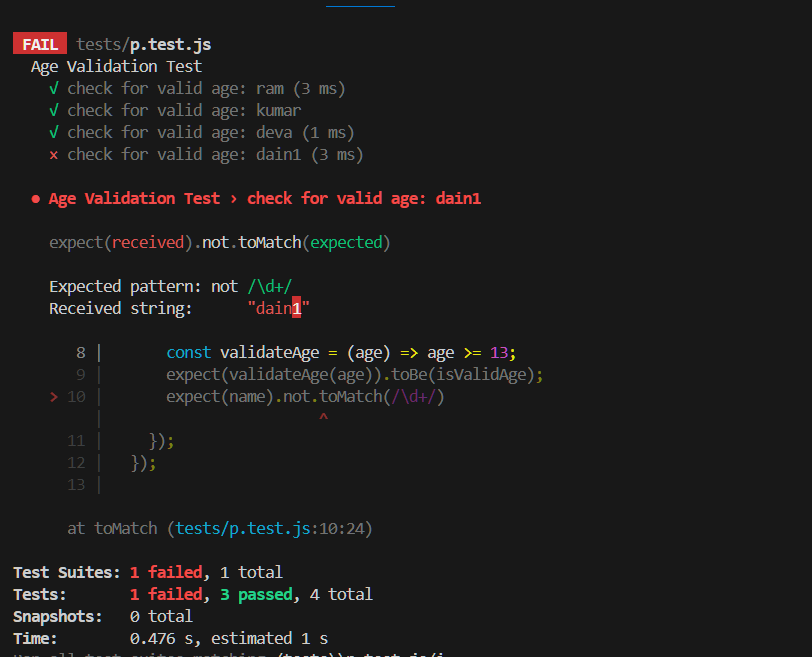
});- Each row in the array contains the name, age, and expected result (isValidAge).
- The validateAge() function checks if the age is greater than or equal to 13.
- The second test ensures that the name doesn’t contain any numbers using a regular expression (/\d+/).
In this example, the last row ([‘dain1’, 25, true]) fails because the name “dain1” contains a number, which violates the name validation rule.
Output:
Handling Complex Data Sets
Jest it.each() function is capable of handling any complex data sets. For example, your object can be in JSON format, and the JSON in turn can contain an array of values with multiple rows. It can be handled easily with Jest it.each() function.
describe('Handling Complex Data Sets', () => {

    it.each([

      [{ employee: { id: 104, name: 'Harman', designation: ['engineer'] } }, 104, 'Harman', true],

      [{ employee: { id: 206, name: 'Cardin', designation: ['lead'] } }, 206, 'Cardin', true],

      [{ employee: { id: 398, name: 'John', designation: ['manager','engineer'] } }, 398, 'John', false],

      [{ employee: { id: 498, name: 'Joseph', designation: [] } }, 498, 'Joseph', true],

      [{ employee: { id: 598, name: 'Jyoyta', designation: ['intern'] } }, 598, 'Jyoyta', true],

    ])('Check for bonus payable to %o', (data, id, expectedName, isBonusPayable) => {

      const employee = data.employee;

      const isEligibleForBonus = !employee.designation.includes('manager');

      expect(employee.id).toBe(id);

      expect(employee.name).toBe(expectedName);

      expect(isEligibleForBonus).toBe(isBonusPayable);

    });

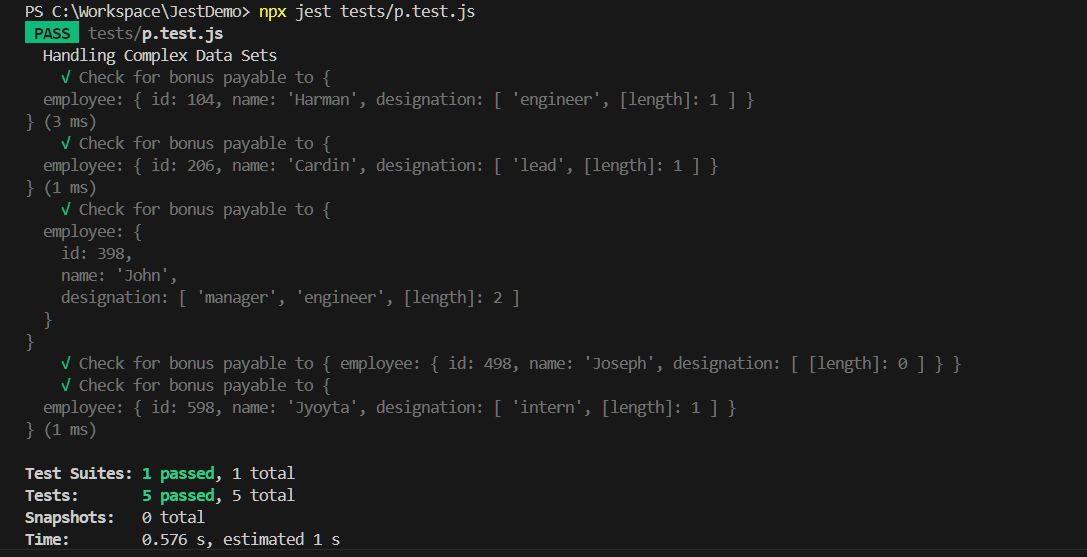
});- Each row contains an employee’s data (ID, name, and designation).
- The test checks if the employee is eligible for a bonus:
- If their designation includes ‘manager‘, they are not eligible for a bonus.
- If the designation excludes ‘manager‘, they are eligible.
- The test verifies the employee’s ID, name, and whether they are eligible for the bonus.
This approach simplifies testing multiple scenarios with complex data, ensuring accurate bonus validation based on an employee’s designation.
Output
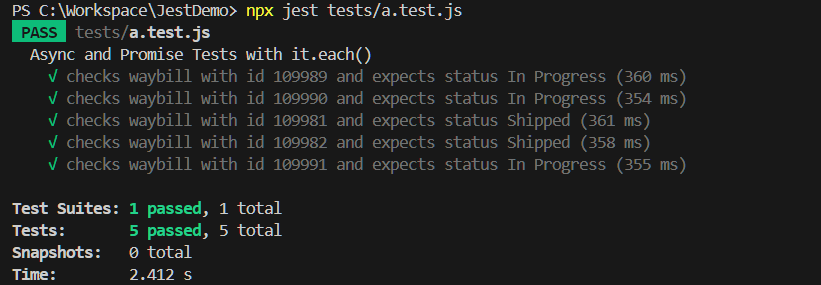
Async and Promise Tests with `it.each()`
Jest supports async and handling promises with await. For example, if your tests invoke an async function that has a promise within it, you may need to wait until the promise is resolved before proceeding to further validation.
In such a scenario you can write asynchronous tests with await.
Example
describe('Async and Promise Tests with it.each()', () => {

    const trackOder = async (waybill) => {

      return new Promise((resolve) => {

        setTimeout(() => {

          oStatus = 'In Progress'

          if(waybill < 109989)

            oStatus = "Shipped"

          resolve({ waybill, status: oStatus });

        }, 350);

      });

    };


    it.each([

      [109989, 'In Progress'],

      [109990, 'In Progress'],

      [109981, 'Shipped'],

      [109982, 'Shipped'],

      [109991, 'In Progress']

    ])('checks waybill with id %d and expects status %s', async (waybill, orderStatus) => {

      const data = await trackOder(waybill);

      expect(data.status).toBe(orderStatus);

    });

});- trackOrder(): This async function simulates retrieving an order’s status based on the waybill number. It returns a promise that resolves after a 350-millisecond delay.
- Promise Handling: The function resolves with either “Shipped” or “In Progress,” depending on the waybill number.
- Asynchronous Test: The test uses await to handle the promise returned by trackOrder(), ensuring that the test waits until the promise resolves before running the assertions.
In this example, multiple waybill IDs are tested using it.each(). The promise returned by trackOrder() is awaited before verifying if the returned status matches the expected value with expect(). This ensures that the async function is fully resolved before proceeding with validation.
Output
Read More: How to debug Jest tests
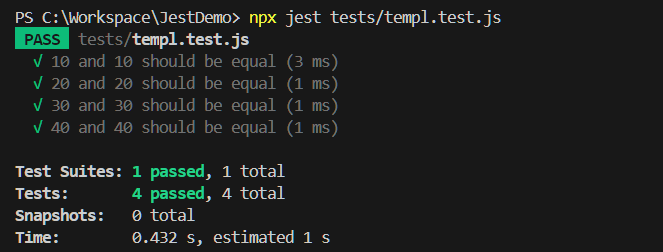
Using Template Literals for Test Descriptions
Jest’s it.each() provides advanced capabilities like template literals, which allow you to define structured test tables with titles. These literals are written using the ${expression} syntax, enabling customized test descriptions based on the data being tested.
Example
test.each`

  height | width

  ${10}  | ${10}

  ${20}  | ${20}

  ${30}  | ${30}

  ${40}  | ${40}

`('$height and $width should be equal', ({ height, width }) => {

    expect(height).toEqual(width)

});- Template Literal Table: A table is defined with height and width titles, and each row contains numbers that are expected to be equal.
- Dynamic Test Descriptions: The test description uses ${height} and ${width}, which are dynamically replaced with actual values during execution. For instance, the description for one of the tests will be “10 and 10 should be equal”.
- Validation: Jest validates each scenario by comparing the height and width values using expect(height).toEqual(width).
When you run the test, each set of height and width values is tested for equality, and the test descriptions are dynamically customized with the actual values from the template literal.
Using template literals simplifies data-driven testing by making test descriptions clearer and more informative based on the data being tested.
Output
Read More: How to configure Jest
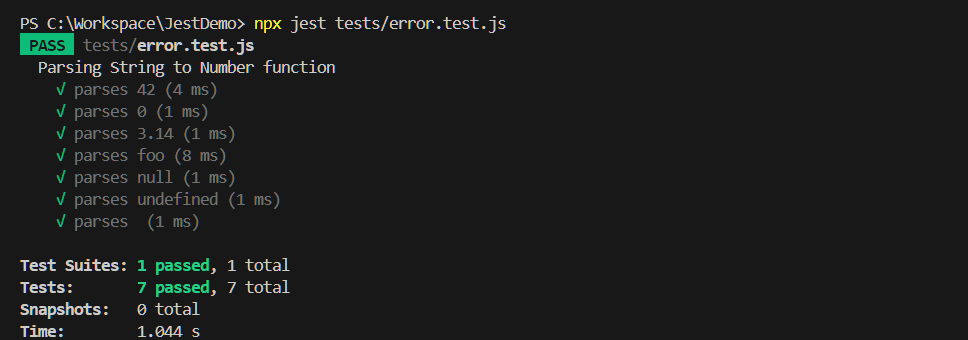
Error Handling in `it.each()`
There are different ways to handle errors in it.each() such as using the if conditions, catching that error as part of assertions, etc. Jest provides .toThrow() function to assert the error, this needs to be chained with expect() function.
Example Code
const numaralParse = (input) => {

    const number = Number(input);

    if (input === '' || input === null) {

        throw new Error('NullOrEmpty parameter');

    }

    if (isNaN(number)) {

        throw new Error('Invalid number');

        debug();

    }

    return number;

};

describe('Parsing String to Number function', () => {

    it.each([

        ['42', 42],

        ['0', 0],

        ['3.14', 3.14],

        ['foo', 'error'],

        [null, 'nullorempty'],

        [undefined, 'error'],

        ['', 'nullorempty']

    ])(

        'parses %s',

        (input, expected) => {

            if (expected === 'error') {

                expect(() => numaralParse(input)).toThrow('Invalid number');

            }

            else if (expected === 'nullorempty') {

                expect(() => numaralParse(input)).toThrow('NullOrEmpty');

            } else {

                expect(numaralParse(input)).toBe(expected);

            }

        }

    );

});
Output
In the above code, the numarlParse() method is used to convert a string representation of a number into a number type. If the input is empty or null, it throws a NullOrEmptyParameterException. If the input is in an invalid format (such as undefined, a non-numeric string, etc.), it throws an InvalidNumberException.
These exceptions can be tested and handled using Jest’s expect() with the toThrow() method. As seen in the code, exceptions are asserted to ensure the correct error is thrown when an invalid input is provided.
Read More: Snapshot testing with Jest
Best Practices for `it.each()`
Here are a few best practices for using it.each() in Jest:
- It.each() is not suitable for all use cases, choose it carefully only when you want to execute the same code against multiple data sets. If the code is different consider using it() function.
- It.each() is best suited when you want to parameterize the tests
- Consider it.each() for better readability and maintenance when you want to run the tests across huge sets of data.
- Use placeholders to make the test name unique in the output
- Use template literals for clear and descriptive tests
- Use external resources such as JSON or CSV to store the test data
- Use the describe() function to group the test cases
Advanced Use Cases – Usage of Test data from external sources
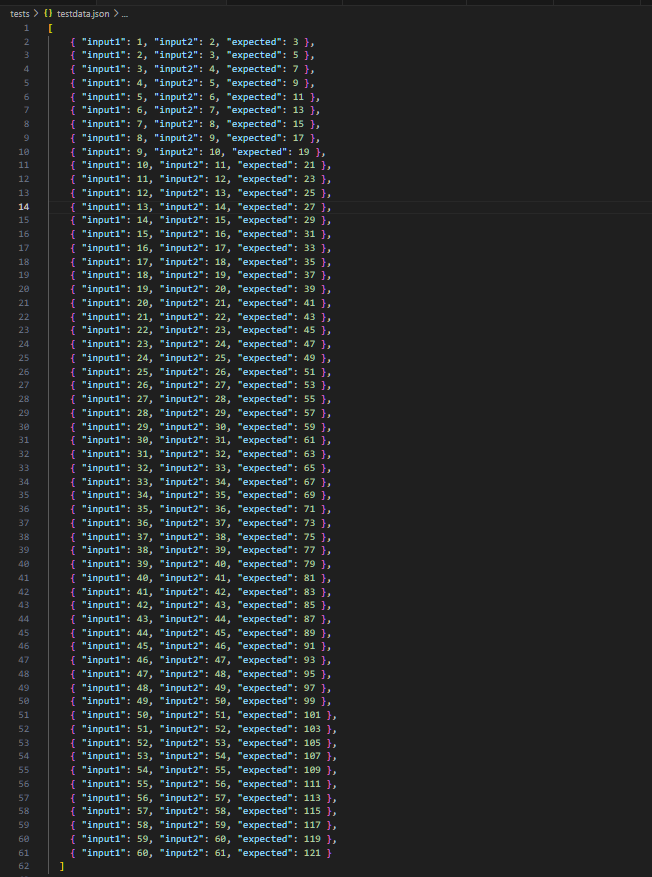
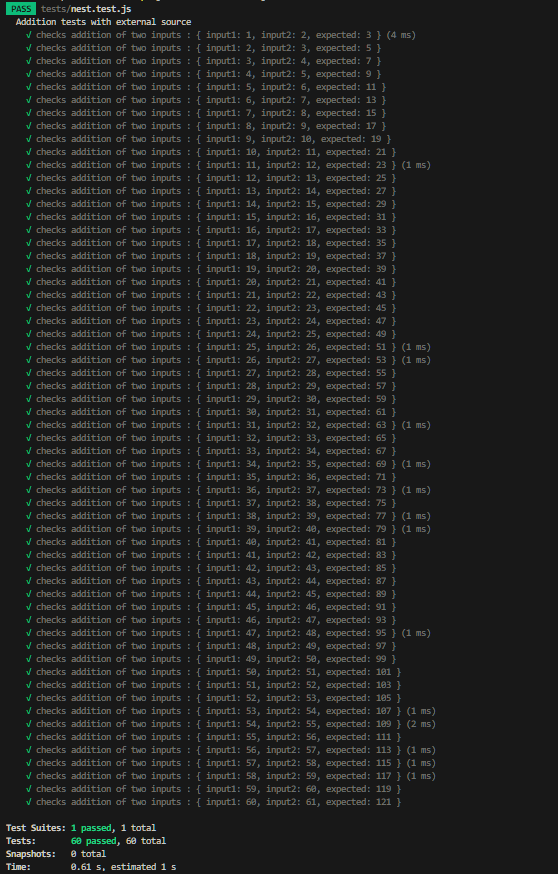
When you have large sets of data having inline data increases the complexity and reduces the readability, additionally maintaining such test cases will be difficult. Jest supports external sources such as .json, .csv, etc. You can consider storing the data in some of those formats.
Consider a simple addition scenario, where you have large sets of data to run the test case against, then you can store them in .json format.
TestData.json file
Example Code
const testdata = require('./testdata.json');

describe('Addition tests with external source', () => {

  it.each(testdata)('checks addition of two inputs : %o', ({input1,input2, expected }) => {

    const result = input1+input2

    expect(result).toBe(expected);

  });

});
In the code, the data is being read from a testdata.json file using require(‘./testdata.json’). This allows you to access the test data for validation. After reading the data, the addition of two numbers is validated in various scenarios using the expect(result).toBe(expected) statement.
Output
Troubleshooting and Debugging
Below are some of the common considerations to avoid mistakes
- Always carefully use the placeholders based on data type
- Avoid incorrectly structured data arrays
- When you use promise, use returns correctly
- Where there is an asynchronous call, use the await
- Use console.log to debug the outputs
Jest also supports debugging using Visual Studio Code. By using the launch.json file, you can configure and dynamically set the breakpoint to debug.
Performance Considerations
Below are the performance considerations while using it.each()
- If you are running huge sets of data, it can impact the performance of your test suite. In such scenarios, you may need to consider running the tests parallelly
- If your tests require pre-setup and post-test activities, then maintain that in beforeAll() and afterAll() functions. This can drastically increase the performance of your test scripts
- Avoid using the console.logs() in your tests
- Avoid performing multiple tasks within single tests, if such scenarios split the tests into multiple tests.
- Breakdown the large tests and always keep the tests simple
- Avoid having large data sets
How to run Jest Tests on BrowserStack with Selenium?
Follow these quick steps to run your Jest tests on BrowserStack’s Selenium Grid with 3,500+ real devices and browsers.
Prerequisites:
- Get your BrowserStack Username and Access Key from your account profile. If you don’t have an account, sign up for a Free Trial.
- Ensure Node.js v12+ is installed on your machine.
Steps to Run Jest Tests:
- Download the Sample Project
- Option 1: Download the project as a ZIP file.
- Option 2: Clone the sample repository from GitHub.
- Configure BrowserStack Credentials
- Open the project and find the browserstack.yml file.
- Add your BrowserStack Username and Access Key to the file.
- Choose Browsers and Devices
- In the same browserstack.yml file, select the browsers and devices you want to test on from BrowserStack’s 3,000+ real devices and browsers.
- Run the Sample Test
- Run the test using the command from the root folder of the project.
- View Test Results
- After running the test, check your results on the BrowserStack Automate Dashboard.
Next Steps:
Once your first test runs successfully, you can integrate your test suite with BrowserStack.
For more details, refer to this documentation for running Jest tests in BrowserStack.
Conclusion
Jest is a powerful and modern testing library with advanced features like it.each(), which simplifies data-driven testing. It supports various types of testing, including end-to-end testing, which often requires validating across multiple browsers, platforms, and devices. Running Jest tests on a cloud platform like BrowserStack ensures scalability and seamless cross-browser testing.
BrowserStack Automate integrates with popular automation frameworks, enabling you to run comprehensive tests effortlessly. You can also integrate your test suite into a CI/CD pipeline for automated testing during deployments, ensuring a smoother development process.
Frequently Asked Questions
1. What is it.each in Jest?
it.each is a Jest function that allows you to run the same test with multiple data sets. It reduces code duplication and increases test coverage by automating repetitive test cases.
2. When should you use it.each?
Use it.each when you need to run the same test case with different data sets, especially when dealing with large numbers of scenarios, like tens or hundreds.
3. What is beforeEach in Jest?
beforeEach is a function in Jest that runs setup code before each test. It reduces code repetition by automatically executing common setup logic before every test case.
4. How do you use assertions in Jest?
Jest uses the expect() function for assertions. You can chain it with methods like .toEqual(), .toBe(), or .toMatch() to compare the actual result with the expected outcome, marking the test as pass or fail.


