Developers prefer Puppeteer for applications that need extensive testing on Chrome. With Puppeteer, they are able to efficiently test, scrape, and interact with web pages programmatically.
Overview
Why use Puppeteer with NPM (Node.js)?
- It automates Chrome/Chromium for web scraping, testing, screenshots, and PDFs.
- Has an easy Setup
- Enables headless browsing without a visible UI, improving speed and efficiency.
- It works seamlessly in Node.js environments.
- Provides cross-platform support on Windows, macOS, and Linux.
- Offers DevTools protocol support
How to Install and Set Up Puppeteer with NPM (Node.js)?
1. Install Puppeteer
- Open the terminal.
- Create a new directory for the project and navigate to it.
- Initialize an npm project.
- Install Puppeteer using npm.
2. Run Your First Puppeteer Test
- Open the project in a code editor.
- Create a new test script file.
- Write a script to launch a browser, open a webpage, take a screenshot, and close the browser.
- Run the script using Node.js.
- The screenshot will be saved in the project directory.
This guide provides step-by-step instructions on how to install and set up Puppeteer with npm(NodeJS).
What is Puppeteer?
Puppeteer is a Node.js library that provides a high-level API to control Chrome or Chromium over the DevTools Protocol. It also provides a powerful headless mode that closely integrates with Chrome’s headless mode.
Use Cases of Puppeteer
You can use Puppeteer for multiple use cases, such as:
- Single browser automation
- Generating screenshots and PDFs of web pages
- Scraping data from web pages
- Injecting JavaScript into web pages
- Controlling the browser’s DevTools
What is NPM?
NPM (Node Package Manager) is the default package manager for Node.js. It is used to install, manage, and share JavaScript packages (also called modules or libraries) that developers use to build applications
Why use Puppeteer with NPM?
Here are the reasons why you must use Puppeteer with NPM:
- Easy Installation & Dependency Management: Puppeteer is best installed via npm because it ensures compatibility with Node.js and automatically downloads the required Chrome/Chromium binaries.
- JavaScript & Node.js Integration: Since Puppeteer is written in JavaScript, it integrates well with Node.js applications.
- Automated Browser Setup: npm install puppeteer installs Puppeteer along with the correct version of Chromium, avoiding compatibility issues.
- Large Community & Support: Puppeteer has strong community support and frequent updates.
Pre-requisites for Setting up Puppeteer
Before you can start running your tests using Puppeteer, you must install certain prerequisites.
- Node.js – As Puppeteer is built on Node.js(node), Node.js must be installed. When you install Node.js, npm is auto installed.
- Google Chrome – Download the Chrome version compatible with the latest Puppeteer version.
Install and Set up Puppeteer
You must create your Puppeteer project, initiate it, and then install Puppeteer with npm and Puppeteer.
1. Open the command line interface/terminal.
2. Create a new directory for your Puppeteer project:
mkdir puppeteer-project
3. Change to the Puppeteer project directory:
cd puppeteer-project
4. Run the following command to initiate a new npm project:
npm init
5. Install Puppeteer and related dependencies using the following command:
npm install puppeteer
Run your first Puppeteer Test
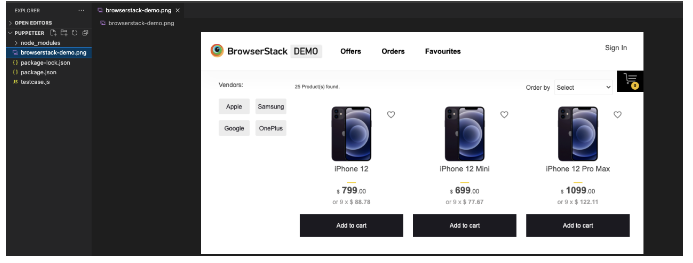
In this test, launch a new browser page, open bstackdemo.com, take a screenshot, and then close the browser.
1. In VSCode, open the puppeteer-project directory.
2. Create a testcase.js file.
3. Copy the following code to the file:
//adding Puppeteer library
const pt = require('puppeteer');
pt.launch().then(async browser => {
//browser new page
const p = await browser.newPage();
//set viewpoint of browser page
await p.setViewport({ width: 1000, height: 500 })
//launch URL
await p.goto('https://bstackdemo.com')
//capture screenshot
await p.screenshot({
path: 'browserstack-demo.png'
});
//browser close
await browser.close()
})
4. Run the following command to test the script:
node testcase.js
After the script runs, the browserstack-demo.png is saved in your project directory.
Best Practices for Creating Puppeteer Tests
Here are a few best practices to consider while creating Puppeteer tests:
- It is recommended that you set the headless option to true when using Puppeteer with Chrome for better performance and automation.
- Add the browser.close method to close the browser at the end of your script to reduce resource consumption.
- When you are interacting with connected pages such as clicking links, submitting forms, ensure that you let Puppeteer know to wait for the next step using the page.waitForNavigation method.
Conclusion
Puppeteer offers great benefits especially due to it being lightweight and supporting headless mode with Chrome. Most web applications need to be tested on varied devices, OS, and browsers for a seamless experience, which might be something Puppeteer expanse might not cover.
BrowserStack Automate gives you access to a real device cloud that supports Puppeteer and lets you run cross browser Puppeteer tests in parallel through 3500+ real devices and browsers on the cloud


