Using AutoIT with Selenium, testers can create comprehensive and efficient test cases for web apps that require interactions outside the browser.
Overview
What is AutoIT?
AutoIT is a free tool that uses a combination of simulated keystrokes, mouse movement and window control manipulation to automate window graphic user interface (GUI) tasks.
Why Use AutoIT with Selenium?
Using AutoIT with Selenium helps overcome the limitations in managing non-browser elements during testing. Though Selenium interacts seamlessly with web-based UI components, it cannot support system-level dialogs and pop-ups. AutoIT helps overcome this limitation by automating interactions with Windows-based elements.
In this article, learn how to use AutoIT with Selenium and some best practices for using AutoIT with Selenium.
What is AutoIT?
AutoIT is an open-source scripting language built to automate window graphic user interfaces (GUIs). It uses a combination of simulated keystrokes, mouse movement, and window control manipulation to automate window graphic user interface (GUI) tasks.
It is a small standalone scripting software that enables the automation of file uploads and clipboard windows operation.
Initially, AutoIT was designed to reliably automate personal computers (PCs). However, it has grown to become a powerful industry scripting language, supporting complex programming expressions such as functions, loops, and other scripting constructs.
Why Use AutoIT for Selenium
Selenium is a great web browser automation tool on its own. However, it is challenging to handle operating system (OS)-level interaction such as file upload, which is a recurring task in most web applications, and complex keyword and mouse movement outside the browser.
For this purpose, AutoIT becomes a necessity to extend Selenium functionality to be able to perform native operating system-level functionality.
AutoIT in Selenium integration makes activities such as automating OS-level operations possible in web automation. It brings both the functionality AutoIT and Selenium as a single unit.
While Selenium automates and handles web elements, page navigation and validation, AutoIT handles interactions with native windows operations like dialog boxes and file uploads. AutoIT is free, it is simple and easy to use, and easy to integrate with Selenium.
Read More: How to Drag and Drop in Selenium?
When to Use AutoIT with Selenium
AutoIT in Selenium is particularly useful in applications that require both OS-level and web automation. The following are some activities that would require the use of AutoIT in Selenium:
- Managing file upload and download operations: Selenium struggles with handling native Windows operations like file upload and download dialog box. These operations require the use of AutoIT in Selenium for efficient automation.
Read more: How to Upload File in Selenium?
- Handling Pop-ups activities: Non-browser elements like system pop-ups or system level pop-ups cannot be handled with Selenium. However, with AutoIT Selenium integration, non-browser elements such as desktop applications and system-level pop-ups can be tested.
- Cross-Platform Automation: Selenium is designed for browser environments. Although it can support multiple browser environments, its functionality is limited to cater to window OS-level specific tasks
- Operations that involve non-browser user interface (UI) interaction: Complex keyboards and mouse operation outside the browser will require the use of AutoIT in Selenium for effective automation.
How to Install AutoIT
Follow these steps to download and install AutoIT:
Before you proceed to install AutoIT, make sure you are running x64-bit or x86-bit operating systems, and you have more than 33.8MB of memory space.
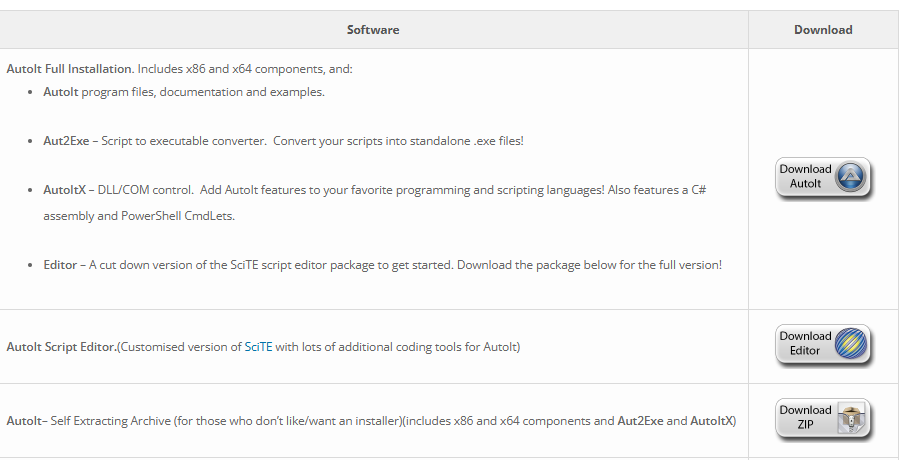
1. Go to AutoIT’s official website to download AutoIT
2. Click on ‘Download AutoIT’
3. Once the download is complete, double-click to start the installation process.
4. Click on “Next” and “I agree” to the license agreement to continue the installation
5. Upon successful installation, click “Finish” to conclude the process
How to Write Your First AutoIT Script (with Example)
In the steps above, AutoIT was downloaded and installed; the next step would be to install the AutoIT script editor to write the first AutoIT script.
To download and install the AutoIT script, follow the steps as outlined below:
1. Visit the official AutoIT Script Editor download page
2. On the official web page, scroll down to the “Current Version” and click on the executable file to download.
3. Open the downloaded file to install the editor
4. Click “Next” and Agree to the license agreement
5. Click on “Finish” to conclude the installation
Now that AutoIT and AutoIT Script Editor have been successfully downloaded and installed, it is time to write the first script.
To start with the first script, navigate to the folder where you wish to save your script:
- Right-click on the folder
- Select New
- Click on AutoIt v3 Script
- Rename the “New AutoIt v3 Script” to “HelloStack”
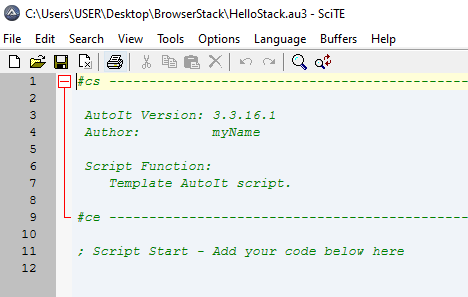
Now the script file (HelloStack.au3) is ready, the next step is to edit the file and write the first script message.
The following steps guide you on how to edit the script file:
1. Right-click on the HelloStack file
2. Select Edit Script
3. The Script editor (SciTE) will open
4. Write the following script in your editor
```

#include <MsgBoxConstants.au3>

MsgBox($MB_OK, “BrowserStack”, “Hello BrowserStack”)

```
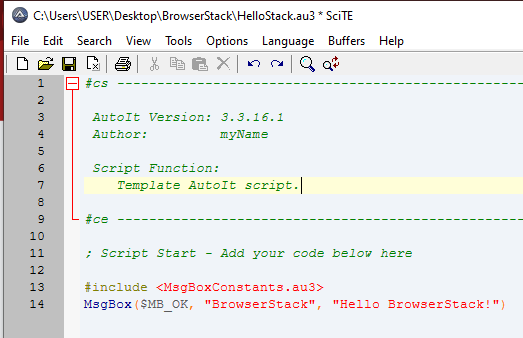
In the code above, you imported the MsgBoxConstants package using the include keyword. Then, the MsgBox function is invoked from the MsgBoxConstants.
The MsgBox function takes three arguments with an optional timeout argument. Your script should look like the one below:
To run the script,
- Save the script by pressing ctrl S on Windows.
- Then go back to the HelloStack.au3 file,
- Right-click on the file and select Run Script (x64) or Run Script (x86), whichever your machine supports.
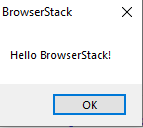
If you do everything right, you should see a window pop-up with the message, “Hello BrowserStack!”
The next step would be to look at how to integrate AutoIT with Selenium.
How to Integrate AutoIT with Selenium
Integrating AutoIT with Selenium means coupling the functionality of both tools together to enable you to take advantage of capabilities to perform tasks they can’t do individually. This means you can automate scenarios that involve both Browser- and desktop-related operations.
The steps below illustrate how to integrate AutoIT in Selenium:
- Following the steps above, create a new AutoIT script (BrowserStack.au3)
- Write a script in it
- Save the file
- Now right-click on the file and select Compile Script
Now, you have an executable file (BrowserStack.exe), which you’ll pass to the Selenium Driver Runtime (Runtime.getRuntime().exec) class command.
Read More: Mastering Keyboard Actions in Selenium
File Upload in Selenium using AutoIT
Uploading files is one of the most common actions users perform when they visit a website. To automate testing for this use case, use the integration of AutoIT in Selenium, as illustrated in the steps below:
1. Create a new AutoIT script to handle file upload
2. Write the following script inside the file
```

WinWaitActive("File upload")


Send("C:\Users\USER\Desktop\BrowserStack\FileUpload.au3")

Send("{ENTER}")

```
3. Save and compile the script following the steps above
To integrate with Selenium, we need to run the compiled AutoIT script within a Java-Selenium code, as shown below:
```java

System.setProperty("webdriver.chrome.driver", "add path to your chrome");


        WebDriver driver = new ChromeDriver();

        driver.manage().window().maximize();

try {


            driver.get("https://uploadnow.io/en");


            WebElement fileUploadButton = driver.findElement(By.id("file-upload"));


            fileUploadButton.click();


            Thread.sleep(2000);


            // Execute the AutoIT compiled script

            String autoITScriptPath = "C:\Users\USER\Desktop\BrowserStack\FileUpload.exe";

            Runtime.getRuntime().exec(autoITScriptPath);


         } catch (IOException e) {

            System.err.println("Error executing the AutoIT script: " + e.getMessage());

        } catch (InterruptedException e) {

            System.err.println("Thread interrupted: " + e.getMessage());

        } catch (Exception e) {

            System.err.println("An unexpected error occurred: " + e.getMessage());

        } finally {

             if (driver != null) {

                   driver.quit();

                   System.out.println("Browser closed successfully.");

            }

        }


```
In the Java code snippet above, the setProperty method is invoked to set the path to the Chrome browser. After this, you instantiate a new Chrome instance on the `WebDriver object`.
In the next step, the Chrome Window is maximized.
Within the try block, you navigated to the site where you wanted to upload the file, clicked on the file upload button, and implemented a 2-second wait time for the AutoIT script to execute.
All possible exceptions were handled in case any error was encountered.
Use Cases of AutoIT and Selenium Integration
Selenium and AutoIT are both power automation tools with unique strengths. Integrating both tools opens up an endless opportunity and serves several use cases. The following are use cases of AutoIT in Selenium integration:
- Handling Window-based dialogs such as alert and authentication pop-up
- Handling file upload and download dialog boxes
- Interacting with System-level operations such as system notification and printer dialog
- Managing complex keyboard and mouse actions
When to Consider Other Alternatives Apart from AutoIT for Selenium
Several situations would demand the use of other alternatives apart from AutoIT in Selenium:
- When an OS-independent automation tool is needed. Tools like PyAutoGUI, an OS-independent Python module, fit this requirement.
- If the use case is for a test script that runs on multiple OS, then there is a need to consider another alternative.
Why run Selenium tests on Real Devices?
Using Real devices for Selenium Test Automation will yield more accurate test results. Real devices ensure that all real user conditions are taken into account during testing.
BrowserStack Automate allows you to integrate your Selenium Test suite and run tests on 3500+ real devices and browsers under real user conditions.
BrowserStack Automate is a powerful cloud-based testing platform designed to streamline and enhance your web and mobile application testing processes. It enables you totest your web apps across a comprehensive range of real browsers and devices so that you can maximize test coverage to deliver a consistent user experience.
Go through the Official Documentation to learn how to run Selenium Tests with BrowserStack Automate on real devices for various programming languages.
Best Practices for Using AutoIT with Selenium
While writing scripts with AutoIT with Selenium, these are some of the best practices to adhere to:
- Maintain a clear and concise script documentation
- Avoid hardcoding path
- Write scripts that are readable and understandable
- Try to implement a wait time in case it takes time for the script to respond
- Regularly update scripts
Challenges of using AutoIT with Selenium and How to Overcome Them
These are some challenges associated with using AutoIT with Selenium:
- AutoIT works only on Windows. To overcome this challenge, use cross-platform alternatives
- Manually maintaining scripts can be frustrating for a large script base. The use of a version control system can help overcome these challenges
- Executable files pose security risks. To overcome this, restrict access and always verify file sources
- Lastly, avoid writing complex scripts.
Conclusion
By Integrating AutoIT with Selenium, you can automate both browser and OS-level operations. AutoIT is, therefore, a valuable tool for extending Selenium capabilities to handle OS-level interactions. For more comprehensive testing across multiple real devices and browsers, consider using BrowserStack.
Useful Resources for Selenium
Methods, Classes, and Commands
- Selenium Commands every Developer or Tester must know
- Selenium WebElement Commands
- Desired Capabilities in Selenium Webdriver
- Assert and Verify Methods in Selenium
- Understanding System setProperty in Selenium
- Select Class in Selenium : How to select a value in dropdown list?
- SendKeys in Selenium WebDriver
- getAttribute() method in Selenium: What, Why, and How to use
- How does Selenium isDisplayed() method work?
- findElement vs findElements in Selenium
- Types of Listeners in Selenium (with Code Examples)
- How to set Proxy in Firefox using Selenium WebDriver?
Configuration
- How to set up Selenium on Visual Studio
- How to configure Selenium in Eclipse
- Maven Dependency Management with Selenium
- How to Build and Execute Selenium Projects
XPath
- How to use XPath in Selenium?
- How to find element by XPath in Selenium with Example
- Top Chrome Extensions to find Xpath in Selenium
Locators and Selectors
- Locators in Selenium: A Detailed Guide
- CSS Selector in Selenium: Locate Elements with Examples
- How to Create Object Repository in Selenium
Waits in Selenium
- Wait Commands in Selenium C and C#
- Selenium Wait Commands: Implicit, Explicit, and Fluent Wait
- Understanding Selenium Timeouts
- Understanding ExpectedConditions in Selenium
- Understanding Role of Thread.sleep() in Selenium
Frameworks in Selenium
- Data Driven Framework in Selenium
- Implementing a Keyword Driven Framework for Selenium: A Practical Guide
- Hybrid Framework in Selenium
Miscellaneous
- How to create Selenium test cases
- How to set Proxy in Selenium?
- Difference between Selenium Standalone server and Selenium server
- Exception Handling in Selenium WebDriver
- How to use JavascriptExecutor in Selenium
- How to run your first Selenium test script
- Parallel Testing with Selenium
Best Practices, Tips and Tricks
- Top 5 Challenges Faced During Automation Selenium Testing
- 5 Selenium tricks to make your life easier
- 6 Things to avoid when writing Selenium Test Scripts
- Best Practices for Selenium Test Automation
- Why you should pay attention to flaky Selenium tests
- How to start with Selenium Debugging
- How to make your Selenium test cases run faster
- How to upgrade from Selenium 3 to Selenium 4
- Why you should move your testing to a Selenium Cloud?
Design Patterns in Selenium: Page Object Model and Page Factory
- Design Patterns in Selenium
- Page Object Model and Page Factory in Selenium
- Page Object Model and Page Factory in Selenium C#
- Page Object Model in Selenium and JavaScript
- Page Object Model and Page Factory in Selenium Python
Action Class
- How to handle Action class in Selenium
- How to perform Mouse Hover Action in Selenium
- Understanding Click Command in Selenium
- How to perform Double Click in Selenium?
- How to Drag and Drop in Selenium?
- How to Scroll Down or Up using Selenium Webdriver
- How To verify Tooltip Using Selenium
TestNG and Selenium
- Database Testing using Selenium and TestNG
- How to use DataProvider in Selenium and TestNG?
- All about TestNG Listeners in Selenium
- How to run parallel test cases in TestNG
- How to use TestNG Reporter Log in Selenium: Tutorial
- Prioritizing tests in TestNG with Selenium
JUnit and Selenium
- Understanding JUnit assertions for Selenium Testing with Examples
- How to run JUnit Parameterized Test in Selenium
- How to write JUnit test cases
- JUnit Testing Tutorial: JUnit in Java
- How to create JUnit Test Suite? (with Examples)
Use Cases
- Handling Login Popups in Selenium WebDriver and Java
- How to Launch Browser in Selenium
- How to handle Alerts and Popups in Selenium?
- How to get Selenium to wait for a page to load
- How to Find Element by Text in Selenium: Tutorial
- How to Read/Write Excel Data using Apache POI Selenium
- How to handle Captcha in Selenium
- How to handle multiple windows in Selenium?
- How to handle Multiple Tabs in Selenium
- How to find broken links in Selenium
- How to handle Cookies in Selenium WebDriver
- How to handle iFrame in Selenium
- How to handle Web Tables in Selenium
- How To Validate Text in PDF Files Using Selenium Automation
- Get Current URL in Selenium using Python: Tutorial
Types of Testing with Selenium
- Different Testing Levels supported by Selenium
- How to perform UI Testing with Selenium
- Regression Testing with Selenium: Tutorial
- UI Automation using Python and Selenium: Tutorial
- How to Run Visual Tests with Selenium: Tutorial
- How to perform ETL Automation using Selenium
- Cross Browser Testing in Selenium : Tutorial


