Cypress offers multiple ways to record user interactions and convert them into automated test scripts, making test creation faster and more accessible, especially for beginners.
Overview
How to Record Cypress Tests?
1. Using Cypress Studio:
- Record user interactions directly in the Cypress Test Runner and auto-generate test steps.
- Edit recorded steps like clicks and input actions without writing code manually.
- Append or revise test cases by re-running them in Cypress Studio’s interactive mode.
2. Use Chrome DevTools Recorder:
- Capture browser actions through Chrome Dev Tool’s Recorder panel and export them.
- Convert DevTools recordings to Cypress test scripts using the export feature.
- Edit recorded scripts manually after exporting, for more customization.
- Integrate recorded scripts into your Cypress test suite and run them in your CI setup.
This guide explores the two ways to record, edit and execute Cypress tests.
When is recording considered a Good Option?
If you are new to Cypress and want to explore the tool, then it is a good idea to record a test and generate a code based on the actions you perform on the website. You can explore more on the script generated. It will help you to understand how it works.
Record and playback functionality is a widely-used feature in test automation tools. However, it is essential to consider the appropriate use cases for this feature and when it should be avoided, just like any other tool in your toolbox.
See the scenarios where recording can be useful:
- Ease of use: It is easy to use and requires minimal technical knowledge. It is a great tool for QA engineers or developers unfamiliar with Cypress who want to create tests.
- Record and Replay: You can record the test and replay it again; this can be useful for debugging or understanding the test flow.
- Useful for automation: Recorder allows you to quickly create tests for an existing web application without manually writing test code. This can save time and effort, especially for large and complex applications.
- Easy Test Maintenance: When the web application changes, Cypress Recorder can quickly update existing tests by re-recording the interactions and updating the test code.
- Improved Test Coverage: Recorder can help you identify areas of the web application that may not be covered by existing tests, allowing you to improve the overall test coverage.
Note: It’s important to note that Recorder is not a replacement for manually writing tests, but rather a option that can be used to quickly generate tests and improve the overall test coverage of an application.
What is Cypress Studio?
Cypress Studio is an experimental feature in Cypress that allows testers to record and generate test steps by interacting with the application through the Cypress Test Runner.
It’s designed to simplify test creation by capturing user actions, like clicking buttons, entering text, and selecting elements, and automatically converting them into test code.
How It’s Used for Cypress Test Recording:
- Enable Cypress Studio by setting “experimentalStudio”: true in the cypress.config.js file.
- Launch the Cypress Test Runner and run a test spec.
- In the UI, click “Add commands to test” to start recording.
- Interact with your application (for example, click, type).
- Cypress Studio records these steps and adds them to your test script.
- Review and edit the generated commands before saving.
This makes test authoring faster, especially for beginners or for building initial drafts of test cases.
How to Record and Edit Cypress tests using Cypress Studio?
Cypress Studio offers a visual approach to creating tests using the Cypress Test Runner by recording user actions on the target application. It is an experimental feature and can be enabled by updating the option in the config file (shown in the last section).
- With Cypress Studio, you can quickly record and playback user interactions, making it easy to test complex workflows and create reliable test cases.
- It supports common commands such as .click(), .type(), .check(), .uncheck(), and .select().
- It generates test code while interacting within the Cypress Studio DOM.
To use Cypress Studio, add the experimentalStudio attribute in the configuration file.
For Cypress version 10 and above, Add it in cypress.config.js, just like shown below:
How to Record and Run Cypress tests using Cypress Studio?
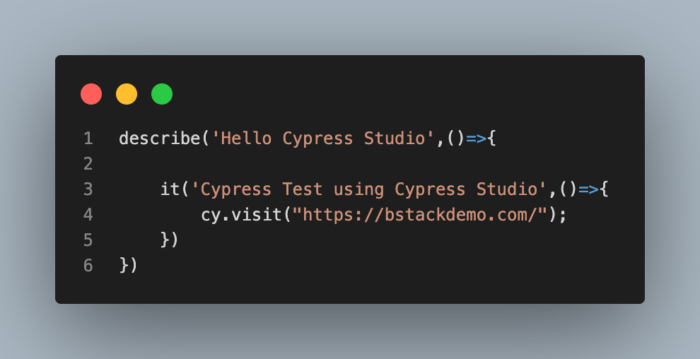
After you are done with the above configuration.Now, write the test to open a URL .
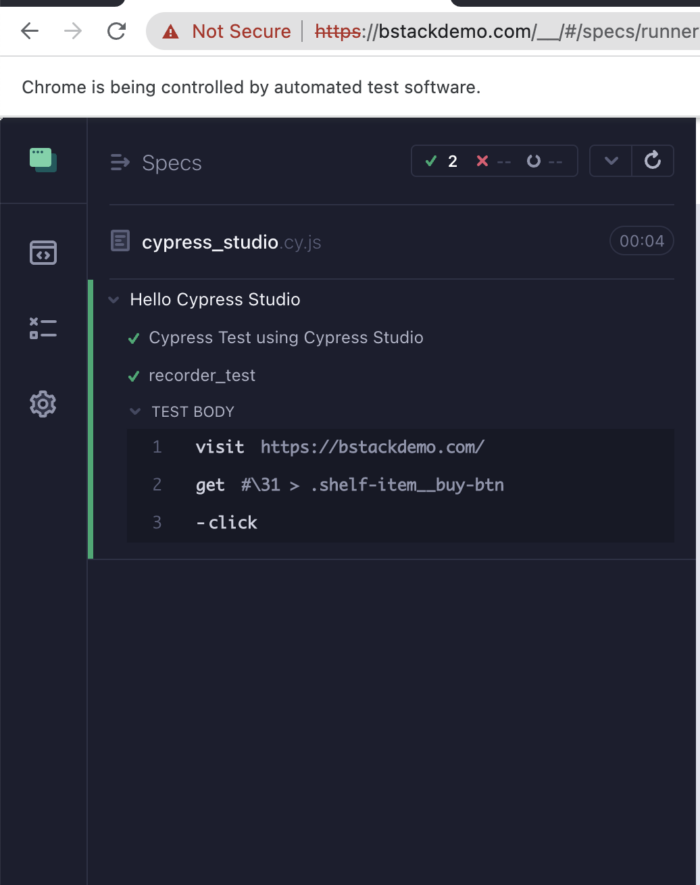
Run the above test case and learn how to use Cypress Studio.
1. From Spec Runner Screen, hover over a Test Suite Name in the Command Log to reveal an “Add New Test” button.
2. Click “Add New Test” to launch the Cypress Studio. If you are using Cypress version 10 and above, it will ask you to enter url but If you are using Cypress version below 10, it will show Studio Beta Pop-Up Window.
3. Click on Get Started. Next, it will ask you to enter the url . Now, enter the URL(Example: ”https://bstackdemo.com/”) and click on Continue Button.
4. After clicking on the continue, Cypress Studio starts recording and whatever action you perform on the application, it gets recorded and gets transformed into Cypress code.
5. Perform some actions: Click on “Add to cart” for the product “iPhone 12”
When you perform any action on the page, you can observe the commands get added automatically on the left screen (Runner screen.)
6. Once, you are done performing actions, click on Save Commands on the left panel
7. After clicking Continue,It will ask you to enter name for the test. Enter the name and now,you will see new Test added in Test Runner.
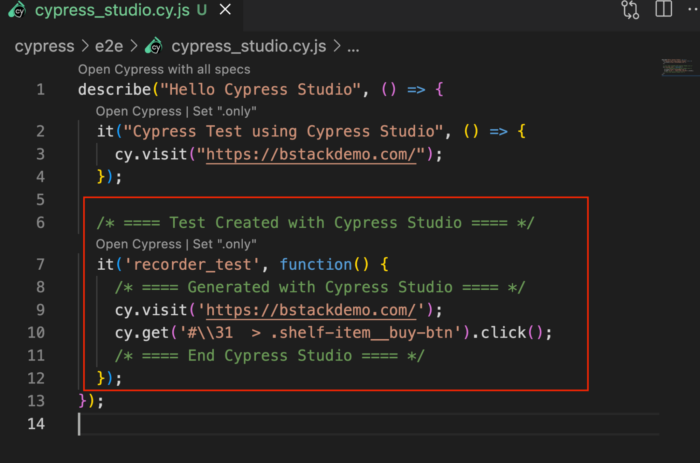
8. Now, go to your Cypress test case in IDE and you will see, there is test case added in spec file with all the actions you performed on the web page. There is a comment also added above the test case to inform you that this test case is created using Cypress Studio.
Following the above steps, you cans easily add a new test case using Cypress Studio.
How to update Existing Test using Cypress Studio?
In the above section, you learnt how to add a new test case. But, what if you want to update any existing test case.Don’t worry, you can update a test case as well using Cypress Studio.
Below is step-by-step process to update existing test case using Cypress Studio:
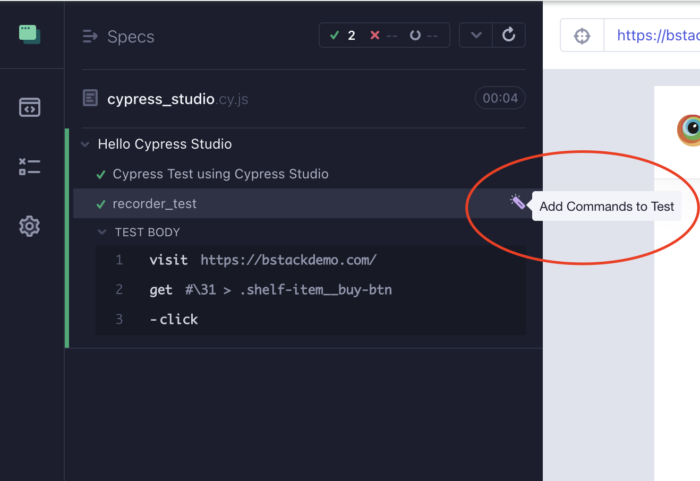
1. Run your Cypress test case. Hover over a Test Case Name in the Command Log to reveal an “Add Commands To Test” button.
To add a new test case, you need to hover over a test suite name but in order to update a test case ,you need to hover over a test case..
2. Click on “Add Commands To Test” to update the existing test case. After you click on Add Commands to test, it will launch the Cypress Studio. And, there, you can perform actions on the web page.
Understand with an example.
Continuing with the last test case, perform below actions on the recorder-test ( test name)
- Click on Checkout
- Select username from dropown
- Select password from dropdown
- Click on Login
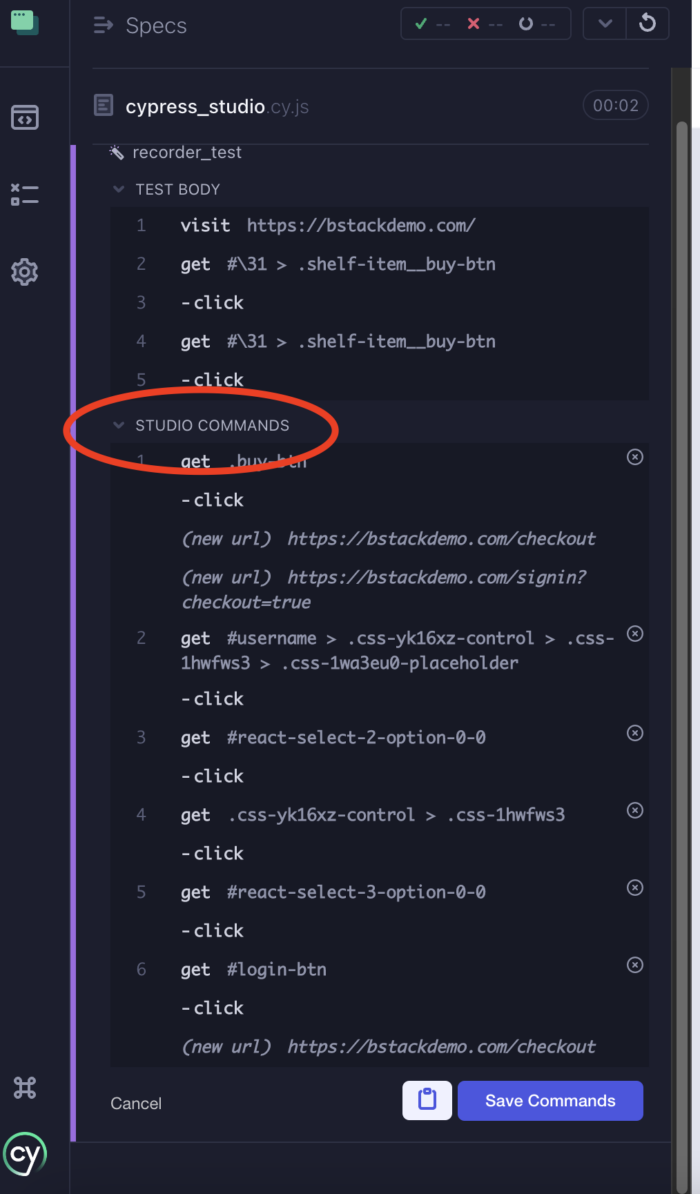
The above screenshot is from the web application where you selected username, password and clicked on login. On the left side, there is section of STUDIO COMMANDS which will be visible.
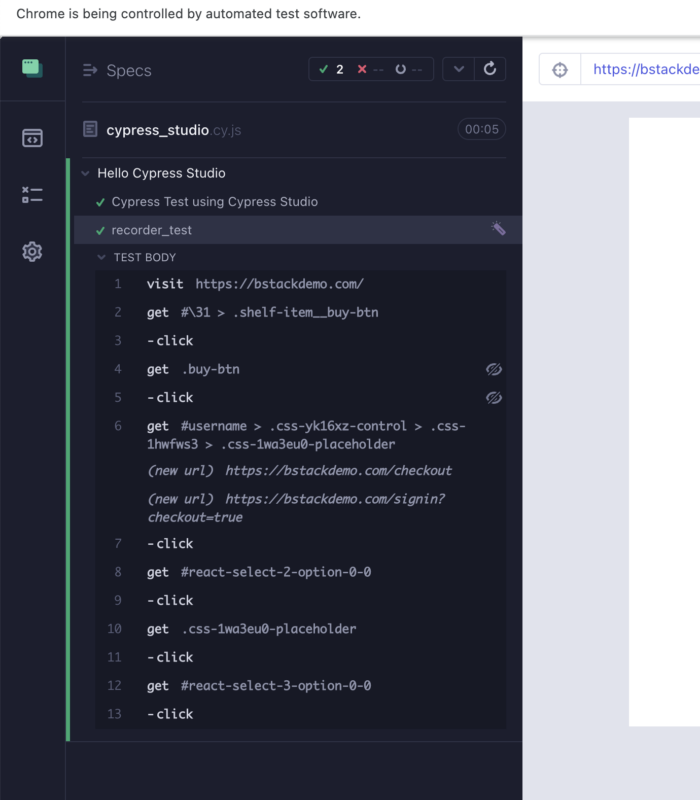
These are the new steps which are updated in your existing test case. Once, you save the test, it will be re-run on the Test Runner with the updated steps which you performed on the web application.
3. Click on Save Commands to save the changes. Once, you click on Save Commands. It gets saved to the existing test case and your test would be executed again with the updated steps
4. Go back to you Cypress test case in IDE, you will observe the test case got updated with the new commands
Following the above approach, you can update your existing test cases using Cypress Studio. Apart from adding and updating a test case, you can also add Assertion in test case using Cypress Studio.
What is Chrome Dev Tools Recorder Panel?
Chrome DevTools Recorder Panel is a built-in tool in the Chrome browser that allows you to record user interactions on a webpage—such as clicks, navigation, and form inputs, and export them as test scripts. It is useful for quickly generating Cypress tests without manual coding, especially for simple workflows.
How it’s used in Cypress Test Recording:
- Open Chrome, right-click anywhere on the page, and select Inspect to open DevTools.
- Go to the Recorder tab and click Start recording.
- Perform user actions on the webpage (for example, click buttons, fill forms).
- Stop the recording once it’s done.
- Click Export and choose the Cypress format (or use a converter if needed).
- Copy the exported script and paste it into your Cypress test file for execution.
How to record and update tests using Chrome Dev Tools Recorder panel?
The “Recorder” panel in Chrome DevTools allows you to record user interactions with a web page and save them as a sequence of events that can be replayed. This feature is useful for debugging and performance analysis, because it allows you to see how a page behaves over time, identify slow-loading elements, and isolate specific issues.
With Recorder panel, you can perform both the actions – adding and updating a new test case.
How to record new Tests using Chrome Dev Tools Recorder panel?
See step by step, how to record a test using Chrome Dev Tools Recorder panel.
1. Open Chrome Browser. Enter the url of your web application ( Example:” https://bstackdemo.com/”) and open the Dev Tools.
2. Once, you open the Chrome Dev Tools, you can see Recorder tab. Click on Start new recording button.
3. Enter the recording name as per your choice ( Example : Add to cart). Selector Attribute is optional. So, you can leave it as empty.
4. Click on Start a new recording button to start the recording of the actions you perform on the web application.
5. The panel will show “Recording” and you can see the progress of the recording on the Recorder tab.
6. Perform actions on the website:
Understand with an example. Perform below actions on the page.
- Click on Add to cart for product iPhone 12
- Click on Add to cart for one more product iPhone 12 Mini
- Click on Checkout
- Select username from dropdown
- Select password from dropdown
- Click on login
While you perform the actions on the page, you can observe the Recorder will have steps added in Recorder panel.
7. Once you are done with all the actions, click on End recording in Recorder panel. After, you end the recording. You can replay the recording by clicking on Replay button and check the progress of it in Recorder Panel.
You can replay and check the test case recording on the web-application.So, this is how you can record a test case using the Dev Tools Recorder Panel.
How to edit Tests using Dev Tools Recorder Panel?
Apart from creating a new test case, you can also update the existing test case using Recorder panel. In order to edit any test, there should already be a test recorded in Recorder panel.
1. Continuing with the last test case, where I recorded a test case already using recorder panel.Now, If you want to edit any test. Just click on that step of the test case and It will be expanded.
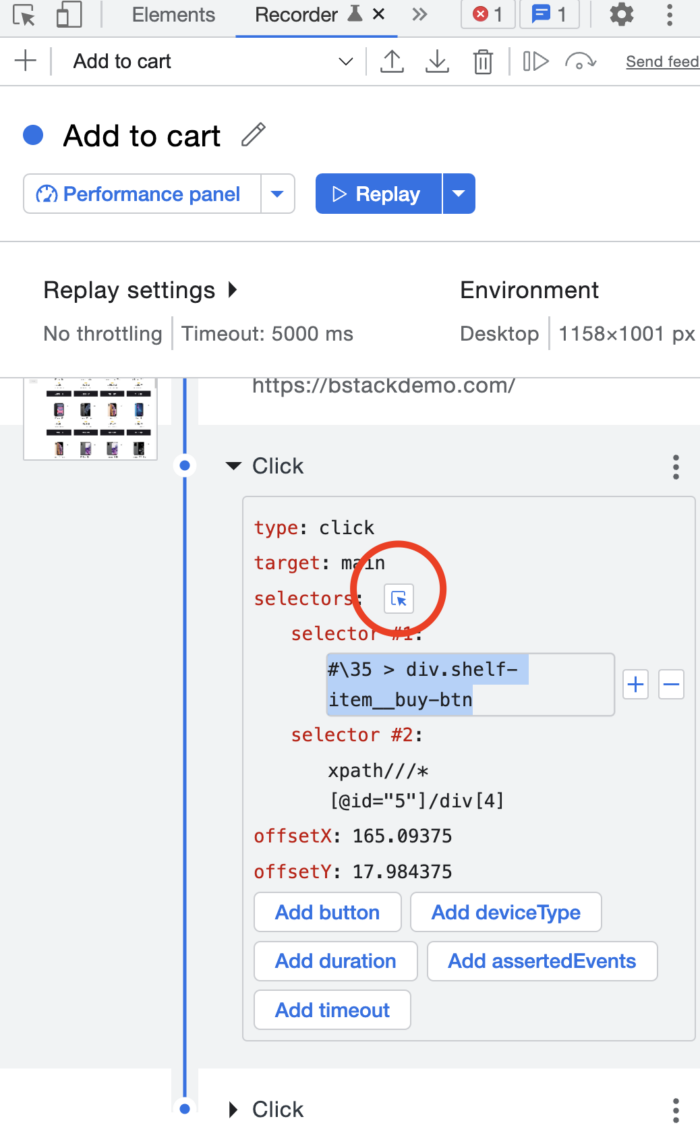
2. Now, click on selector and perform the actions on the web-application. So, your old action would be overwritten by new actions.
Try to understand with an example:
- Expand the Click action from Recorder panel.
- Click the Select button
- Select add to cart for another product (iPhone11) on the web application
3. Click on Replay. This time, It will also add iPhone11 to the cart.
4. You can also edit it manually by clicking on the selector value, if you want to change the locator value.
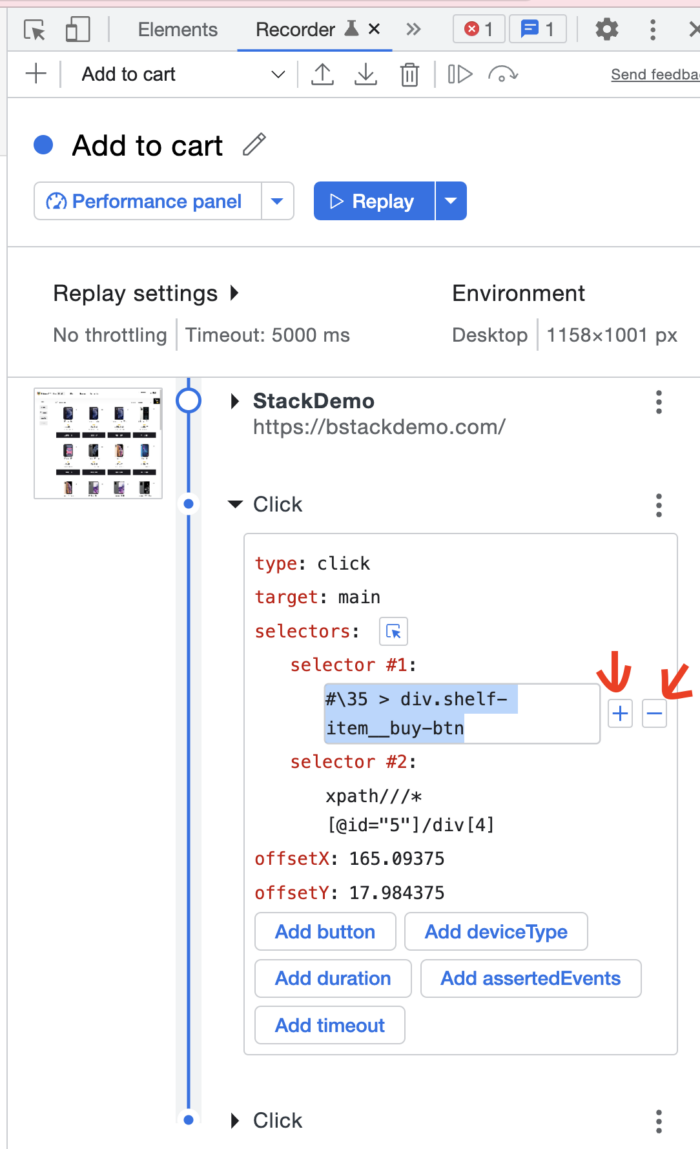
Apart from updating the value, you can also add or remove a selector by clicking on + and – icon next to the selector. In case, by mistake if you clicked on a element which was not part of testing. You can easily remove that selection by clicking on (–) icon, present next to selector.
This way, you can edit any existing recorded test case in Recorder panel
How to export the Recorder panel test case and run it in Cypress?
In last section, you learnt how to add and edit the test case using Recorder panel. Now, see how to save this test case and run it using Cypress in your local machine.
Pre-Requisite: To export JSON files from the Chrome DevTools Recorder, your Chrome version must be 101 or higher
1. Record a user-interation on your website using Cypress Chrome Recorder (follow the last section to record a test) .
On the same Recorder tab where you added the recording,click on Export icon.
2. After clicking on Export, you will see 3 options. Select “Export as JSON file”
3. After selecting the Export option. Save the file.
Tip : Do not pass spaces in the name, otherwise it will throw error while reading it
4. Go to Cypress project on your system. Open terminal in IDE and run the below command:
npm install -g @cypress/chrome-recorder
Pro-Tip: If you get permission issue, you can run it using the command
sudo npm install -g @cypress/chrome-recorder
Explanation:
The command npm install -g @cypress/chrome-recorder installs the Cypress Chrome Recorder as a global package for Node.js via the npm package manager. The -g flag specifies to install the package globally, making it available for use across your system.
After installing the package, you can import the recorded test case in our Cypress Project. To do the same, run the following command in the teminal.
npx @cypress/chrome-recorder ~/location of folder/{file-Name}.jsonExample : My test case name is Add-to-cart.json and it is saved in Documents folder. So, for this case, the command would be
npx @cypress/chrome-recorder ~/Documents/Add-to-cart.json
Implementation:
Now, you would be able to see the test case added in e2e/Integration folder depending on the Cypress versions you are using ( e2e => If Cypress version is 10 and above and integration => if Cypress version is below 10)
You can now run the above test case using Terminal and it will give you the same results which you saw while recording.
Note: it’s important to note that Recorder is not able to automate all the interactions with the web application, you may need to make some adjustments to the generated test code in order to make it work properly.
Disadvantages of Cypress Record and Playback of tests
Here are the key disadvantages of using Cypress record-and-playback (through Cypress Studio or DevTools Recorder) for test automation:
- Limited Flexibility: Recorded scripts often handle simple user flows well but struggle with dynamic or complex test scenarios (for example, conditional logic, loops, or reusable functions).
- Fragile Tests: Recorded selectors may be unstable or overly specific, leading to frequent test failures when the UI changes slightly.
- Hard to Maintain: Updating recorded steps manually can become time-consuming as your app evolves, especially in large test suites.
- Lacks Modularity: Record-and-playback tools don’t promote reusable components or test design best practices like Page Object Models.
- Not Ideal for CI/CD: Recorded tests often require refinement before they can be reliably integrated into continuous integration pipelines.
- No Support for Advanced Features: Features like API stubbing, custom commands, and conditional testing often need to be manually coded and can’t be recorded.
Why run Cypress tests on Real Devices?
Running Cypress tests on real devices ensures your web application behaves consistently across actual user environments. Emulators and headless browsers can’t always replicate real-world conditions like device-specific rendering issues, touch interactions, network variability, and OS-level behavior.
Testing on real devices helps you:
- Catch bugs specific to mobile browsers or screen sizes
- Validate responsive designs and mobile gestures
- Ensure performance and layout accuracy on actual hardware
- Gain confidence that your app delivers a consistent experience to end-users
BrowserStack Automate lets you run Cypress tests on a wide range of real devices and browsers hosted in the cloud. With no setup required, you can test across Chrome, Firefox, Edge, and mobile browsers, ensuring cross-browser compatibility and responsive performance. Automate supports parallel test execution, CI/CD integrations, and real-time debugging with video recordings and logs, helping you scale your testing effortlessly.
Conclusion
Test recording in Cypress provides a powerful and efficient way for testers/developers to automate their testing process. It offers a user-friendly interface, which makes it easy to create and maintain test scripts, as well as its ability to handle modern web applications. By utilizing test recording in Cypress, organizations can save time and resources, while improving the overall quality of their applications.


