Visual testing is an important aspect of user interface testing. It ensures that UI elements like fonts, colors, and size contrasts appear as intended and helps identify visual bugs that may impact user experience and accessibility.
Overview
Storybook visual testing is used to validate the appearance and consistency of UI components independently. It involves capturing snapshots of components and comparing them against baseline images to detect visual regressions.
How to Perform Storybook Visual Testing
- Set Up Storybook: Install and configure a storybook in your project.
- Choose and Install a Visual Testing Tool: Select a tool such as Percy for visual testing.
- Run Visual Tests and Capture Snapshots: Generate and compare snapshots of UI components to identify differences.
- Review the Test Results: Check the tool’s dashboard for visual differences and approve or fix them.
- Automate Testing in CI/CD: Integrate visual tests into your CI/CD pipeline for continuous UI validation.
This guide explores Storybook visual testing, its benefits, and how to perform it step by step.
What is Storybook Visual Testing?
Storybook visual testing validates the appearance of the UI components in isolation to ensure that they maintain their intended design and functionality. It takes snapshots of components and compares them to baseline images, allowing teams to detect even minor visual regressions.
This testing process helps developers ensure that their UI components render correctly and maintain visual consistency across different browsers and devices.
It helps to catch unintended design changes early, preventing issues from reaching production and streamlining the development cycle.
How does Storybook Visual Testing Work?
To understand the process of Storybook visual testing, it’s important to break down the key steps involved in it.
- Component Isolation: Storybook allows developers to build and test UI components in an isolated environment, ensuring they render correctly without external dependencies.
- Snapshot Comparison: Visual testing tools like Percy capture images of components and compare them to previously approved versions to detect regressions.
- Automated Testing: Integrated into CI/CD pipelines, Storybook visual testing ensures consistent UI across different browsers and devices before deployment.
Must Read: What is Component Testing? (with Examples)
How to Perform Storybook Visual Testing with Percy?
Pre-Requisite
- React App with Storybook Integration
- Let’s use the sample React To-Do application created from the Github codebase.
- Let’s see how to integrate Storybook with Percy to run Visual Tests
Step 1: Install required node packages
Install required Percy Node Packages using the command below.
npm install --save-dev @percy/cli @percy/storybook
Step 2: Get the PERCY_TOKEN
- Login to Percy (If you don’t have an account, create one by Signing Up)
- Create a New Project
- Navigate to Project Settings
- Copy the PERCY_TOKEN
Step 3: Set the PERCY_TOKEN environment variable
Based on the command-line tool you are using you can set the environment variable as below
# Unix
$ export PERCY_TOKEN="<your-project-token>"

# Windows
$ set PERCY_TOKEN="<your-project-token>"

# Powershell
$ $Env:PERCY_TOKEN="<your-project-token>"
Step 4: Execute the PERCY test
To execute Percy test use the below command
npx percy storybook:start
Alternatively, if you have already configured the package.json test command you can use the command
npm run test
Step 5: View the Results
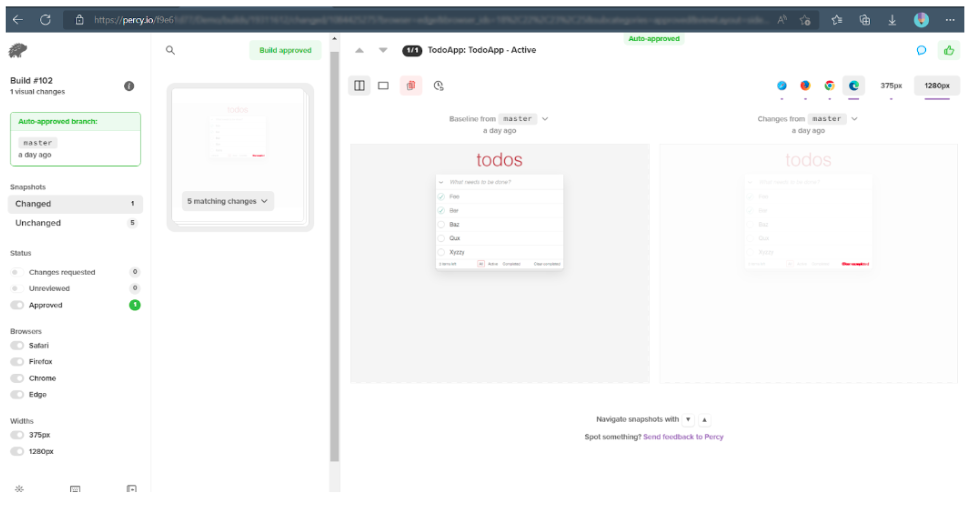
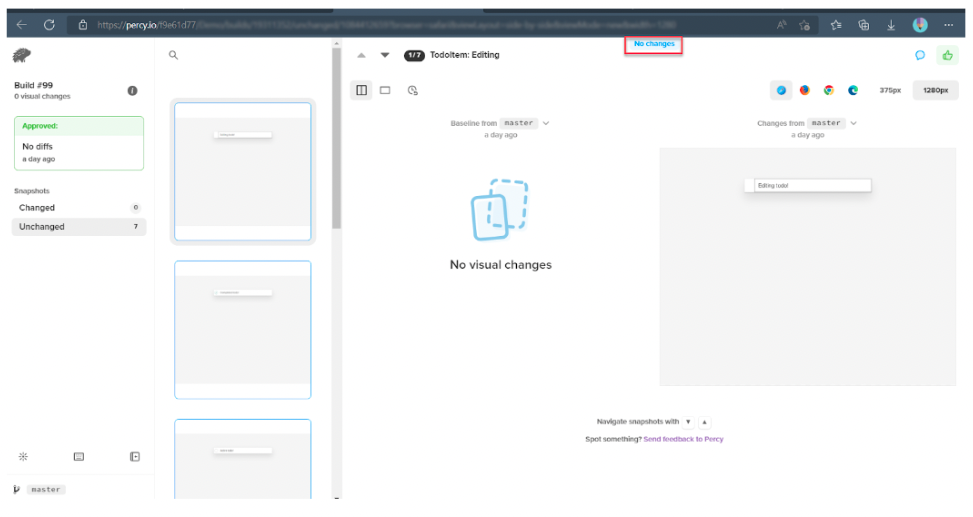
Wait until the execution completes and you will see the results with the build URL then you can easily navigate to the URL and see the visual differences.
If there is a difference then it will show the difference in Percy Dashboard.
If there is no difference you can see the message “No Changes”
Percy Storybook also provides an option to take additional snapshots, using additionalsnapshots options. additonalSnapshot option helps to take a snapshot of various states of your component.
For example, you have ***.stories.js file like below.
import React, { useState, useRef } from 'react';
import TodoApp from './TodoApp';

export default {
title: 'TodoApp',
component: TodoApp,
};

export const App = args => <TodoApp {...args}/>;

// match component name for single story hoisting
App.storyName = 'TodoApp';

App.args = {
showTodos: 'all',
todos: [
{ title: 'Foo', completed: true },
{ title: 'Bar', completed: true },
{ title: 'Baz' },
{ title: 'Qux' },
{ title: 'Xyzzy' }
]
};
Now, if you won’t take the additional snapshots for the different states you can add the App.parameters sections like below.
App.parameters = {
// take additional snapshots of various states
percy: {
additionalSnapshots: [{
suffix: ' - Active',
args: { showTodos: 'active' }
},{
suffix: ' - Completed',
args: { showTodos: 'completed' }
}, {
suffix: ' - None',
args: { todos: [] }
}]
}
};
In the above code we have added additional snapshots option to capture various states of the component. Once you execute the Percy test, then the screenshot will be captured, and the screenshot name will be suffixed with the value given in the suffix parameter as above (EX: Active, None etc).
Benefits of Storybook Visual Testing
Here are some of the key benefits of Storybook visual testing:
- Early Detection of Visual Regressions: Visual testing helps catch unintended design changes before they make it to production.
- Improved UI Consistency: This feature ensures that UI components appear the same across multiple browsers and devices, helping users get a consistent look across different platforms.
- Faster Development and Release Cycle: Automating visual tests reduces manual checks, speeding up the development process. It also ensures that the UI remains stable throughout the development process, allowing the team to focus on creating new features.
- Collaboration Between Teams: Storybook visual testing bridges the gap between developers, designers, and QA. Visual snapshots allow all team members to easily review and approve UI changes, streamlining the communication and decision-making process.
- Seamless Integration with CI/CD: Visual testing integrates easily with CI/CD pipelines, making it easy to catch regressions with every code push. This helps ensure that UI issues are detected and addressed continuously, not just at the end of the development cycle.
- Enhanced Cross-Browser Testing: Storybook visual testing, paired with tools like Percy, ensures that components look and function as intended across various browsers and devices. This ensures a flawless user experience for all users, regardless of their choice of browser or device.
- Reduced Manual Testing Effort: Storybook visual testing reduces manual visual check requirements with automated snapshot comparisons. This speeds up the entire testing process and minimizes the risk of human error.
- Easier Debugging and Tracking of Changes: With visual snapshots stored over time, it’s easier to trace the history of changes. This makes it simpler to identify when and where a regression occurred, speeding up the debugging process and improving code quality.
Why Use BrowserStack Percy
When it comes to visual testing for Storybook, Percy by BrowserStack stands out as a purpose-built solution that transforms how teams catch UI bugs before they reach production.
Percy is an AI-powered visual testing platform that automates visual regression testing for web applications, seamlessly integrating into CI/CD pipelines to detect meaningful layout shifts, styling issues, and content changes while significantly reducing false positives.
Key advantages of using Percy for Storybook visual testing:
- Effortless Integration: Percy integrates with Storybook with a single line of code, enabling true shift-left testing by catching visual issues at the component level before they’re assembled into full pages.
- AI-Powered Accuracy: The Visual AI Engine uses advanced algorithms to automatically ignore visual noise from dynamic banners, animations, and anti-aliasing, focusing only on meaningful changes that affect user experience. Features like “Intelli ignore” and OCR differentiate important visual shifts from minor pixel-level differences, greatly reducing false positive alerts.
- Accelerated Reviews: The Visual Review Agent highlights impactful changes with bounding boxes and human-readable summaries, accelerating review workflows by up to 3x.
- Comprehensive Coverage: Percy supports monitoring across 3500+ browsers and devices, with flexible scheduling options and the ability to compare any environment, critical for ensuring your Storybook components render correctly everywhere.
- Scalable Testing: With support for all major frameworks and CI tools, Percy offers SDKs for quick onboarding and frictionless scalability as your component library grows.
Percy offers a free plan with up to 5,000 screenshots per month for getting started, with paid plans starting at $199 for advanced features and custom enterprise pricing available.
Best Practices for Storybook Visual Testing with Percy
Implementing Storybook visual testing with Percy ensures UI consistency and helps detect regressions early. Following best practices can enhance the efficiency and reliability of visual tests, improving the overall development process.
- Use One File Per Component: Organizing each component in a separate file makes the codebase easier to maintain and navigate. This structure helps to manage test cases efficiently and ensures that each component is tested in isolation, reducing complexity.
- Integrate Visual Testing at an Early Stage: Consider visual testing at an early stage of the development process. Visual testing is often an afterthought when developing the UI application; having the visual testing tool integrated with the storybook at an early stage makes the application more stable.
- Make Visual Testing Mandatory: Enforcing visual testing as a required step in the development workflow helps prevent costly UI issues later. Running Percy visual tests at the component level allows teams to catch visual bugs early, reducing rework and ensuring a smoother development cycle.
- Automate Visual Testing in CI/CD Pipelines: Integrating Percy into CI/CD pipelines allows automated visual regression testing with every commit. This practice helps identify unintended UI changes early, preventing them from being merged into production.
- Schedule Regular Visual Test Builds: Just like functional tests, visual tests should be considered an essential part of a continuous testing strategy. Running scheduled Percy builds helps detect unexpected UI changes caused by updates to dependencies, browser variations, or other external factors.
- Review and Approve Visual Changes Proactively: Percy provides a dashboard for reviewing visual changes in the design. Teams should actively monitor test results, approve intentional updates, and investigate unexpected differences to maintain UI consistency.
- Optimize Storybook Stories for Testing: Ensure that Storybook stories represent real-world use cases and cover different component states. Testing edge cases and interactive elements prevents regressions in dynamic UI components.
Conclusion
Storybook visual testing is essential for maintaining UI consistency and detecting regressions early in the development process. By integrating tools like Percy, teams can automate visual testing, streamline collaboration, and ensure components render correctly across browsers and devices.
Implementing Storybook visual testing enhances development efficiency and contributes to delivering a stable and visually polished user experience.


