End-to-end testing tests an application entirely, verifying whether its flow from beginning to end behaves as expected or not. Unlike unit testing, which focuses on a particular unit of the entire product—such as the database, network, or file system; E2E testing tests if all these individual units work well when they are integrated.
E2E testing is significant because it exercises the application in the closest possible way to a real end-user experience.
End to End Testing of Angular Apps using Protractor
End-to-end testing (E2E) of Angular applications is performed using the Protractor testing framework, which is created by the Angular team themselves. Protractor can perform end to end tests on Angular applications that are running in a real browser by interacting with it, similar to that of an end-user.
How Protractor Framework Works
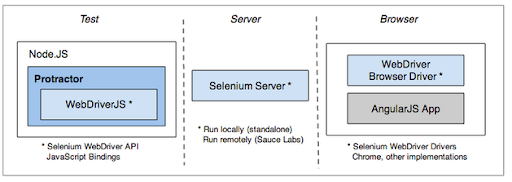
Protractor is a Node application written on top of Selenium’s WebDriverJS. You can understand it as a wrapper around WebDriverJS, which provides some additional features to test Angular applications.
The components of Protractor end to end test architecture are as follows:
- Protractor: Wrapper for WebDriverJS
- WebDriverJS: JavaScript binding for Selenium WebDriver in JavaScript.
- Unit Testing Framework: such as Jasmine or Mocha.
- Selenium Server
- Browser: such as Chrome, Firefox.
- End-to-end test scripts are generally written using the Jasmine framework. After Protractor launches, it hands the execution of your tests over to Jasmine (or Mocha, or Cucumber, or whichever test framework you prefer).
- Based on the steps defined in Jasmine tests, Protractor uses WebDriverJS to send corresponding commands (text inputs, button clicks, etc) to the Selenium Server.
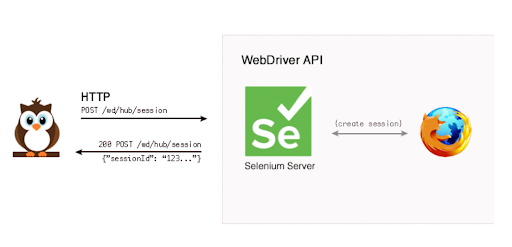
- The Selenium Server receives WebDriver commands from the protractor and accordingly controls the browser using vendor-specific browser drivers (Chrome, Firefox, Safari, etc).
How to Install Protractor
To install Protractor via npm, you need to have Node.js installed already. Once NodeJS is installed successfully, open the terminal and run the following command to install Protractor:
npm install -g protractor
As soon as the installation finishes, use the following command to verify Protractor’s version:
protractor --version
The above installation command installs two executables, i.e., Protractor and webdriver-manager, an executable for starting the Selenium Server instance.
Create Angular E2E Test using Protractor
The Configuration file configures Protractor, allowing it to locate the test files, and helps understand which framework or web browser to use. When the user in the configuration file does not define a specific configuration, then Protractor uses the default configuration. While the Spec file is the actual test file containing the assertions to be verified.
Creating Spec File
To write the first Protractor test case, let’s start with the spec file. Open a text editor, create a new file, and enter the following code snippet on it:
describe('Protractor Testing', function() {
it('to check the page title', function() {
browser.ignoreSynchronization = true;
browser.get('https://example.com/');
browser.driver.getTitle().then(function(pageTitle) {
expect(pageTitle).toEqual('Example Domain');
});
});
});
Save the file name myFirstTestSpec.js.
Words describe and it belong to Jasmine’s syntax, where describe contains the whole flow of your test, while it contains a specific step or scenario. You can set ignoreSynchronization to true when the website under test isn’t an Angular application but a regular website and false when the website under test is an angular application by using the browser global to hit the target URL and retrieve the value of its title. Finally, the assertion here verifies whether the obtained page title is equal to the expected one.
Creating Configuration File
Again, create a blank text file using any text editor. Then, enter the following code snippet in it.
exports.config = {
framework: 'jasmine',
seleniumAddress: 'http://localhost:4444/wd/hub',
capabilities: {
browserName: 'chrome',
},
specs: ['myFirstTestSpec.js']
};
Save the file, naming it conf.js.
Here, the first option is framework, with the value jasmine. Jasmine, as discussed above, is a popular testing framework for JavaScript. The capabilities section, defines the browser name, which is Chrome here. The specs section indicates the path to the spec file.
E2E test using Protractor with Selenium
Running a Protractor test just requires executing a single command. But prior to that, the local Selenium server must be set. This can be done by running the following command:
webdriver-manager update
This will download all the necessary binaries needed to start the Selenium server. The next step simply starts the instance:
webdriver-manager start
As the Selenium Server is running at port 4444, the following message is seen
Now that Selenium Server is running, the system is ready to run the test. Open a new terminal window and enter the following command:
protractor conf.js
If everything goes well, a Chrome window will open, with the example.com website opened. In the terminal, the output can be seen as
As seen above, the output message reads 1 spec, 0 failures. This indicates that the code had 1 it block, which was executed with 0 failures.
Run End to End Test on Angular App
Run End to End Test directly using Protractor
With Protractor, it is also possible to drive the browser directly, without executing the Selenium server explicitly. For doing that, change the configuration file and add the following command to it:
directConnect: true
The complete file should look like this:
exports.config = {
directConnect: true,
framework: 'jasmine',
capabilities: {
browserName: 'chrome',
},
specs: ['myFirstTestSpec.js']
};
This allows executing the tests directly, without having to start the Selenium server at port 4444.
Protractor Alternatives
According to the Protractor’s announcement on Github, the Angular team will stop the development of Protractor by the end of 2022 in conjunction with Angular v15.
This means that users need to migrate from Protractor since there will not be any further updates to the framework.
This also means the Angular team will not consider bugs or feature requests.
Users may end up with disruptions in their automation scripts by continuing to use Protractor.
Top 6 Protractor alternatives to migrate Protractor tests to:
End to End Testing in Angular using Nightwatch.js
Nightwatch is built in Node.js and allows you to write tests even if you don’t have any experience with it. Nightwatch.js enables you to write end-to-end tests in Node.js quickly and effortlessly that run against a Selenium/WebDriver server”.
Nightwatch uses W3C WebDriver API (Selenium WebDriver) for controlling DOM elements and browser interfaces to make testing as smooth as possible.
Core features of Nightwatch.js
- A clean syntax that helps write tests rapidly.
- Allows using CSS and XPath selectors for locating elements.
- It integrates seamlessly with cloud-based testing platforms like BrowserStack.
- Supports CI by integrating the end to end angular test with CI pipelines like Teamcity, Hudson, Jenkins.
- It has Built-in Test Runner that supports sequential or parallel testing in grouped and tagged test suites.
- It has automatic control over Selenium, ChromeDriver, and other WebDrivers in a separate child process for improved performance.
How to Install Nightwatch
For running Nightwatch, you need a local standalone Selenium server, as well as WebDriver, to use Chrome/Firefox for end to end testing Angular applications locally.
The components of Protractor end to end test architecture are as follows:
To configure Nightwatch use the following steps:
Step 1: Add Nightwatch
Adding Nightwatch to the project by running the below command
npm install nightwatch --save-dev
This command places the Nightwatch executable in the ./node_modules/.bin folder so that there is no need to install it globally.
Step 2: Download Selenium
Selenium is an open-source project for a range of tools and libraries aimed at supporting web browser automation. The prerequisite for Selenium is to have JDK 7 or higher installed. The Selenium Server is a Java application that Nightwatch uses to connect with various browsers.
Download the Selenium JAR. After that, create a bin folder inside the project and place the JAR file in the bin folder.
Step 3: Download ChromeDriver
Download the ChromeDriver place it in the same bin folder created in the previous step. It is a standalone server, implementing the W3C WebDriver wire protocol for Chromium.
Step 4: Configuring Nightwatch.js
The basic Nightwatch configuration is done through a JSON configuration file. To create a nightwatch.json file, enter the below code snippet in a text file
{
"src_folders" : ["tests"],
"output_folder" : "reports",

"selenium" : {
"start_process" : true,
"server_path" : "./bin/selenium-server-standalone-3.3.1.jar",
"log_path" : "",
"port" : 4444,
"cli_args" : {
"webdriver.chrome.driver" : "./bin/chromedriver"
}
},

"test_settings" : {
"default" : {
"launch_url" : "http://localhost",
"selenium_port" : 4444,
"selenium_host" : "localhost",
"desiredCapabilities": {
"browserName": "chrome",
"javascriptEnabled": true,
"acceptSslCerts": true
}
}
}
}
This configuration file provides Nightwatch information regarding the location of the binary files of Selenium Server and ChromeDriver, along with the location of the tests to be run.
Create Angular E2E Test using Nightwatch
Compared to other frameworks, testing on Nightwatch is a little different because here, the features are called by chaining them, similar to how js async calls with CSS and XPath selectors.
In NightwatchJS, every file in the tests folder is a suite in itself that must use the node module.exports. However, it can have any number of steps or validations in the form of functions, as shown below:
module.exports = {
'Demo test Google' : function (client) {
client
.url('http://www.google.com')
.waitForElementVisible('body', 1000)
.assert.title('Google')
.assert.visible('input[type=text]')
.setValue('input[type=text]', 'rembrandt van rijn')
.waitForElementVisible('button[name=btnG]', 1000)
.click('button[name=btnG]')
.pause(1000)
.assert.containsText('ol#rso li:first-child',
'Rembrandt - Wikipedia')
.end()
}
}
Running Angular End to End Test with NightwatchJS
To run Nightwatch, add a new script into the scripts section of package.json scripts section and enter the below code snippet in it:
"scripts": {
"test-e2e": "nightwatch"
}
Run the angular e2e tests in Nightwatch using this command:
npm run test-e2e
If everything goes well, the test will open up Chrome browser, then Google and Wikipedia.
Interactions with Nightwatch
Nightwatch offers an interesting feature: Interactions, which allows you to click, press keys, set values, check if it displays correct data, and the main elements are loading well. Below is a sample case that demonstrates how you can use Interactions for some of your uses cases.
module.exports = {
'Input data testing #2'(browser) {
const searchInputSelector = '#algolia-doc-search';
const searchText = "state";
const editSelector = '.css-1x091gh';

browser
.url('https://reactjs.org')
.waitForElementVisible(searchInputSelector)
.setValue(searchInputSelector, searchText)
.waitForElementVisible('.ds-dataset-1')
.keys(browser.Keys.ENTER)
.assert.containsText(editSelector, 'Edit')
.click(editSelector)
.assert.urlContains('https://github.com/reactjs/reactjs.org/blob/master/content/docs/')
.pause(1000)
}
}
Hooks with Nightwatch
Hooks are another feature of Nightwatch that can make the whole process smoother. These can be used for basic activities like logging, sending messages, and even some asynchronous tasks. Below is a sample of how you can use Hooks:
module.exports = {
'Input data testing #2'(browser) {
const searchInputSelector = '#algolia-doc-search';
const searchText = "state";
const editSelector = '.css-1x091gh';

browser
.url('https://reactjs.org')
.waitForElementVisible(searchInputSelector)
.setValue(searchInputSelector, searchText)
.waitForElementVisible('.ds-dataset-1')
.keys(browser.Keys.ENTER)
.assert.containsText(editSelector, 'Edit')
.click(editSelector)
.assert.urlContains('https://github.com/reactjs/reactjs.org/blob/master/content/docs/')
.pause(1000)
},

after: function (browser, done) {
browser.end(function () {
console.log("Test completed, ending browser connection");
done();
});
},
}End to End Testing in Angular using Cypress
Given below are the steps to conduct end-to-end testing in Angular using Cypress:
Setting up Cypress
1. Install Cypress
npm install cypress --save-dev
2. Open Cypress UI
npx cypress open
This will scaffold the cypress/ directory in your project.
Creating Your First E2E Test
- Go to cypress/e2e/
- Create a file like home-page.cy.ts
describe('Home Page', () => {

  it('should load the home page', () => {

    cy.visit('http://localhost:4200');

    cy.contains('Welcome'); // replace with text on your homepage

  });

});
Run the Test
Headless
npx cypress run
Interactive
npx cypress open
Integrate with Angular CLI
Update angular.json to add a new npm script:
"scripts": {

  "cypress:open": "cypress open",

  "cypress:run": "cypress run"

}
Protractor vs Nightwatch vs Cypress: Better Framework for E2E Angular Testing
Here is a detailed comparison of the three frameworks to help you choose the right one for E2E Angular testing:
| Feature / Tool | Protractor | Nightwatch.js | Cypress |
|---|---|---|---|
| Status | Deprecated | Active | Active |
| Designed for Angular | Yes | No | Works well with Angular |
| Speed | Moderate | Moderate | Fast |
| Ease of Setup | Complex | Medium | Simple |
| Debugging Tools | Basic | Console logs only | Advanced (time-travel, auto-reload) |
| Test Execution | WebDriver-based | WebDriver-based | Runs directly in browser |
| Cross-Browser Support | Yes | Yes | Limited (but improving) |
| CI/CD Integration | Supported | Supported | Supported |
| Community Support | Declining | Moderate | Strong and growing |
| Best For | Legacy Angular applications | Selenium/WebDriver users | Modern Angular and JS frameworks |
Read More: Top 5 Alternatives to Protractor
Why Run Angular E2E Tests using Nightwatch on Real Device Cloud?
Here’s why you should run your Nightwatch, tests on BrowserStack Automate:
- Diverse Environment Testing: Execute tests across a wide range of browsers and operating systems without maintaining local infrastructure, ensuring consistent performance across platforms.
- Concurrent Test Execution: Run multiple test suites simultaneously to reduce total testing time, enabling quicker feedback and faster deployment cycles.
- CI/CD Integration: Seamlessly integrate with major CI/CD systems like Jenkins, Travis CI, CircleCI, and GitHub Actions to automate testing within your development pipeline.
- Diagnostic Tools for Better Debugging: Access detailed logs, screenshots, and video recordings of test sessions to quickly identify and resolve issues.
- Testing on Real Devices: Test on real devices and browsers in the cloud for precise and real-world outcomes.
- Customizable Test Execution: Tailor test runs through BrowserStack’s user interface or APIs to meet specific needs.
Conclusion
However, one must understand the development technique and testing criteria involved before selecting a framework. This makes it easier to choose the best framework that suits our requirements.
No matter which framework you choose, it is important to perform tests on real devices and browsers over emulators and simulators for accurate results. Using BrowserStack Real Device Cloud, you can access 3500+ browser-device combinations offering a wide coverage, allowing you to test end to end under real user conditions.
