How to perform Unit testing for Angular apps?

Learn how to perform Angular Unit Testing with the help of Jasmine & Karma Testing Frameworks

Get Started free
How-to-perform-Unit-testing-for-Angular-apps
Home Guide How to perform Unit testing for Angular apps?

How to perform Unit testing for Angular apps?

Unit testing in Angular apps is an essential practice to ensure individual components & functions work as expected. By isolating parts of the application, unit tests can validate whether each piece performs correctly, independent of the entire app.

Angular provides robust tools for unit testing through Jasmine, a popular testing framework, and Karma, a test runner. Together, both of these tools make it easy to write, run, and monitor tests for Angular components, services, pipes, and more.

Writing unit tests not only boosts the app’s reliability but also enables faster identification and resolution of bugs, leading to a smoother development process and a more stable application in production.

This guide discusses angular unit testing in detail.

What is Angular Unit testing?

Angular unit testing is the process of testing individual parts of an Angular application, such as components and services, in isolation to make sure they function correctly.

It uses Jasmine for writing tests and Karma for running them in a controlled environment. By focusing on small, self-contained tests, Angular unit testing helps developers catch bugs early, improve code quality, and make maintenance easier.

A widely used approach for structuring unit tests is the AAA (Arrange-Act-Assert) pattern. The method involves

  • Setting up the test conditions (Arrange)
  • Performing the action being tested (Act)
  • Checking the results (Assert)

This pattern enables developers to write clear, maintainable tests, ultimately enhancing code quality and building confidence in the application’s functionality.

Why Angular Unit Testing is important?

In Test-Driven Development (TDD), developers write unit tests before the program code itself, converting requirements into tests and then building the code to pass them.

Unit tests isolate components, to allow developers to identify issues early, make any changes confidently and maintain stable functionality without affecting any other part of the program.

Key advantages of unit testing include:

  • Early Issue Detection: Unit tests identify & address problems early. Thus, saving time and resources.
  • Safety Net for Changes: A solid test suite helps prevent regressions, and ensures code changes do not break the existing functionality.
  • Improved Code Quality: Tests allow developers to refactor safely, resulting in cleaner & maintainable code.
  • Better Architecture: Writing unit tests promotes a modular design, for a more structured application.
  • Documentation: Tests serve as executable documentation, showing how code is expected to work.
  • Detects Code Smells: Difficulty in testing can reveal complex or problematic code that should be simplified.
  • Streamlined Defect Investigation: A strong unit test suite helps testers quickly pinpoint issues in specific components, reducing back-and-forth with developers and enabling faster defect resolution.

What are Jasmine and Karma in Angular Testing?

Jasmine and Karma are widely used tools for testing Angular applications. Jasmine, a BDD framework, makes tests readable and understandable, while Karma, a test runner, executes tests in real browsers for real-time feedback.

Jasmine

Jasmine is a free, open-source Behavior Driven Development (BDD) framework that supports writing clear, behavior-driven test cases without including the DOM. It’s ideal for front-end testing and lets developers simulate user interactions, test UI responsiveness, and automate user behaviors. Jasmine’s strong community and documentation make it accessible and easy to use.

Karma

Karma is a test runner that executes Jasmine tests across multiple browsers via the command line, and instantly displays results. It watches files for changes and re-runs tests automatically. Angular uses Karma by default by integrating it easily into the development workflow.

How to create an Angular test App?

There are certain prerequisites required before starting with the testing, the first being to write a basic test app.

In order to incorporate Jasmine and Karma, it is advised to use Angular CLI (Node.js) to create your Angular App. This also lets us create a simple Jasmine spec file named the same as the App file but ending in .spec.ts

To create and build a new Angular app, use the following command in your Angular CLI:

ng new simpleApp
Copied

This command will create a new sample Angular App called simpleApp. Once the App is created, go to the parent directory of your app and run the below command to run your app in the browser.

Cd simpleApp
ng serve
Copied

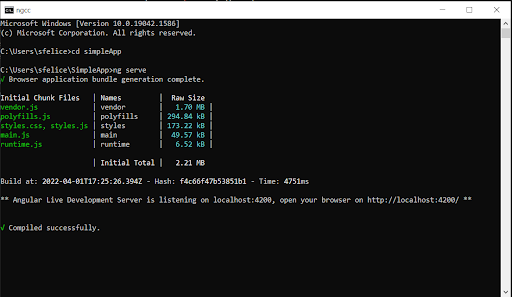
After running the command, CLI will look like this.

Creating Angular Test App

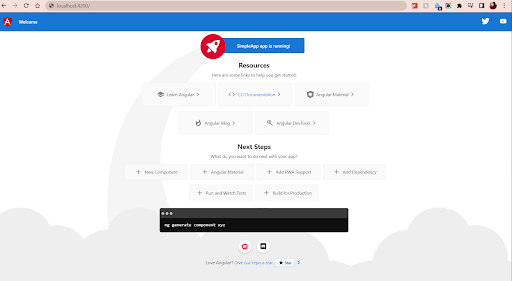
Your newly created Angular App will look like this when you open it via http://localhost:4200/

Angular Test App on Local Host

How to write a Unit Test in Angular?

The Angular testing package includes two utilities called TestBed and async. TestBed is the main utility package. (Please see the app.component.spec.ts file below)

There are three main methods in this test file:

  • describe() – It’s a suite of Test scripts that calls a global Jasmine function with two parameters: a string and a function. It also consists of beforeEach block.
  • it() – It’s the smallest unit test case that is written to be executed, which calls a global Jasmine function with two parameters: a string and a function. Multiple it() statements can be written inside the describe()
  • expect() – Every it() statement has a expect() function which takes a value and expects a return in true form

BrowserStack Automate Banner

When the sample angular App is created, the test script file is also created alongside. It ends with .spec.ts. Below is what the initial test script file app.component.spec.ts looks like:

import { TestBed } from '@angular/core/testing';
import { AppComponent } from './app.component';

describe('AppComponent', () => {
beforeEach(async () => {
await TestBed.configureTestingModule({
declarations: [
AppComponent
],
}).compileComponents();
});

it('should create the app', () => {
const fixture = TestBed.createComponent(AppComponent);
const app = fixture.componentInstance;
expect(app).toBeTruthy();
});

it(`should have as title 'SimpleApp'`, () => {
const fixture = TestBed.createComponent(AppComponent);
const app = fixture.componentInstance;
expect(app.title).toEqual('SimpleApp');
});

it('should render title', () => {
const fixture = TestBed.createComponent(AppComponent);
fixture.detectChanges();
const compiled = fixture.nativeElement as HTMLElement;
expect(compiled.querySelector('.content span')?.textContent).toContain('SimpleApp app is running!');
});
});
Copied

In the above code, there are three it() functions that equal three Unit test cases. Now, let’s run the above Unit test cases by using the following command in CLI:

ng test
Copied

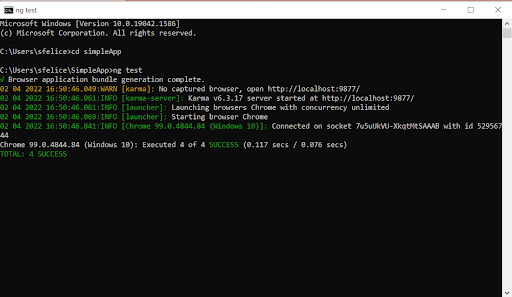
The CLI will look like this:

Unit Test of Angular App

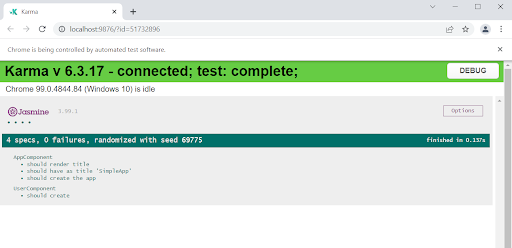
A successful test will look something like this in the browser:

Unit Test in Karma Test Runner

How to write a Negative Unit Test in Angular?

Now, let’s rewrite the above app.component.spec.ts file to showcase what a failed test will look like:

import { TestBed } from '@angular/core/testing';
import { AppComponent } from './app.component';

describe('AppComponent', () => {
beforeEach(async () => {
await TestBed.configureTestingModule({
declarations: [
AppComponent
],
}).compileComponents();
});

it('should create the app', () => {
const fixture = TestBed.createComponent(AppComponent);
const app = fixture.componentInstance;
expect(app).toBeTruthy();
});

it(`should have as title 'SimpleApp'`, () => {
const fixture = TestBed.createComponent(AppComponent);
const app = fixture.componentInstance;
expect(app.title).toEqual('FreeApp');
});

it('should render title', () => {
const fixture = TestBed.createComponent(AppComponent);
fixture.detectChanges();
const compiled = fixture.nativeElement as HTMLElement;
expect(compiled.querySelector('.content span')?.textContent).toContain('SimpleApp app is running!');
});
});
Copied

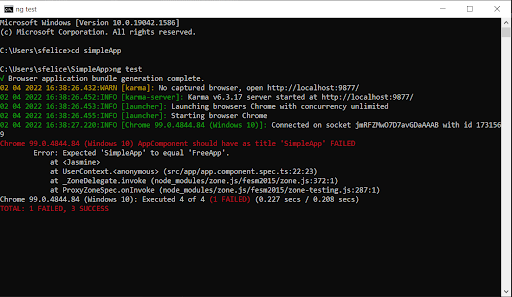
The second it() function has been modified to have the title as FreeApp. This would result in a negative test since the title of our sample app is SimpleApp.

The CLI will look like this:

Negative Unit Test of Angular App

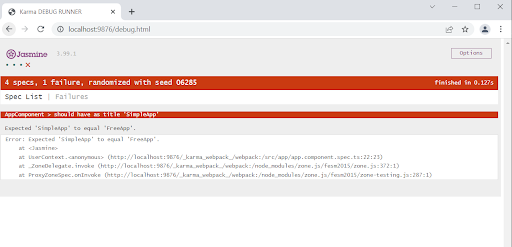
A failed test will look like this in the browser:

Failed Unit Test of Angular App

Similarly, multiple components can be created in your angular app, which will have their own test file that can be used to perform Unit testing.

Talk to an Expert

How to Unit Test an Angular Component

When designing unit tests for Angular components, it is important to consider the following behaviors:

  • Rendering Templates: Ensure that the component can properly render templates in the HTML DOM structure.
  • Inputs and Outputs: Verify that the component can receive data via @Input properties from its parent component & send data back using @Output events.
  • Event Handling: Ensure that the component can respond to various events and interactions, such as user clicks, input changes and more.
  • Service Communication: Test if the component can interact with services or stores to fetch or manipulate data.
  • Data Binding: Ensure the component can properly bind data to the template, making it editable & interactive for the user.

Below are the main steps to unit test an angular component:

1. Set up the Testing Environment: The first thing to do is import Angular’s TestBed, which allows you to configure & initialise the environment for testing. You will also need to import your component and any other necessary dependencies, like services.

import { TestBed } from '@angular/core/testing';

import { MyComponent } from './my.component';
Copied

2. Create the TestBed Configuration: Here, declare the component you want to test. You may also need to import necessary modules or provide mock services if your component depends on them.

beforeEach(() => {

TestBed.configureTestingModule({

declarations: [ MyComponent ],

}).compileComponents();

});
Copied

3. Write the Test: Once the setup is done, you can start writing your tests. The most basic test would check if the component gets created properly.

it('should create the component', () => {

const fixture = TestBed.createComponent(MyComponent);

const component = fixture.componentInstance;

expect(component).toBeTruthy();

});
Copied

4. Test Component Logic: To test the component’s logic, you can interact with it through its properties or methods. You can also trigger change detection if needed.

it('should have a default value for title', () => {

const fixture = TestBed.createComponent(MyComponent);

const component = fixture.componentInstance;

expect(component.title).toBe('Welcome');

});
Copied

How to Test an Async Operation in Angular

Testing asynchronous operations, like HTTP requests or timers, maybe tricky, but Angular makes it easy. Here’s how to handle async operations in your tests in a simple way.

1. Using fakeAsync and tick

Angular provides the fakeAsync function to simulate the passage of time in tests, which is really useful for testing things like setTimeout, HTTP requests, or any async operations.

To use fakeAsync, you can wrap your test function and use tick() to simulate time and trigger the completion of the async tasks.

Example:

import { fakeAsync, tick } from '@angular/core/testing';

import { MyComponent } from './my.component';

import { MyService } from './my.service';

import { of } from 'rxjs';


it('should handle async operation', fakeAsync(() => {

const service = TestBed.inject(MyService);

const fixture = TestBed.createComponent(MyComponent);

const component = fixture.componentInstance;


// Mock an async service call

spyOn(service, 'getData').and.returnValue(of('Async Data'));


component.ngOnInit(); // Triggers the async service call


tick(); // Simulates time passage (e.g., waiting for HTTP response)


fixture.detectChanges(); // Updates the component after async operation


expect(component.data).toBe('Async Data'); // Verifies the result

}));
Copied

2. Using async and whenStable

If you’re dealing with more complex async tasks (like HTTP requests), you can use Angular’s async function and whenStable() to wait for the async operation to complete before making assertions.

Example:

it('should wait for async operation to complete', async(() => {

const fixture = TestBed.createComponent(MyComponent);

const component = fixture.componentInstance;


fixture.detectChanges(); // Starts async tasks, such as an HTTP request


fixture.whenStable().then(() => { // Waits for all async tasks to complete

expect(component.data).toBe('Async Data'); // Verifies the result

});

}));
Copied

In both the above cases, the goal is to test that the component behaves correctly after the async operation completes. The key difference is that fakeAsync lets you simulate time, while async and whenStable wait for real async behavior to complete.

How to Test Angular Pipes and Directives

Pipes and directives are essential parts of Angular applications that help transform data and add behavior to HTML elements.

Pipes allow to format data before displaying it to users, while Directives enhance the functionality & interactivity of the user interface. Testing these components is crucial to ensure they work correctly and prevent issues that could affect the user experience.

Testing Angular Pipes

Pipes are used to transform data in Angular. When testing pipes, it’s important to check how they handle different inputs including edge cases like null or undefined values.

Let’s take an example where we have a pipe that formats dates. To ensure that it works correctly for different inputs, here’s how we can write the tests:

import { DateFormatPipe } from './date-format.pipe';

describe('DateFormatPipe', () => {

const pipe = new DateFormatPipe();

it('should format "2024-10-15" to "15/10/2024"', () => {

expect(pipe.transform('2024-10-15')).toBe('15/10/2024');

});

it('should handle null input by returning an empty string', () => {

expect(pipe.transform(null)).toBe('');

});

});
Copied

Here,

  • We are testing if the pipe correctly formats a date from 2024-10-15 to 15/10/2024.
  • We also check if the pipe properly handles null input by returning an empty string.

Testing pipes like this ensures that your application handles data transformations reliably and consistently.

Testing Angular Directives

Directives are used to add behavior to elements in the DOM. When testing directives, we need to create a host component that acts as a sandbox for applying the directive and observing its behavior.

Let’s say we have a directive called HighlightQuoteDirective that highlights a quote when it is selected. Here’s how we can test it:

import { Component } from '@angular/core';

import { TestBed, ComponentFixture } from '@angular/core/testing';

import { HighlightQuoteDirective } from './highlight-quote.directive';

@Component({

template: `

<div [appHighlightQuote]="isSelected" class="quote">Test Quote</div>

`

})

class TestQuoteComponent {

isSelected = false;

}

describe('HighlightQuoteDirective', () => {

let component: TestQuoteComponent;

let fixture: ComponentFixture<TestQuoteComponent>;

beforeEach(() => {

TestBed.configureTestingModule({

declarations: [TestQuoteComponent, HighlightQuoteDirective]

});

fixture = TestBed.createComponent(TestQuoteComponent);

component = fixture.componentInstance;

});

it('should highlight quote when selected', () => {

component.isSelected = true;

fixture.detectChanges();

expect(fixture.nativeElement.querySelector('.quote').style.backgroundColor).toBe('yellow');

});

it('should not highlight quote when not selected', () => {

fixture.detectChanges();

expect(fixture.nativeElement.querySelector('.quote').style.backgroundColor).toBe('');

});

});
Copied

Here,

  • We create a TestQuoteComponent that uses the HighlightQuoteDirective.
  • The test checks if the background color of the quote changes to yellow when the quote is selected (isSelected = true).
  • Another test ensures the background color remains unchanged when the quote is not selected.

Testing directives like this help verify that the added behavior works as expected and provides the correct user interaction.

Mocking dependencies in Angular tests

When testing Angular components or services, you need to isolate them from other parts of your application. This is exactly where mocking dependencies come into the picture.

By replacing original dependencies with mock ones, you can focus on testing just the behavior of the component or service and not worry about the implementation of the other parts.

Key Principles for Mocking Dependencies

When mocking dependencies in your tests, it’s important to follow the following principles:

  1. Equivalence: The mock interface should match the original dependency, i.e., it should have the same methods, properties, and return types.
  2. Replaceability: The mock is only needed to act as a stand-in for the original in the context of the test. You don’t need to replicate the entire logic of the real dependency.
  3. Synchronization: The mocks should be in sync with the original dependency. If the real dependency changes, the mock should be able to update accordingly to avoid false positives in tests.

In Angular tests, you typically use Jasmine for mocking. Here’s a simple example of mocking a service:

import { TestBed } from '@angular/core/testing';

import { MyComponent } from './my.component';

import { MyService } from './my.service';

import { of } from 'rxjs';


describe('MyComponent', () => {

let component: MyComponent;

let mockService: jasmine.SpyObj<MyService>;


beforeEach(() => {

// Create a mock service with the same interface as MyService

mockService = jasmine.createSpyObj('MyService', ['getData']);


// Set up the mock to return a specific value when getData is called

mockService.getData.and.returnValue(of('Mocked Data'));


// Configure the testing module with the mock service

TestBed.configureTestingModule({

declarations: [MyComponent],

providers: [

{ provide: MyService, useValue: mockService } // Replace MyService with the mock

]

}).compileComponents();


component = TestBed.createComponent(MyComponent).componentInstance;

});


it('should display mocked data', () => {

component.ngOnInit();

expect(component.data).toBe('Mocked Data'); // Assert that the component uses the mocked data

});

});
Copied

Best Practices for Unit Testing in Angular

Unit tests are an important part of ensuring the Angular applications work as expected. Here are some of the best practices to follow:

  • Keep Tests Fast and Simple: Unit tests should be quick to run. The faster they are, the more often you’ll use them, which helps catch bugs early. Simple tests give you accurate results without extra complexity.
  • Do not Repeat Code: Your tests shouldn’t duplicate your app’s logic. Instead, focus on checking if things work as expected, not rewriting the same code. This keeps tests clean and focused.
  • Test in Real Environments: For reliable results, test on real devices & browsers, not emulators. Real-world testing gives you a better idea of how your app will behave in production.

BrowserStack Automate Banner

  • Use a Sandbox for Testing: Always run the tests in an isolated environment to avoid outside interference. This makes sure your tests are consistent & not affected by external factors.
  • Use Spies for Services: When testing services, use Jasmine spies to mock different methods. This lets you focus on testing the component or function without worrying about the service itself.
  • Access DOM with debugElement: Instead of using native elements, interact with the DOM using Angular’s debugElement. It helps make your tests more reliable and consistent across different environments.
  • Choose the Right Query Method: Use By.css to query DOM elements, especially if your app is on a server. This works better across platforms and isn’t limited to browsers.
  • Aim for 80% Coverage: Try to cover at least 80% of your code with tests. This ensures you’re testing most of your app and reduces the chances of bugs slipping through.
  • Name Tests Clearly: Use clear, consistent names for your tests. It helps others understand what each test does and keeps everything organized.

Conclusion

Unit testing is crucial for ensuring the reliability and quality of Angular applications. By using Jasmine and Karma, developers can create and run tests that check individual components, services and pipes to make sure they function as expected.

Additionally, following best practices like keeping tests simple, using mocks for dependencies and ensuring a high level of code coverage can lead to more maintainable and bug free applications.

However, to ensure your software works in real user conditions, it is important to test on actual browsers and devices using platforms like BrowserStack.

BrowserStack provides a cloud-based Selenium Grid with access to over 3500+ real browsers and devices and also offers Cypress testing on more than 30 real browser versions. Simply sign up, choose your desired device, browser, and OS combination, and begin testing your application on real user environments for free.

Try BrowserStack for Free

Frequently Asked Questions

1. Which testing framework is best for Angular?

Jasmine and Karma are the most commonly used frameworks for unit testing in Angular. However, Cypress can also be used for end-to-end testing as it is fast and has modern features.

2. What are the different types of testing in Angular?

The main types of testing in Angular include:

  • Unit testing: Here, individual components, services and functions are tested in isolation, using Jasmine and Karma.
  • Integration Testing: You can test the interaction between different application parts like components and services.
  • End-to-End (E2E) Testing: Run tests on the application as a whole to simulate user behavior using frameworks like Cypress.

Useful Resources

Tags
Automation Testing Types of Testing Website Testing