The Selenium NUnit Framework is a popular choice for automating web application tests using the C# programming language. In this tutorial, you’ll learn how to set up Selenium with NUnit in Visual Studio, write your first test in C#, and run it both locally and on BrowserStack for seamless cross-browser testing.
What is NUnit Framework? Why is it needed?
NUnit is a Unit Testing framework that supports all the .NET languages. It was initially ported from JUnit. However, the latest version, NUnit 3 is completely rewritten, offering new features and wider support to .NET platforms.
When searching for a Unit testing framework for .Net with Selenium, NUnit is the most popular framework suggested, along with XUnit and MsTest. However, due to its feature-packed Unit testing, NUnit has become a favorite choice among the developers and testers when it comes to running Selenium Integrated browser tests.
Here are a few features that make Nunit a good choice for integrating Selenium:
- NUnit framework is an open-source project with strong community support.
- Well suited for Test Driven Development approach
- Reporting is crucial for any test framework. and NUnit produces a comprehensive test report with ReportUnit integration
- Using Nunit’s [TestCase] attribute, one can implement parameterized tests, which will make the test reusable for multiple data sets.
- NUnit includes a fluent version of Assert APIs.
- NUnit can run in both 32-bit and 64-bit architectures.
- Support for parallel test execution in the Selenium Grid reduces the test execution time to a greater extent.
Read More: Run NUnit Tests in Parallel with Selenium
Pre-requisites for Setting up Selenium C# with NUnit Framework
Before initiating test automation using the Selenium C# NUnit Framework, ensure the following are installed:
- Install Microsoft Visual Studio Community 2022 (64-bit)
- Install .NET 6.x version
- Install ChromeDriver latest version
- Install Chrome browser
Creating a New NUnit Project in Visual Studio
To set up a new project within the Selenium C# NUnit Framework:
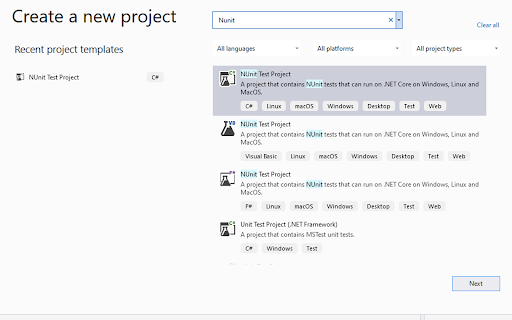
Step 1: Open the Visual Studio click on New project and search for Nunit, select it and click on Next to create a new project.
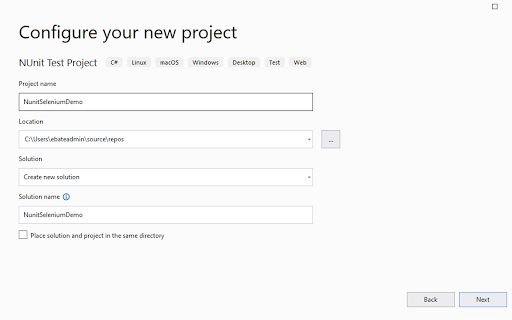
Step 2: Enter the project name and details to create the new project file.
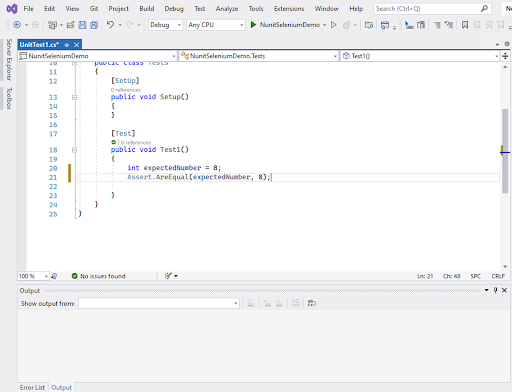
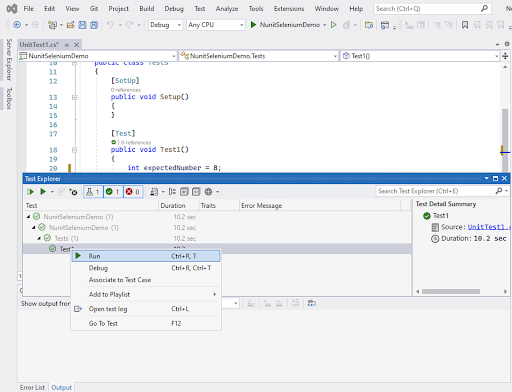
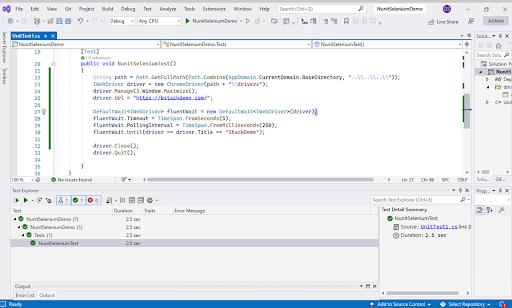
Step 3: Once the project is created, a default UnitTest is created inside the project and is opened in the editor as seen below. The test script is added under this UnitTest file.
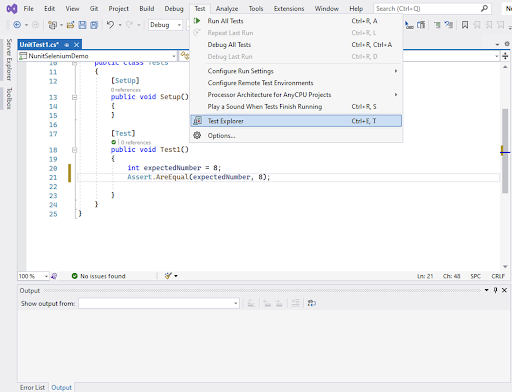
Step 4: Upon writing the test script, run the test by enabling the Test Explorer window. Click on Test > Test Explorer
Step 5: Test Explorer lists all the NUnit tests created within the project. It allows you to select an individual test to run or the whole project.
Run NUnit Selenium Tests on BrowserStack
Integrating Selenium with NUnit
Follow these steps to integrate Selenium with NUint:
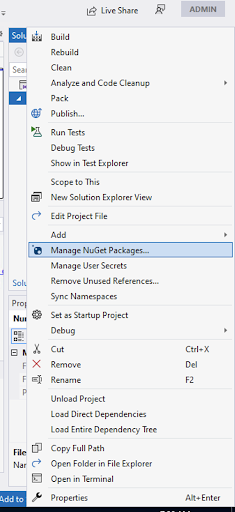
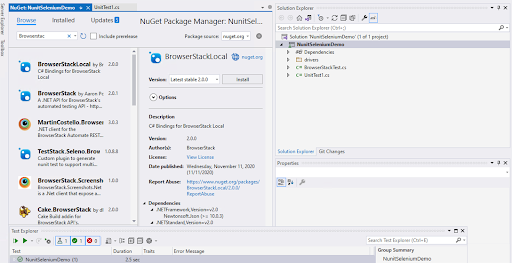
Step 1: Right-click on the Project in Solution Explorer and Select Manage Nuget Packages
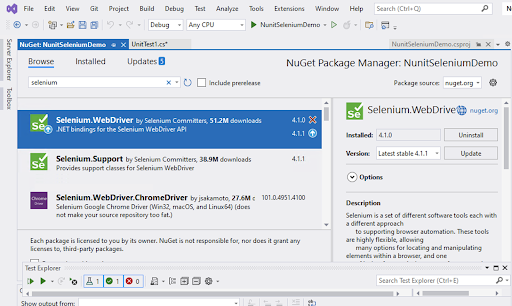
Step 2: In the Nuget Package Manager Window > Browse, enter Selenium and install the package
Installing the Selenium Webdriver package to the Project is just like adding a JAR dependency to the project.
Creating First Nunit Selenium Test
Follow these steps to create first NUnit Selenium Test:
Step 1: Download the latest stable ChromeDriver
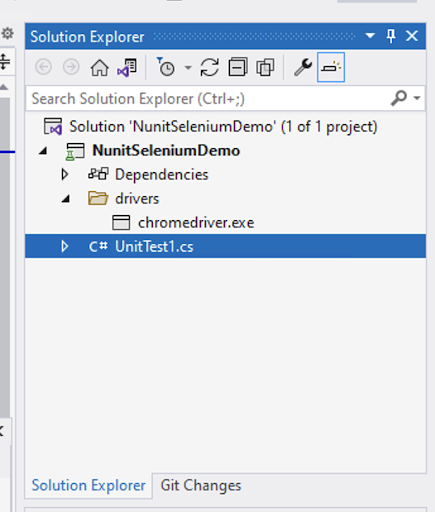
Step 2: Create a new folder called drivers inside the project and add the chromedriver.exe in it.
Step 3: Writing the test script using the code snippet below. It imports the reference classes, lets Selenium Webdriver know where to find the chromedriver.exe, and calls the Selenium APIs
using NUnit.Framework;
using OpenQA.Selenium;
using OpenQA.Selenium.Chrome;
using System.IO;
using System;
using OpenQA.Selenium.Support.UI;


namespace NunitSeleniumDemo
{
public class Tests
{
[SetUp]
public void Setup()
{

}

[Test]
public void NunitSeleniumTest()
{
String path = Path.GetFullPath(Path.Combine(AppDomain.CurrentDomain.BaseDirectory, "..\\..\\..\\"));
IWebDriver driver = new ChromeDriver(path + "\\drivers");
driver.Manage().Window.Maximize();
driver.Url = "https://bstackdemo.com/";

DefaultWait<IWebDriver> fluentWait = new DefaultWait<IWebDriver>(driver);
fluentWait.Timeout = TimeSpan.FromSeconds(5);
fluentWait.PollingInterval = TimeSpan.FromMilliseconds(250);
fluentWait.Until(driver => driver.Title == "StackDemo");

driver.Close();
driver.Quit();

}
}
}
Step 4: Run the test using Test Explorer which will open the chrome browser and access browserstack site, fluent wait until expected title is found and close the browser.
Integrating the Selenium C# NUnit Test with BrowserStack
Follow these steps to integrate Selenium C# NUnit test with BrowserStack:
BrowserStack Automate allows QAs to test on 3500+ real mobile and desktop devices through its cloud Selenium Grid. BrowserStack’s real device cloud helps them test their application under real user conditions, which makes it easy to identify bottlenecks in the user experience.
Read More: Detailed documentation regarding Integration between BrowserStack, NUnit & Selenium.
Step 1: Sign up for free. Login to get the Username and Access Key from User Account > Summary section.
Step 2: Add BrowserStackLocal nuget package to your project
Step 3: Modify the local test like below in order to run in BrowserStack cloud from your local machine. Add the username and accesskey details in below code snippet.
using System;
using OpenQA.Selenium;
using OpenQA.Selenium.Remote;
using OpenQA.Selenium.Support.UI;
using NUnit.Framework;
using System.Collections.Generic;
using OpenQA.Selenium.Chrome;

namespace SeleniumTest
{
    class Tests
    {
        [Test]
        public void NunitSeleniumTest()
        {
            IWebDriver driver;
            Dictionary<string, object> browserStackOptions = new Dictionary<string, object>();
            browserStackOptions.Add("userName", "<username>");
            browserStackOptions.Add("accessKey", "<accesskey>");
            ChromeOptions options = new ChromeOptions();
            options.AddAdditionalOption("bstack:options", browserStackOptions);
            driver = new RemoteWebDriver(new Uri("https://hub-cloud.browserstack.com/wd/hub/"), options);
            WebDriverWait wait = new WebDriverWait(driver, TimeSpan.FromSeconds(10));
            try
            {
                driver.Manage().Window.Maximize();
                driver.Url = "https://bstackdemo.com/";

                DefaultWait<IWebDriver> fluentWait = new DefaultWait<IWebDriver>(driver);
                fluentWait.Timeout = TimeSpan.FromSeconds(5);
                fluentWait.PollingInterval = TimeSpan.FromMilliseconds(250);
                fluentWait.Until(mydriver => mydriver.Title == "StackDemo");

            }
            catch
            {
                ((IJavaScriptExecutor)driver).ExecuteScript("browserstack_executor: {\"action\": \"setSessionStatus\", \"arguments\": {\"status\":\"failed\", \"reason\": \" Some elements failed to load.\"}}");
            }
            driver.Quit();
        }
    }
}
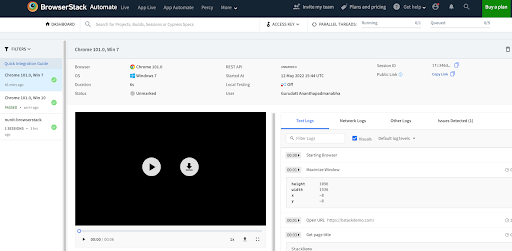
Step 4: After running the test, check the result updated in the BrowserStack Automate dashboard
Conclusion
By following these steps, you can successfully set up and execute automated tests using the Selenium C# NUnit Framework, both locally and on BrowserStack’s cloud platform. This setup enhances your testing capabilities, allowing for scalable and cross-platform testing.


