Selenium is a well-established automation testing framework that provides tools tailor-made for browser automation. When it comes to deftly navigating various websites and web scraping material, or carrying out repetitive tasks Selenium is quintessential.
This tutorial illustrates a core method to get the current URL in selenium using python. The current_url method is generally employed in cases where you require an intermediate URL from a redirect chain or need to do a series of navigations among different URLs.
Overview
Steps to get the current URL of a webpage in a browser using Selenium Python:
- Install Selenium and set up WebDriver for your browser.
- Import Selenium and necessary modules in your Python script.
- Launch the browser using a WebDriver instance.
- Navigate to the target webpage using .get().
- Use .current_url to retrieve the URL of the loaded page.
- Print or validate the URL as needed.
- Close the browser session after the test.
This method is ubiquitous in most situations involving browser automation.
How to get Current URL in Selenium Webdriver using Python? (with Example)
To instantiate the usefulness of the current_url method, a basic example involving navigation to a website using google chrome was performed. To further illustrate its import, navigation between multiple websites while screen scraping information was also implemented. This example showcased how the current_url method is indispensable to verify correct navigation with browser automation.
Before executing the code to navigate to the URL https://www.google.com, the following prerequisites are needed.
Pre-requisites
- Set up a python environment.
- Install Selenium. If you have conda or anaconda set up then using the pip package installer would be the most efficient method for Selenium installation. Simply run this command (on anaconda prompt, or directly on the Linux terminal):
pip install selenium
- Download the latest WebDriver for the browser you wish to use, or install webdriver_manager by running the command:
pip install webdriver_manager
Using the Current URL method in Selenium to perform a URL check on google.com
Step 1: Import the required packages using the following command.
from selenium import webdriver
from selenium.webdriver.chrome.service import Service
from webdriver_manager.chrome import ChromeDriverManager
Step 2: Use WebDriver manager to download the required WebDriver for your browser (currently ChromeDriver, GeckoDriver, IEDriver, OperaDriver, and EdgeChromiumDriver can be downloaded via this package).
First, the WebDriver manager package will search for the version of the browser being used. Following this, it will check your cache to see if the WebDriver is already present in your cache. If there is no WebDriver present, or an old version is present, the package will download and save the latest version of the WebDriver.
In this example google chrome is being used, therefore the WebDriver manager installed the latest version of the ChromeDriver.
driver = webdriver.Chrome(service=Service(ChromeDriverManager().install()))
In the above command, the Service object inherits and sets the executable path as the location where the WebDriver has been saved following installation.
Step 3: You can also manually download the WebDriver for your respective browser here. If you manually downloaded the WebDriver you will either need to place the driver on your system path (put the chromedriver.exe file in the same location as your python code file) or alternatively set your executable path as the location of the WebDriver.
If your driver is on your system path:
from selenium import webdriver
driver = webdriver.Chrome()
Alternatively set executable path as the location of webdriver:
from selenium import webdriver
from selenium.webdriver.chrome.service import Service

ser = Service(r"C:/Users/Asus/Downloads/chromedriver_win32/chromedriver.exe")
driver = webdriver.Chrome(service=ser)
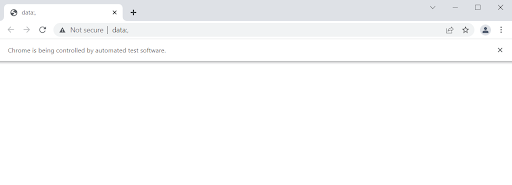
Following this, the chrome browser should open with data; in the URL bar. When we attempt to get the current URL without fetching another URL, this is the URL, which will be obtained.
Step 4: Load your required URL using get(), in this example, we fetched google.com from the WebDriver as seen below.
driver.get("https://www.google.com")Step 5: Use the current_url method to obtain the current URL from the driver and print it.
get_url = driver.current_url
print("The current url is:"+str(get_url))
driver.quit()
Try Selenium Testing on Real Devices for Free
Performing URL checks with Current URL in Selenium using Python
One can ensure precise navigation across multiple websites following the methodology of the code below.
from selenium import webdriver
from selenium.webdriver.chrome.service import Service
from selenium.webdriver.support.ui import WebDriverWait
from selenium.webdriver.support import expected_conditions as EC
from bs4 import BeautifulSoup
import codecs

ser = Service(r"C:/Users/Asus/Downloads/chromedriver_win32/chromedriver.exe")
driver = webdriver.Chrome(service=ser)

driver.get("https://www.google.com")

get_url = driver.current_url

print("The current url is:"+str(get_url))

#Redirect
val = input("Enter a url: ")
wait = WebDriverWait(driver, 10)
driver.get(val)
wait.until(EC.url_to_be(val))
page_source = driver.page_source

soup = BeautifulSoup(page_source,features="html.parser")
title = soup.title.text
file=codecs.open('article_titles.txt', 'a+')
file.write(title+"\n")
file.close()

get_url = driver.current_url
print("The current url is:"+str(get_url))

val = input("Enter a url: ")
wait = WebDriverWait(driver, 10)
driver.get(val)
wait.until(EC.url_to_be(val))
page_source = driver.page_source
soup2 = BeautifulSoup(page_source,features="html.parser")
title = soup2.title.text
file=codecs.open('article_titles.txt', 'a+')
file.write(str(title)+"\n")
file.close()

get_url = driver.current_url
print("The current url is:"+str(get_url))
driver.quit()
Output
The current url is:https://www.google.com/
Enter a url: https://www.browserstack.com/guide/python-selenium-to-run-web-automation-test
The current url is:https://www.browserstack.com/guide/python-selenium-to-run-web-automation-test
Enter a url: https://www.browserstack.com/guide/download-file-using-selenium-python
The current url is:https://www.browserstack.com/guide/download-file-using-selenium-python
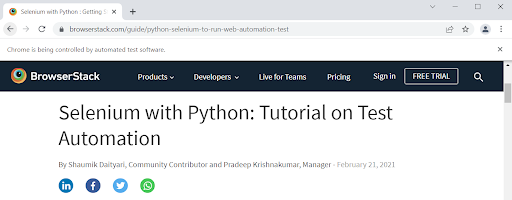
The program first opens https://www.google.com/. Then it asks for a URL input; The URL of the article Selenium with Python : Getting Started with Automation is entered as input by the user. The title of the article on this page is then scraped and stored in article_titles.txt as shown below.
Fetching the input URL and scraping the title of the article.
Writing the article title into article_titles.txt.
Saving the article_titles.txt file.
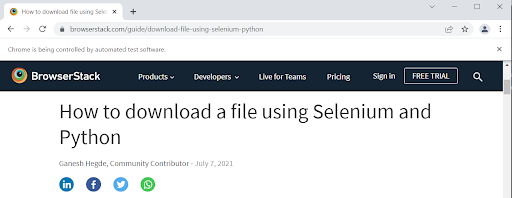
Next another url for an article titled How to download a file using Selenium and Python is entered as input. The program scrapes the title of this article as well, appending it the article_titles.txt document as shown in the screenshots below.
Fetching the input URL and scraping the title of the article
Writing the article title into article_titles.txt.
Difference between .current_url vs .get()
It is important to distinguish between driver.current_url and driver.get():
- driver.get(URL): This command instructs the browser to navigate to the specified URL and initiates page loading.
- driver.current_url: This attribute returns the URL of the page currently loaded in the browser instance.
driver.get() ‘loads’ a URL, while driver.current_url ‘retrieves’ the URL of the currently loaded page.
| Feature | .get(url) | .current_url |
|---|---|---|
| Function | Navigates to a new page | Retrieves the current page URL |
| Input/Output | Takes a URL string as input | Returns a URL string |
| Side Effect | Loads a new page | No side effect, just fetches data |
| Return Value | None | String (the URL) |
Example:
driver.get("https://example.com")   # navigates to the page

print(driver.current_url) # prints 'https://example.com'Practical Use Cases of Getting Current URL
Retrieving the current URL has numerous practical applications in Selenium automation:
- Verifying Navigation: To ensure that clicking a link or submitting a form leads to the correct page.
- Handling Redirects: To track and verify intermediate URLs in a redirection chain.
- Session Management: To confirm that user sessions are maintained or altered as expected after certain actions.
- Dynamic URL Handling: To extract dynamic IDs or parameters from URLs for further use in tests.
- Error Logging: To include the current URL in error reports to provide context for test failures.
Best Practices for Working with .current_url in Selenium
When working with current_url, consider these best practices:
- Navigate before using .current_url: Always call .get() or complete navigation before accessing .current_url.
- Use assertions for validation: Combine .current_url with assert to check if the expected URL is loaded.
- Handle delayed redirects: Add explicit waits to ensure the URL has updated before verification.
- Normalize URLs: When comparing URLs, consider normalizing them by removing trailing slashes or URL parameters that might vary but do not affect the page’s content.
- Log URLs on Failure: In case of test failures related to URL verification, log the actual current URL to aid in debugging.
- Avoid Hardcoding Entire URLs: For dynamic parts of URLs, use url_contains() or regular expressions for more flexible assertions.
- Log for debugging: Print or log .current_url during tests to trace navigation issues.
- Combine with content checks: Use .current_url along with element or text checks for full validation.
- Use in exception handling: Capture the current URL in error handling to understandthe failure context.
- Be aware of single-page apps: In SPAs, watch for hash or query changes that affect .current_url.
Read More: How to handle dropdown in Selenium Python?
Why run Selenium tests on Real Devices?
Executing Selenium tests on real devices offers these advantages:
- It improves test accuracy and reliability.
- Real devices replicate actual user environments, including hardware, OS, and browser behavior.
- They help uncover issues related to performance, responsiveness, and device compatibility.
- Real device testing supports validation of mobile-specific features like touch, GPS, and orientation.
BrowserStack Automate is a comprehensive testing tool that enables running Selenium Python tests across a wide range of real mobile devices and desktop browsers. This eliminates the complexities of managing an in-house device lab and ensures tests are executed in environments that accurately represent end-user scenarios. This leads to more reliable test results and improved application quality.
Try Automation Testing on BrowserStack for Free
Conclusion
The current_url attribute in Selenium WebDriver with Python is a fundamental tool for verifying navigation, handling redirects, and ensuring the application behaves as expected. By understanding its usage and adhering to best practices, automation scripts can be made more robust and reliable.


