GeckoDriver acts as a link between your Selenium tests and Firefox, facilitating browser automation. It’s needed when using Firefox with Selenium in Python.
Overview
What is GeckoDriver
GeckoDriver is a web browser engine that is used by a lot of applications built by the Mozilla Corporation. It is used as a proxy by the W3C WebDriver-compatible clients to interact with Gecko browsers.
Benefits of Using GeckoDriver for Selenium Python
- Cross-platform compatibility
- W3C WebDriver compliance
- Headless execution
- Active support & updates
- Enhanced debugging
This guide explains in detail how to install GeckoDriver for Selenium Python.
What is GeckoDriver?
GeckoDriver is a web browser engine that facilitates communication between the Selenium WebDriver API and Mozilla Firefox. Using the GeckoDriver protocol, the Selenium commands are translated into a format that Firefox understands. This allows the automation of browser actions in Firefox. Since Firefox does not support the legacy driver built into Selenium any longer, using Geckodriver is quite important for running Selenium tests on Firefox.
In short, The browser driver, GeckoDriver, is required to interface between WebDriver-enabled clients and the browser, Firefox, to execute the automation test scripts written in various programming languages.
How Does GeckoDriver Work?
To run automation scripts with Selenium on any browser, a compatible browser driver must be utilized. GeckoDriver allows the user to automate various actions on Gecko-based platforms such as Firefox.
Interestingly, GeckoDriver doesn’t directly communicate with the Firefox browser, it needs to go through Marionette. Marionette is Firefox’s automation driver and uses Firefox’s automation protocol. Essentially Marionette accepts requests sent to it via GeckoDriver and executes them in Gecko, performing functions such as automated actions on the user interface. GeckoDriver is needed as a go-between for Selenium and Marionette because Marionette protocol isn’t compatible with Selenium.
When running a test script in Selenium, the geckodriver.exe file must be used to implement the WebDriver protocol. Compatibility is the main benefit of utilizing GeckoDriver over the built-in Firefox driver. GeckoDriver and Selenium communicate using the W3C WebDriver protocol. The universally accepted Web Driver standard is W3C. This trait of GeckoDriver is highly beneficial to developers since it makes the tests more consistent across browsers and stable.
The figure above illustrates how GeckoDriver works.
geckodriver.exe launches a local server that can be used to execute test scripts. By acting as a proxy, interfacing with Selenium, and translating requests into Marionette automation protocol. GeckoDriver establishes communication between Selenium and the Firefox browser.
Benefits of Using GeckoDriver for Selenium Python
Here are the various benefits of using GeckoDriver for Selenium Python:
- Cross-platform compatibility: GeckoDriver supports macOS, Windows, and Linux, to facilitate smooth Firefox automation across various systems.
- W3C WebDriver compliance: It aligns with the WebDriver standard, allowing for stable and predictable browser interactions.
- Headless execution: Lets run Firefox in headless mode, which can be useful for CI/CD and server environments.
- Active support & updates: Maintained by Mozilla, it obtains regular updates to support new Firefox versions.
- Improved debugging: Offers logs and error messages that make troubleshooting Selenium tests much easier.
Read More: How to Perform Remote Firefox Debugging
How to Download and Install GeckoDriver for Selenium Python
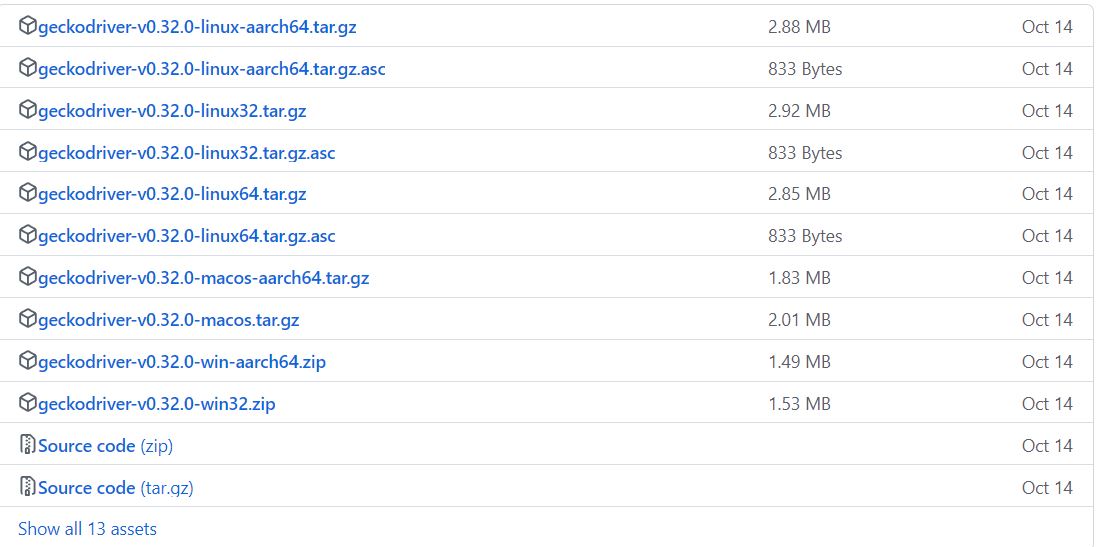
Step 1: GeckoDriver can be installed from this link here. Pick the version of GeckoDriver based on the system being utilized. In this tutorial, the system is 64-bit and runs on Windows OS.
Step 2: Unzip the file and obtain geckodriver.exe. This executable file needs to be accessible when running a program with Selenium, and there are three possible methods to accomplish this task.
- Edit the Path variable using the Advanced system
- Specify the executable path of geckodriver.exe within the test script
- Use the web-driver manager package
Method 1: The first method is to edit the Path variable using the Advanced system settings.
- Go to Advanced System Settings, a system properties window will open.
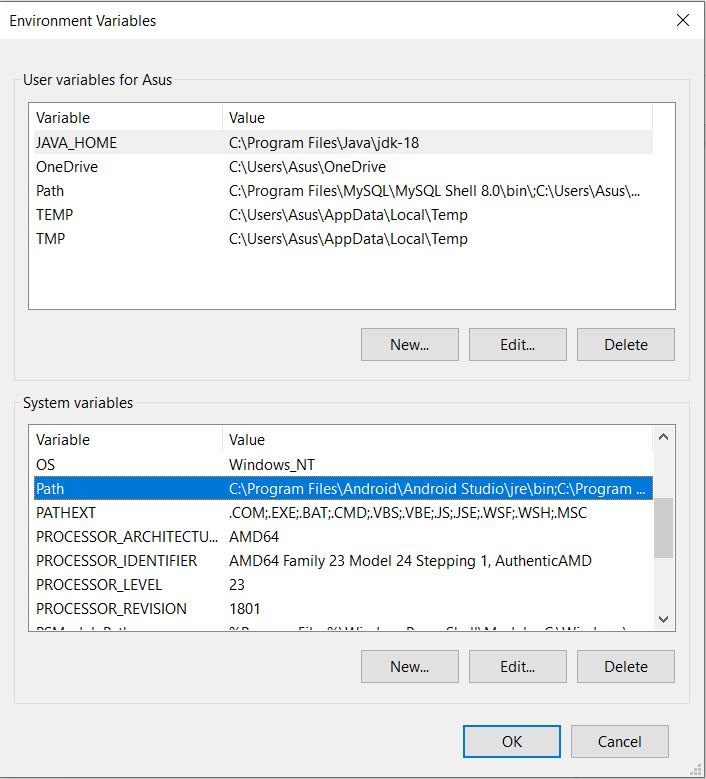
- Click on Environment Variables.
- Go to System Variables and find the “Path” variable. Select this variable and click Edit.
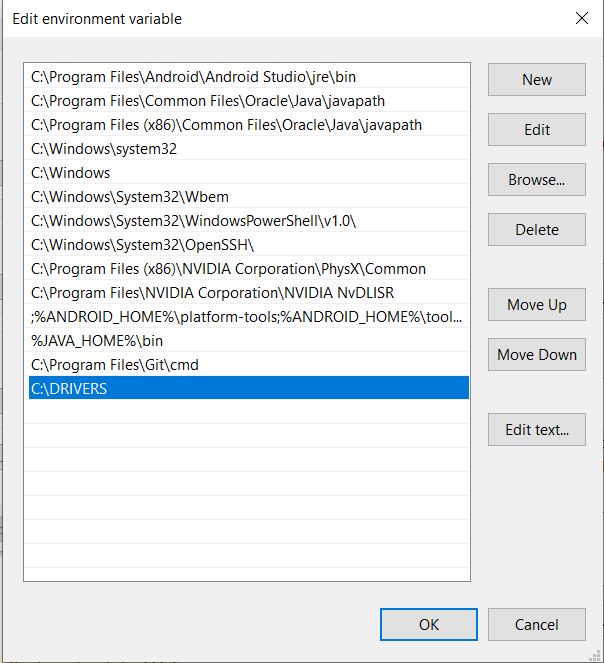
- Click New in the Edit environment variable window. Add the location of the geckodriver.exe file to the Path. In this example, the file is located in C:\DRIVERS.
- Restart the computer prior to running any test scripts.
Method 2: Specify the executable path of geckodriver.exe within the test script.
- Simply enter the executable path of the geckodriver.exe file when initiating the driver.
from selenium import webdriver
driver = webdriver.Firefox(executable_path=r'C:\Program Files (x86)\geckodriver.exe')
Method 3: Use the web-driver manager package.
- Install webdriver-manager. Pip is the most efficient way to install python packages. If you have anaconda setup then simply enter the following command into the anaconda powershell window or directly into the linux terminal.
pip install webdriver-manager
- Simply use the webdriver-manager package to obtain the appropriate driver for Firefox.
from selenium import webdriver
from selenium.webdriver.firefox.service import Service as FirefoxService
from webdriver_manager.firefox import GeckoDriverManager

driver = webdriver.Firefox(service=FirefoxService(GeckoDriverManager().install()))
- The webdriver-manager package simplifies management by allowing the user to install and use the right version of the browser driver required for their test script. See the following example using the webdriver-manager package:
- The package first checks if the driver is already present in the cache. If it isn’t found, then the manager will check the version of Firefox being used on the system and then install the latest driver compatible with the system and cache it. Then the next commands in the test script will be executed via the driver.
The above-mentioned methods are the easiest to utilize and work on any system, be it Windows, Linux, or macOS.
Alternatively, the following steps can also be used to download and set up GeckoDriver via the command line on any Linux/macOS system.
1. Pick the right version of GeckoDriver based on the system being utilized from the releases available. For this example, the latest version is “geckodriver-v0.32.0-linux64.tar.gz”.
2. Simply enter the following command into the terminal to install this release.
wget https://github.com/mozilla/geckodriver/releases/download/v0.32.0/geckodriver-v0.32.0-linux64.tar.gz
The following lines will be seen once the download is completed.

3. If you haven’t directly downloaded it into the right location, move the tar file to the appropriate folder with the following command.
mv geckodriver-v0.32.0-linux64.tar.gz softwares/
The file will be moved to the software directory.
4. Now unzip the file with the following command
tar -xvzf geckodriver-v0.32.0-linux64.tar.gz
The geckodriver.exe file will now be available.
5. Lastly, set the PATH in the .bashrc file with the following command.
export PATH=$PATH:/mnt/c/Users/Asus/softwares/geckodriver*
6. Install Conda on the Linux terminal, then use the following command to directly install GeckoDriver.
conda install -c conda-forge geckodriver
How to Launch the Firefox Browser Using GeckoDriver in Selenium Python
Here’s a step-by-step process on how you can launch the Firefox browser using GeckoDriver in Selenium Python:
Pre-requisites
- Set up a Python environment.
- Install GeckoDriver and use any of the methods outlined above to ensure that the driver is accessible when running the test script.
- Ensure that Selenium is installed. If it isn’t, use the pip package installer to install the package. If you have Conda or Anaconda set up, simply enter the following command in the Linux terminal, or the Conda/Anaconda prompt.
pip install selenium
Steps to Launch the Firefox Browser
Step 1: Import the WebDriver and options module from Selenium.
from selenium import webdriver
from selenium.webdriver.firefox.options import Options
Step 2: Options is a concept that was added to Selenium in order to allow the user to customize the Firefox session. In this example, it is used to provide the binary location of firefox.exe.
options = Options()
options.binary_location = r'C:\Program Files\Mozilla Firefox\firefox.exe'
Step 3: Initialize the browser driver, and pass an instance of the options class in the driver initialization. If GeckoDriver hasn’t been added to the path, then execute the following command.
driver = webdriver.Firefox(executable_path=r'C:\Program Files (x86)\geckodriver.exe', options=options)
However, if the geckodriver.exe file location has been added to the path, then execute the following command.
driver = webdriver.Firefox(options=options)
Step 4: Launch the Firefox browser and navigate to a website.
driver.get('https://www.bstackdemo.com/')
Output:
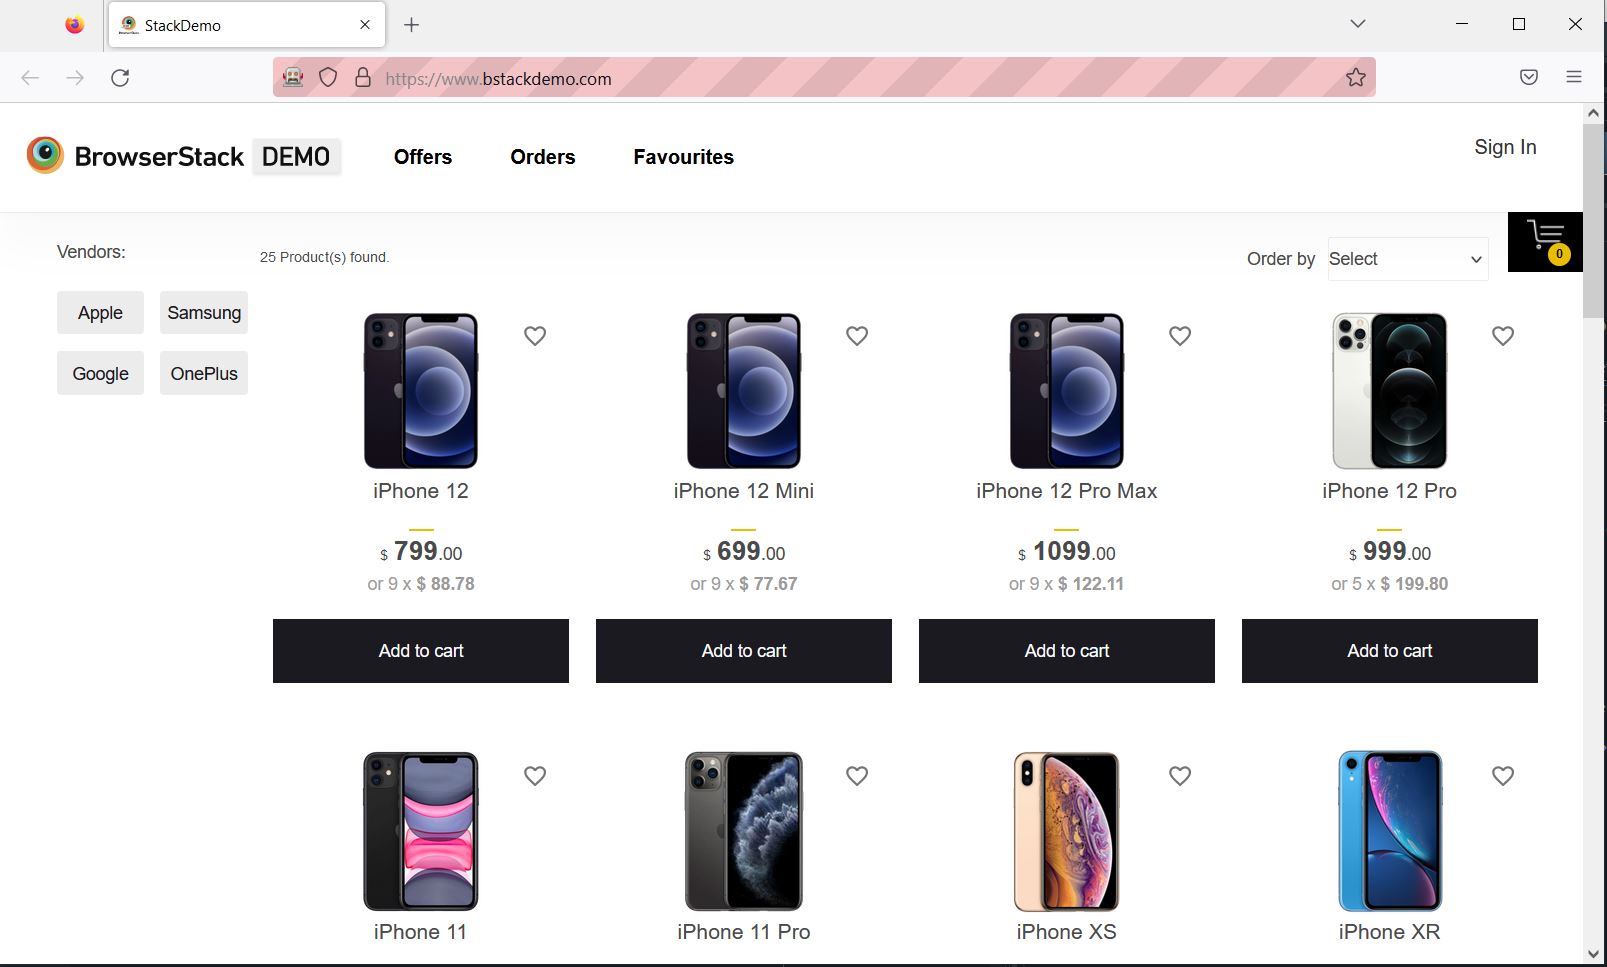
Alternatively, this process is made far easier if the WebDriver-manager package is utilized.
See the example code below:
from selenium import webdriver
from selenium.webdriver.firefox.service import Service as FirefoxService
from webdriver_manager.firefox import GeckoDriverManager

driver = webdriver.Firefox(service=FirefoxService(GeckoDriverManager().install()))
driver.get('https://www.bstackdemo.com/')Output:


Ways to initialize GeckoDriver
Given below are a few ways to initialize GeckoDriver in Selenium Python:
1. With Default System PATH
If GeckoDriver is added to your system path, you can use:
from selenium import webdriver


driver = webdriver.Firefox()
2. Manually Specify Executable Path
When GeckoDriver is not in your path:
from selenium import webdriver


driver = webdriver.Firefox(executable_path="/path/to/geckodriver")
3. Use Service Class
This is recommended for new versions of Selenium.
from selenium import webdriver

from selenium.webdriver.firefox.service import Service


service = Service(executable_path="/path/to/geckodriver")

driver = webdriver.Firefox(service=service)
4. Headless mode
This can be used with any method:
from selenium import webdriver

from selenium.webdriver.firefox.options import Options

from selenium.webdriver.firefox.service import Service


options = Options()

options.headless = True

service = Service(executable_path="/path/to/geckodriver")

driver = webdriver.Firefox(service=service, options=options)
How to Modify a script for non- Gecko to Gecko
You can modify a Selenium Python script written for a non-Gecko driver to work with GeckoDriver (Firefox) by doing the following:
Step 1: Import the correct Firefox classes
First you have to replace the given
from selenium import webdriver
With
from selenium import webdriver

from selenium.webdriver.firefox.service import Service

from selenium.webdriver.firefox.options import Options
Step 2: Switch to Firefox-specific driver and options
Replace the given
driver = webdriver.Chrome()
With
options = Options()

# options.headless = True  # Optional, for headless mode

service = Service(executable_path="/path/to/geckodriver")

driver = webdriver.Firefox(service=service, options=options)
Step 3: Leave the Selenium Commands untouched.
Selenium methods will remain the same, as they follow the WebDriver protocol.
Example:
non- Gecko Script for Chrome
from selenium import webdriver


driver = webdriver.Chrome()

driver.get("https://example.com")
The script given above will be converted for GeckoDriver/Firefox:
from selenium import webdriver

from selenium.webdriver.firefox.service import Service

from selenium.webdriver.firefox.options import Options


service = Service(executable_path="/path/to/geckodriver")

options = Options()

driver = webdriver.Firefox(service=service, options=options)

driver.get("https://example.com")How to set up Selenium Python and GeckoDriver on a Raspberry Pi 4
Given below is a step-by-step guide to set up Selenium Python and GeckoDriver on a Raspberry Pi 4:
Step 1: Install Python and pip
sudo apt update

sudo apt install python3 python3-pip -y
Step 2: Install Selenium
pip3 install selenium
Step 3: Install Firefox
sudo apt install firefox-esr -y
Note: firefox-esr s the Extended Support Release version, which is suitable for Raspberry Pi.
Step 4: Download and install GeckoDriver
sudo apt install wget tar

wget https://github.com/mozilla/geckodriver/releases/latest/download/geckodriver-v0.34.0-arm7hf.tar.gz

tar -xvzf geckodriver-*.tar.gz

chmod +x geckodriver

sudo mv geckodriver /usr/local/bin/
Step 5: Write and run a test script
Create a Python script:
from selenium import webdriver

from selenium.webdriver.firefox.service import Service

from selenium.webdriver.firefox.options import Options


options = Options()

options.headless = True  # Run in headless mode for low-resource environments

service = Service("/usr/local/bin/geckodriver")


driver = webdriver.Firefox(service=service, options=options)

driver.get("https://example.com")

print(driver.title)

driver.quit()
Step 6: Run the script
python3 your_script.py
How to Use Geckodriver for Selenium on Linux
Follow the given steps to use Geckodriver for Selenium on Linux:
Step 1: Install Python and pip
sudo apt update

sudo apt install python3 python3-pip -y
Step 2: Install Selenium
pip3 install selenium
Step 3: Install Firefox
sudo apt install firefox -y
Step 4: Download and Install GeckoDriver
wget https://github.com/mozilla/geckodriver/releases/latest/download/geckodriver-v0.34.0-linux64.tar.gz

tar -xvzf geckodriver-*.tar.gz

chmod +x geckodriver

sudo mv geckodriver /usr/local/bin/
Validate its accessibility by:
geckodriver --version
Step 5: Run a Sample Selenium Script with Firefox
from selenium import webdriver

from selenium.webdriver.firefox.service import Service

from selenium.webdriver.firefox.options import Options


options = Options()

# options.headless = True  # Optional: headless mode

service = Service("/usr/local/bin/geckodriver")


driver = webdriver.Firefox(service=service, options=options)

driver.get("https://example.com")

print(driver.title)

driver.quit()
Now you can use GeckoDriver for Selenium on Linux
How to set up GeckoDriver for Selenium on macOS?
Follow the given steps to use Geckodriver for Selenium on macOS:
Step 1: Install Python and pip
sudo apt update

sudo apt install python3 python3-pip -y
Step 2: Install Selenium
pip3 install selenium
Step 3: Install Firefox
Download from https://www.mozilla.org/en-US/firefox/new/ or use the code:
brew install --cask firefox
Step 4: Install GeckoDriver
brew install geckodriver
This is for automatically adding geckodriver to your system PATH.
Step 5: Run a Test Script
from selenium import webdriver

from selenium.webdriver.firefox.service import Service

from selenium.webdriver.firefox.options import Options


options = Options()

# options.headless = True  # Optional for headless testing

driver = webdriver.Firefox(options=options)

driver.get("https://example.com")

print(driver.title)

driver.quit()
Now, you can run Selenium tests with Firefox on macOS.
How to Set up GeckoDriver for Selenium in Windows?
Follow the given steps to set up Geckodriver for Selenium on Windows:
Step 1: Install Python and pip
- Download and install Python: https://www.python.org/downloads/.
- Check the box during installation: “Add Python to PATH”.
Validate installation:
python --version

pip --version
Step 2: Install Selenium
pip install selenium
Step 3: Install Firefox
Download from https://www.mozilla.org/en-US/firefox/new/
Step 4: Download GeckoDriver
- Visit https://github.com/mozilla/geckodriver/releases
- Download the related .zip file (e.g., geckodriver-vX.X.X-win64.zip)
- Extract it and place geckodriver.exe in a folder (e.g., C:\WebDrivers\)
Step 5: Add GeckoDriver to System PATH
- Open System Properties > Environment Variables
- Under System Variables, find Path>click Edit > Add the folder path (e.g., C:\WebDrivers\)
Test it in Command Prompt:
geckodriver --version
Step 6: Run a Test Script
from selenium import webdriver

from selenium.webdriver.firefox.service import Service

from selenium.webdriver.firefox.options import Options


options = Options()

# options.headless = True  # Optional

driver = webdriver.Firefox(options=options)

driver.get("https://example.com")

print(driver.title)

driver.quit()
Read More: How to handle multiple windows in Selenium?
Common exceptions that Occurs When using GeckoDriver
Here are some common exceptions that occurs while using GeckoDriver with Selenium:
1. WebDriverException: Message: ‘geckodriver’ executable needs to be in PATH
This happens when the GeckoDriver is not installed or not added to the system PATH. Therefore, make sure that GeckoDriver installed properly and can be accessed from the terminal or command prompt.
2. SessionNotCreatedException
This occurs when there is a mismatch between Firefox and GeckoDriver versions. Update either of them to compatible versions to overcome the exception.
3. TimeoutException
This happens when page or element takes too long to load or respond. To overcome this, you can increase the timeout, or use WebDriverWait.
Conclusion
Installing GeckoDriver for Selenium in Python is an easy process that facilitates browser automation with Firefox. Once installed properly, it helps you run and test web applications seamlessly across various environments. For smoother cross-browser testing without local setup, you can use tools like BrowserStack that offer cloud-based access to Firefox and other browsers with support for Selenium.
Useful Resources for Selenium
Selenium Python
- Selenium Python Tutorial (with Example)
- Headless Browser Testing With Selenium Python
- How to Press Enter without Element in Selenium Python?
- How to install GeckoDriver for Selenium Python?
- How to perform Web Scraping using Selenium and Python
- How to Create and Use Action Class in Selenium Python
- Using Selenium Wire Proxy in Python
- Get Current URL in Selenium using Python: Tutorial
- How to read Config Files in Python using Selenium
- Page Object Model and Page Factory in Selenium Python
- How to perform Scrolling Down in Selenium with Python?
- How to install Selenium Python on macOS?
- How to Maximize Browser Window in Selenium with Python
- How to use Python WebDriver Manager for Selenium Testing?
- UI Automation using Python and Selenium: Tutorial
- How to handle dropdown in Selenium Python?
- Start Selenium Testing with Python: Automated Testing of a User Signup Form
- How to Switch Tabs in Selenium For Python
- How to Double Click on an Element in Selenium Python?
- How to take Screenshots using Python and Selenium
- How to download a file using Selenium and Python
Methods, Classes, and Commands
- Selenium Commands every Developer or Tester must know
- Selenium WebElement Commands
- Desired Capabilities in Selenium Webdriver
- Assert and Verify Methods in Selenium
- Understanding System setProperty in Selenium
- Select Class in Selenium : How to select a value in dropdown list?
- SendKeys in Selenium WebDriver
- getAttribute() method in Selenium: What, Why, and How to use
- How does Selenium isDisplayed() method work?
- findElement vs findElements in Selenium
- Types of Listeners in Selenium (with Code Examples)
- How to set Proxy in Firefox using Selenium WebDriver?
Configuration
- How to set up Selenium on Visual Studio
- How to configure Selenium in Eclipse
- Maven Dependency Management with Selenium
- How to Build and Execute Selenium Projects
XPath
- How to use XPath in Selenium?
- How to find element by XPath in Selenium with Example
- Top Chrome Extensions to find Xpath in Selenium
Locators and Selectors
- Locators in Selenium: A Detailed Guide
- CSS Selector in Selenium: Locate Elements with Examples
- How to Create Object Repository in Selenium
Waits in Selenium
- Wait Commands in Selenium C and C#
- Selenium Wait Commands: Implicit, Explicit, and Fluent Wait
- Understanding Selenium Timeouts
- Understanding ExpectedConditions in Selenium
- Understanding Role of Thread.sleep() in Selenium
Frameworks in Selenium
- Data Driven Framework in Selenium
- Implementing a Keyword Driven Framework for Selenium: A Practical Guide
- Hybrid Framework in Selenium
Miscellaneous
- How to create Selenium test cases
- How to set Proxy in Selenium?
- Difference between Selenium Standalone server and Selenium server
- Exception Handling in Selenium WebDriver
- How to use JavascriptExecutor in Selenium
- How to run your first Selenium test script
- Parallel Testing with Selenium
Best Practices, Tips and Tricks
- Top 5 Challenges Faced During Automation Selenium Testing
- 5 Selenium tricks to make your life easier
- 6 Things to avoid when writing Selenium Test Scripts
- Best Practices for Selenium Test Automation
- Why you should pay attention to flaky Selenium tests
- How to start with Selenium Debugging
- How to make your Selenium test cases run faster
- How to upgrade from Selenium 3 to Selenium 4
- Why you should move your testing to a Selenium Cloud?
Design Patterns in Selenium: Page Object Model and Page Factory
- Design Patterns in Selenium
- Page Object Model and Page Factory in Selenium
- Page Object Model and Page Factory in Selenium C#
- Page Object Model in Selenium and JavaScript
- Page Object Model and Page Factory in Selenium Python
Action Class
- How to handle Action class in Selenium
- How to perform Mouse Hover Action in Selenium
- Understanding Click Command in Selenium
- How to perform Double Click in Selenium?
- How to Drag and Drop in Selenium?
- How to Scroll Down or Up using Selenium Webdriver
- How To verify Tooltip Using Selenium
Use Cases
- Handling Login Popups in Selenium WebDriver and Java
- How to Launch Browser in Selenium
- How to handle Alerts and Popups in Selenium?
- How to get Selenium to wait for a page to load
- How to Find Element by Text in Selenium: Tutorial
- How to Read/Write Excel Data using Apache POI Selenium
- How to handle Captcha in Selenium
- How to handle multiple windows in Selenium?
- How to handle Multiple Tabs in Selenium
- How to find broken links in Selenium
- How to handle Cookies in Selenium WebDriver
- How to handle iFrame in Selenium
- How to handle Web Tables in Selenium
- How To Validate Text in PDF Files Using Selenium Automation
- Get Current URL in Selenium using Python: Tutorial


