Flutter and React Native are cross-platform development frameworks that let developers create applications that run seamlessly across multiple platforms, such as iOS, Android, and the web, using a single codebase.
Though they belong to the category of cross-platform development frameworks, they differ greatly from each other in terms of their underlying technologies, designs, and features.
Flutter, which uses Dart programming language, offers high performance but with limited IDE support. On the other hand, React Native, which uses JavaScript, has broader community support and faster development due to its familiar language.
This article covers Flutter vs React Native in detail to help you choose the most appropriate framework for your cross platform app development.
Flutter vs React Native: Differences
While Flutter uses a Widget-based interface, React Native is Component-based to support Native UI features of iOS and Android. This makes Flutter compilation Ahead of Time and React Native Compilation Just in Time.
Here’s a table comparing Flutter vs React Native, two popular frameworks for building cross-platform mobile applications.
| Aspect | Flutter | React Native |
|---|---|---|
| Framework | Developed by Google | Developed by Facebook |
| Language | Dart | JavaScript (with JSX) |
| User Interface | Widget-based | Component-based |
| Performance | Generally considered to be faster | Performance can vary depending on factors |
| Compilation | Ahead-of-Time (AOT) compilation | Just-in-Time (JIT) compilation |
| UI Components | Offers its own set of UI components (Material Design) | Utilizes native UI components for iOS and Android |
| Hot Reload | Supports Hot Reload for fast development | Supports Hot Reload for rapid iteration |
| Community Support | Growing community with strong support | Large and active community |
| Ecosystem | Developing ecosystem, growing library support | Mature ecosystem with extensive libraries |
| Learning Curve | Requires learning Dart language and Flutter framework | Requires familiarity with JavaScript and React
|
| Tooling | Offers Flutter SDK and tools | Uses React Native CLI and Expo |
| Support for 3D | React Native has better support for 3D | Flutter does not support 3D |
| Performance Tuning | Offers more control over performance tuning | Limited control over native performance tuning |
| Native Modules Integration | Requires platform-specific channels for native integrations | Allows integration with native modules through bridges |
| Platform Support | Supports iOS, Android, Web, Desktop (experimental) | Supports iOS, Android, Web |
What is Flutter?
Flutter is an open-source UI framework developed by Google in 2017 that aims to design cross-platform apps to run on mobile, Windows, macOS, and Linux and on the web. Flutter’s framework is built upon Dart. Many big companies like Alibaba, Philips Hue, Hamilton, etc., choose Flutter for development. Moreover, Google frequently provides updates for Flutter, improving its performance with each update.
Also Read: Introduction to UI Testing in Flutter
Advantages of using Flutter
- Great UI
- Has several widgets
- Apps are faster
- Helps build web apps (Flutter 2)
- Well-structured documentation and community
- It helps replicate and create the same UI for different devices
Disadvantages of Flutter
- Not native
- Apps are larger
- Has a limited set of tools
Also Read: How to run integration tests on Flutter apps
Real-world Examples of Flutter
Flutter is leveraged by a lot of popular organizations to build apps due to its cross-platform functionalities and robust performance:
- Google Pay: The redesigned version of Google Pay India was built using Flutter due to its ability to handle complex UI and cross-platform support.
- Alibaba: One of the biggest e-commerce platforms, Alibaba, developed parts of their app using Flutter to boost user experience.
- BMW: Flutter was used to build the my BMW app, which integrates with their vehicles across various platforms to provide a connected driving experience.
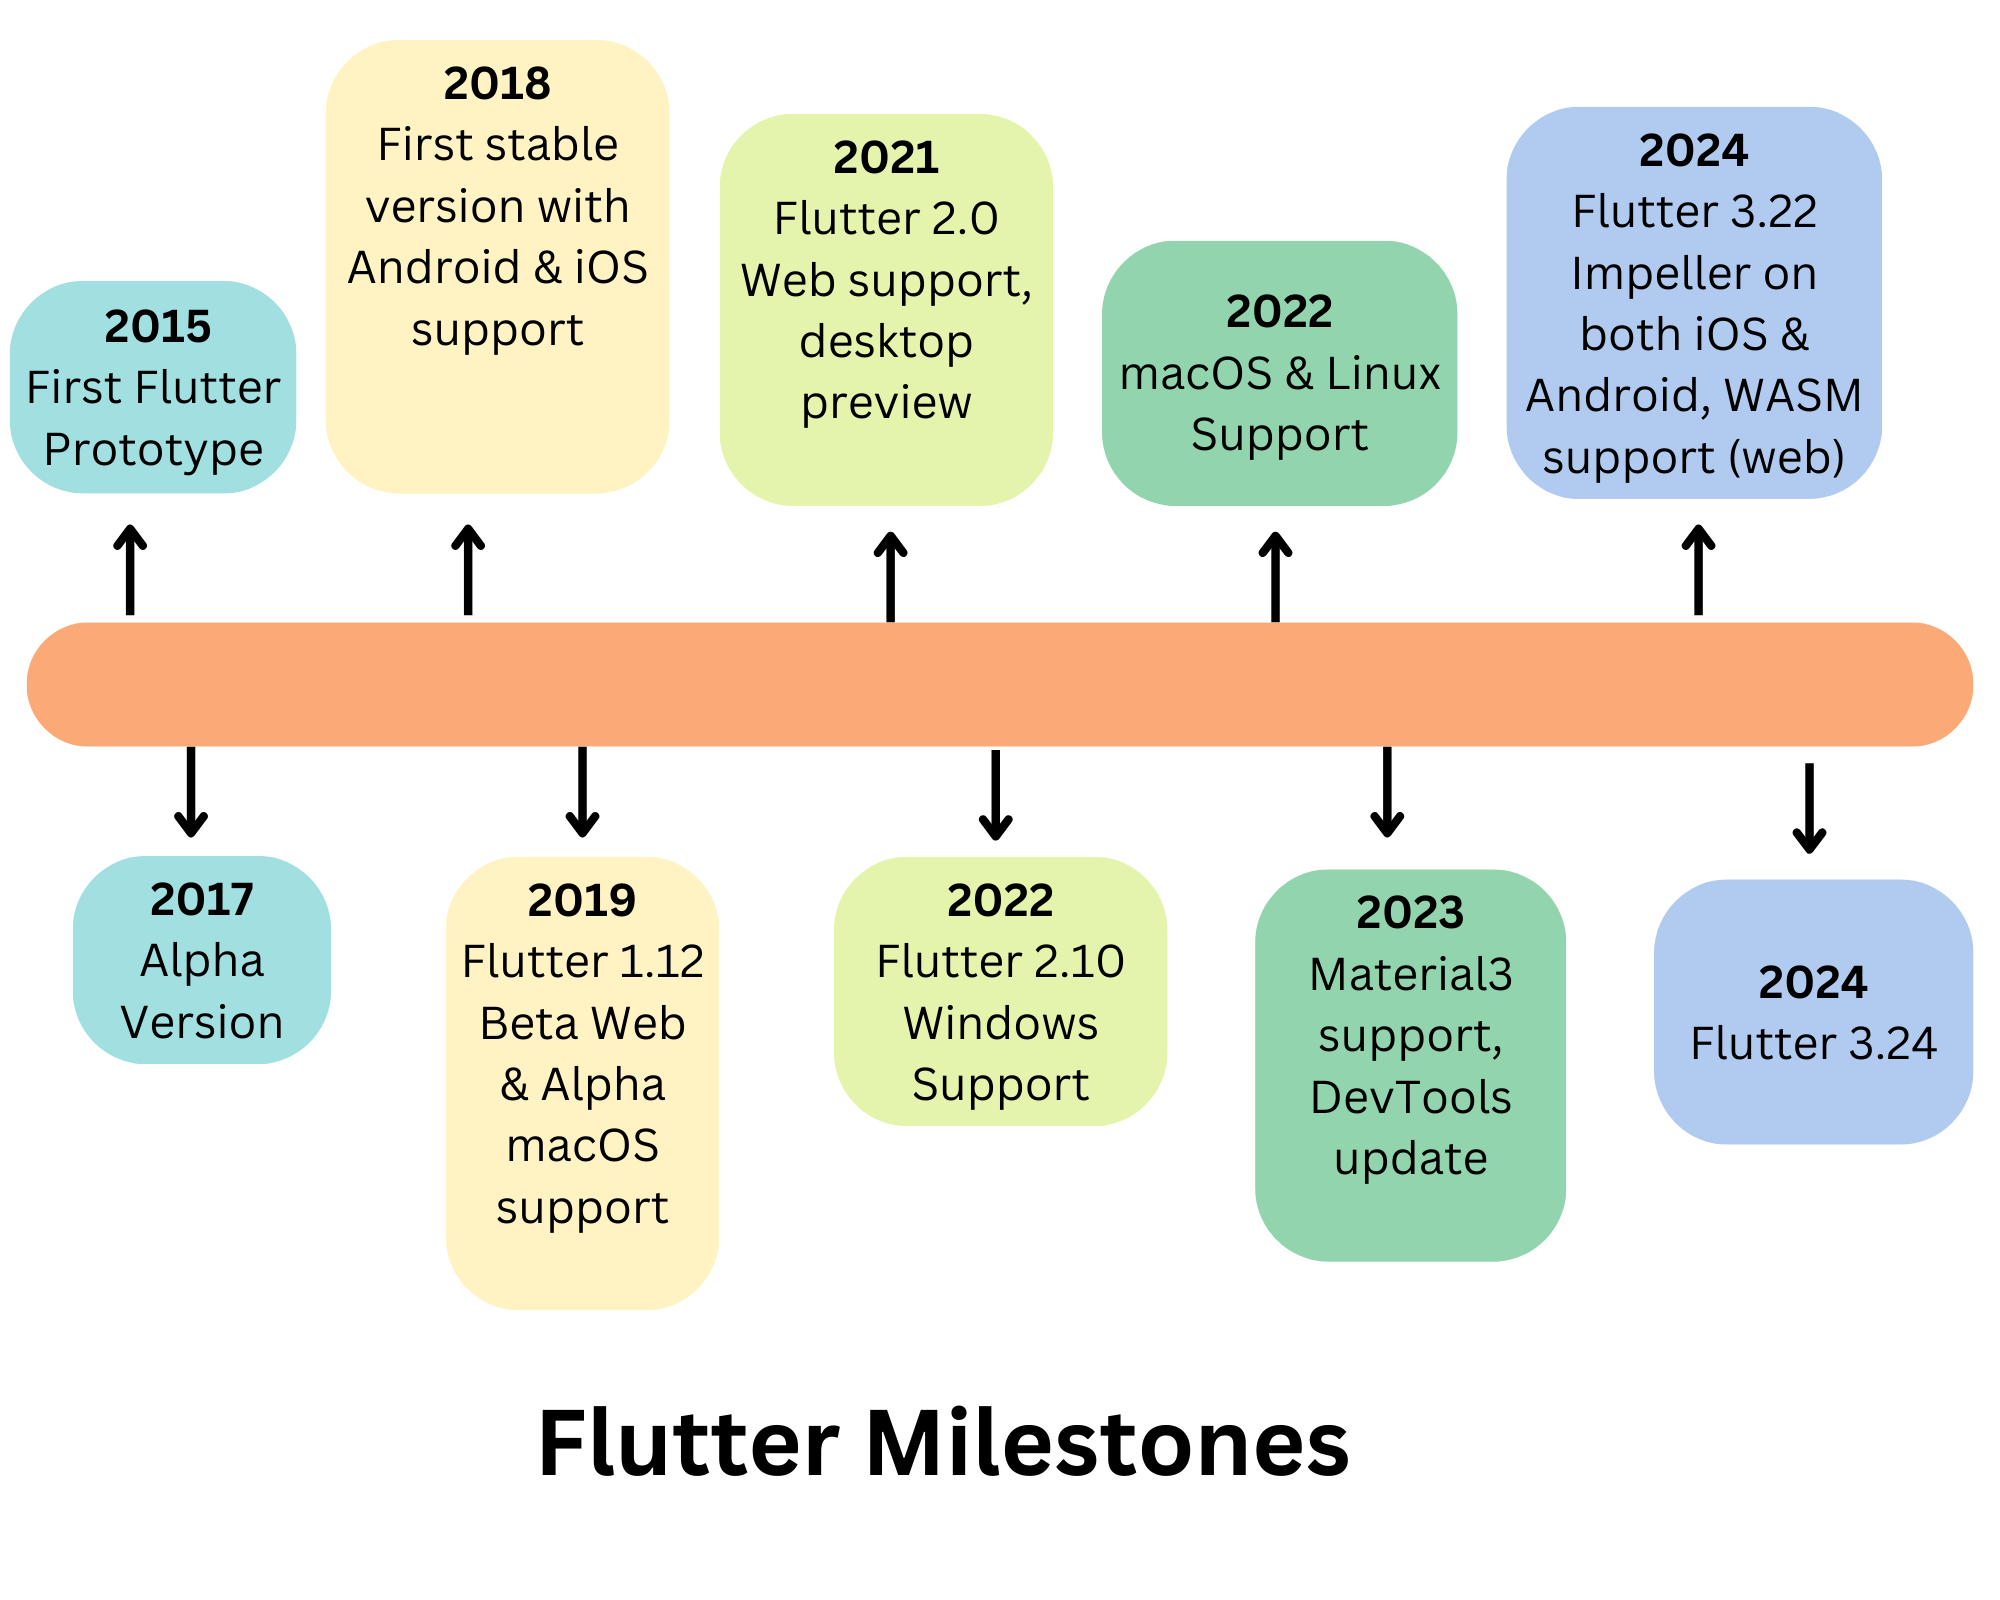
Flutter Milestones
Flutter was built as an open-source project by Google, which is why both Google and the Flutter community contribute to its development.
Here are some milestones of Flutter as it evolved:
Exploring Flutter 3.24
Flutter 3.24, the latest version, was released in August 2024. It comes with standout features like:
- Preview of Flutter GPU that enhances the app’s visual abilities through advanced graphics and 3D scenes within Flutter.
- Multi-view embedding is another feature for web apps that facilitates the concurrent rendering of multiple Flutter views.
- The newly introduced video ad monetization also creates potential revenue opportunities for developers via in-stream video ads.
Creating a Cross Platform App using Flutter
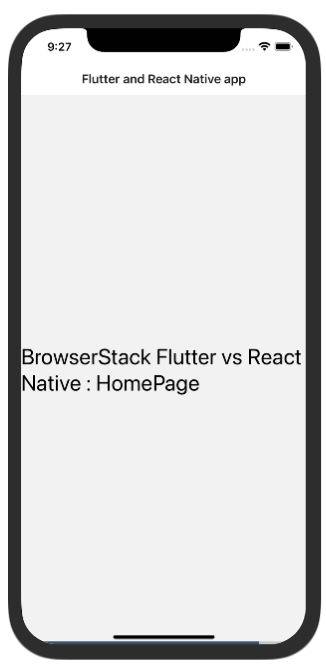
Here’s how you can create a cross-platform application that has a very basic UI using Flutter
If you want to set up Flutter in your local system, you can refer to its official guide.
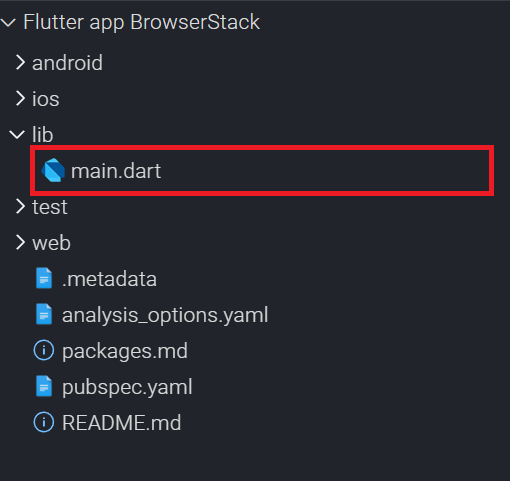
The Flutter application displays the code in its UI, written in the main.dart file. Hence, this is the most-important file while writing Dart in Flutter.
import 'package:flutter/material.dart';

void main() => runApp(MyApp());

class MyApp extends StatelessWidget {
@override
Widget build(BuildContext context) {
return MaterialApp(
title: 'is flutter better than react native',
theme: ThemeData(
primarySwatch: Colors.white,
),
home: MyHomePage(title: 'Flutter and React Native App'),
);
}
}

class MyHomePage extends StatelessWidget {
final String title;
const MyHomePage({Key? key, required this.title}) : super(key: key);

@override
Widget build(BuildContext context) {
return Scaffold(
appBar: AppBar(
title: Text(title),
),
body: Center(
child: Text(
'BrowserStack Flutter vs react native: HomePage ',
),
),
);
}
}
What is React Native?
Facebook developed React Native in 2015. It is an open-source framework that is based on JavaScript. It also provides a similar feature, using the same codebase to create cross-platform apps, thus eliminating the need to compile other technologies for creating mobile apps. Skype, Instagram, Uber Eats, etc., depends upon React Native for development.
Advantages of using React Native
- Uses JavaScript
- Can create apps for multiple platforms using a single codebase
- Understands the importance of code reusability and promotes it
- Growing and active community
- Helps in accelerating coding time
Disadvantages of using React Native
- Not native
- Does not provide innovative, out-of-the-box components
- Limited choices
- Abandoned libraries and packages
- UI can be hampered easily and needs to undergo vigorous UI testing
- Larger apps
Also Read: React Native and Appium
Real-world Examples of React Native
React Native is a popular framework choice for many organizations to build mobile applications. Here are some real-world examples of apps that utilizes React Native:
- Facebook (Meta): The creators of React Native, Facebook, use the framework in their mobile app to build and maintain features like Marketplace.
- Instagram: Instagram incorporated React Native to facilitate features like push notifications. React Native helped deploy features faster across both iOS and Android.
- Tesla: The automotive giant Tesla utilizes React Native for its app, which manages vehicles remotely, inspects battery status, and performs other key functions.
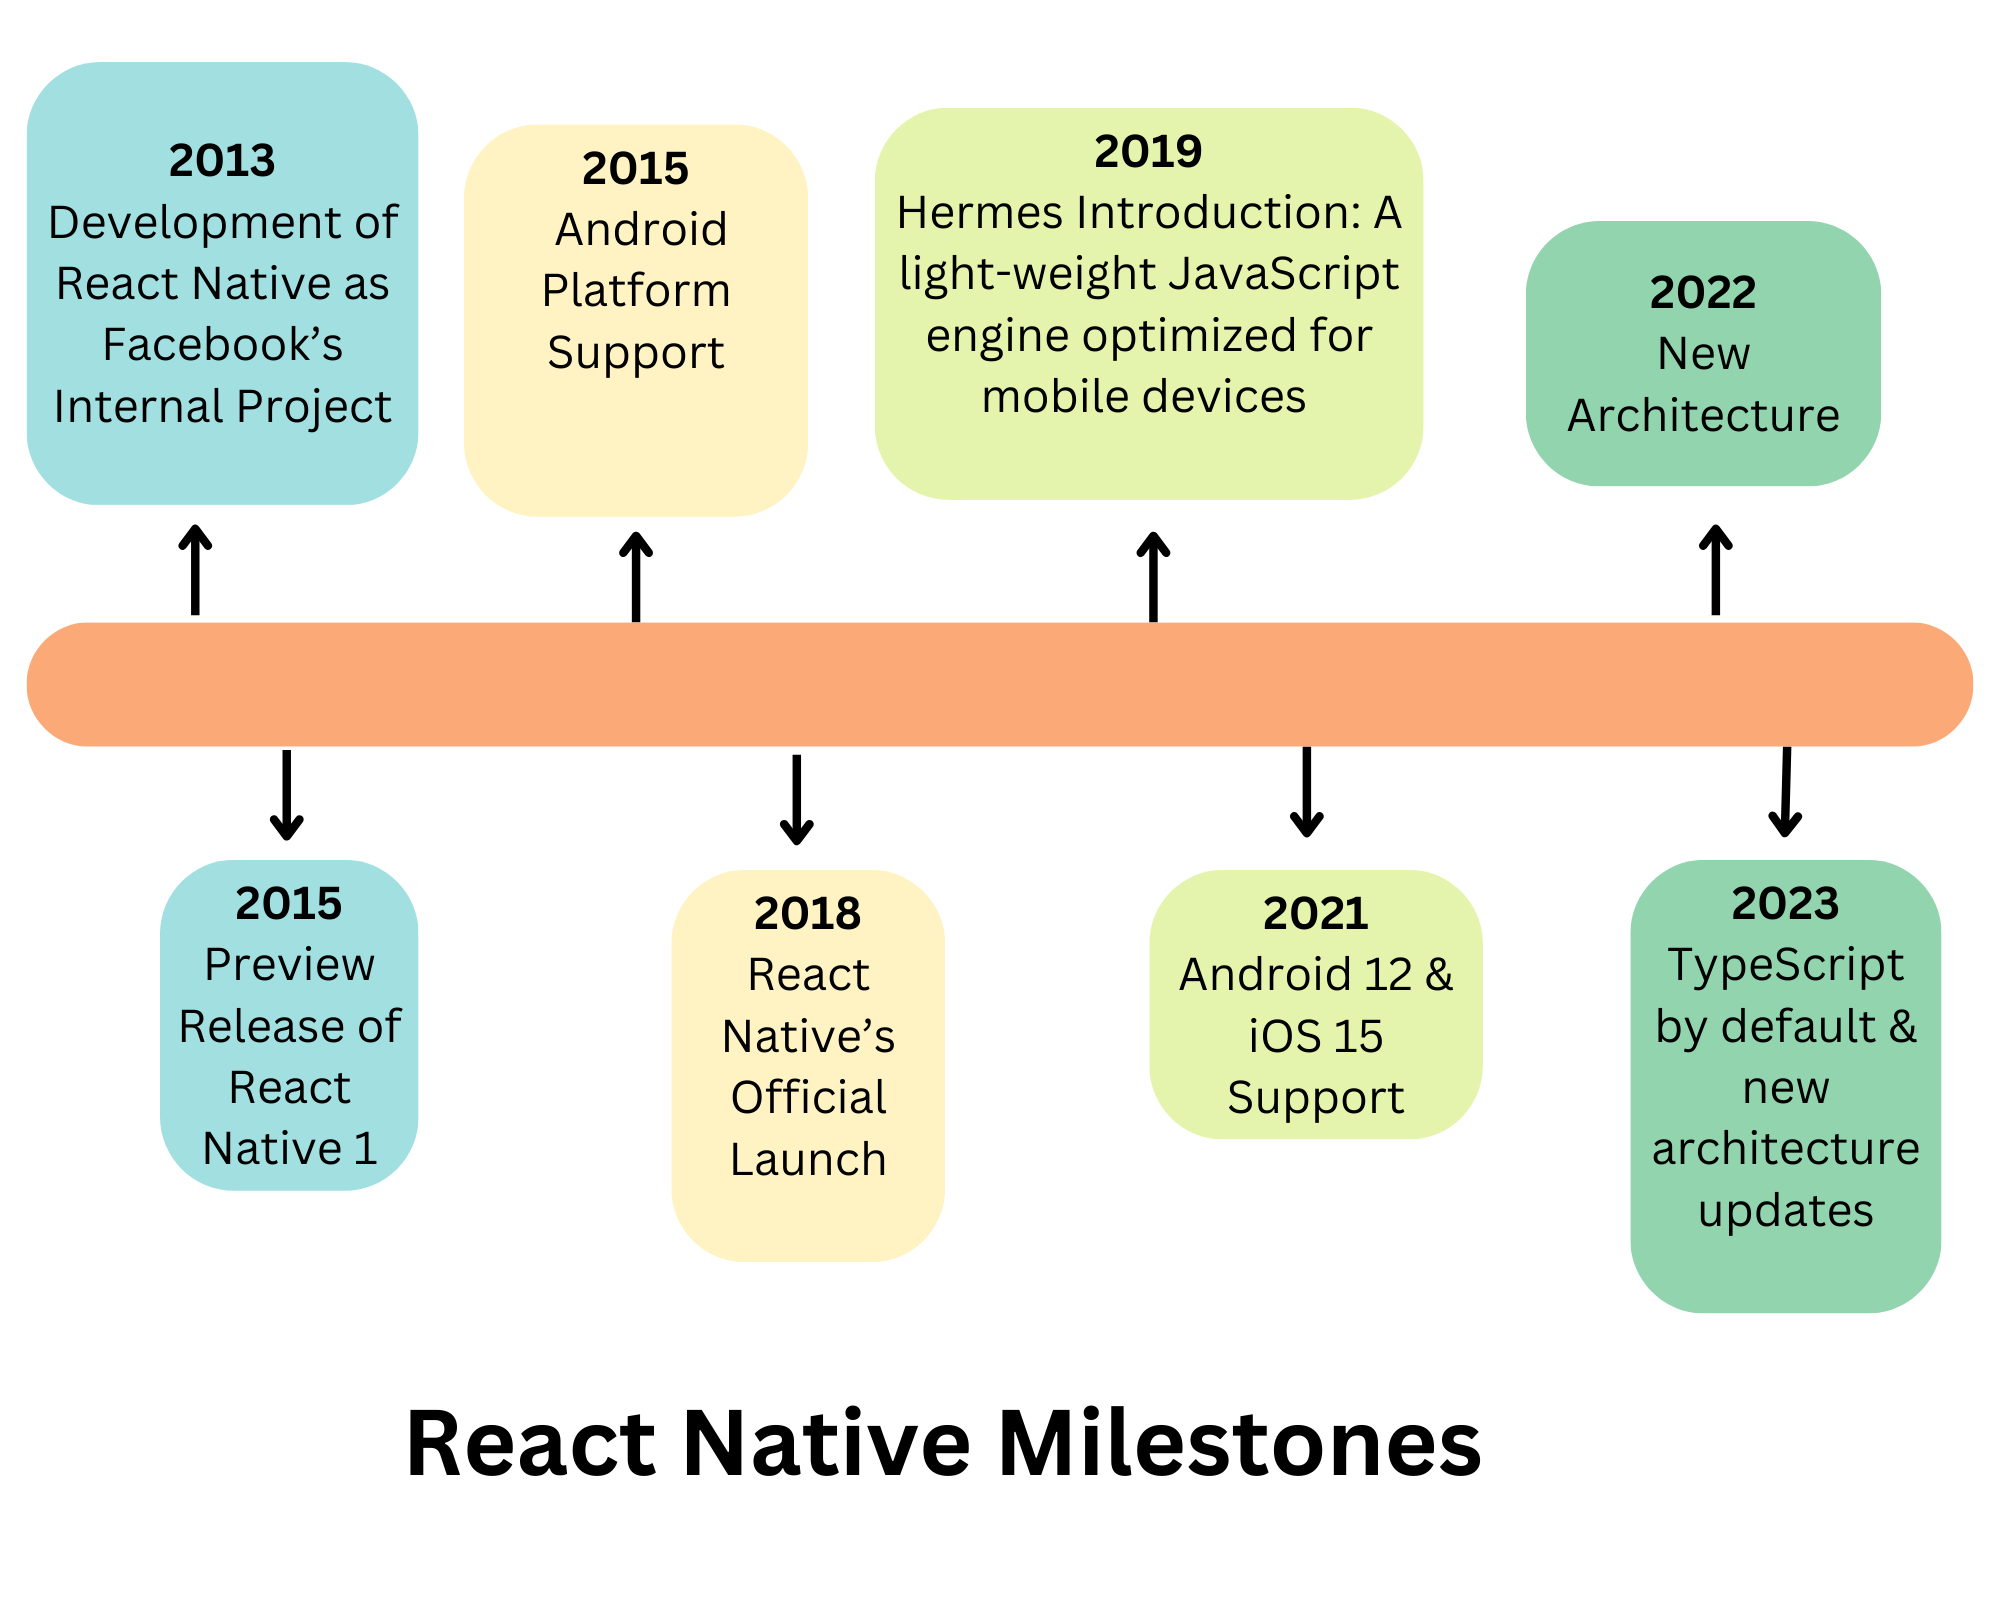
React Native Milestones
React Native was developed by Meta as an open-source framework using JavaScript.Here are some milestones of React Native as it evolved since its inception in 2013.
Creating a Cross Platform App using React Native
Here’s how you can create a cross-platform application that has a very basic UI using React Native
Setting up the project for React Native is far less complex than setting up the Flutter project. You can install React Native from the command line using NPM. You might also refer to the official guide of React Native for better clarity.
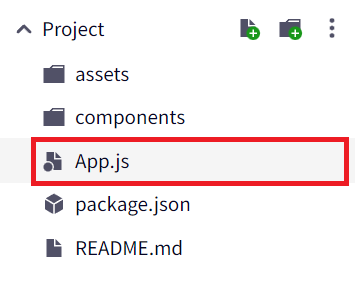
In the React Native project, the UI displays code which is written in the App.Js file.
import * as React from 'react';
import { Text, View, Button, StyleSheet } from 'react-native';
import 'react-native-gesture-handler';
import { NavigationContainer } from '@react-navigation/native';
import { createStackNavigator } from '@react-navigation/stack';

const AppBar = createStackNavigator();

export default function App() {
return (
<>
<NavigationContainer>
<AppBar.Navigator initialRouteName="App Title">
<AppBar.Screen name="Flutter and React Native app" component={HomeScreen} />
</AppBar.Navigator>
</NavigationContainer>
</>
);
}

function HomeScreen() {
return (
<View style={style.container}>
<Text>BrowserStack Flutter vs React Native: HomePage</Text>
</View>
);
}

const style = StyleSheet.create({
container: {
flex: 1,
alignItems: 'center',
justifyContent: 'center',
},
});
Flutter vs React Native – Which is better?
Choosing between Flutter vs React Native, depends on various factors such as project requirements, developer expertise, and performance needs.
Flutter, using Dart, offers high performance but has a smaller developer base and limited IDE support. React Native, leveraging JavaScript, has broader community support and faster development due to its familiar language.
Ultimately, the decision should be based on the specific needs of the project and the preferences of the development team.
Why choose Flutter
- Uses Dart language, which compiles faster than JavaScript, leading to high performance.
- Dart has a smaller adoption rate compared to JavaScript, making it less familiar to developers.
- Limited IDE support for Dart due to its lesser popularity.
- Provides faster development but results in larger file sizes.
- Offers integrated testing features for easier testing.
When to choose Flutter
Flutter can be an ideal choice when:
- Your app needs highly customized, pixel-perfect UI designs. Flutter has a widget-based architecture and it functions without relying on platform-specific components.
- Your app comes with heavy graphics and animations and requires high performance. Flutter can aid this with the help of its own rendering engine Skia.
- If you want your app to look identical across both Android and iOS devices, then Flutter is the go-to choice.
Why choose React Native
- Leverages JavaScript, which has broader community support and is easier for developers to learn.
- Slower performance due to JavaScript bridging.
- Saves time for developers by using a familiar language.
- Requires third-party testing frameworks like Detox for testing.
- More widely adopted and supported by a larger community.
When to Use React Native
Choose between React Native or Flutter according to what your app demands. You can use React Native when:
- You want to reuse the components of your desktop app or website for a mobile app.
- If your team is better acquainted with JavaScript or React, then React Native should be the obvious choice since it uses the same language and concepts.
- If you want to reduce memory consumption, particularly on Android devices, React Native is a great choice, as the Hermes engine helps optimize memory usage.
- When your app will have to frequently use native modules like camera, GPS etc., React Native can be chosen considering its robust integration with native APIs.
Testing Flutter and React Native Apps on Real Devices
Testing Flutter and React Native apps on real devices is crucial to ensure their performance, functionality, and compatibility across different platforms. Here’s how you can test apps developed using both frameworks on real devices:
Testing Flutter Apps on Real Devices
Steps to test Flutter Apps on Real Devices:
- Install Flutter SDK: Make sure you have Flutter SDK installed on your development machine.
- Connect Devices: Connect the real devices (Android or iOS) to your development machine using USB cables.
- Enable Developer Mode: Enable Developer Mode on the connected devices and allow USB debugging.
- Run Flutter App: Run your Flutter app on the connected devices using the flutter run command in the terminal.
- Test on Different Devices: Test your app on a variety of real devices with different screen sizes, resolutions, and OS versions.
- Perform Manual Testing: Manually test all features and functionalities of your app on each device to identify any issues or inconsistencies.
- Use Debugging Tools: Utilize Flutter DevTools or other debugging tools to analyze performance, inspect widgets, and troubleshoot any errors.
Testing React Native Apps on Real Devices
Steps to test Flutter Apps on Real Devices:
- Set up React Native Environment: Set up your development environment for React Native app development.
- Connect Devices: Connect real devices (Android or iOS) to your development machine using USB cables.
- Enable Developer Mode: Enable Developer Mode on the connected devices and allow USB debugging.
- Start React Native App: Start your React Native app on the connected devices using the appropriate commands (react-native run-android or react-native run-ios) in the terminal.
- Test on Various Devices: Test your app on a range of real devices with different specifications and OS versions.
- Conduct Manual Testing: Manually test all aspects of your app on each device to ensure functionality, UI consistency, and performance.
- Utilize Debugging Tools: Take advantage of React Native Debugger or other debugging tools to inspect and debug your app’s code, analyze network requests, and identify any issues.
UI Testing of a real React Native Mobile App using BrowserStack App Live
UI is essential for creating a great user experience. To understand how to perform UI testing of React Native Mobile Apps, consider this example of testing a real React Native Mobile App – Pinterest.
Step 1: Log in to BrowserStack App Live, and choose any desired Android or iOS real device.
Step 2: Install the test application via any of the available options. In this case, Play Store is being used to install the app.
Step 3: Once, the app is installed, log in to the same and perform the test scenarios. In this case, you will be checking room decor ideas on Pinterest and ensuring the user experience is seamless and consistent across different devices and OS versions.
Google Pixel 6 & Android Version 12
Samsung Galaxy S21 & Android Version 11
Test Result
As observed, on all of the devices, the React Native mobile app of Pinterest worked consistently with seamless functionality and is providing the same user experience.
UI Testing of a real Flutter Mobile App using BrowserStack App Live
Consider testing a Flutter app across various devices. Here Google Play app has been chosen, which uses Flutter for its development. The following are the steps to perform UI testing on a Flutter Mobile App.
1. Log in to BrowserStack App Live: Select any desired Android or iOS real device.
2. Install the Test Application: Use any available option, such as the Play Store, to install the app.
3. Perform Test Scenarios: Once installed, log in to the app and execute your test scenarios. Ensure the user experience is seamless and consistent across different devices and OS versions.
Samsung Galaxy S22 v12.0
Google Pixel 8 on Android v 14
Test Result
As observed, on all of the devices, the Flutter mobile app of Google Pay worked consistently with seamless functionality and is providing the same user experience.
Why prefer BrowserStack to test Flutter and React Native Apps
There are several reasons why BrowserStack App Automate is a preferred choice for testing Flutter and React Native apps:
- Real Device Testing: Access to a vast library of real iOS and Android devices via a real device cloud for testing your mobile apps in real-world conditions.
- Instant Access: Instantly access thousands of real devices with no setup required, allowing you to start testing immediately.
- Debugging Tools: Use built-in debugging tools to identify and fix issues quickly, ensuring a seamless user experience.
- Interactive Testing: Interact with your app in real-time on real devices, enabling you to validate functionality, UI/UX design, and performance.
- Native Gestures Support: Test native gestures such as swipes, taps, pinches, and rotations on real devices to ensure your app responds correctly to user interactions.
- Screen Mirroring: Mirror the device screen to your computer for easy viewing and debugging, making it easier to identify and troubleshoot issues.
- Network Simulation: Simulate various network conditions such as 3G, 4G, or Wi-Fi to test app performance under different network scenarios.
- Geo-location Testing: Test location-based features by simulating different GPS locations on real devices, ensuring accurate functionality across different regions.
- Secure Testing Environment: Ensure data privacy and security with a secure testing environment that protects your app and user data.
- Integration with CI/CD Tools: Seamlessly integrate with popular CI/CD tools such as Jenkins, TeamCity, Bamboo etc. to automate testing and streamline your development workflow.
- Collaboration Features: Collaborate with team members by sharing live sessions, logs, and screenshots, facilitating communication and collaboration during the testing process.
- Comprehensive Reporting: Generate detailed test reports with screenshots, logs, and performance metrics to track testing progress and identify areas for improvement.
BrowserStack App Automate revolutionizes the way you test React Native mobile applications by offering seamless automation across thousands of real iOS and Android devices. With App Automate, you can ensure the quality and reliability of your apps by automating tests securely and efficiently.
Conclusion
This Flutter vs React Native comparison guide explains the reasons behind the great popularity of the two emerging frameworks for creating cross-platform applications. Flutter and Native solve the issue of creating separate code for native platforms like Android and iOS. Now, you can create an application for all the platforms using the same code.
Moreover, picking the best framework for yourself depends upon your experience, requirements, and the business needs of your project. If you’re already aware of the JavaScript programming language, then there’s no doubt that React Native is a good choice. However, if you’re targeting a highly stable and fast performance, Flutter has several advantages over React Native.
Irrespective of your chosen framework, testing your application thoroughly before releasing it is necessary. BrowserStack allows you to perform cross browser testing and cross platform compatibility across 3000+ browsers, devices and operating systems. You can seamlessly test the apps built using Flutter and React Native.
Useful Resources for React Native and Flutter
React Native
- What is React Native? (The Essential Guide)
- Replace Android Emulator to test React Native
- End-to-End React Native Testing
- Top 5 React Native UI Components
- React vs React Native: When to use which?
- How to make React Native App Responsive?
- UI Testing of React Native Apps
- Test React Native Apps with Cypress
- React Native and Appium Tutorial
- How to Test React Native Apps on iOS and Android Devices
Flutter
- Essential Guide to Flutter Test Automation
- Flutter vs React Native: A Comparison
- How to make Flutter App Responsive
- How to Test Flutter Apps Using Appium Automation
- TDD in Flutter: How To Use Test Driven Development in Flutter
- How to run integration tests on Flutter apps
- Introduction to UI Testing in Flutter
- How to test Flutter Apps on Android Devices?
- Flutter vs Android Studio: Core Differences
- How to Test Flutter Apps on Real iOS Devices
