Espresso is a robust, lightweight UI testing framework built for Android that facilitates efficient testing of user interactions.
It provides a straightforward API for simulating user actions like clicks, swipes, and text input, and for verifying that your app behaves as expected across various ecosystems. Whether you’re ensuring app stability or debugging edge cases, Espresso has the tools you need to deliver a smooth user experience.
Overview
When to Use Espresso?
- Android-Only Testing: Best suited for testing native Android apps with deep platform integration.
- Fast Test Execution: Runs UI tests directly in the app’s process, making it faster than client-server-based frameworks.
- Tightly Integrated with Android: Works seamlessly with Android Studio and native Android code (Java/Kotlin).
- Minimal Setup: Requires no additional dependencies or server configurations, making it easy to start.
- UI Thread Synchronization: Automatically syncs with the UI thread to handle asynchronous events and background tasks.
- Rich Assertions Library: Provides a robust set of assertions to validate UI states and behavior.
- Custom Matcher Support: Allows testing of complex or custom UI components using tailored matchers.
Workflow of Espresso Framework
- Step 1: Locating the UI Element: Identify UI components using matchers like onView() and withId().
- Step 2: Performing Actions: Interact with UI elements using methods like click(), typeText(), or swipeLeft().
- Step 3: Validating Outcomes: Use assertions like isDisplayed() and withText() to verify expected behavior.
This article dives into what makes Espresso a go-to choice for Android testing, its core features, and how it simplifies the process of writing and running UI tests.
What is the Espresso Testing Framework?
Espresso is a testing framework that helps developers write automation test cases for user interface (UI) testing. It has been developed by Google and aims to provide a simple yet powerful framework. Espresso is one of the popular Android App Testing Frameworks, that is widely used by QAs. It allows black-box testing, at the same time, allows QAs to test fragments and individual components during development cycles.
Espresso is highly robust. It allows developers to test both Android native views as well as hybrid web-views. Test cases using this framework can be written in Java or Kotlin, ensuring no new skill development is required to use it.
Using this framework, testers will be able to leverage a plethora of features. Synchronized test executions, intent validations, and capabilities to run recipes are some of its prominent features.
Read More: What is Espresso Testing? How does it work?
Understanding Espresso Testing in Android
Espresso automation involves understanding the paradigm in which it has to be used. As a developer, one needs to first understand that it’s purely an Android app UI testing framework. This explains why the Espresso Android framework is built without tight coupling to Android APIs such as getView() and getCurrentActivity().
The first step while starting with Espresso is to assume that you are a user. Create test cases by first identifying which UI element has to be tested and then initiating some action on it (basically interacting with it). This makes sense as it causes testers to write automation test cases that mimic user interactions with the UI.
Workflow of the Espresso Framework
For executing UI tests in Android applications, you need to understand the workflow of Espresso Framework, which involves three main steps:
Step 1: Locating the UI Element:
Use the onView() method to locate UI elements. Espresso offers a variety of matchers such as withId(), withText(), or isDisplayed() to accurately target the required component.
// Locate a button with ID "button" and perform a click onView(withId(R.id.button)).perform(click());
Step 2 : Performing Actions:
Interact with the located UI element using methods from the ViewActions class, such as click(), typeText(), or swipeLeft(). This simulates real user actions on the app’s UI.
// Locate the EditText with ID "editText" and type "Hello World" onView(withId(R.id.editText)).perform(typeText("Hello World"));Step 3: Validating Outcomes:
Leverage the assertions from the ViewAssertions class to validate that the UI behaves as expected after an interaction. Matchers like isDisplayed() and withText() help in validating the state or content of a UI component.
// Verify that the TextView with ID "textView" contains the text "Success" onView(withId(R.id.textView)).check(matches(withText("Success")));Key Principles of Espresso Workflow
Here are the Key Principles of Espresso Workflow:
- Automated Synchronization: Espresso automatically synchronizes with the UI thread, ensuring that interactions and validations only occur once the UI is idle and ready to process the action. This built-in synchronization eliminates the need for manual waits, such as Thread.sleep(), which can make tests slower and less reliable.
- Minimal Boilerplate: Espresso reduces boilerplate code by eliminating the need for explicit waits or delays, making test scripts more concise, readable, and easier to maintain over time.
- User-Centric Testing: The Espresso framework is built to closely replicate real user interactions like tapping, scrolling, or typing, to ensure that tests are more realistic and reliable for validating the app’s behavior in real-world scenarios.
Espresso’s API Components
Here are the four API components of Espresso that lay the foundation of Espresso Testing:
Espresso’s API Components
- Espresso
- ViewMatchers
- ViewActions
- ViewAssertions
1. Espresso
This is the starting point for all test cases. This component provides entry points or methods to start the interaction with the app’s view. Each app’s view has two components.
First is the part of the view that belongs to the app. Testers will be able to interact with it by using the onView() and onData() methods. The second part of the view consists of the components that are provided by the OS ( home screen button, back button, etc). Espresso also provides APIs to interact with non-app components. For example, the pressBack() method initiates going back.
2. ViewMatchers
Views are always in a hierarchy called the View Hierarchy. For the test cases to navigate the view hierarchy, ViewMatchers are used. Technically, they are a collection of objects, and they implement the Matcher interface. Testers will be able to pass one or more of these objects to the OnView() method provided by Espresso Component.
3. ViewActions
These components define the action that has to be performed on any given View. Espresso allows testers to send more than one ViewAction as a collection to the Interaction method. An example of a view action would be the click() method which helps a test script click on a given View’s UI component.
4. ViewAssertions
Assertions complete a test case. They are the components that check if the test has passed or failed. In Espresso Android, the ViewAssertions can be passed to the Check() method from the ViewInteraction package. Matches assertion is the most commonly used check which verifies the final state of the view with what is expected.
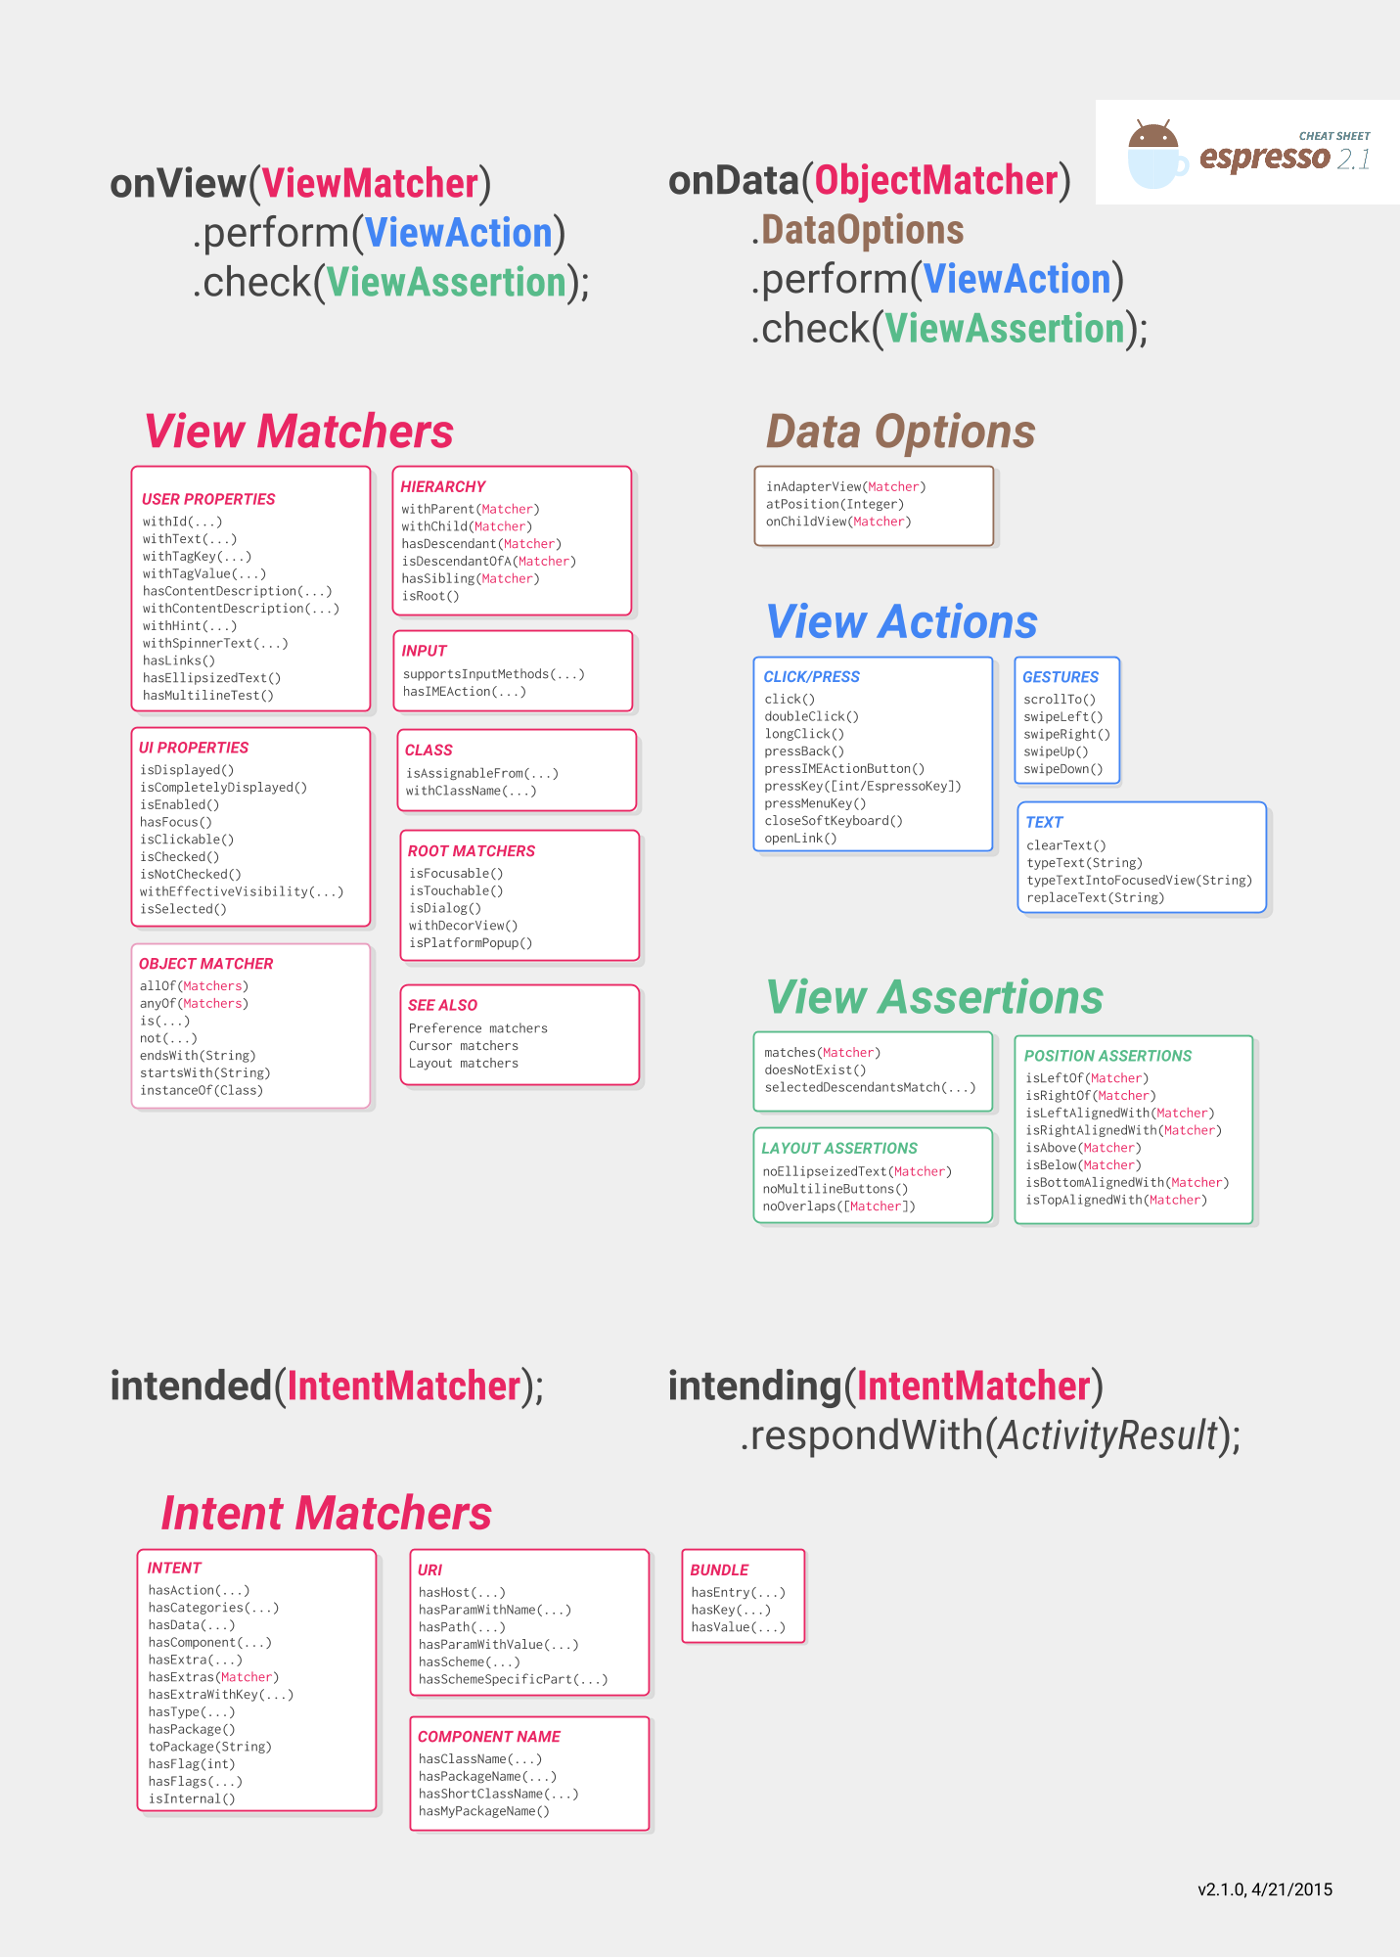
Espresso Test Android Cheat Sheet
The Espresso Test Android Cheat Sheet is a quick reference guide designed for Android developers to write and troubleshoot UI tests using the Espresso framework efficiently.
The cheat sheet serves as a condensed resource to help developers navigate the framework’s features and syntax, especially when dealing with more complex test scenarios.
Purpose
The main goal of the Espresso Test Cheat Sheet is to streamline the process of writing robust UI tests by providing quick access to commonly used functions, best practices, and troubleshooting tips.
It helps both novice and experienced developers avoid common mistakes, speed up test development, and improve the reliability of automation testing. Since UI testing can be time-consuming and complex, this cheat sheet aims to make the process faster and more intuitive.
The cheat sheet below offers references to most of the instances that come with the Espresso components discussed earlier.
Source: Espresso
Uses of Espresso Cheat Sheet
Here are the uses of Espresso Cheat Sheet:
- Quick Reference for Commands: Provides a consolidated list of commonly used Espresso methods, reducing the need to search documentation frequently.
- Simplifies Test Writing: Helps developers and testers quickly implement UI interactions, assertions, and synchronization methods.
- Reduces Learning Curve: New testers and developers can get up to speed faster by referring to predefined patterns and best practices.
- Handles Complex UI Interactions: Guides users on performing advanced gestures, scrolling, swiping, and multi-element interactions.
- Prevents Synchronization Issues: Offers insights into using Espresso’s built-in synchronization methods like IdlingResource to avoid flaky tests.
- Improves Test Organization: Encourages structured test writing, helping maintain cleaner, reusable, and scalable test scripts.
- Aids in Debugging: Provides troubleshooting tips for handling test failures, capturing logs, and identifying UI testing bottlenecks.
- Boosts Efficiency: Saves time by offering ready-to-use code snippets and best practices, allowing testers to focus on execution rather than syntax.
Example Highlights:
1. Locating a View: To find a UI element by its ID:
onView(withId(R.id.button)).perform(click());
2. Typing Text:To input text into an EditText field:
onView(withId(R.id.editText)).perform(typeText("Hello World"));3. Assertions: To check if a TextView displays the correct text:
onView(withId(R.id.textView)).check(matches(withText("Success")));By offering quick access to these commonly used Espresso methods, the cheat sheet helps Android developers focus on writing tests instead of getting bogged down with syntax or forgotten commands.
How to Set up Test Environment in the Device for Espresso
Here are the steps to set up the test environment in the device for Espresso:
How to Set up Test Environment in the Device for Espresso?
- Set Up Android Studio for Espresso Testing
- Prepare the Android Device or Emulator
- Set Up Espresso Test Configuration
- Running Espresso Tests on the Device
- Troubleshooting
- Additional Considerations
1. Set Up Android Studio for Espresso Testing
First, ensure that Android Studio is properly configured to support Espresso testing. Here’s how:
- Install Android Studio: Ensure you are using the latest version of Android Studio, which includes all the necessary tools to write and run Espresso tests.
- Include Espresso Dependencies: Open your build.gradle (app-level) file and add the necessary dependencies for Espresso to enable UI testing in your project. This will ensure you have the core libraries needed to write the tests, handle UI interactions, and more.
In your app/build.gradle file:
dependencies {

    // Espresso core library for basic UI testing

    androidTestImplementation 'androidx.test.espresso:espresso-core:3.5.1'


    // Optional: For testing with UIAutomator (advanced UI testing)

    androidTestImplementation 'androidx.test.uiautomator:uiautomator:2.2.0'


    // Optional: For testing intents between components

    androidTestImplementation 'androidx.test.espresso:espresso-intents:3.5.1'


    // Optional: Add support for Espresso Idling Resources if your app has async tasks

    androidTestImplementation 'androidx.test.espresso:espresso-idling-resource:3.5.1'


    // JUnit for test framework

    androidTestImplementation 'junit:junit:4.13.2'

}- Enable Test Runner: In the android block of your app/build.gradle, specify the test instrumentation runner:
android {

    defaultConfig {

        // Specify the test runner for Espresso tests

        testInstrumentationRunner "androidx.test.runner.AndroidJUnitRunner"

    }

}- Sync Gradle: After adding the dependencies, sync your project by clicking on “Sync Now” to ensure all necessary libraries are downloaded.
2. Prepare the Android Device or Emulator
Next, you’ll need to configure either a physical Android device or an emulator to run the tests.
- Enable Developer Options and USB Debugging:
- Open the Settings app on your device.
- Go to About Phone and tap Build Number 7 times to unlock Developer Options.
- Enable USB Debugging under Developer Options.
- Use Android Emulator (Optional):
If you prefer to use an emulator:
- Open the AVD Manager in Android Studio.
- Create a new virtual device (e.g., Pixel) and select a system image that supports Google APIs (required for Espresso testing).
- Launch the emulator and make sure it’s running before executing the tests.
- Install the APK on the Device/Emulator:
Ensure that your app is installed on the device or emulator. You can install it manually or use Android Studio to run the app.
3. Set Up Espresso Test Configuration
Now, you can start setting up the structure for your Espresso tests.
- Create Test Directory: If it doesn’t already exist, create a src/androidTest/java/ directory to house your test files. This directory should be placed under the main project’s source folder.
Example:
src/

  androidTest/

    java/

      com/

        yourpackage/

          ExampleEspressoTest.java
- Write a Test Class: Your test class will contain the logic to perform UI interactions.
For example:
@RunWith(AndroidJUnit4.class)

public class ExampleEspressoTest {


    @Test

    public void testButtonClick() {

        // Perform click on button

        onView(withId(R.id.button_submit)).perform(click());


        // Check if text appears after button click

        onView(withId(R.id.text_result))

            .check(matches(withText("Button clicked")));

    }

}- UI Thread Synchronization: Espresso automatically synchronizes the test execution with the UI thread. However, if your app uses background tasks, you might need to use Idling Resources to synchronize with them.
4. Running Espresso Tests on the Device
You can run your Espresso tests in several ways:
- From Android Studio:
- Right-click on the test class or method and click “Run ‘testName‘” to run the tests on the connected device or emulator.
- Via Command Line (ADB): You can also execute tests from the command line using Gradle:
./gradlew connectedAndroidTest
This will trigger the tests to run on the connected device or emulator.
5. Troubleshooting
If tests fail, it’s important to have some strategies in place to debug the issue:
- Check Device Logs: Use Logcat in Android Studio to check logs during test execution. This can help you pinpoint failures or issues in your app.
- Use Idling Resources: If your app performs asynchronous operations (e.g., network requests), ensure that you implement Idling Resources to prevent timing issues and flaky tests.
- Run on Multiple Devices: Run tests on multiple devices or emulators to validate the proper working of your app on different screen sizes and Android versions.
6. Additional Considerations
- Permissions: If your app requires permissions (e.g., camera, location), you may need to request these permissions in your test setup or mock the data during testing.
- Test Data: Ensure that the app’s state is consistent before running tests. For consistent test results, you can use Mockito or other mocking libraries to mock external dependencies like databases or APIs.
Sample Test Case for Espresso Android
Based on the components discussed above, here is how one can write a test case with Espresso using:
1. Java
onView(withId(R.id.my_view),withText("Hello!"))
.perform(typeText("Hello"),click())
.check(matches(withText("Hello!")));
2. Kotlin
onView(withId(R.id.my_view),withText("Hello!"))
.perform(typeText("Hello"),click())
.check(matches(withText("Hello!")))
Code Explanation
Here’s what both the Java and Kotin test case above does.
- Firstly, it tries to find a view with a certain ID and a uniquely identifiable feature. In this case, the script is saying the text “Hello!” on the view is a unique feature.
- Next, the script performs two actions on that view. It first types “Hello!” on a text box that is present, and then it clicks on a button that exists.
- Finally, it calls the assertion matches() to check if the view shows “Hello!” once the click is performed. The result will be a successful test case if the view has the desired text on it. Otherwise, the test case fails.
Read More: How to test Toast Message using Espresso?
Espresso vs Appium: When to Use Which
When it comes to automating tests for mobile applications, Espresso and Appium are two of the most popular frameworks. Both are used to automate UI testing, but they serve different needs and have distinct advantages. Here’s an overview of both frameworks, followed by when to use each one.
Overview of Espresso and Appium
1. Espresso:
- Platform: Primarily for Android (Java/Kotlin).
- Language: Java and Kotlin.
- Integration: Deeply integrated with Android Studio and the Android testing ecosystem.
- Use Case: Best for testing native Android apps.
- Execution: Runs directly within the app on Android devices or emulators.
- Speed: Fast execution because it directly interacts with the UI on the device using the UI thread.
- Limitations: Limited to Android; cannot test iOS apps. It’s tightly integrated with Android components and tools.
2. Appium:
- Platform: Cross-platform (supports Android and iOS).
- Language: Supports multiple languages (Java, JavaScript, Python, Ruby, C#, etc.).
- Integration: Works independently from the IDE; can be integrated into different CI/CD tools and workflows.
- Use Case: Best for cross-platform mobile testing (Android and iOS).
- Execution: Uses a client-server architecture where tests are executed on a real device/emulator via WebDriver.
- Speed: Slower compared to Espresso due to the overhead of WebDriver and cross-platform architecture.
- Limitations: Requires setting up Appium server and often slower than native solutions like Espresso or XCUITest.
When to use Espresso?
Here are the scenarios where you must use Espresso:
When to use Espresso?
- Android-Only Testing
- Fast Test Execution
- Tightly Integrated with Android
- Minimal Setup
- UI Thread Synchronization
- Rich Assertions Library
- Custom Matcher Support
- Android-Only Testing: If you are focused on Android apps and need tight integration with Android features, Espresso is the best choice because it is built specifically for the Android platform.
- Fast Test Execution:If speed is critical, Espresso is preferred because it interacts directly with the app’s UI and runs tests in the same process as the app (on the UI thread), making it faster than solutions that require a client-server communication layer like Appium.
- Tightly Integrated with Android: If you are already using Android Studio and are working with native Android code (Java or Kotlin), Espresso integrates seamlessly with Android’s testing environment, making it easy to set up, write, and execute tests.
- Minimal Setup : Espresso is built into Android Studio, so it doesn’t require complex server configurations or additional dependencies. This makes it easy to get started quickly without extra setup time.
- UI Thread Synchronization: If you need to test UI interactions while managing background tasks or asynchronous actions, Espresso automatically synchronizes your test with the UI thread, making it a great choice for handling common Android-specific tasks.
- Rich Assertions Library: Espresso provides a robust and readable API for assertions, making it easier to validate UI components’ states and properties during testing. This helps ensure the app behaves as expected during interactions.
- Custom Matcher Support: If your application requires testing complex or custom UI components, Espresso allows you to create custom matchers to locate and interact with these elements, offering more flexibility in test scenarios.
When to Use Appium
Here are the scenarios where you must use Appium:
When to use Appium?
- Cross-Platform Testing (Android and iOS)
- Non-Native (Hybrid) or Web App Testing
- Multiple Language Support
- Cloud-Based or Remote Testing
- Advanced Test Scenarios
- Cross-Platform Testing (Android and iOS): If you need to write tests that work on both Android and iOS, Appium is the better choice. It supports multiple platforms, allowing you to use the same test scripts for both Android and iOS applications, which saves time and resources.
- Non-Native (Hybrid) or Web App Testing: If you’re working with hybrid mobile apps (built using web technologies like HTML5, CSS, JavaScript) or mobile web apps that run in a browser, Appium can be used effectively. It also supports WebDriver, enabling the testing of web components within mobile applications.
- Multiple Language Support:Appium supports a variety of programming languages, including Java, JavaScript, Python, Ruby, and C#. This is helpful if your team has expertise in a specific language or if you want to write tests in a language other than Java/Kotlin.
- Cloud-based or Remote Testing: If you’re planning to run tests on remote or cloud testing platforms like BrowserStack) Appium can be integrated easily with these services for real-device testing.
- Advanced Test Scenarios: Appium supports a wide range of test scenarios, including interacting with mobile apps via gestures, push notifications, and native device features (like camera, GPS, etc.). This is particularly useful if you need to test more complex workflows or integrations.
Read More: Appium vs Espresso: Key Differences
Run Espresso Tests on Real Devices
This Android Espresso tutorial strives to offer core information and starting points for action with the Espresso Testing Framework. The initial learning curve might seem a bit steep, which is true for any sort of automation testing. However, with time, it will pay off, and you will be saving a lot of time and money.
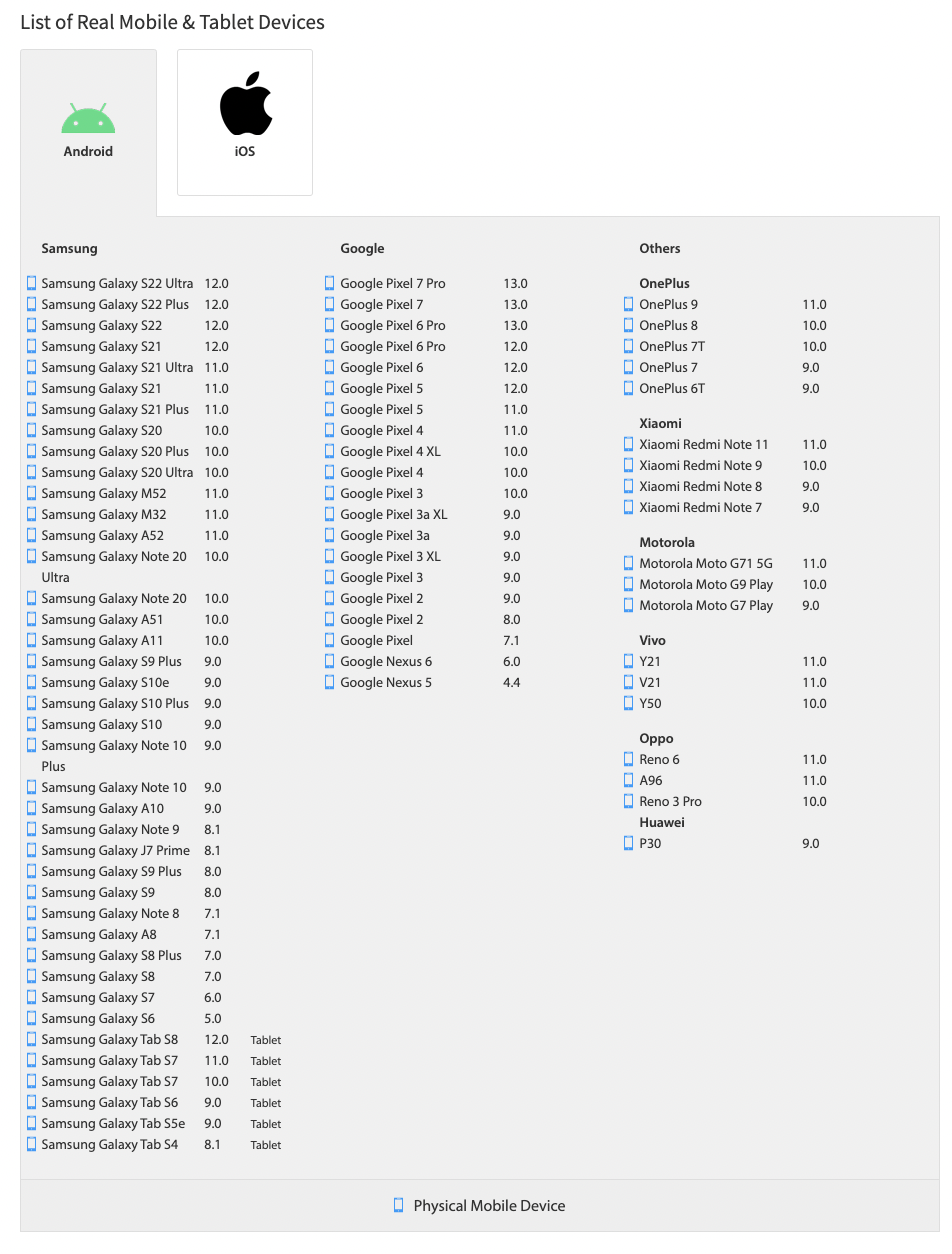
It is recommended for the SDETs and QA teams to run Espresso Tests on real devices and take real user conditions into account while testing. A cloud-based real device tool like BrowserStack App Automate provides access to all the latest and legacy real Android Devices such as Samsung Galaxy Devices, Google Pixel, One Plus, etc., to run your Automation tests and achieve accurate test results for better quality. Check out the entire List of Devices below.
Try Espresso Testing on Real Devices
Why run Espresso tests on Browser App Automate?
Running Espresso tests on BrowserStack App Automate provides several advantages for efficient and scalable mobile testing. Here’s why you should consider it:
Key Benefits
- Real Device Testing: Test on real Android devices (not emulators), ensuring more reliable results across different device models and OS versions.
- Parallel Testing: Run tests on multiple devices simultaneously to speed up test execution and improve feedback cycles, especially in CI/CD pipelines.
- Cross-Device Testing: Access a wide range of devices, screen sizes, and Android versions without maintaining a physical device lab.
- Seamless CI/CD Integration: Easily integrate with CI/CD tools like Jenkins or CircleCI for automated testing as part of your workflow.
- Debugging Tools: Get detailed logs, screenshots, and videos for faster issue resolution during test failures.
- No Device Maintenance: Eliminate the need to set up, maintain, and update physical devices, as BrowserStack handles all device provisioning.
- Global Testing: Simulate different network conditions and test across various geolocations for broader app coverage.
How to Run Espresso Tests with BrowserStack
Here are the steps on how to run Espresso tests using BrowserStack:
- Set up your BrowserStack account: Sign up on BrowserStack and configure your Espresso tests to connect to their cloud for running tests on real Android devices.
- Upload your APK or AAB file: Upload your Android application file (APK or AAB) along with the associated Espresso test suite to BrowserStack. This ensures that the test suite will be executed on real devices.
- Select devices for testing: Choose specific devices or a range of devices to test your application across different Android versions and hardware configurations. This ensures that your app performs well across various real-world environments.
- Integrate with your CI/CD pipeline: Integrate BrowserStack into your continuous integration/continuous deployment (CI/CD) pipeline for automated and scalable testing. This allows you to run tests automatically as part of your development lifecycle.
- Monitor test results and debug: Use the BrowserStack dashboard to monitor your test results, access detailed debugging logs, and quickly identify and resolve issues to improve the quality of your app.
Read More: Debugging Tools for Android
Best Practices for Espresso Testing
Here are some best practices to follow while facilitating Espresso testing:
- Write Isolated Tests: Each test should test one specific feature or scenario. This makes it easier to maintain and debug.
- Use Page Object Pattern: If your app has many complex UI interactions, organizing the UI elements using a Page Object Pattern can make your tests cleaner and more reusable.
- Automate Regularly: Set up continuous integration (CI) tools to regularly run your Espresso tests on physical devices or emulators, ensuring that your app’s UI stays stable over time.
Conclusion
Espresso is a powerful and efficient framework for automating UI tests on Android applications. It offers deep integration with Android Studio, fast execution, and automatic synchronization with the UI thread, making it a great choice for testing native Android apps.
Espresso’s simplicity, combined with its ability to scale for complex scenarios, ensures that it remains an essential tool for developers and QA teams aiming to deliver high-quality Android apps.
Using tools like BrowserStack App Automate can enable efficient, real-device testing for Espresso tests, offering scalability, device coverage, and seamless integration with CI/CD workflows. It’s a powerful solution to streamline and scale your mobile test automation.


